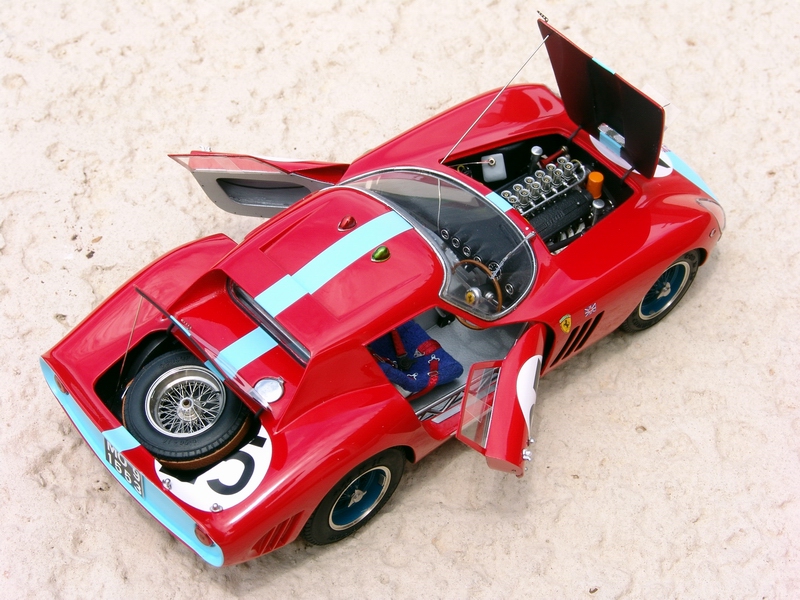
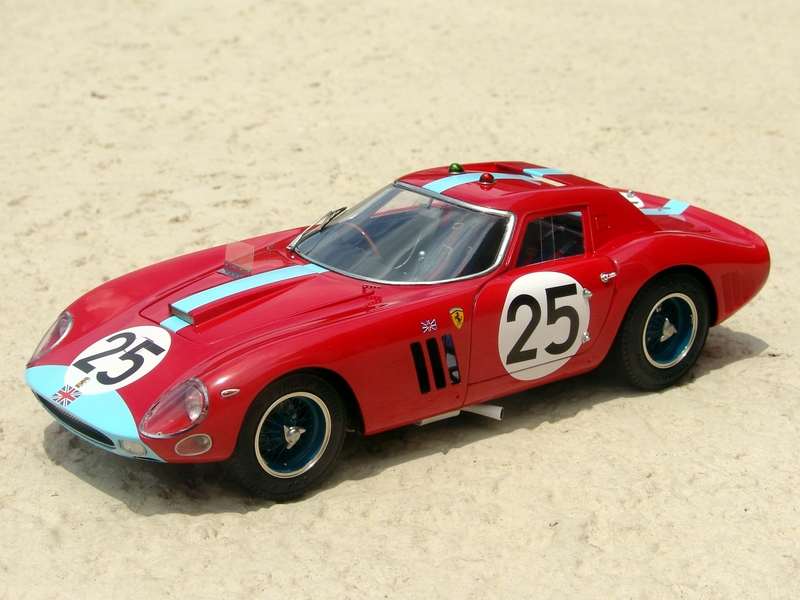
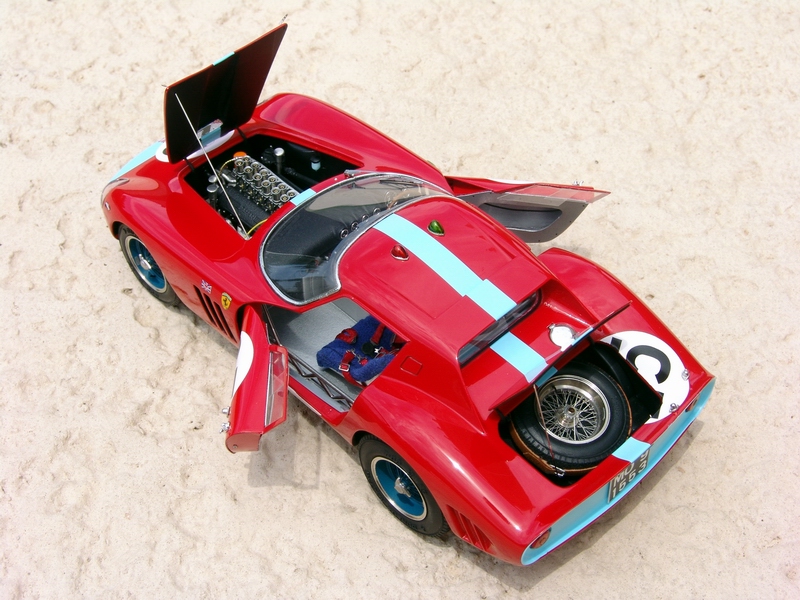
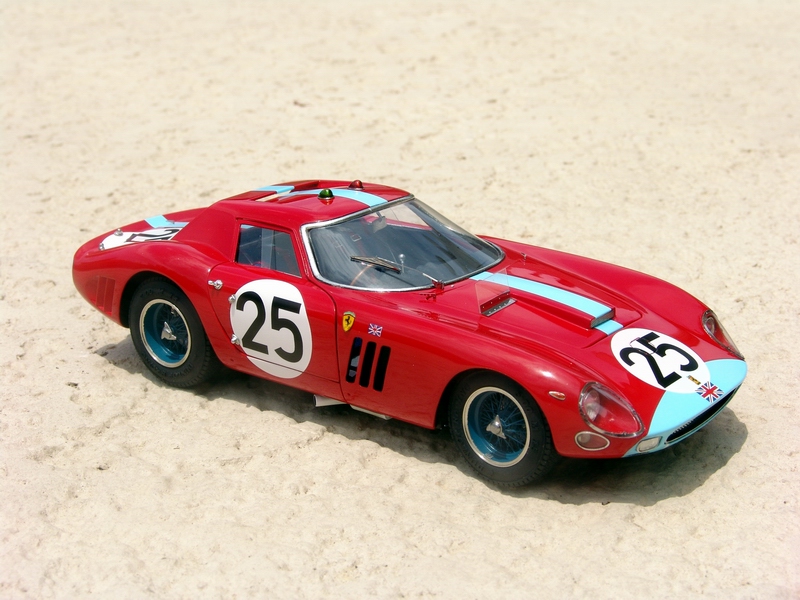
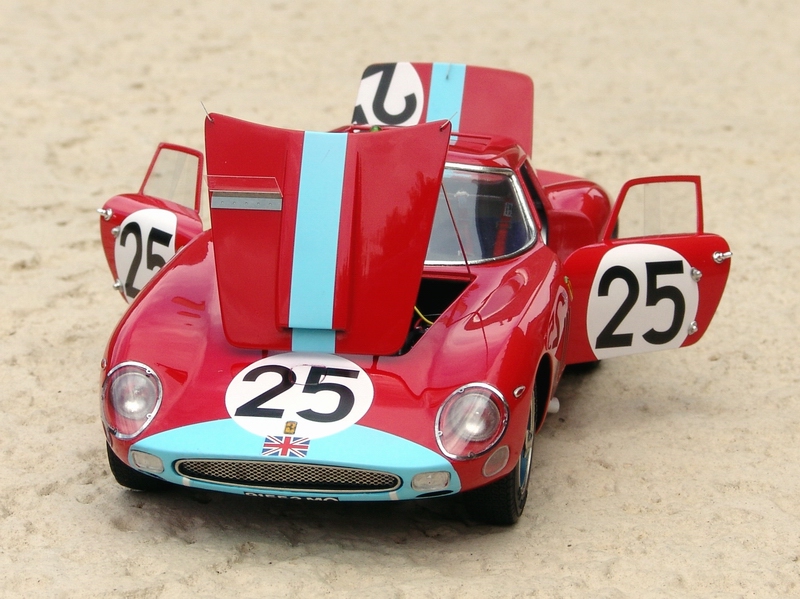
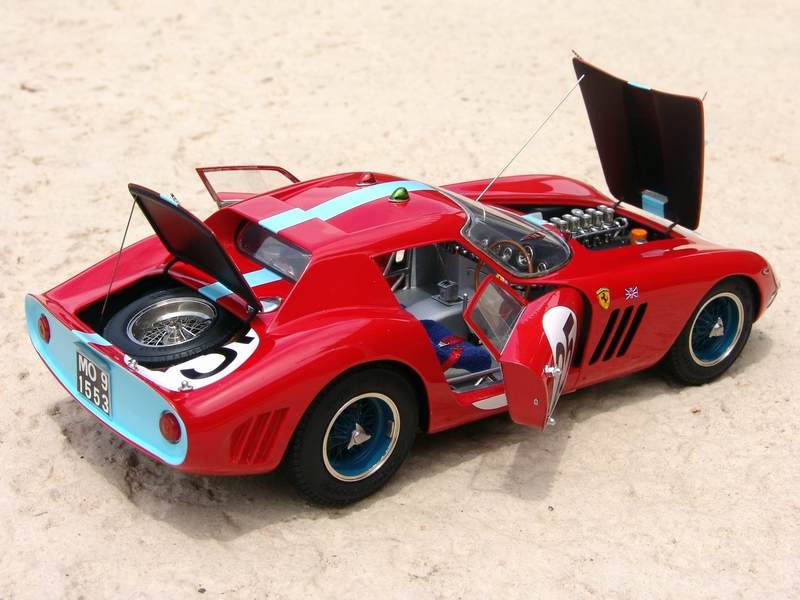
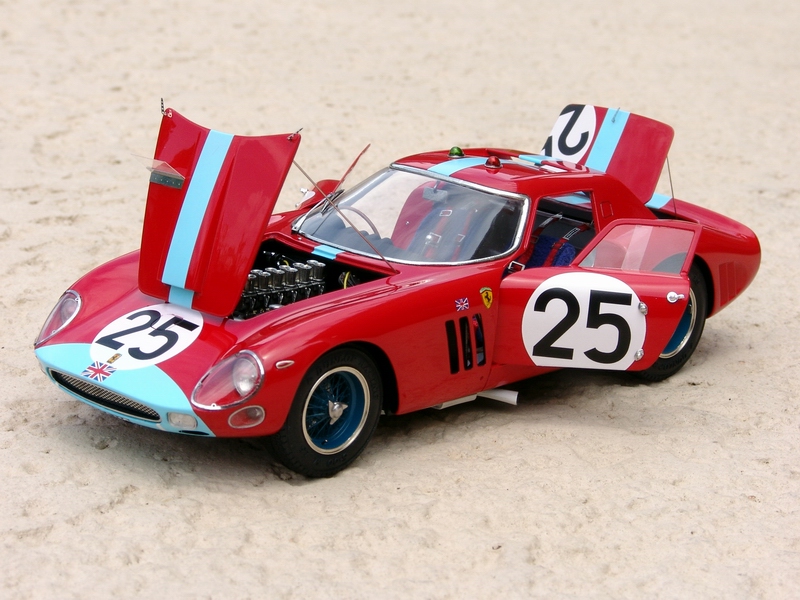
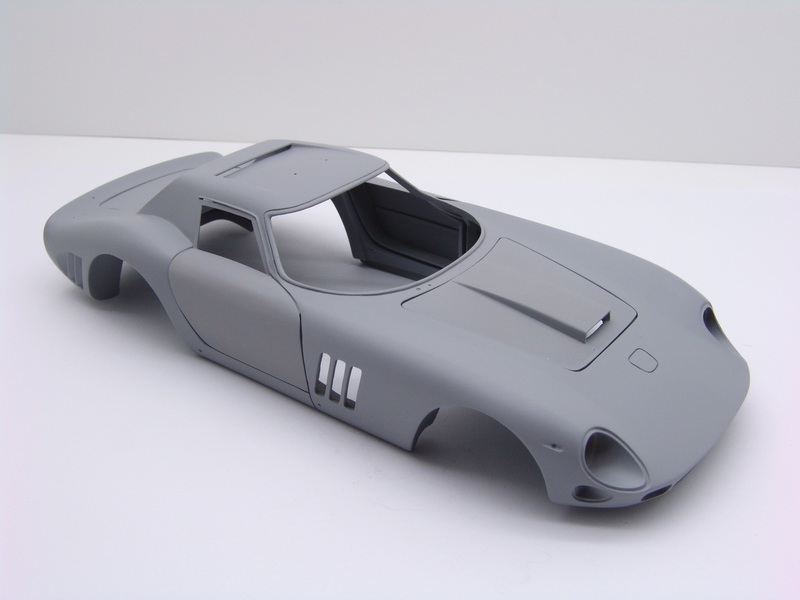
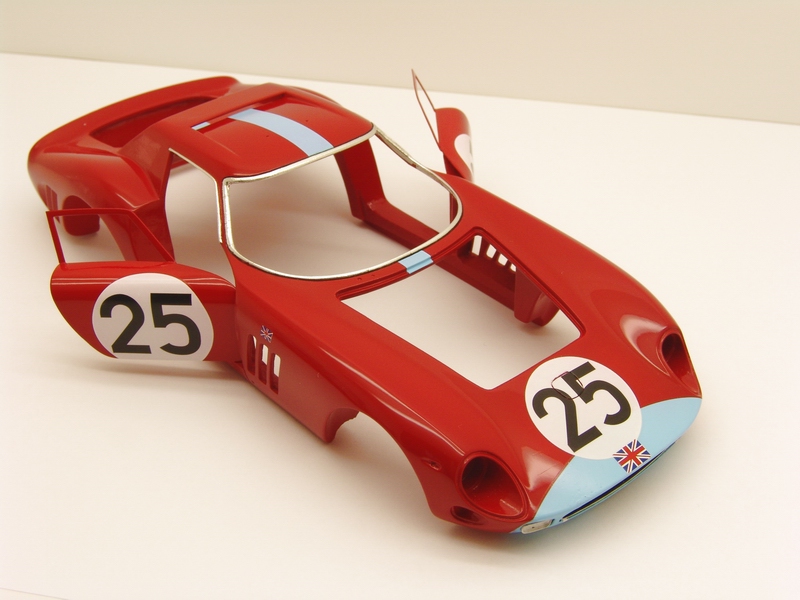
F e r r a r i 250 GTO Series II, Le Mans 1964
S/N 4399GT, #25 Innes Ireland/Tony Maggs
 |
 |
 |
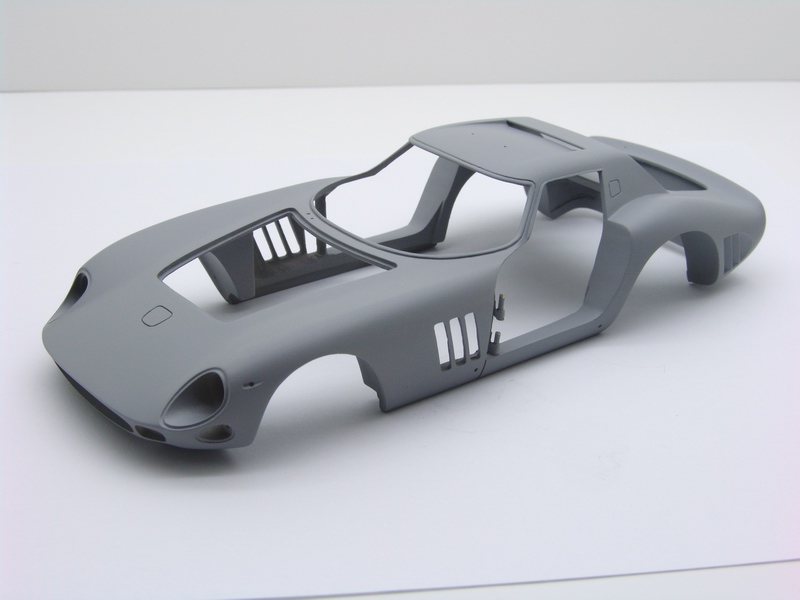
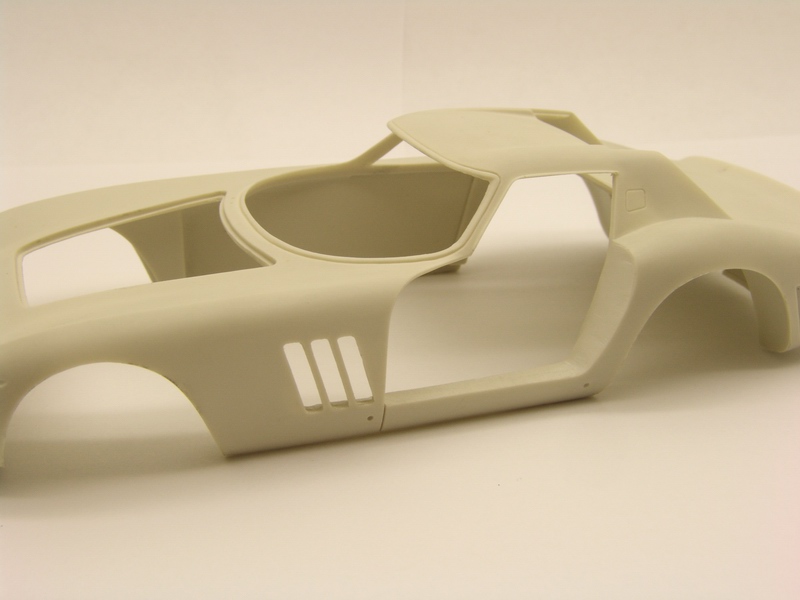
Kit: 1/24 Model Factory Hiro Ferrari 250 GTO Series II, S/N 4399GT Pros: Based on great old Climax kit. Nicely cast and accurate resin body (Hiro improved on Climax's design), great multi-piece P/E and turned metal wire wheels. Soft rubber-like tires, with accurate and authentic thread detail and sidewall markings. Accurate and complete decal sheet made by Cartograf for 2 cars. Decals are very opaque and work great with setting solutions (I used Microsol). Full chassis and engine detail. Lots of rubber-backed P/E parts, which were slightly altered from original Climax's design to fit modified parts. Precisely machined metal parts that include brake disks, headlight bezels, exhaust tips, levers and handles. Good instruction sheet with mostly correct colors and excellent decal placement guide. Cons: White metal is very hard to clean and Hiro's castings are not the best to begin with - mold lines on delicate parts, casting defects on small parts and flat surfaces. In addition, fit of these metal parts leaves a lot to be desired - I had problems on almost all stages of assembly. Many parts had to be modified, bent or otherwise altered to fit. Most holes were not drilled or way too small. No hinge for the hood. High price. Verdict: Definitely not a kit for a beginner, and even an experienced builder will face more than a few problems during assembly. I had modified this kit quite extensively, but I'm sure it would look great even if built straight out-of-the-box. Highly recommended to experienced builders. |
 |
 |
 |
|
 |
|
 |
Buildup
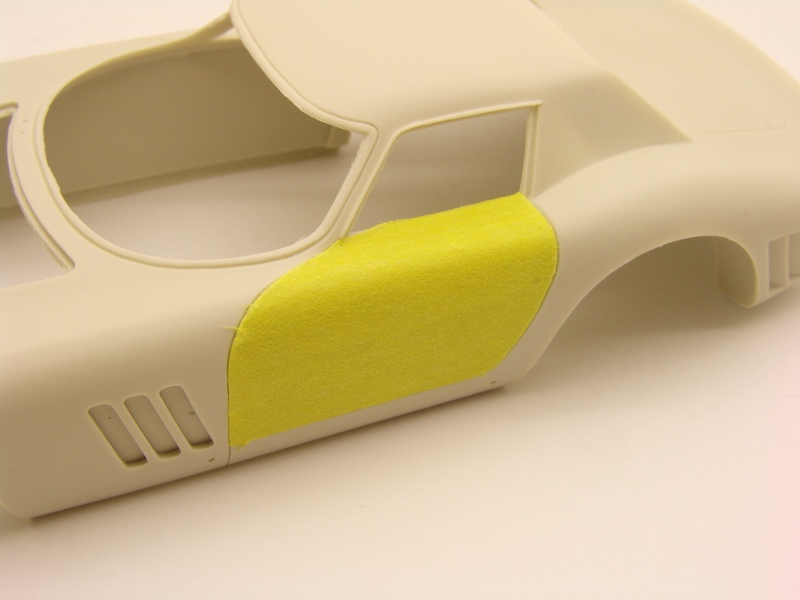 |
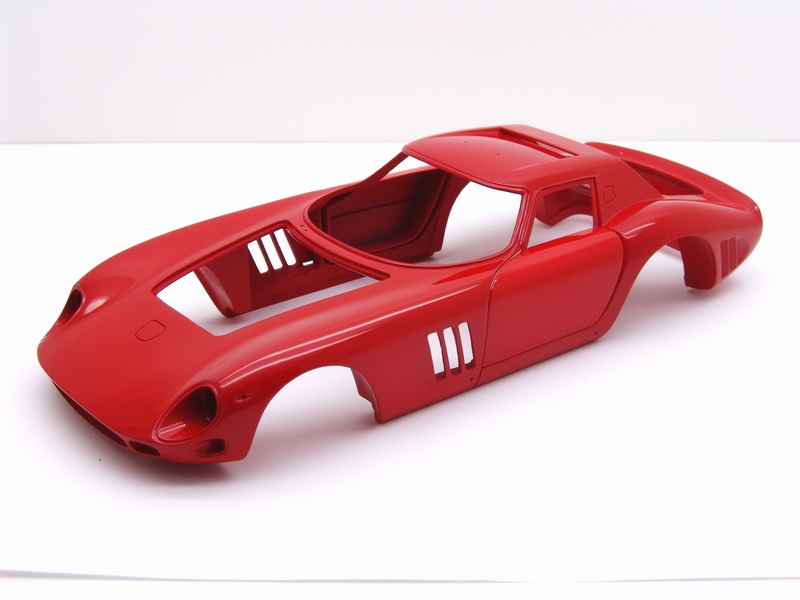
Series II GTO is one gorgeous race car - one of my all time favorite Ferraris. I really wanted to do justice to the car with this model. Hiro kit is a jewel, but I wanted a one-off! So I decided to modify the kit. Before cutting the doors out, I made a template with Tamiya 40mm masking tape. |
 |
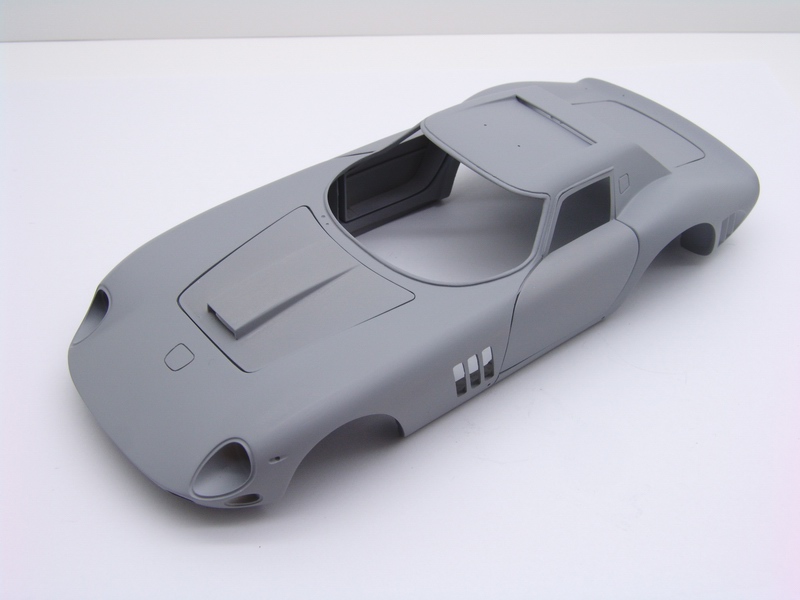
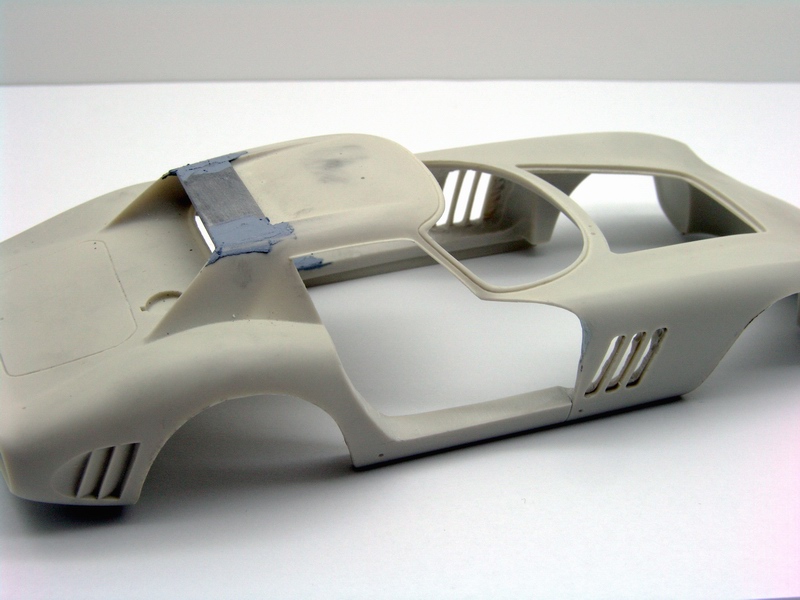
Entire body was one more time cleaned, tidied, and all little imperfections fixed, and entire body shell sanded. Then I washed it and sprayed one last coat of gray primer. |
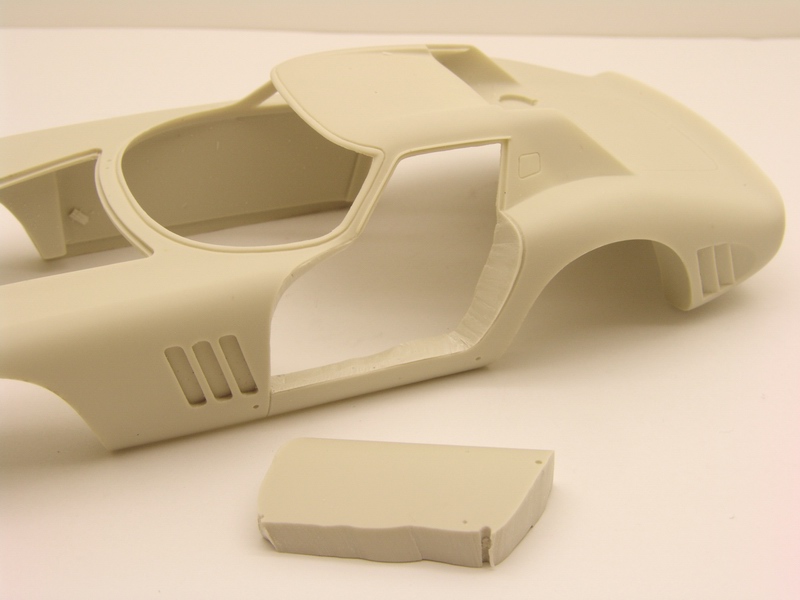 |
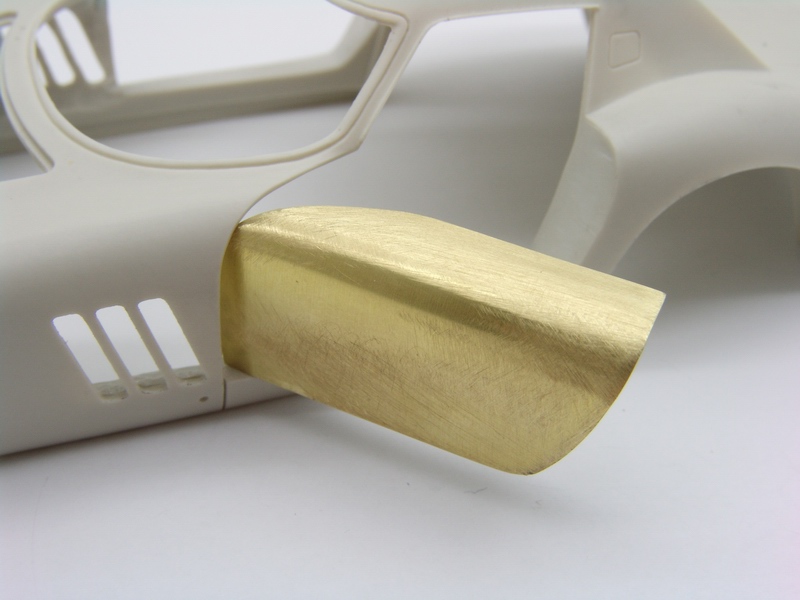
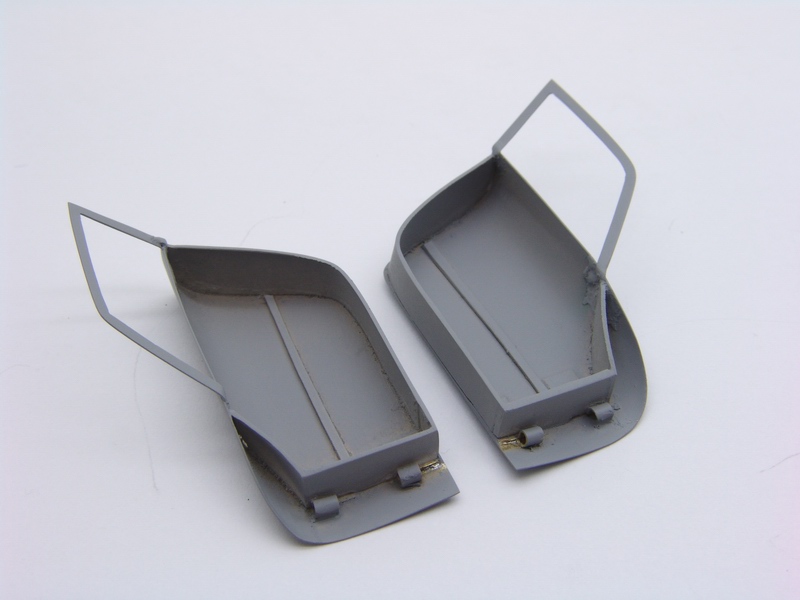
The body was really thick! I had to go and buy me a fret saw in order to cut out the doors without breaking the body. But resin thickness was also a plus, since I didn't have to make a door jamb from sheet styrene now. Picture shows rough cut I made to get the door out. |
 |
All remaining body panels were subjected to similar cleanup and then primed with a coat of gray primer too. Then I test fitted all panels to check the fit and make sure all hinges worked as they supposed to. |
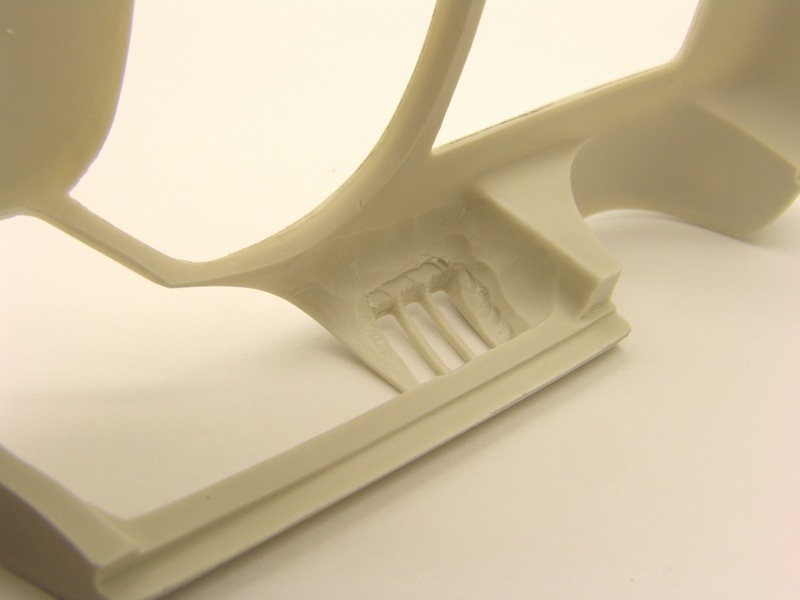 |
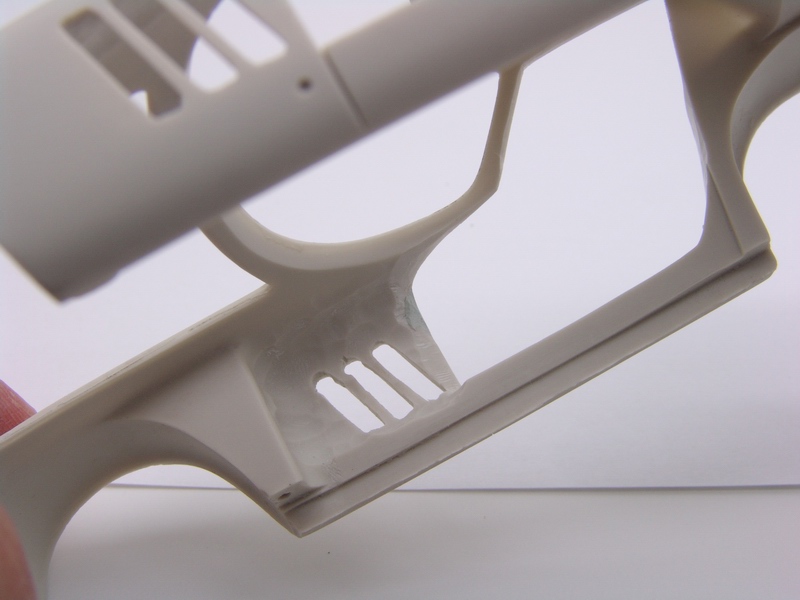
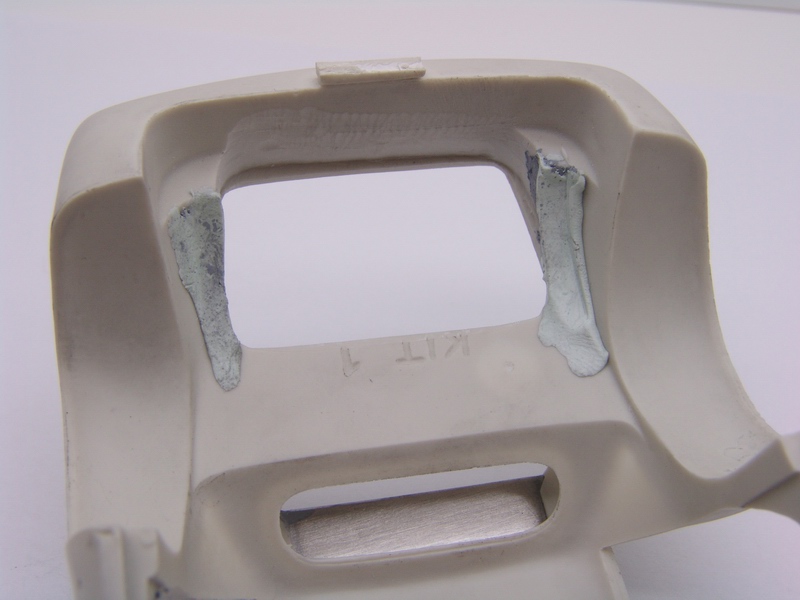
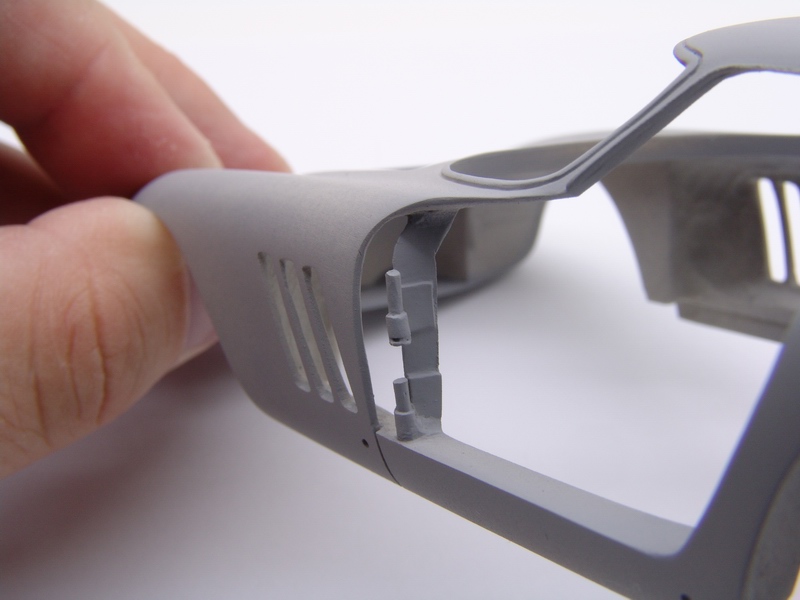
I couldn't leave side fender vents the way they were, so I started carefully grinding resin with round cutting bit in my Dremel. The closer I was to the surface, the harder it was to work, but my patience paid off and I got most of the resin out. |
 |
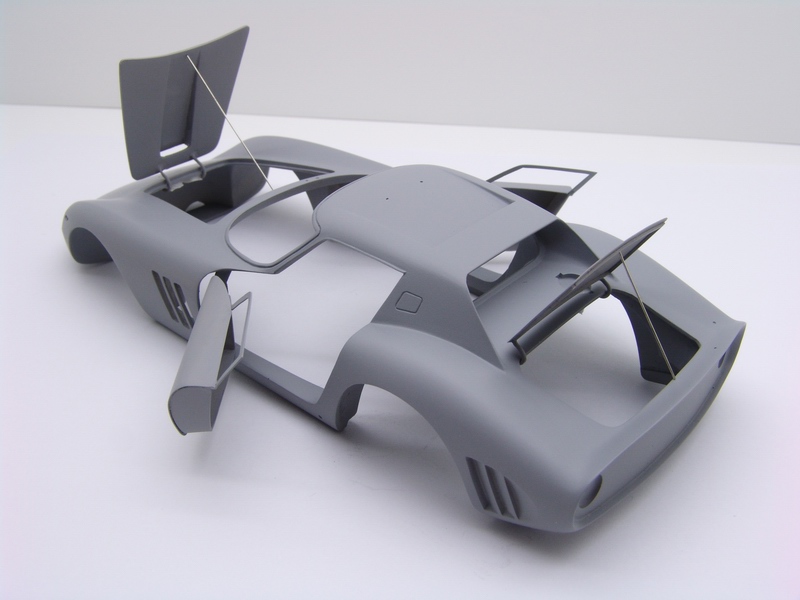
Everything seemed to work just fine and body looked gorgeous with all panels open! |
 |
Vents were cleaned with sharp Exacto blade, and door opening re-shaped first with flat cutter, then with sanding sticks, and finally with needle files. It is still rough on this picture, but closer to what it should be. |
 |
Then I tried to close all panels and realized that after I will spray some white primer, then few coats of paint, panel gaps will be a lot smaller than they are right now, and fit would be much tighter... |
 |
Once left side was more or less done, I continued with similar "surgery" on the other side of the body. At this point body was really fragile, especially at the bottom of the windshield frame, so I had to work really slowly and carefully. |
 |
...so I had to remove the panels and sand the edges some more to make sure the panels would still fit after all this paint. Only then I sprayed two coats of white primer. |
 |
Roof spoiler was superglued to the body (for additional strength) and seams were puttied with Tamiya putty. Left side is almost completed on this picture. |
 |
After white primer was completely dry, I decanted some Tamiya TS8 Italian Red into my airbrush and sprayed all "hard to reach" areas of this curvaceous body. |
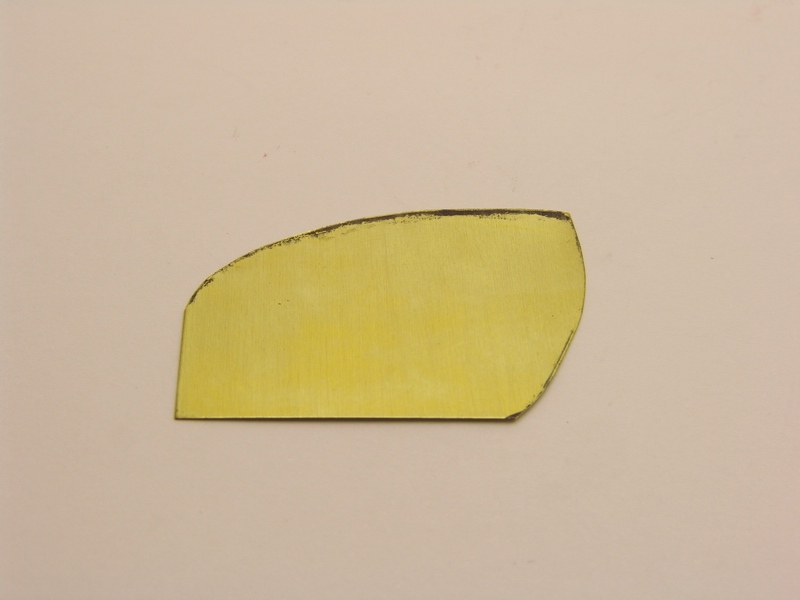 |
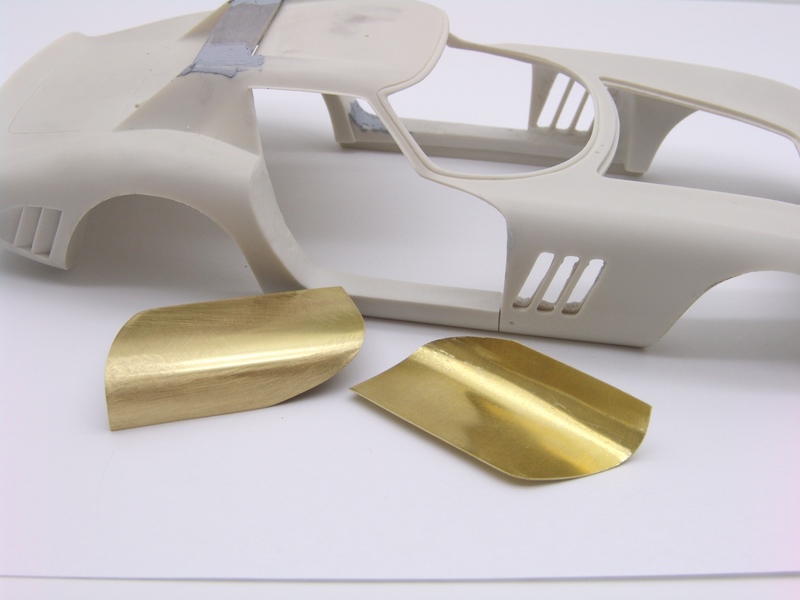
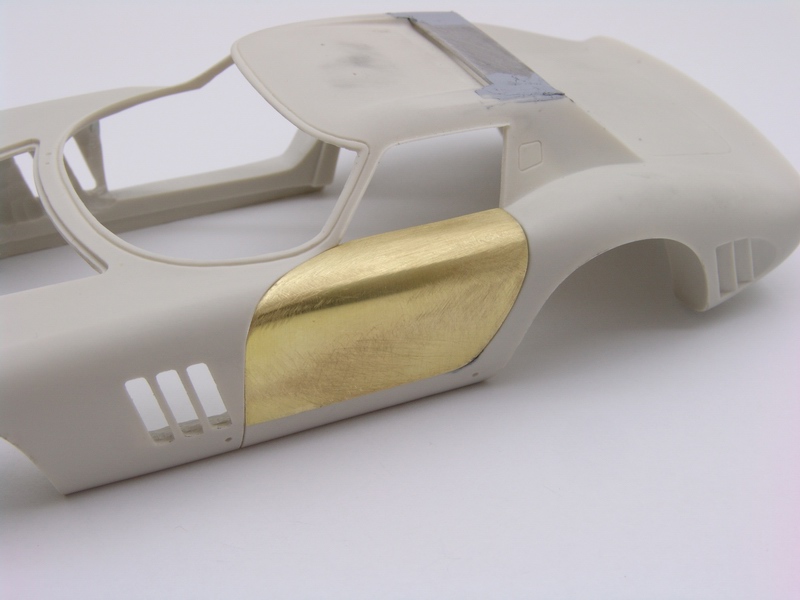
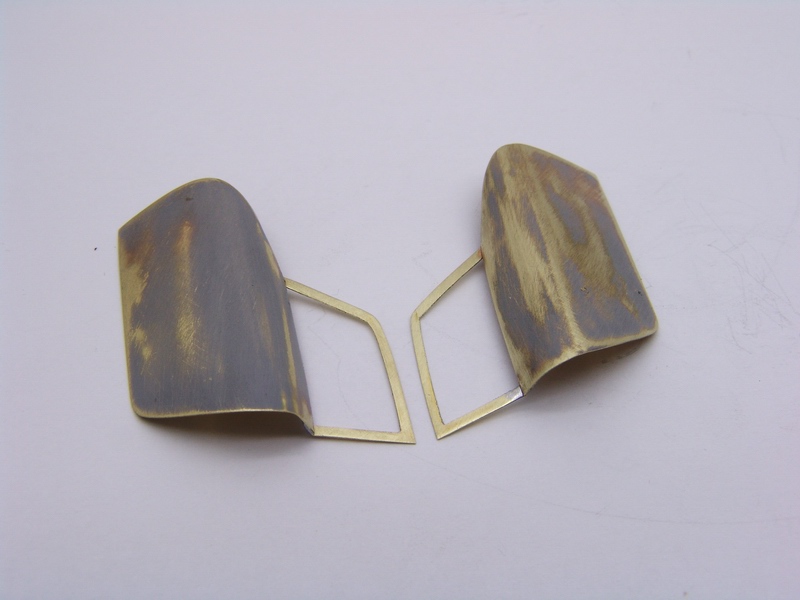
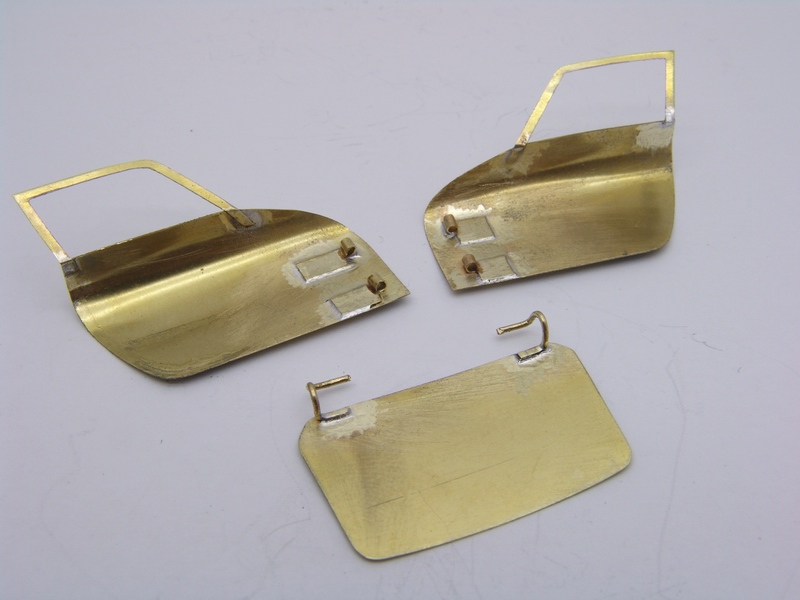
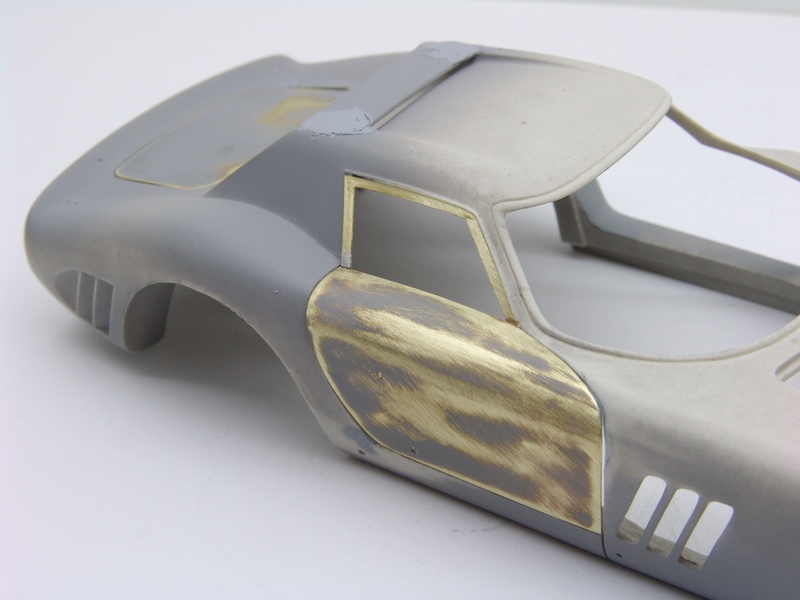
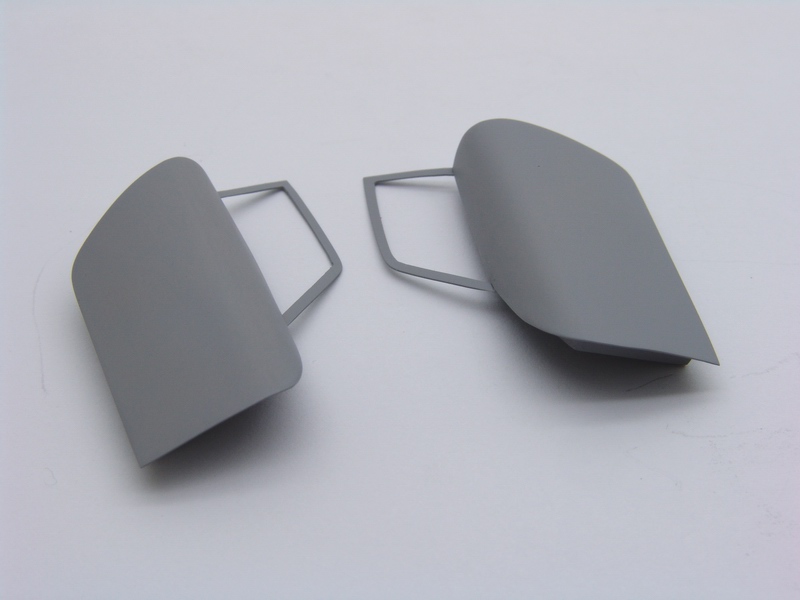
Once I had both sides opened up, I needed to make the doors now. Since there was no way I could use resin doors, I decided to make new skins out of sheet brass. Using template that I made with masking tape in the beginning, I made several brass door skins. |
 |
Then two mist coats to "even out" the color and two wet coats 30 minutes apart to build up the color. |
 |
After several attempts to bend brass to shape with various tools and fingers, I had two door skins that I was satisfied with. Then I started a very tedious process of matching the skins to the door openings. |
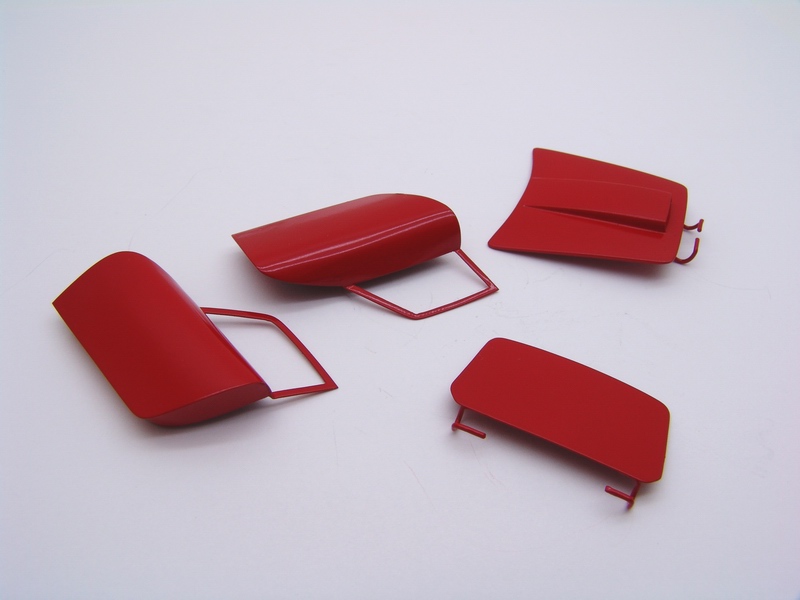 |
Doors, hood, and trunk lid received the same treatment. |
 |
After few more hours of test-fitting and filing and grinding, and test-fitting and filing and grinding, (both brass and resin) I had matched both door covers to the body. |
 |
After couple of days of drying, I roughly polished the paint with Tamiya polishing compounds and test fitted the panels to make sure all this new paint still allowed all panels to operate properly. Everything looked good and I left body and panels to cure for a few days. |
 |
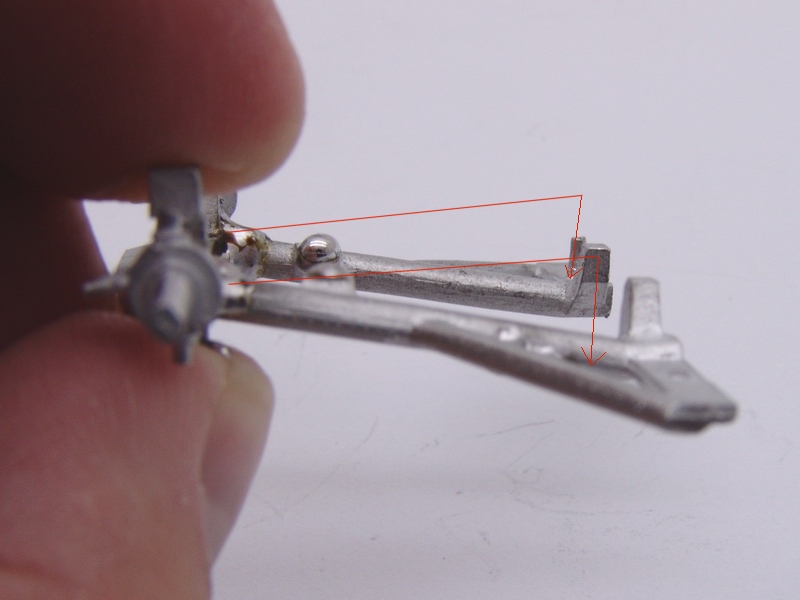
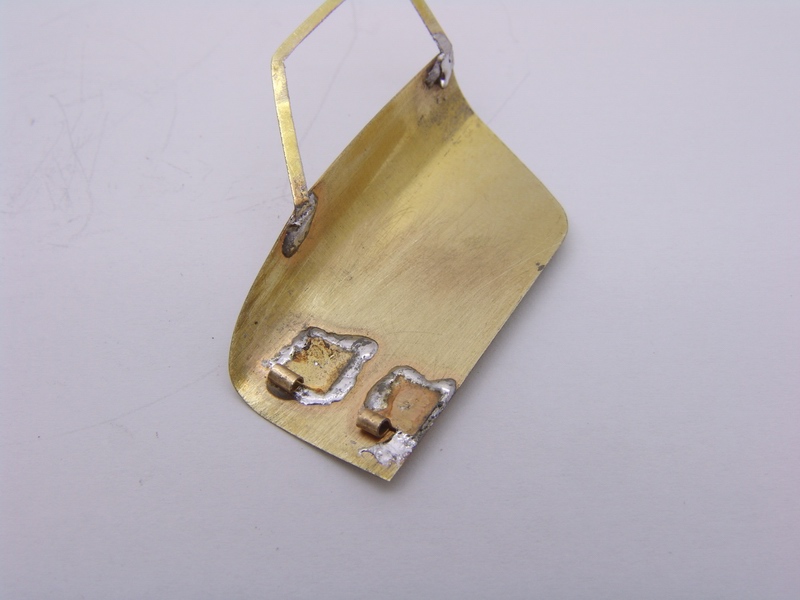
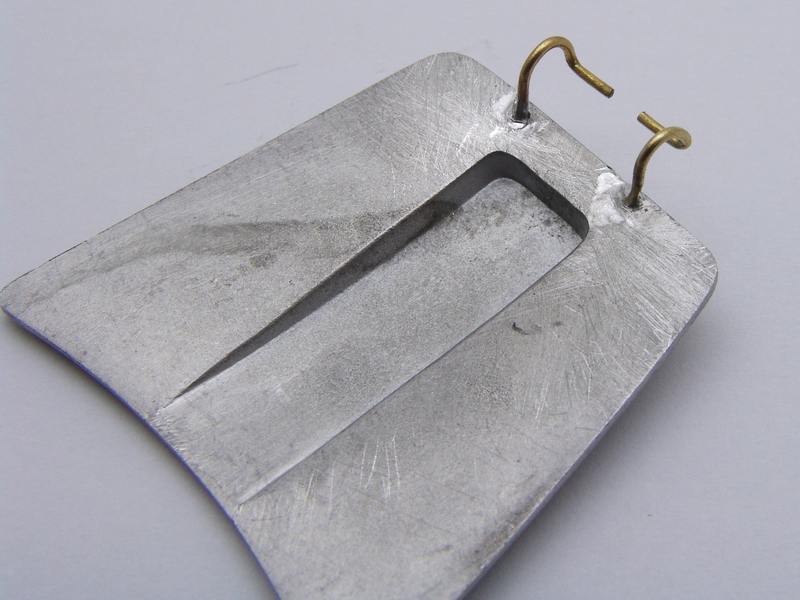
Next were the hinges - I wanted to make the hinges as close to the original ones as possible, so after studying reference pictures for some time (and with help of fellow modeler Ramon Garcia) I decided on the following design: tiny brass strips were cut to the shape shown on the picture... |
 |
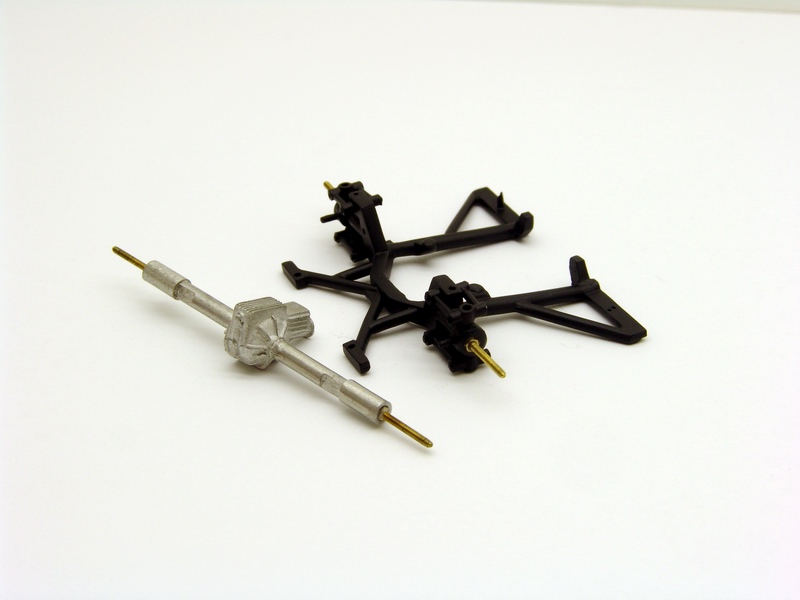
While the paint on the body and panels was drying, I moved to the chassis. Front suspension was molded at a wrong angle, so I had to cut it and solder at a different, correct angle. |
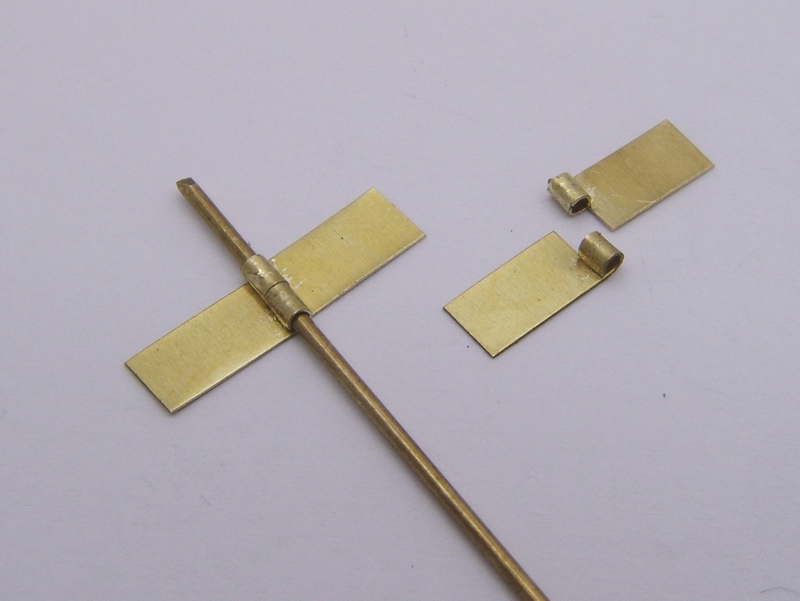 |
...then they were bent to shape over brass rod using needle pliers as shown on the picture. Four strips would make two hinges for one door. |
 |
I also beefed up motor mounts on the frame with more solder and started clean-up process. Then I decided that it would be cool if I could remove the wheels after the model is completed to show brake and suspension detail. All this got me thinking... |
 |
After the hinges were completed, I made a temporary plastic hinge support and glued hinges to it to test the doors. This was necessary to see how the doors will operate and mount on the hinges. |
 |
...and I remembered that few months before starting this project I bought some tiny brass hardware at one of the local hobby shops. Bolts, nuts, and miniature taps. |
 |
Similarly, hinges were glued to the brass door skins to check the locations, etc, and temporary door walls were made out of sheet styrene to check for door jamb clearances, etc. |
 |
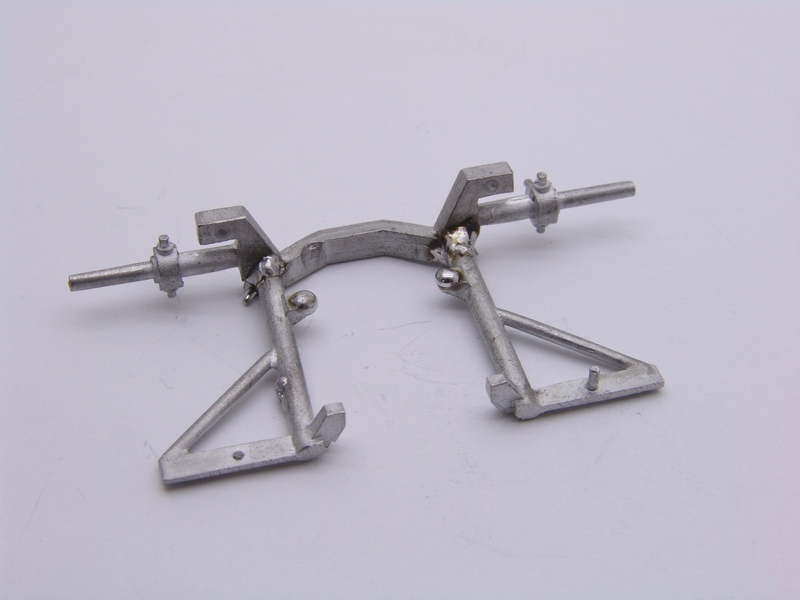
After cleaning the frame I soldered the bolts to the frame in place of white metal axles. |
 |
Then this temporary support was glued to the body so I could mount the doors and see how they work. Lots of test fitting and adjustment was done at this time. |
 |
Here you can see both axles replaced by the bolts, and frame completely cleaned. I was lucky as the bolts were exactly the same length as the original axles! |
 |
The design of the hinge worked really well, allowing the door to go "inside" the body, just like it would do on the real car. |
 |
Wheel hubs were drilled out with bigger drill bit and threaded with the tap all the way through. |
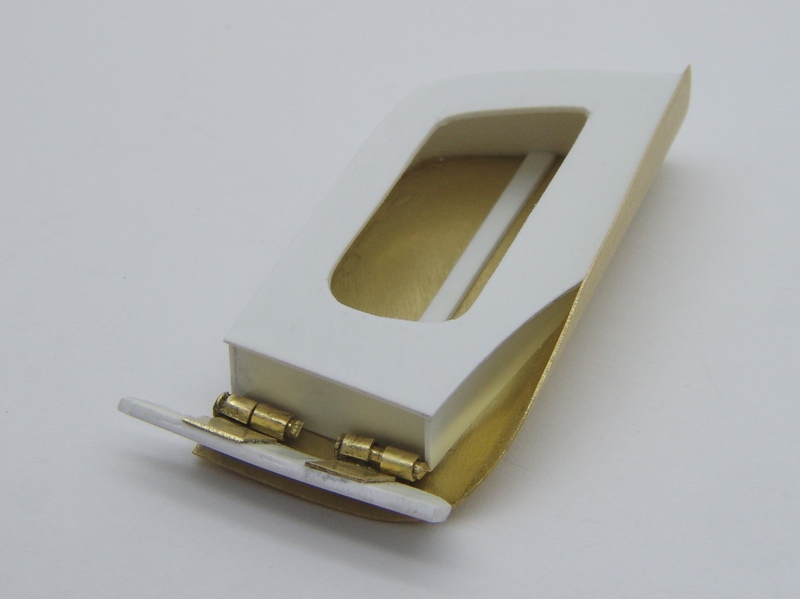 |
I also played a little bit with door inner walls and panels, mostly to see how they will work with door jambs and interior floor, etc. The design you see on the picture was later scraped due to some fit problems and inaccuracies. |
 |
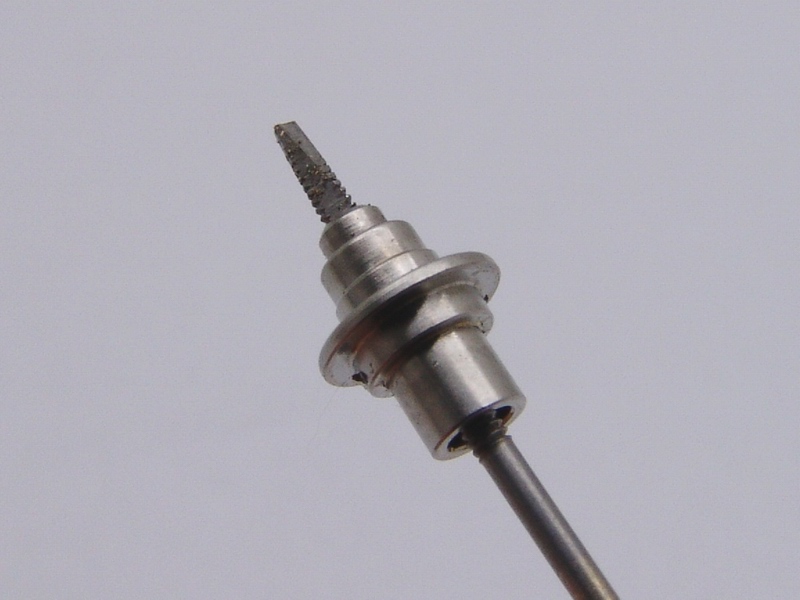
Here you can see a test assembly of the brake disk, wheel hub, and small nut to secure them on a threaded axle that was previously imbedded in the front suspension frame. |
 |
At this point I started thinking about opening the trunk too. I decided that it would be easier than opening doors, and would add great deal to the model. Trunk was cut out with my fret saw - thankfully resin was much thinner in that area. |
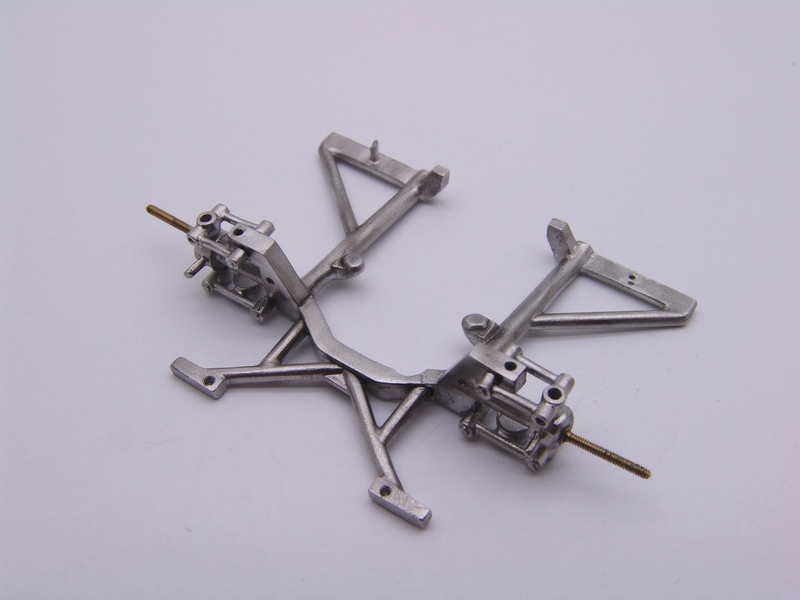 |
Upper and lower A-arms were cleaned and attached to the frame. |
 |
I had to remove quite a bit of resin from the rear panel though, as it was one thick piece of resin - this wall would serve as on of the trunk walls. |
 |
Then I decided to somehow use the nuts in a more realistic manner - how about imbedding then into a knock-off? I had to use slightly bigger Tecnomodel knock-offs since Hiro parts were too small to hold the nut. And it worked quite well. |
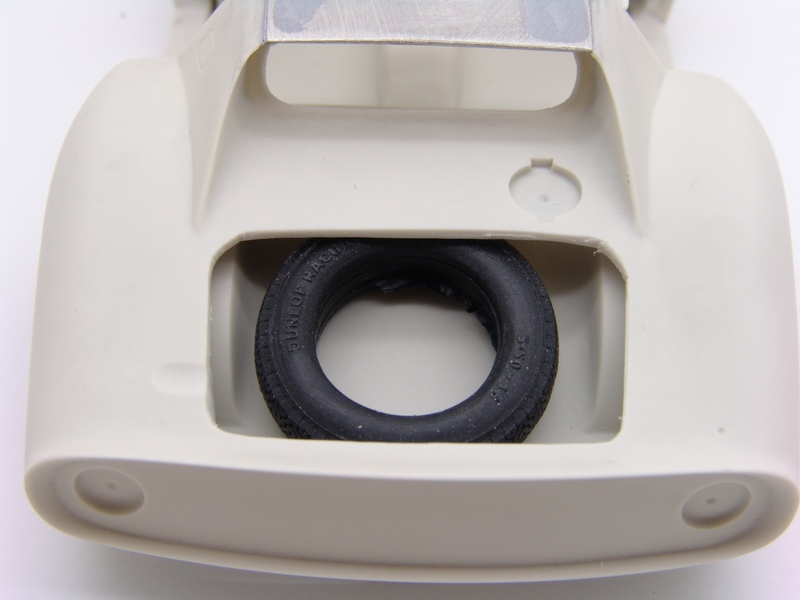 |
I had one spare Hiro tire from some other kit, and I decided to see if it would fit in the trunk as is - and it did fit! That was one less thing I had to do. Now I just needed to make the walls, trunk lid, and order another wire wheel from Hiro. |
 |
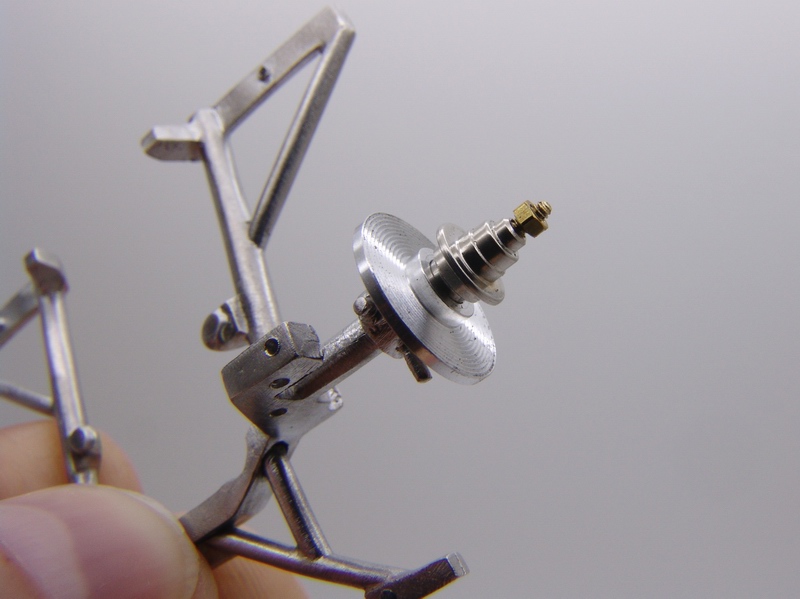
Assembled wheel threaded on the axle and working knock-off next to it. |
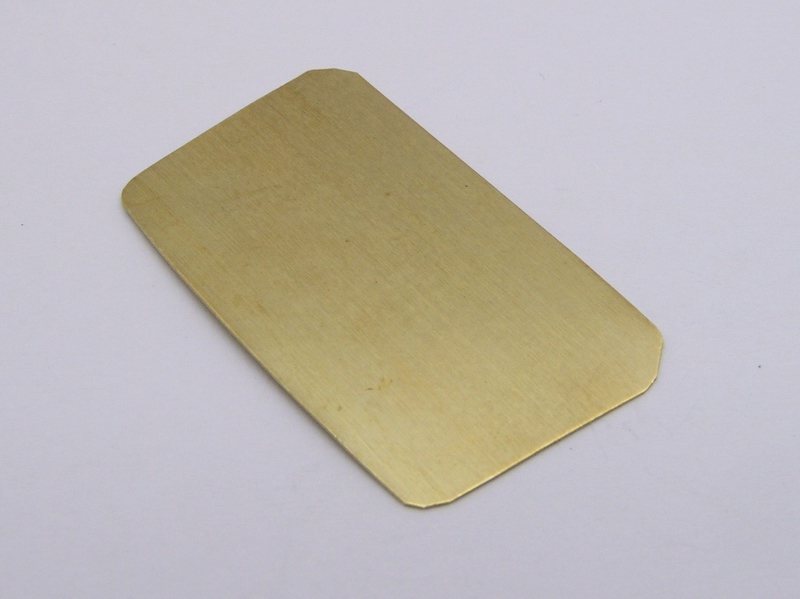 |
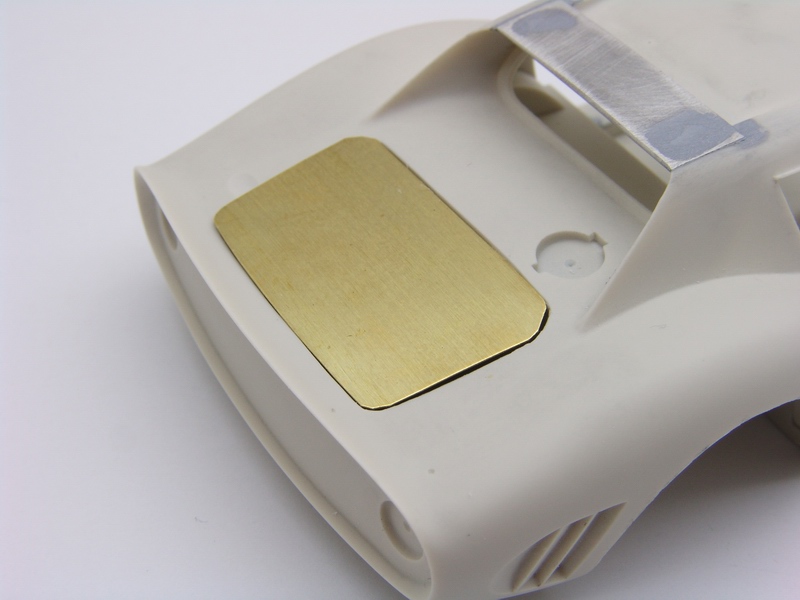
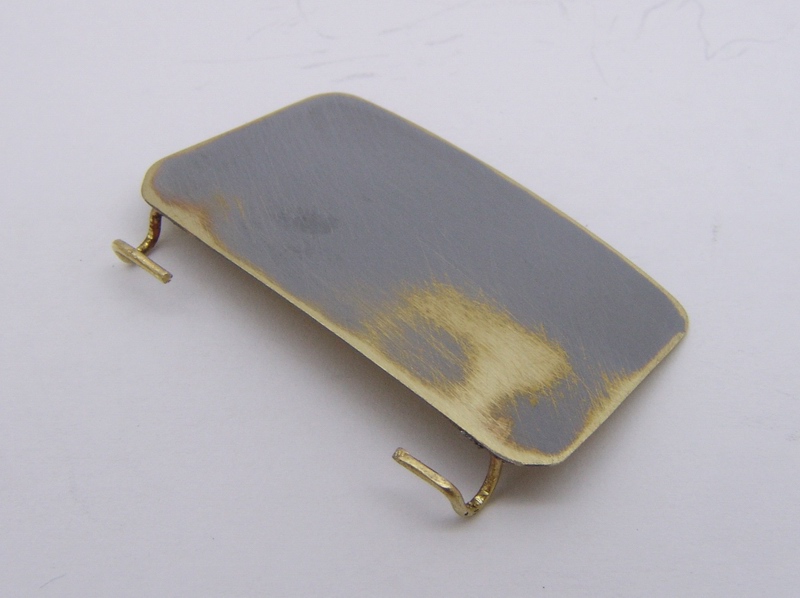
Trunk lid was cut from brass sheet and roughly shaped to match the trunk opening, Since the lid was almost flat on the real car, I didn't bother to shape it at this point. |
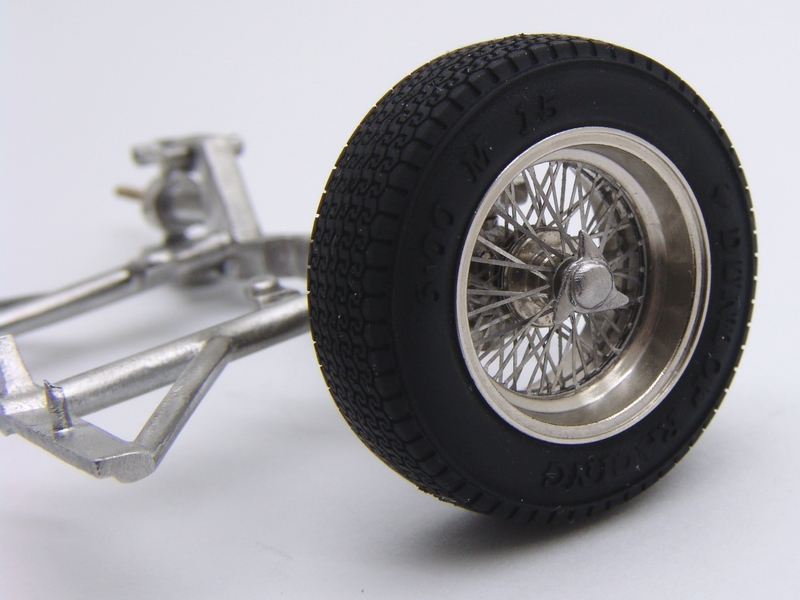 |
Here you can see knock-off with the nut inside securely holding the wheel on the axle. Now I could take the wheels on and put them back on almost like on the real car! |
 |
Test-fitting of the trunk lid to the body and checking clearance of the spare wheel. On this photo, trunk lid is actually resting on the spare wheel. It was still to early to tell whether I need to make any adjustments because I had no idea how the body would fit over chassis after final assembly. |
 |
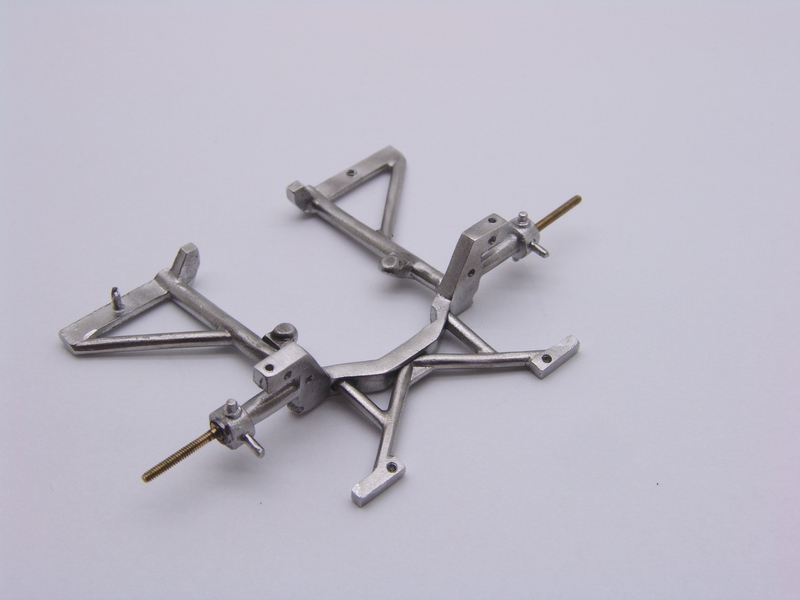
Front suspension frame was painted (I masked off threaded axles with masking tape to protect the threads during painting), and then bolts were imbedded in the rear axle too. |
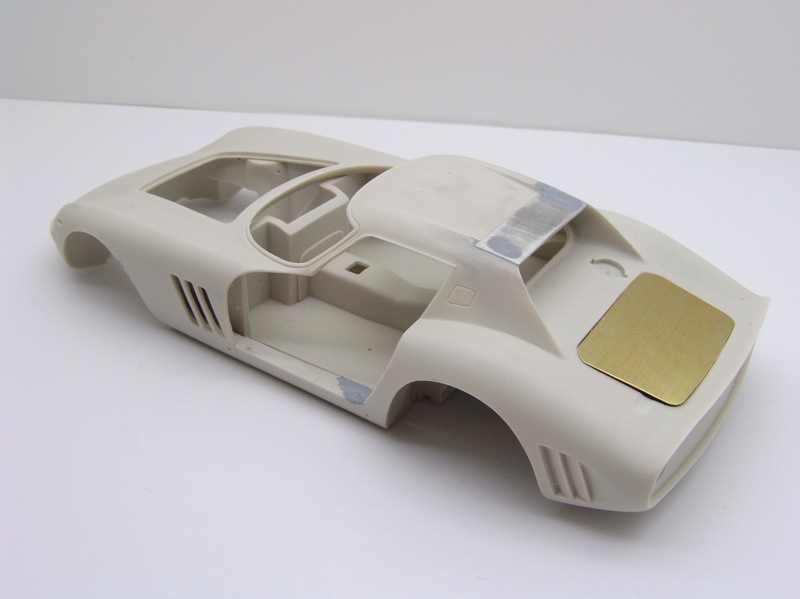 |
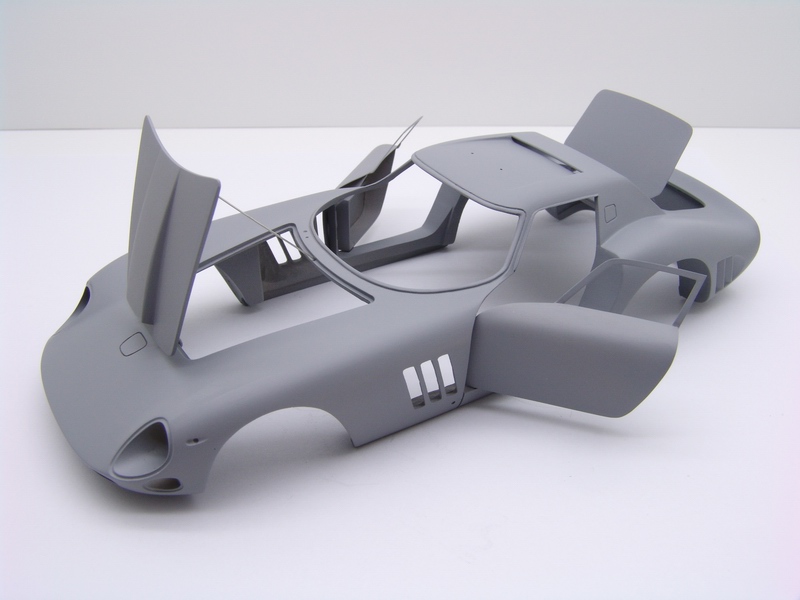
Mock-up of the body with cut out doors, drilled out fender vents, opened trunk, and roof wing. At this point I had about a month invested in this model and it was not even close to primer stage! |
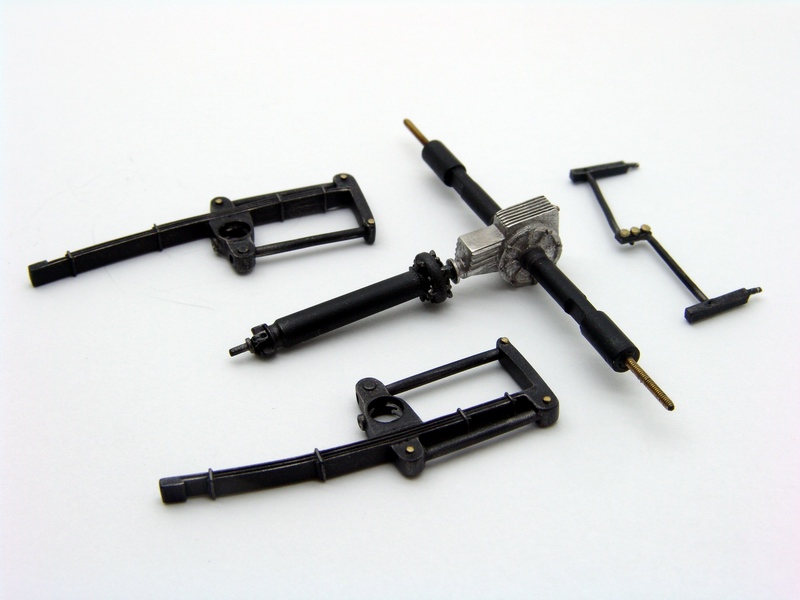 |
Here you can see rear axle, leaf-springs, and Watts linkage painted black and weathered with various MM metalizers, ready for installation. |
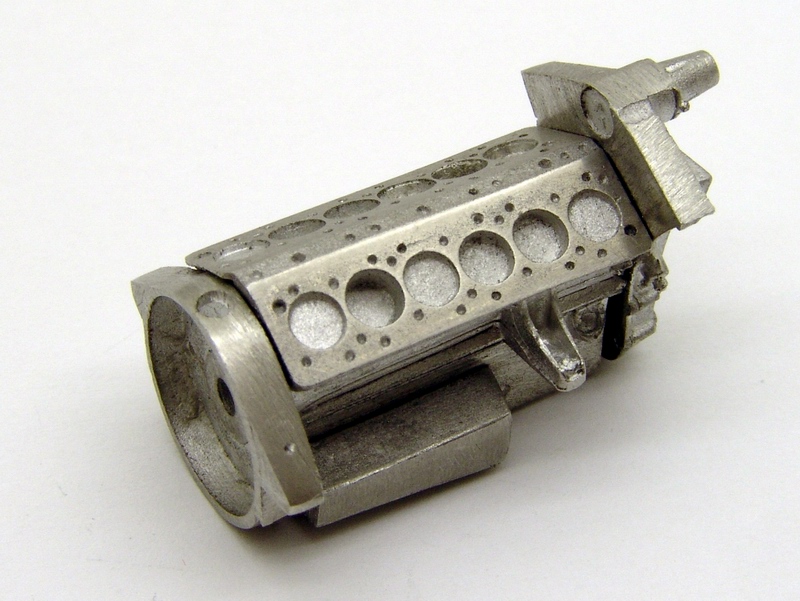 |
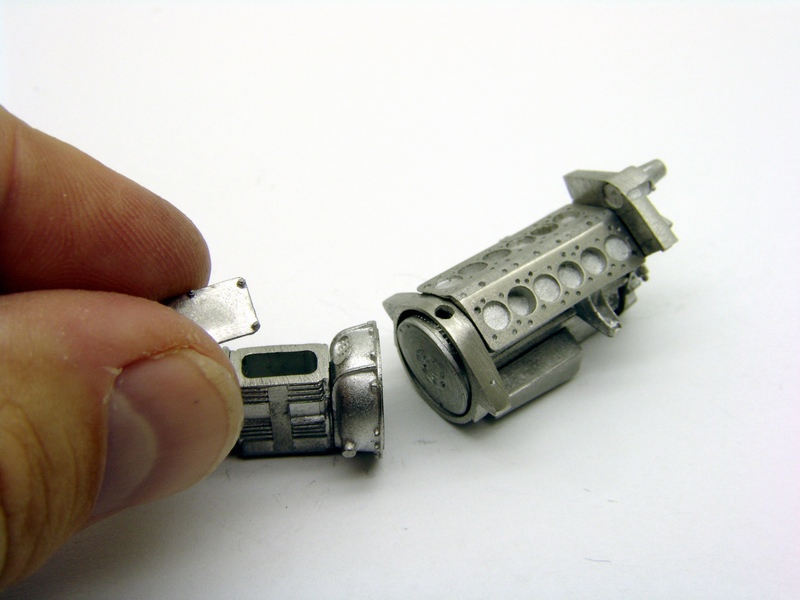
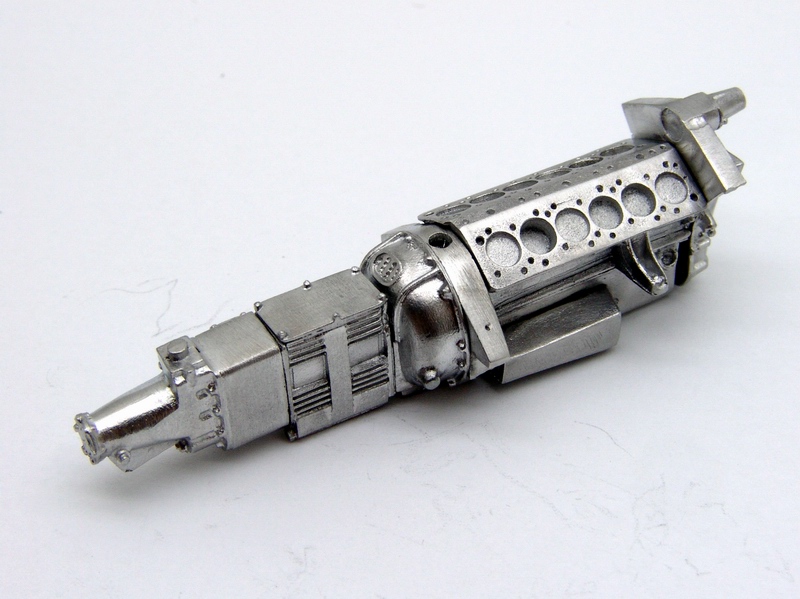
I had enough of the bodywork and decided to turn my attention to something different and more interesting - engine! Most engine parts were white metal - they were cleaned and polished with wire brush. Engine block was assembled and weathered. |
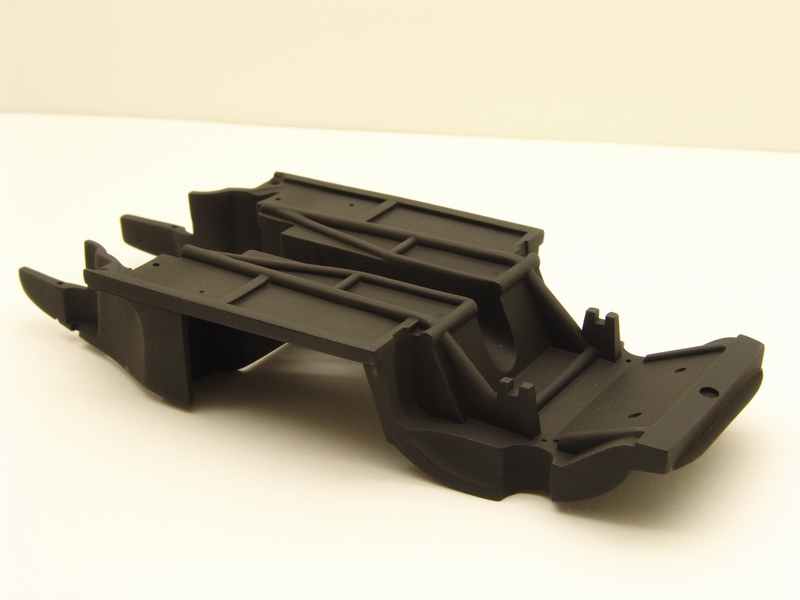 |
Chassis was carefully cleaned, primed, and sprayed flat black. |
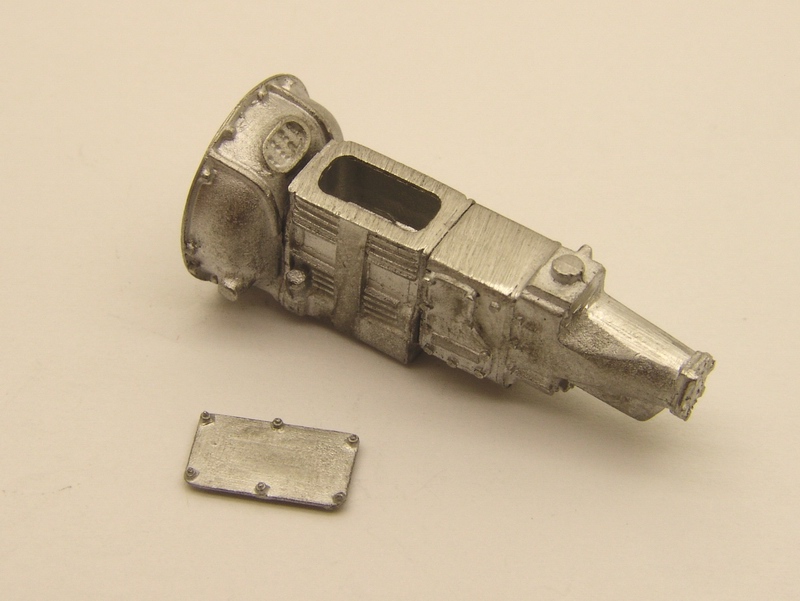 |
Gearbox parts were cleaned and mated to the bell housing. Separate box cover is a very neat touch - this part of the engine won't be even seen on the completed model... |
 |
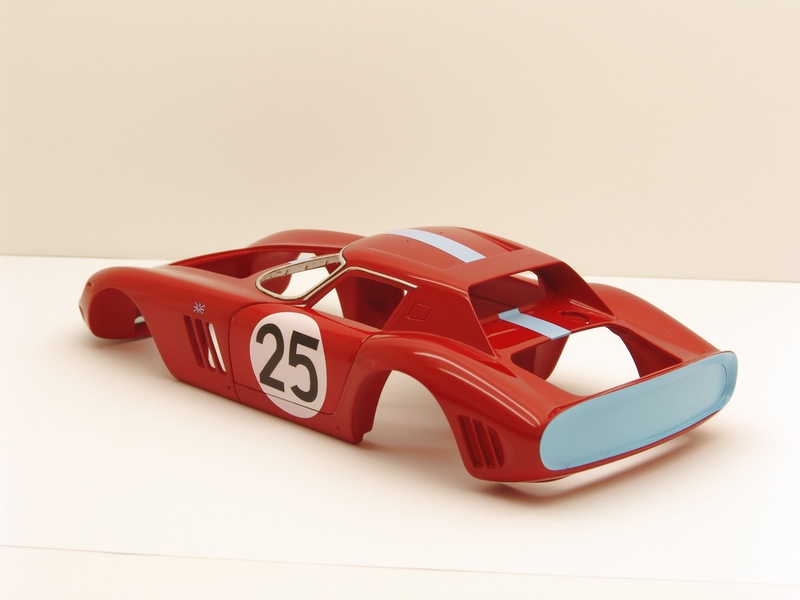
At this point the body was completely dry and I continued with polishing. Tamiya coarse polishing compound was followed by Fine, and Finish, then waxed with Treatment model wax. |
 |
...just like this flywheel won't be seen after the gearbox is attached to the engine, or pistons, when cams are glued on top of the engine block. But its just so much more interesting to build! |
 |
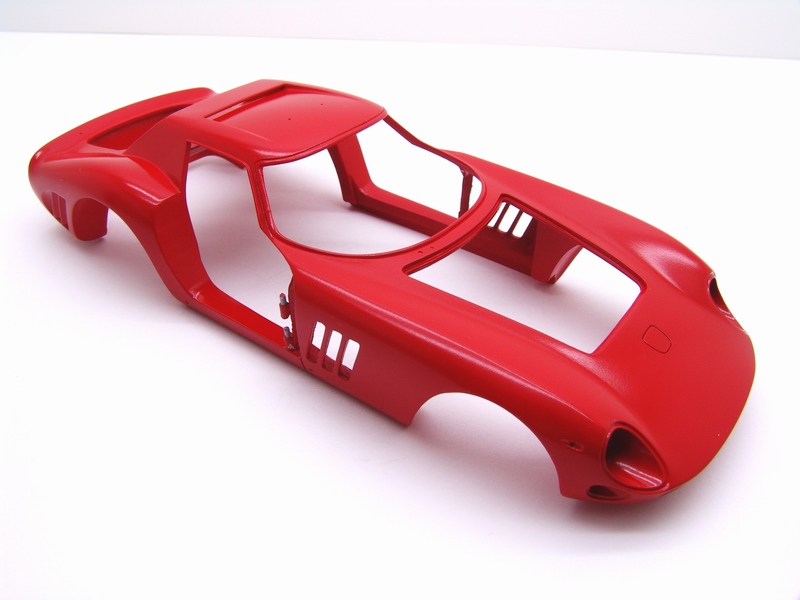
Outdoor pictures show paint color and shine a lot better than indoors pictures. I shot this picture right after waxing - the body looked great. |
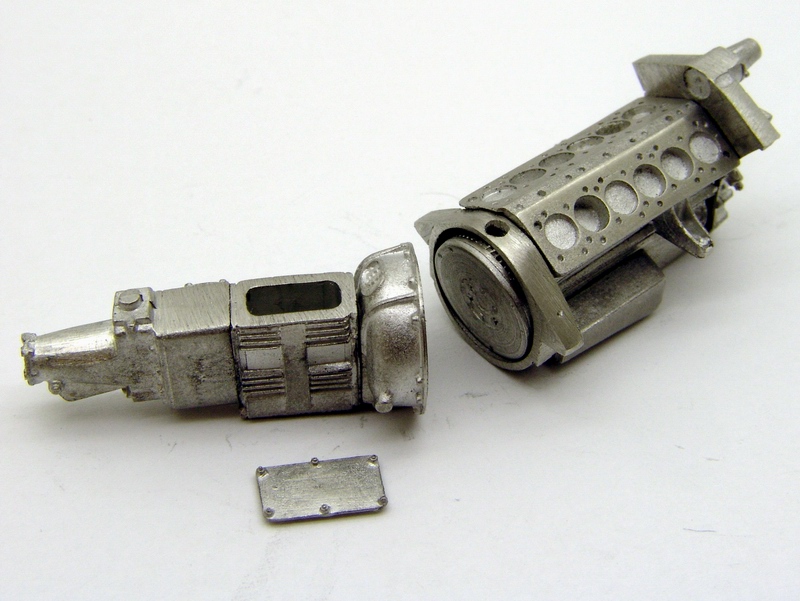 |
A better look of the engine block and gearbox with flywheel and box cover before they were sealed forever. |
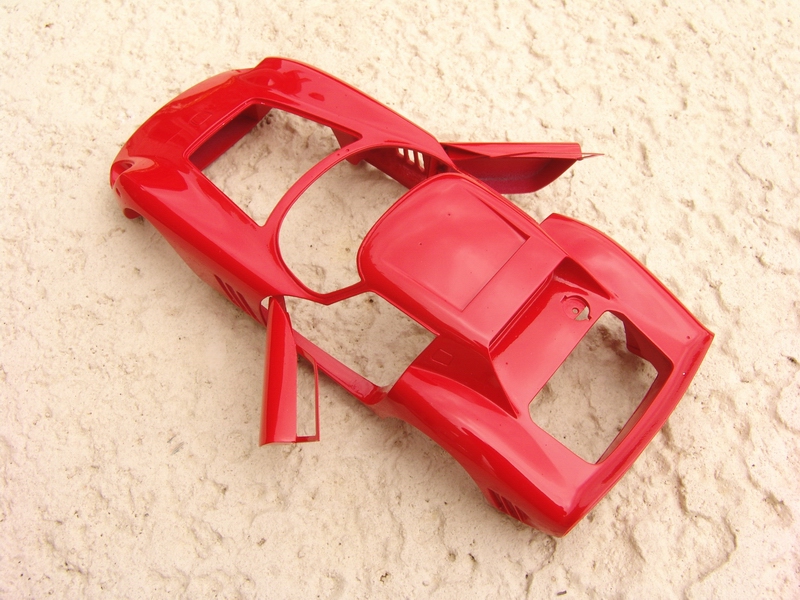 |
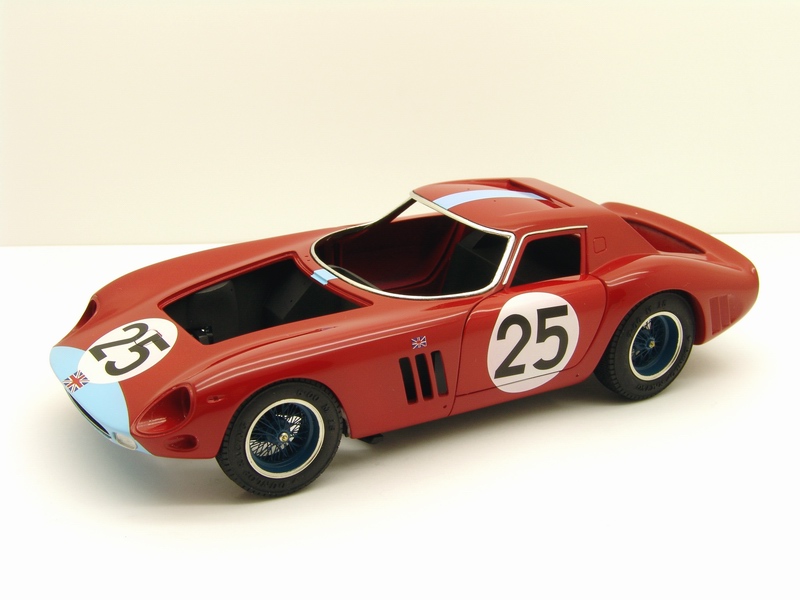
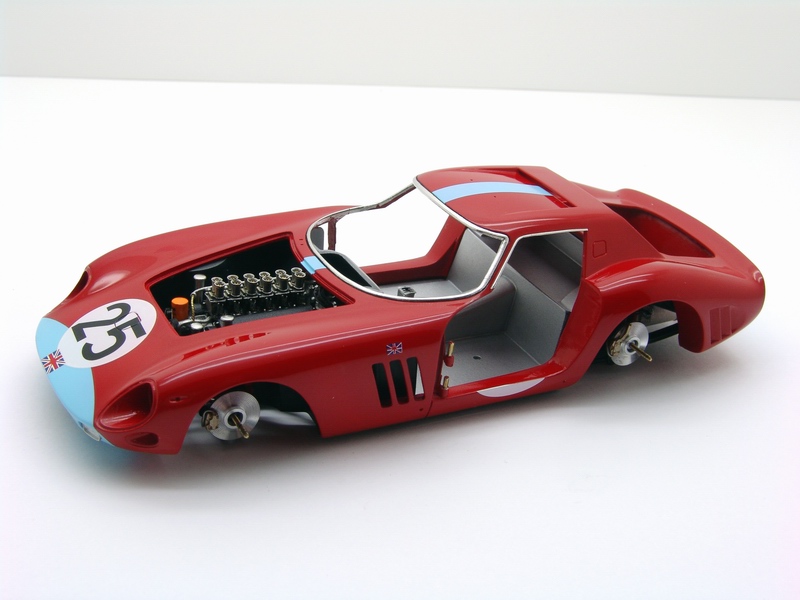
Another shot of finished body. |
 |
After gluing the gearbox to the engine block, entire assembly was one more time carefully sanded and cleaned with wire brush, then polished with felt wheel in my Dremel. |
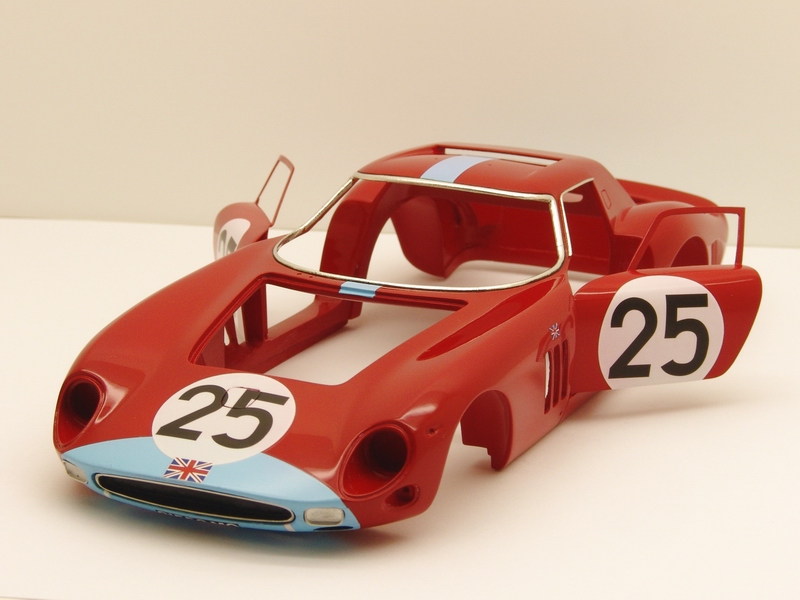 |
Next were decals and BMF window trim. Even though Cartograf decals are usually a treat to work with, blue decals in this kit were so thick that I had really hard time applying them to such curved surfaces. |
 |
Cams, cam covers (fitted with Crazy Modeler photoetched Ferrari scripts) and six Weber carburetors were cleaned and assembled. |
 |
But finally they conformed with loads of Microsol (I wish I had Solvaset for these decals!) and quite a bit of heat from hairdryer. Rear decal was easier than front, of course. |
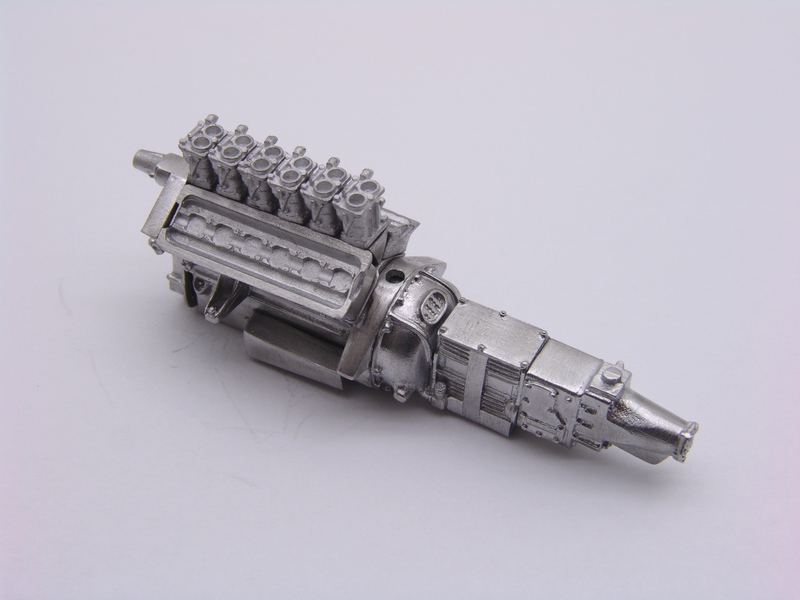 |
Cam covers were painted semi-gloss "crackle" black, and rest of the parts installed on the engine block. |
 |
After decals were dry, I trimmed window frames with BMF, and washed window surrounds with black wash. White decals were really nice and completely opaque, perfectly covering red paint. |
 |
Started, alternator, oil filter, fuel pump, and breather tubes were carefully sanded and polished. |
 |
Panel fit was great after all the paint and decals were on and I was happy - all the hard work and planning has paid off. I left the decals to cure, and continued with engine/chassis assembly. The end was in sight! |
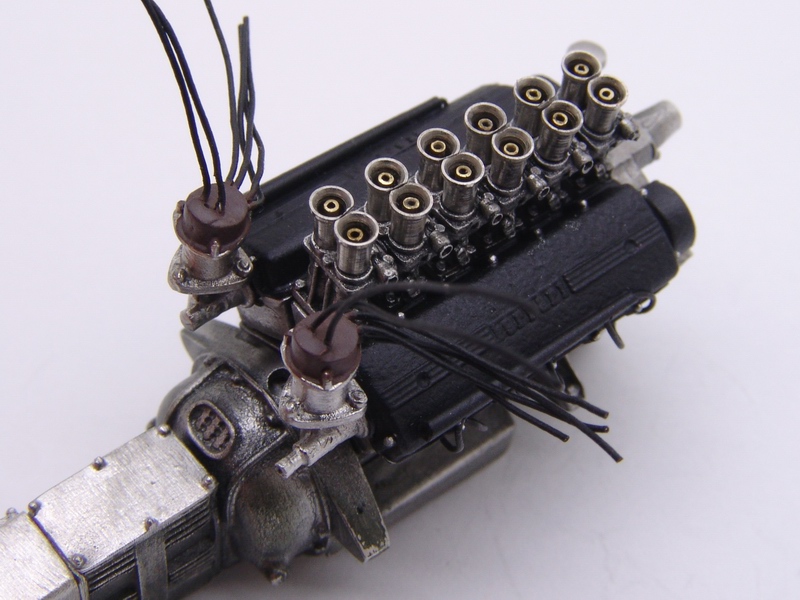 |
Carburetors were fitted with turned-steel velocity stacks and venturi tubes inside, cam covers were glued to the cams, and engine weathered with back wash. Distributors were drilled and wired with ignition wires. |
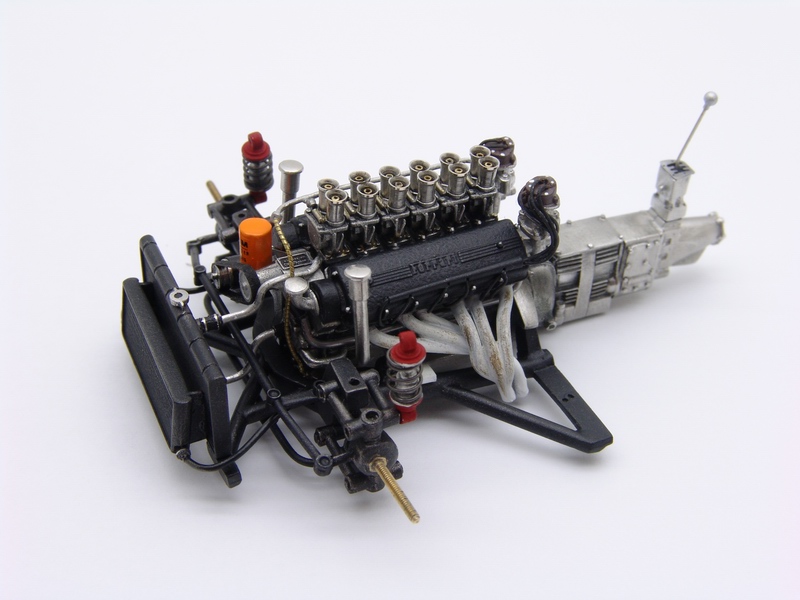 |
Water and oil radiators, exhaust manifolds, water hoses, steering links, etc were all cleaned and painted. Then I assembled front shock absorbers and put this all together with the engine on the front suspension frame. |
 |
Then all additional equipment was painted and fitted to the engine - oil filter, alternator, generator, oil breather tubes, fuel rail with fuel lines (guitar string) and fuel pump. Ignition wires were routed to the spark plugs and firing order plate fitted on top of the engine block. |
 |
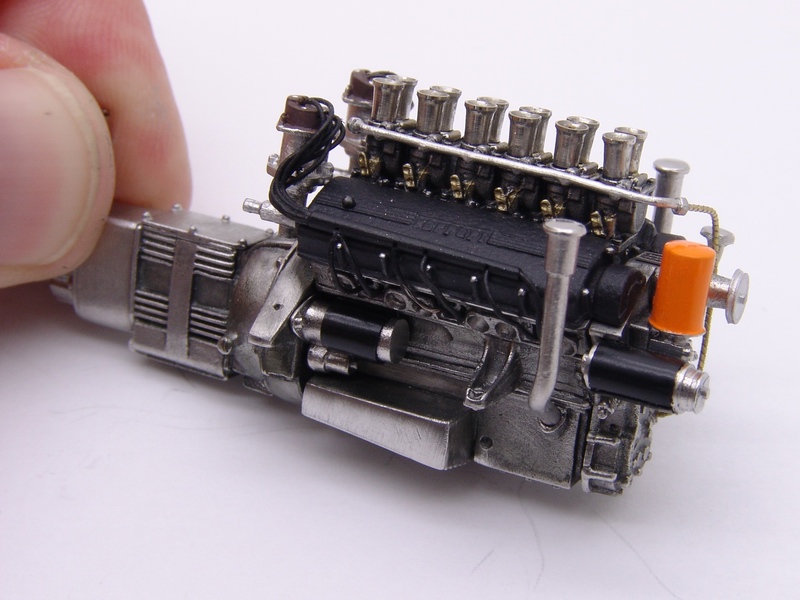
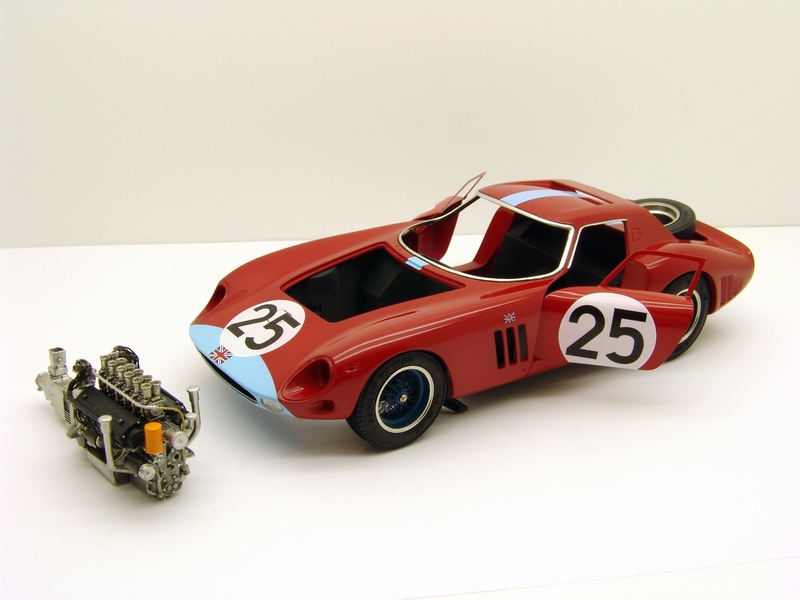
Note also driving belt, decal on the oil filter, and shifter from Replicas and Miniatures Company of MD 250 GTO engine kit. This monster of the engine was ready for installation! |
 |
Another look at the completed engine block from a different angle. Note photoetched shift gate. |
 |
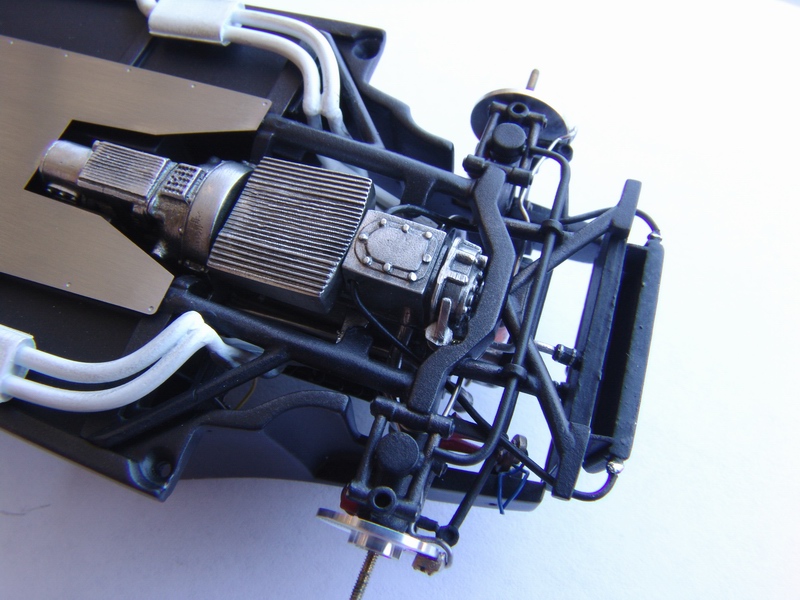
Here is another picture of the complete drive train ready to be installed into the chassis. |
 |
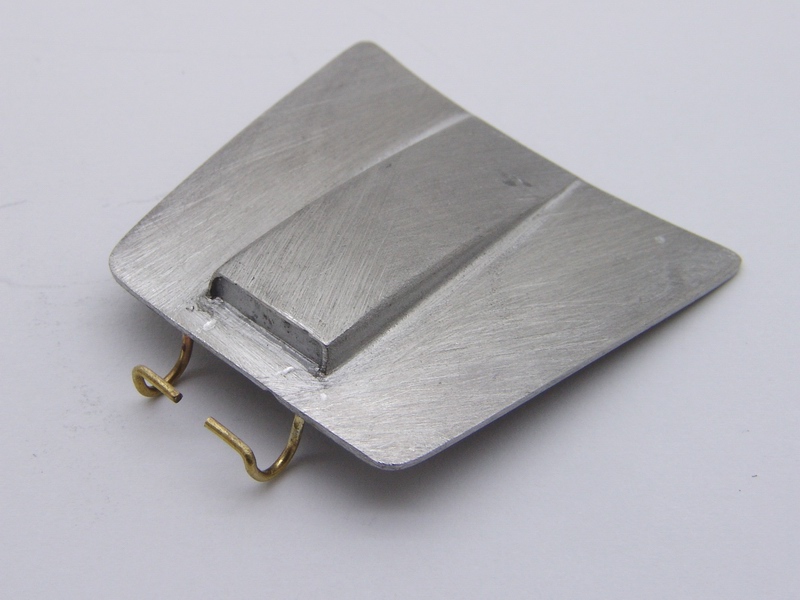
After the engine was assembled, I continued with the bodywork. Trunk walls were made with Tamiya Epoxy putty, and shaped to fit the chassis plate. I had moistened putty surface while it was still soft, and made an impression in the putty with the chassis plate, then let it cure like that. |
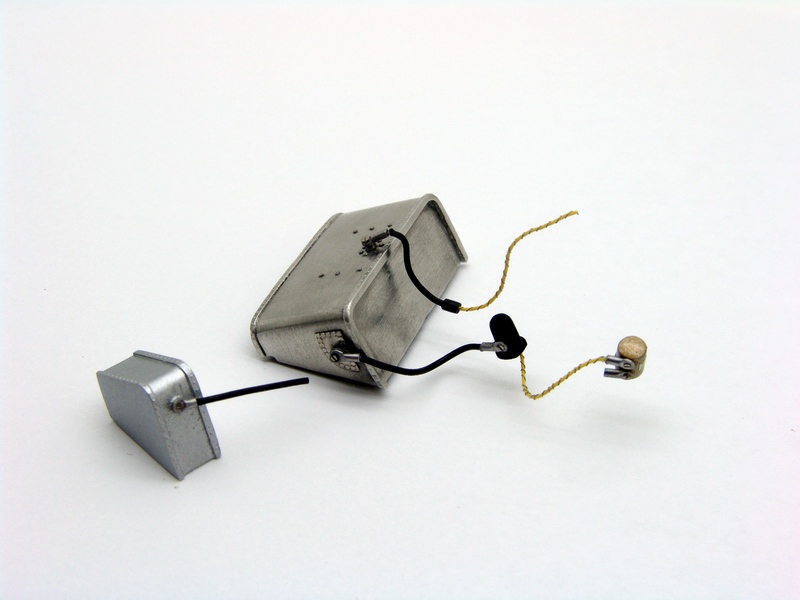 |
But before I could put it all to the chassis, I had to address one more thing - fuel and oil tanks. Tanks were cleaned and polished with felt wheel, and then I scratchbuilt all lines, filters, and fittings using various wires, solder, and small screws from broken hand watch I had. |
 |
Rear trunk wall was ground even more, and side walls shaped and sanded with sanding sticks. I was continuously spraying some grey primer to check the surface and kept sanding until I was satisfied with results. This picture shows one of the intermediate steps in the process. |
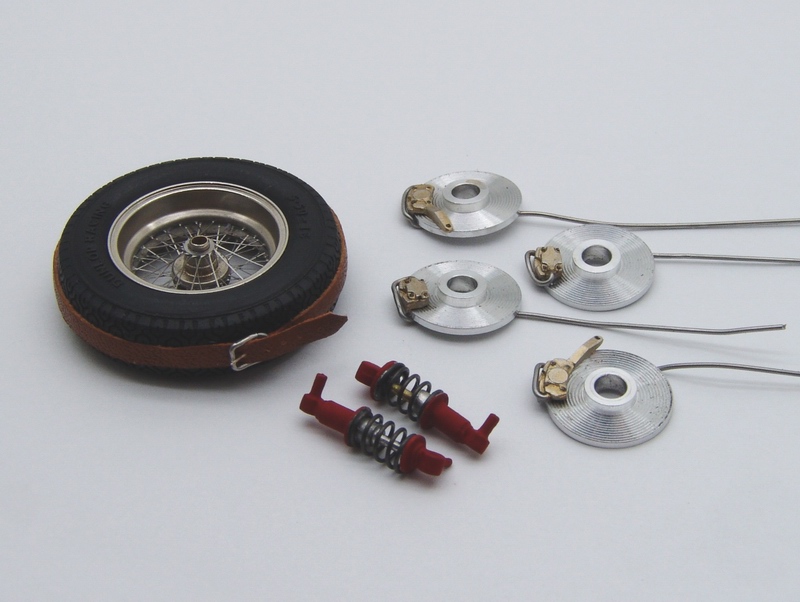 |
Spare wheel was bought from Hiro (thanks Kyoko!) and fitted with leather strap with tiny belt buckle. Brakes were fitted with calipers and brake lines, rear shocks were painted and assembled. |
 |
Working on the trunk walls and roof wing. Trunk turned out to be more problematic than I thought it would be, but it was too late! |
 |
Fuel and oil tanks were glued to the chassis, and then I installed rear suspension, Watts linkage, and brakes with hoses hooked up to brake lines, and fuel and oil lines connected to the oil and water radiators in the front. Everything was lightly weathered with MM metalizers. |
 |
This picture shows the fit of the chassis plate and trunk walls. I also wanted to open up the gas cap, but trunk hinge and spare wheel prevented me from doing that. |
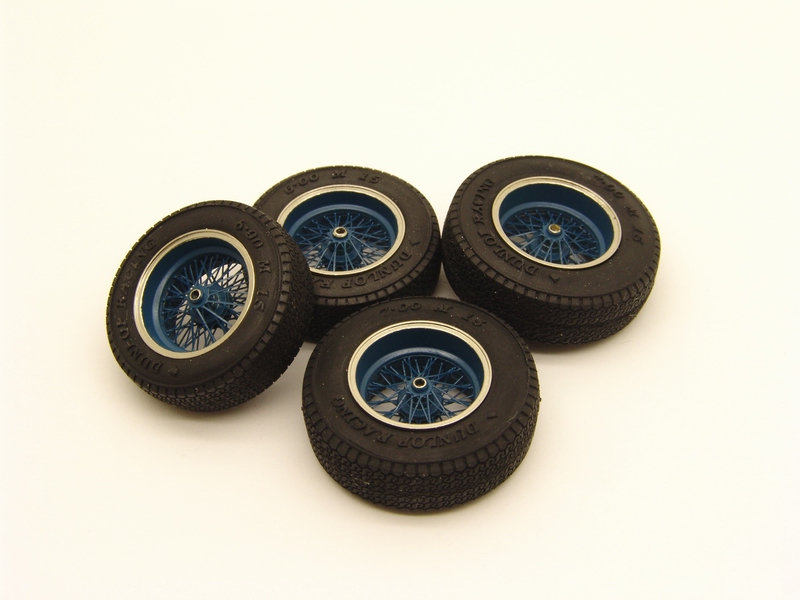 |
Terrific Hiro wire wheels were assembled and painted blue. I missed the color on the wheels, but decided not to repaint them because I actually liked how they looked on the car - I guess I took a bit of an artists license here. |
 |
Mock-up of the body with finished trunk, and installed engine to check for fit and hood clearance. Model started to take shape. |
 |
Final mock-up before the engine and front suspension installation. |
 |
Next were the door frames. After some thinking I decided to make them from brass too for strength. Piece of brass was cut and shaped to precisely fit the frame opening. |
 |
Checking the stance one last time before suspension installation - looks just right! |
 |
Then the frame was carefully cut of using cut-off wheel in my Dremel and shaped with flat needle files and sanding sticks. |
 |
Front suspension frame together with the engine, brakes, and all the wiring and hoses was installed in the chassis. Mudguard was also glued at this point. |
 |
Soldering was the only way to securely join two brass parts together. I have never done any brass soldering in my life. But after reading some online tutorials I soldered the frame to the door - there was no looking back at this point. |
 |
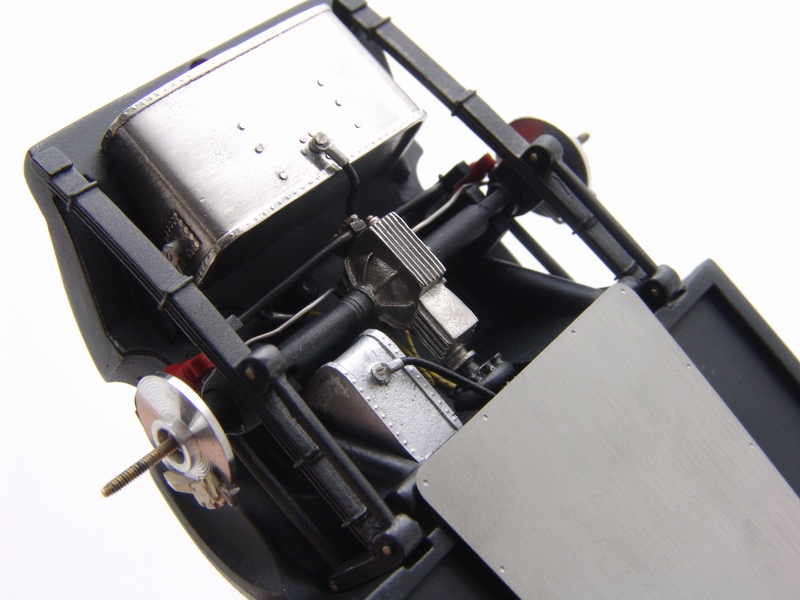
Engine bay after engine installation - still more engine bay accessories to come. |
 |
Door skin with window frame soldered to it. |
 |
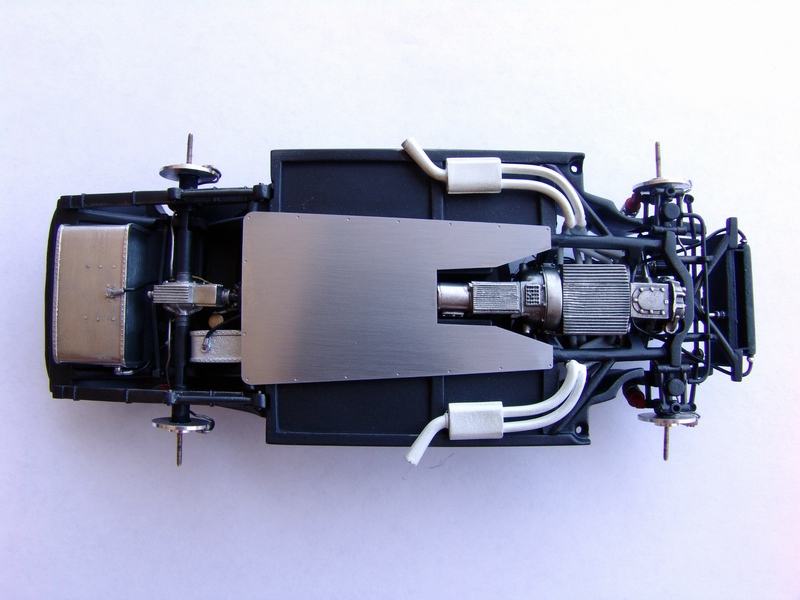
Chassis after suspension and engine installation. Note that interior part of the chassis was painted flat aluminum with Alclad White Aluminum and buffed to high shine. |
 |
Next were the hinges - they were soldered to the door skin just like the window frame. I had to be really careful not to melt solder on the frame joints while soldering on the hinges! |
 |
Checking the body fit and engine clearance - everything seems to be in order. |
 |
Left and right doors with frames and hinges soldered to them. |
 |
Wheels were put on the axles, and spare wheel fitted in the trunk. |
 |
After frames and hinges were securely soldered to the door skins, I had them sanded and cleaned with sanding sticks and needle files. |
 |
Another view of the chassis. |
 |
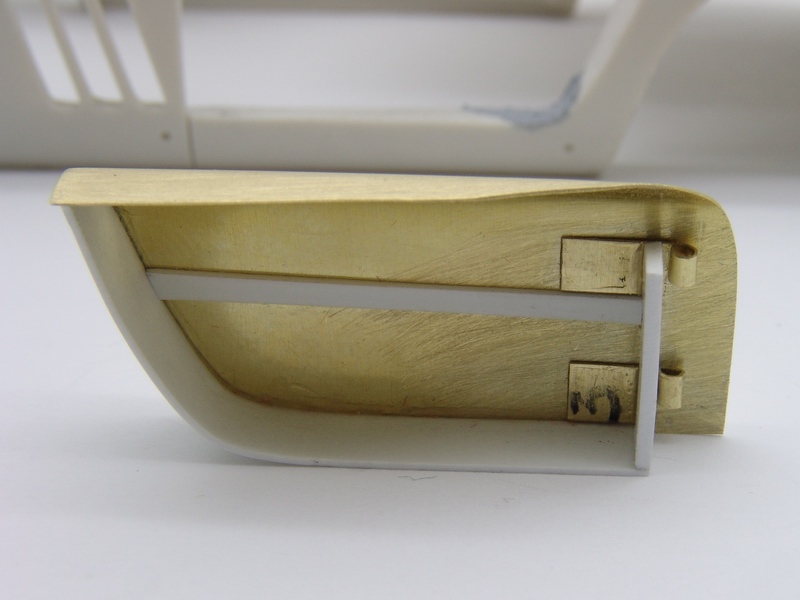
Chassis was a bit too short (I had removed to much resin from the rear trunk wall) and there was a small gap in the trunk floor. This was fixed with a thin styrene strip glued to the trunk floor. The seam was covered with Tamiya putty. |
 |
Final test-fitting of the body to the chassis before installation. Everything seems to fit right, and stance looks just right. |
 |
As you can see on this picture, styrene strip covered the gap perfectly. Picture also shows the fit of the chassis and trunk walls. Trunk edge was carefully cleaned with sanding sticks and trunk lid bent to fit the opening. |
 |
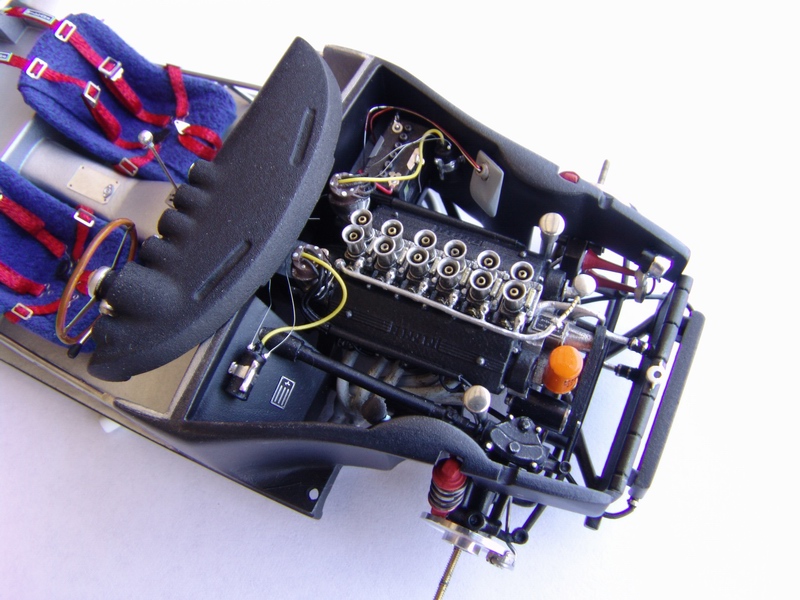
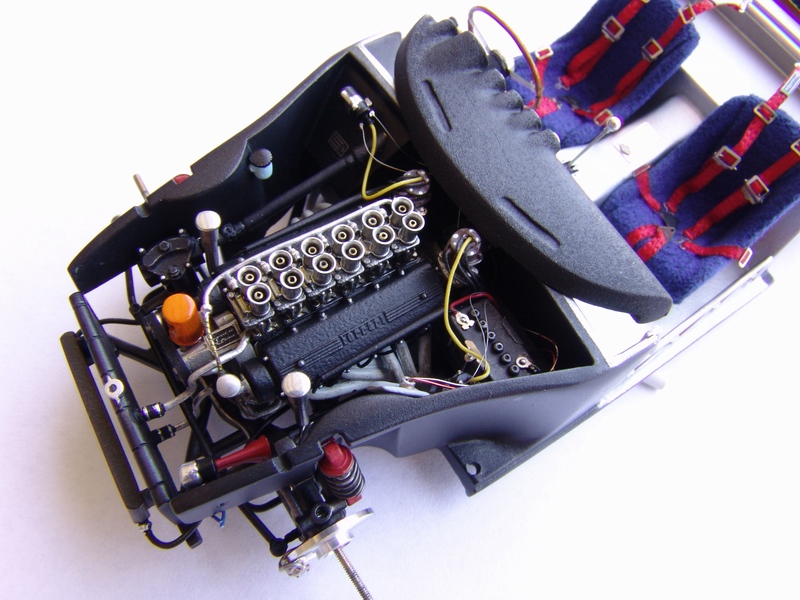
After looking at many interior pictures of the real car, I decided to dress-up Hiro's sparse interior a little bit. I made a little aluminum cover on the central tunnel and fitted it with P/E fastener, shifter surround frame, then added some bolds and fasteners around central tunnel. |
 |
I made hinges for the trunk lid from some brass rod, and soldered them to the lid. |
 |
Seats were cleaned, polished with wire brush, and sanded with fine sanding sticks. Then I upholstered them with Hiro's adhesive cloth for seats for very realistic cloth appearance. |
 |
Trunk lid was primed and sanded to level the brass panel out. Edges were rounded to fit the opening in the body. |
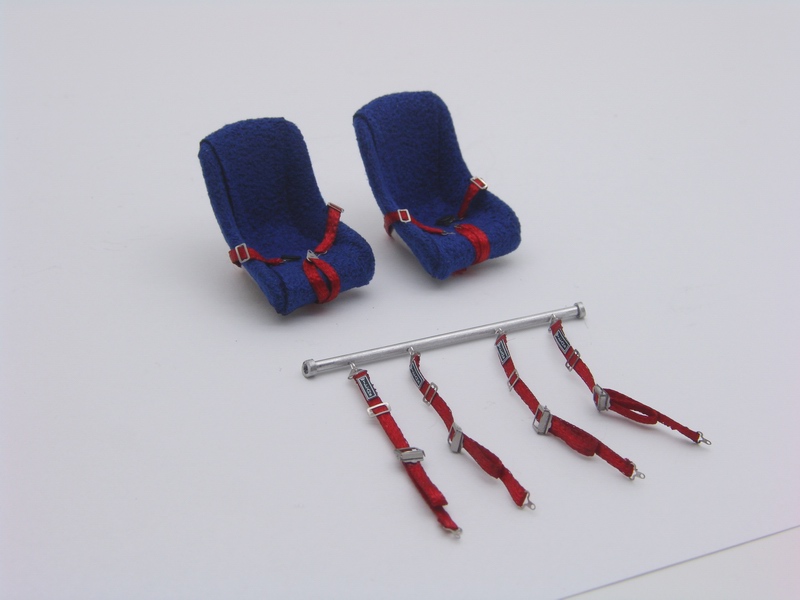 |
Crazy Modeler racing harness set was used to make 5-point racing harnesses for both seats. Shoulder belts were then attached to aluminum bar made from some thin aluminum tubing. |
 |
Extra solder was carefully removed with pointed metal cutter in my Dremel. Not only they looked much cleaner this way, but now I could fit the door panels and trunk lid lining without any problems. |
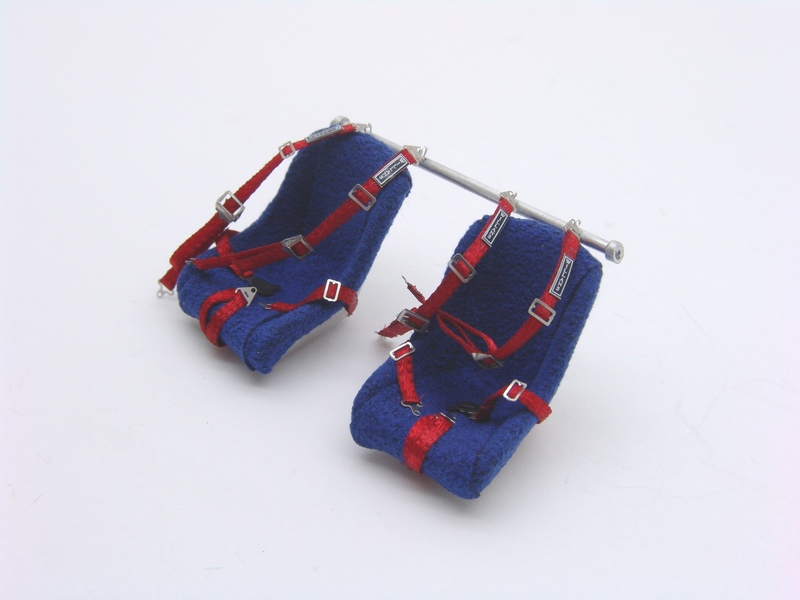 |
Another picture of the seats with racing harnesses installed. The bar would be attached to the back of the cabin. |
 |
At this point I re-did the hinge supports in the body with brass and soldered the hinges to the supports. Then supports were epoxied to the body with J B Weld epoxy. After cleaning some excess epoxy from the joint, I sprayed some grey primer to check the assembly. |
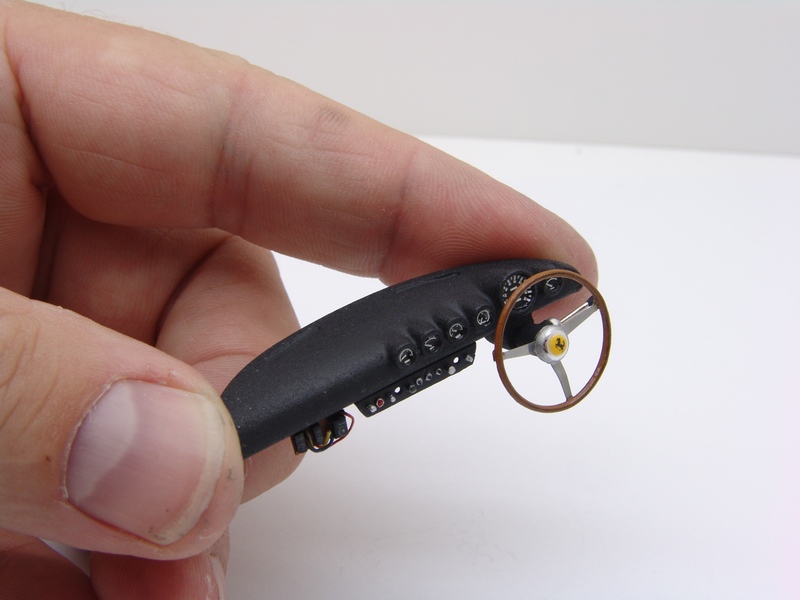 |
Dashboard is the only other resin part in the kit - it was cleaned, primed, and sprayed with semi-gloss black, then "crackled" with few coats of paint sprayed from a distance. Then I added steering column with the wheel, switch board, and a small scratchbuilt circuit board. |
 |
Same was done to the right side door hinge. |
 |
As a final touch I made trim rings for the instruments using fine chrome wire and attached them to the dash. |
 |
With hinges in place and both sides soldered for good to their places, I hinged the doors and started adjusting them to the body. Window frame in this shot still needs some additional adjustments to fit flush, but I was satisfied with overall fit of the doors and hinges worked perfectly. |
 |
Inner door panels were made from thin sheet styrene and painted flat aluminum. I also made wire pulls for the doors, and windows from a clear plastic sheet. Rivets were painted with a Gundam marker. |
 |
Similar to the technique used for the trunk lid hinge, I made the hinge for the hood, and soldered it to the hood. |
 |
Exhausts with massive mufflers were cleaned, primed, painted flat white, and then installed to the chassis. |
 |
Top surface of the hood was sanded and smoothed. I still needed to thin the entire hood down a bit, and cut open the hood scoop. |
 |
Exhaust tips were drilled out and painted flat black inside. The chassis was completed. |
 |
After tedious and careful sanding the hood was thinned down to acceptable thickness. I also drilled out the scoop, and made trunk lid frame from styrene strips. Both parts were primed with Tamiya metal and grey primers. |
 |
Seats, seatbelts, and dashboard were installed in the interior. I also cleaned and installed some sort of cage/side protection frames that were provided in the kit. |
 |
Then I constructed door walls from thin sheet styrene and again, primed both parts with Tamiya metal and grey primers. They still needed a bit of clean-up here and there, but I left them like that until white primer coat. |
 |
Engine bay was detailed with battery (to which I added Detail Master wiring kit), distributors were fitted with wired coils, and finally a water bag, horns, and a steering rod. |
 |
Outer surface of both doors was carefully leveled with putty, primer, and sanding blocks, and then sprayed with grey primer. I think it required three coats to look this good. |
 |
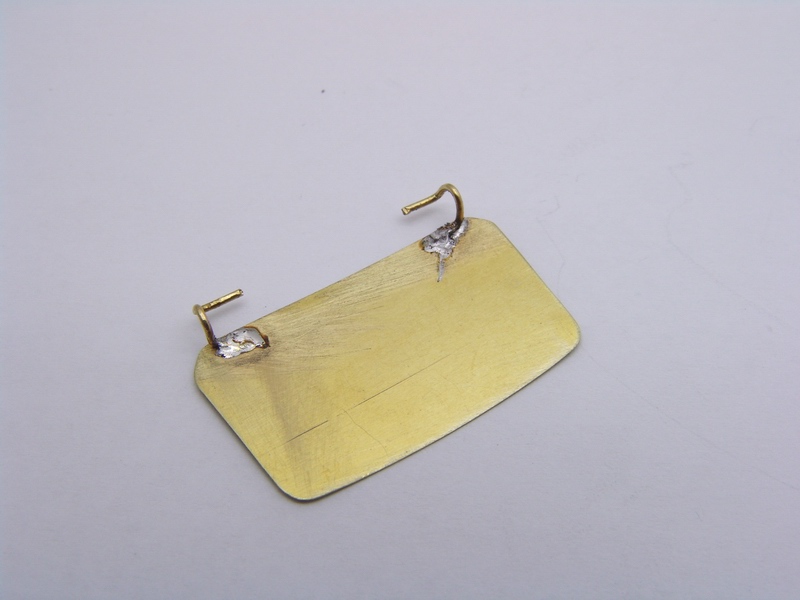
As a final touch I added photoetched Ferrari data plate that was provided in the kit. Here is another view of the engine bay. |
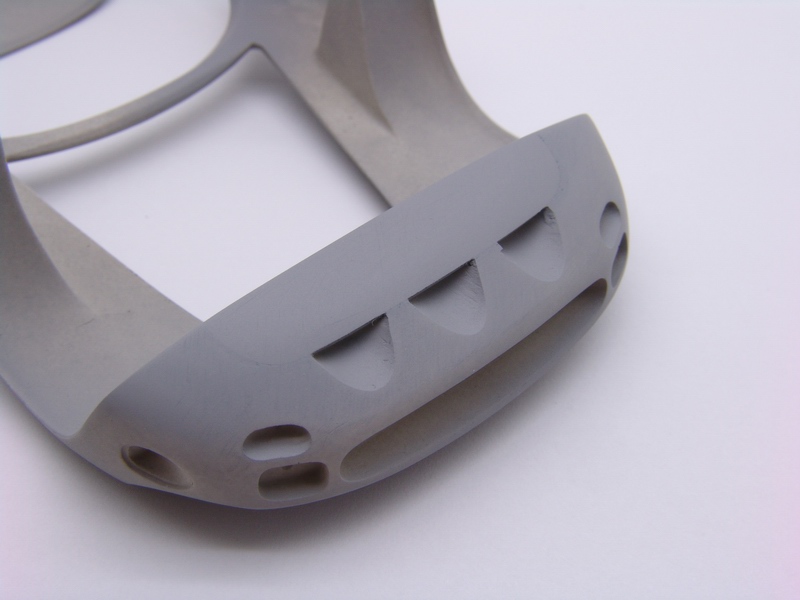 |
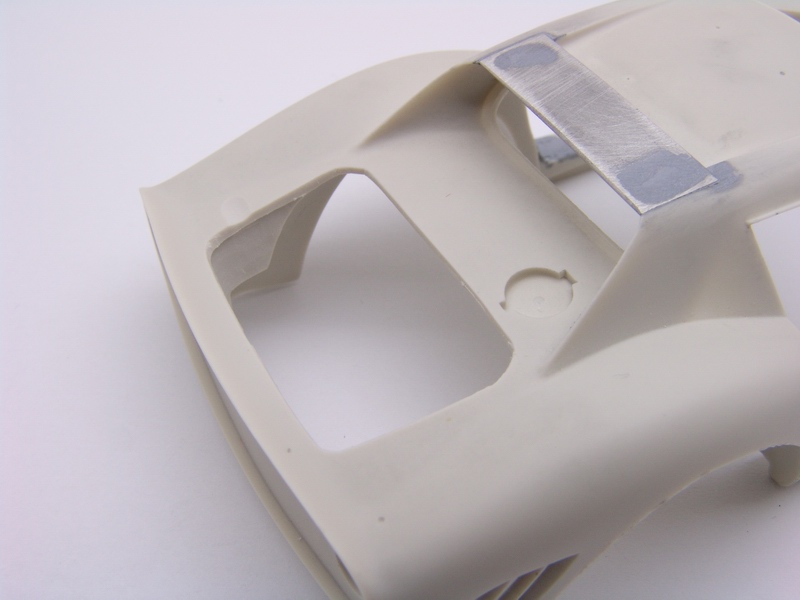
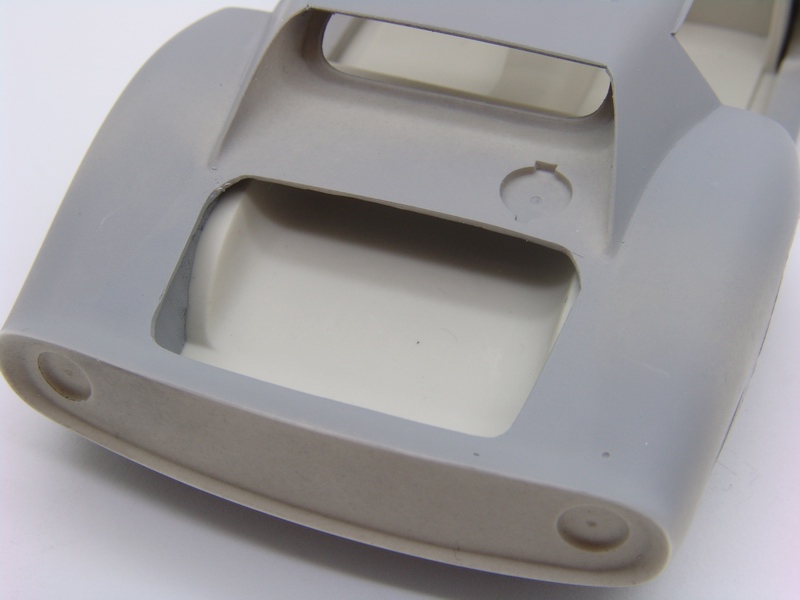
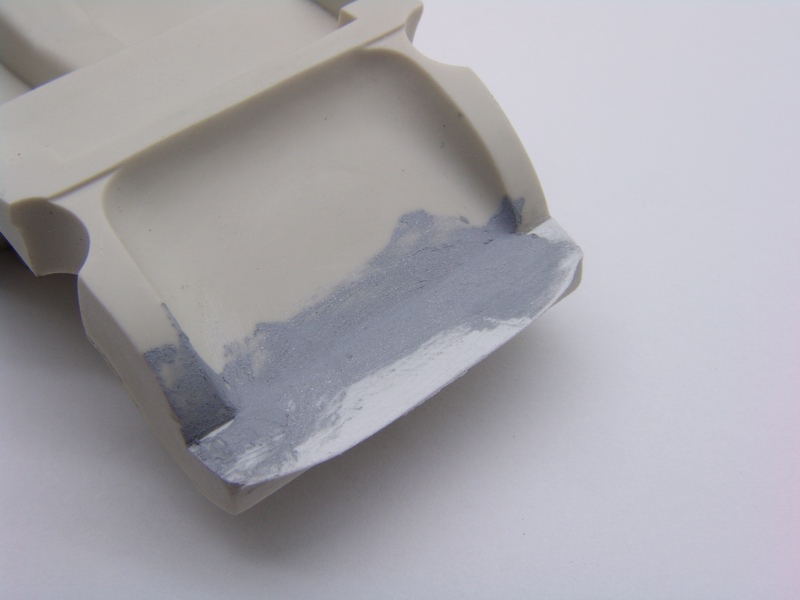
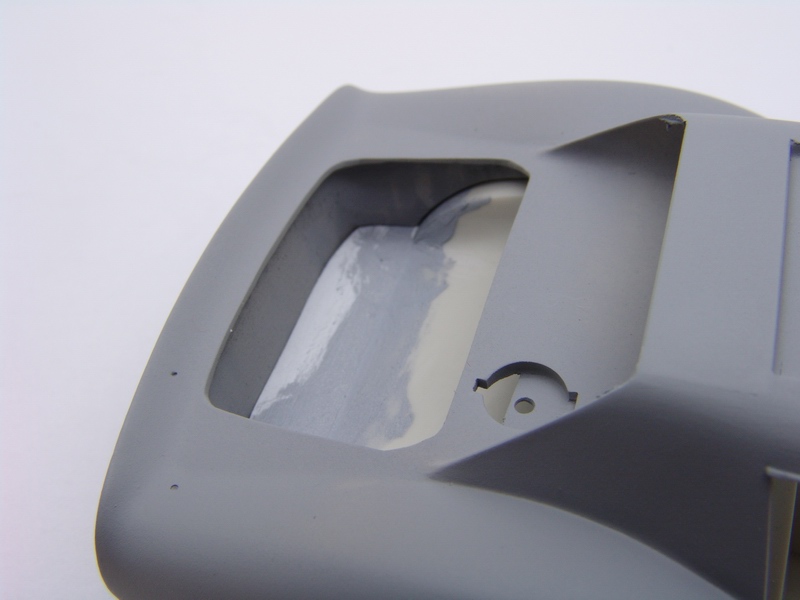
Lower brake ducts panel was glued to the body and seams puttied with Tamiya putty. Here you can see it after first primer shot to test for flaws. Duct openings were later corrected with needle files and re-primed. |
 |
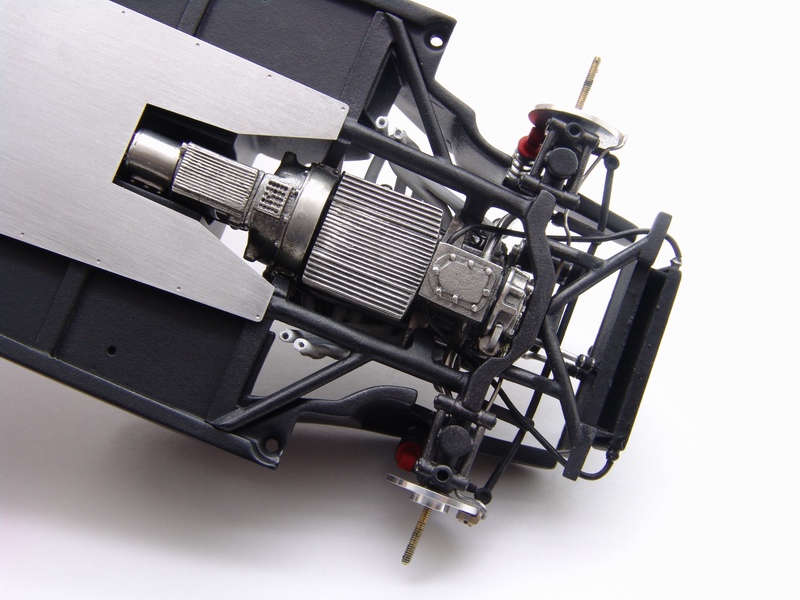
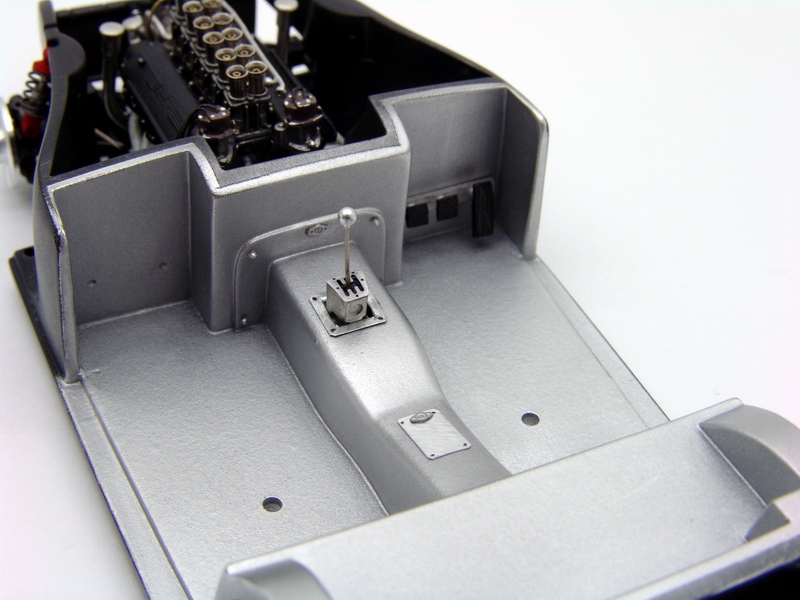
Top view of the completed chassis and interior. It was almost a shame to cover some of it up with the body, but luckily opening panels allowed to see most of it even with the body on. |
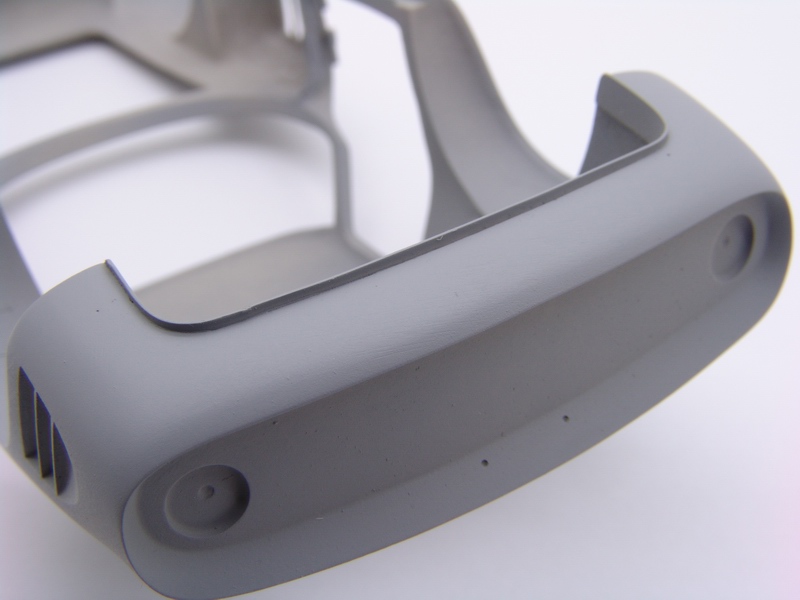 |
All real cars had thin metal lip at the rear end that was missing on Hiro's body, so I imitated it with a strip of thin styrene glued to the body and carefully shaped with sanding sticks. |
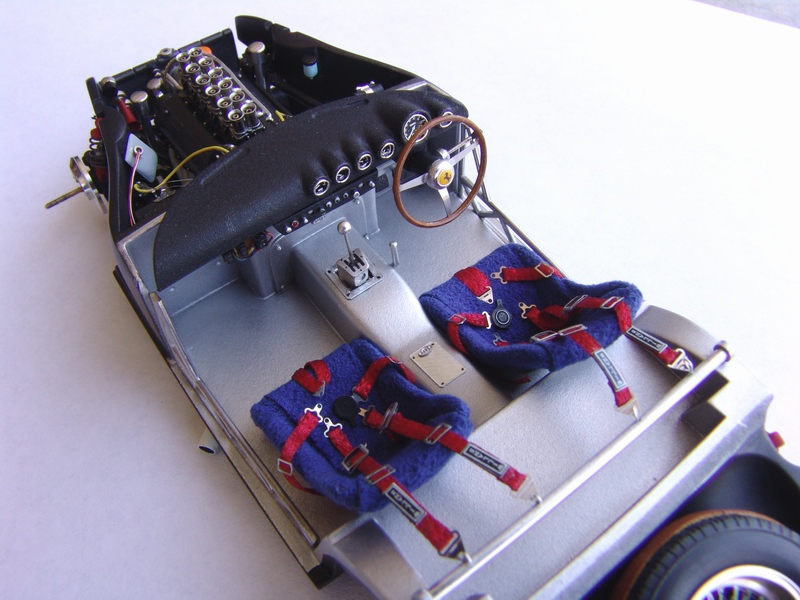 |
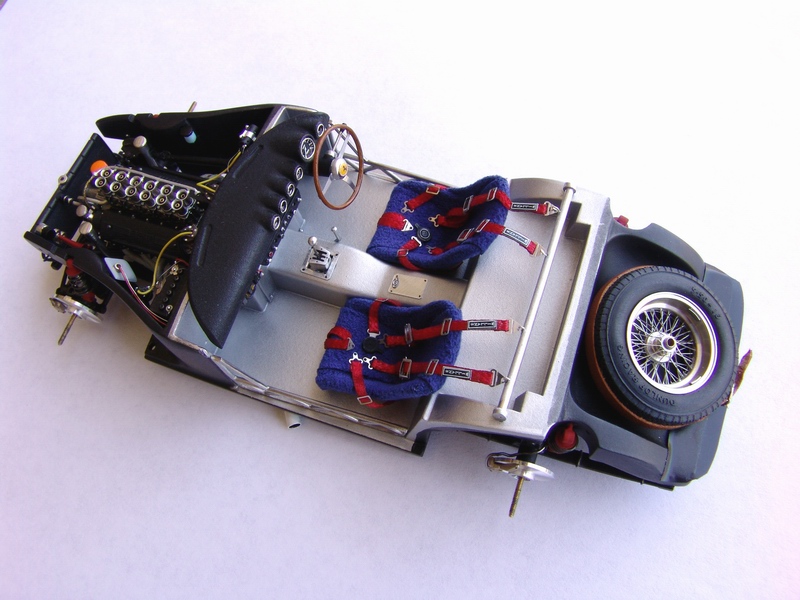
Another view of the sparse racing interior. Few minutes after this shot was taken, I have installed the body on this chassis for good. And after adding few little details to the body, the model was completed, waxed, and sealed in a display case. |
|
|
Copyright 2007 Alex Kustov. No copying or reproduction in any shape or form without written permission of the author.