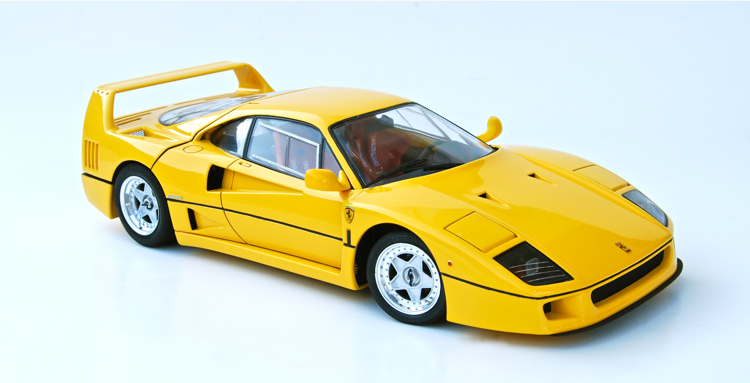
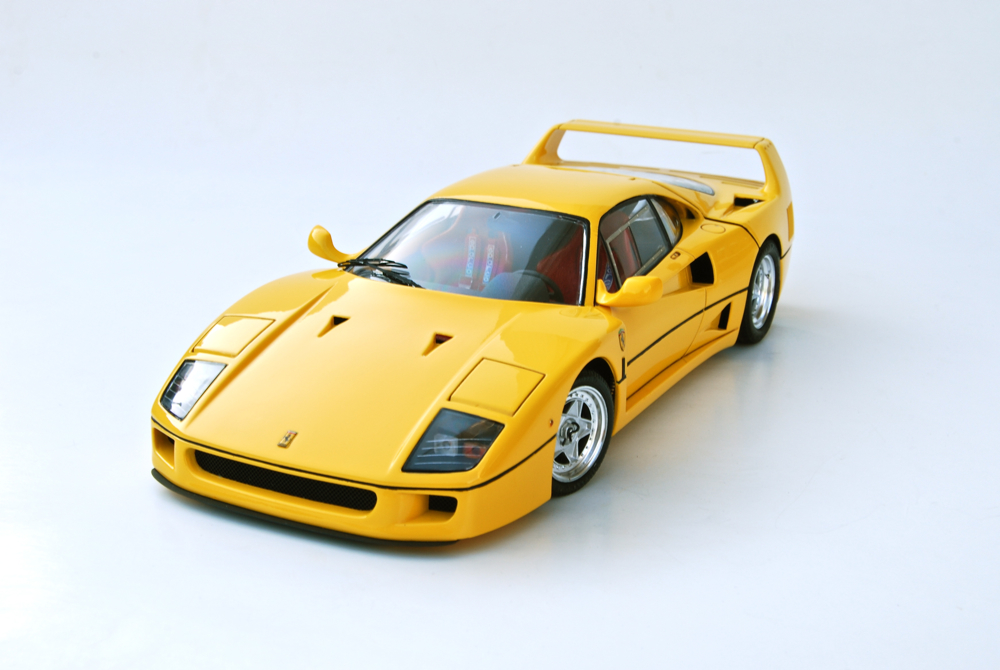
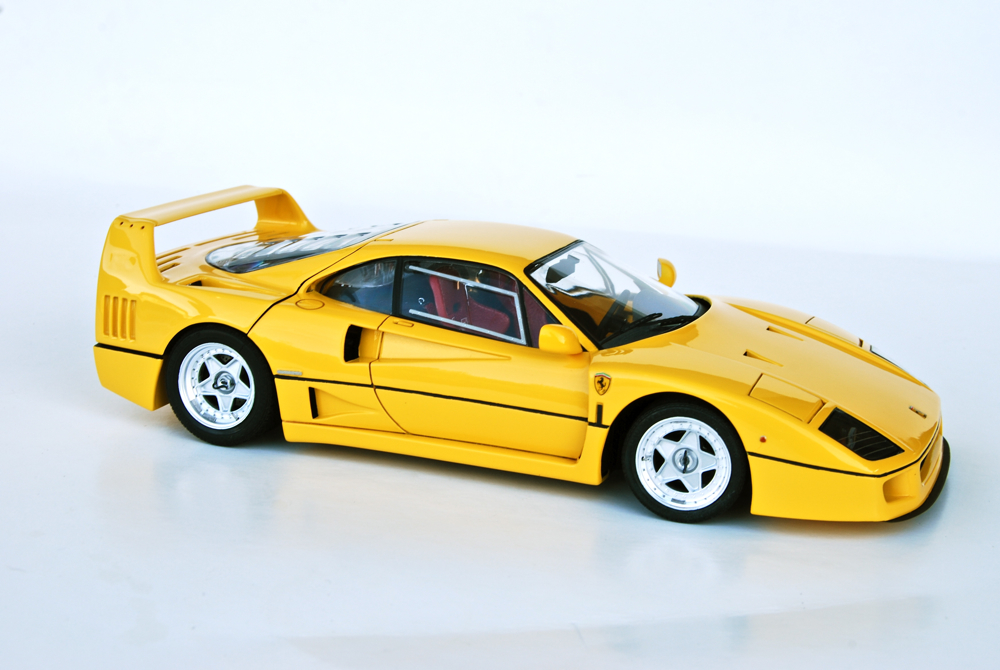
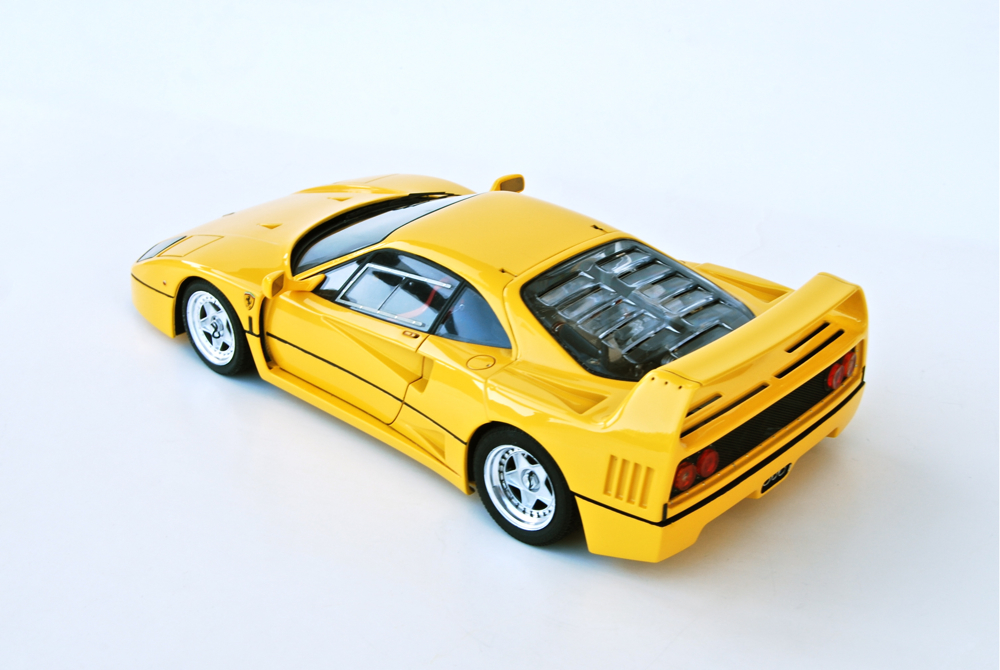
F e r r a r i F40
 |
 |
 |
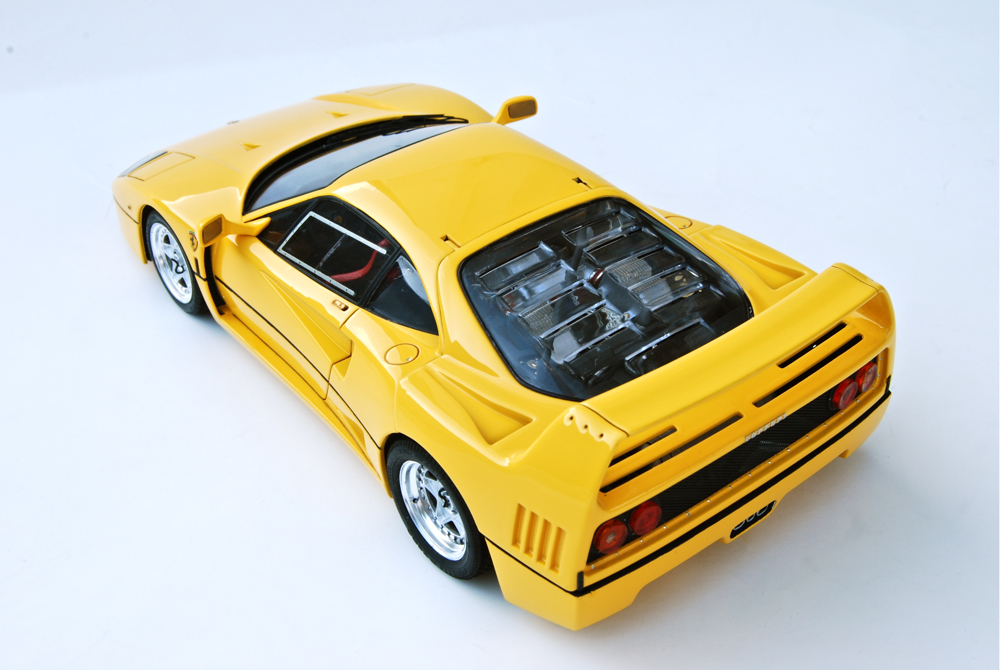
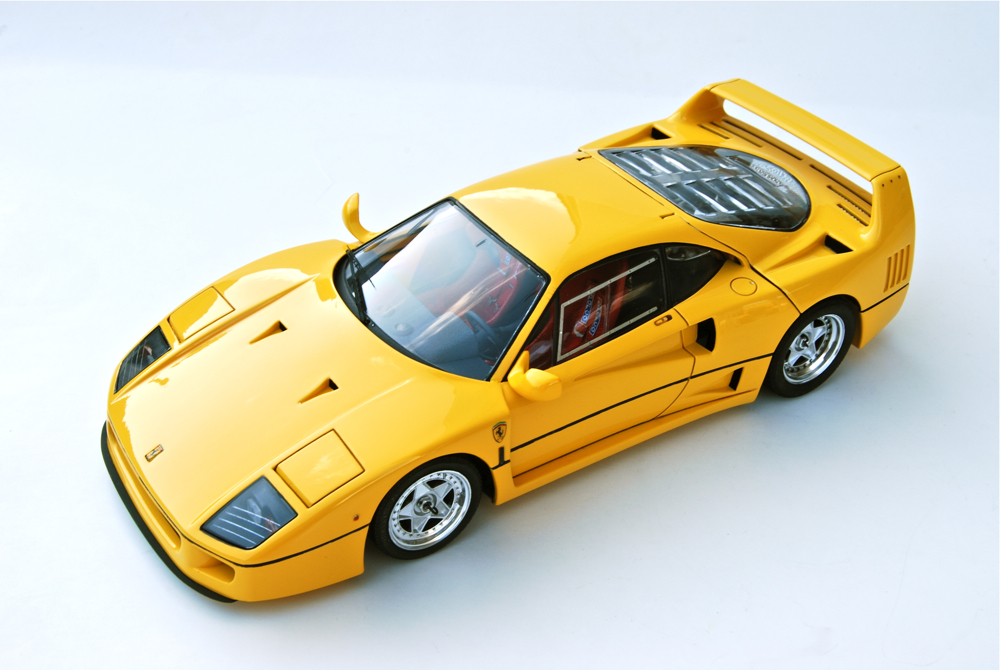
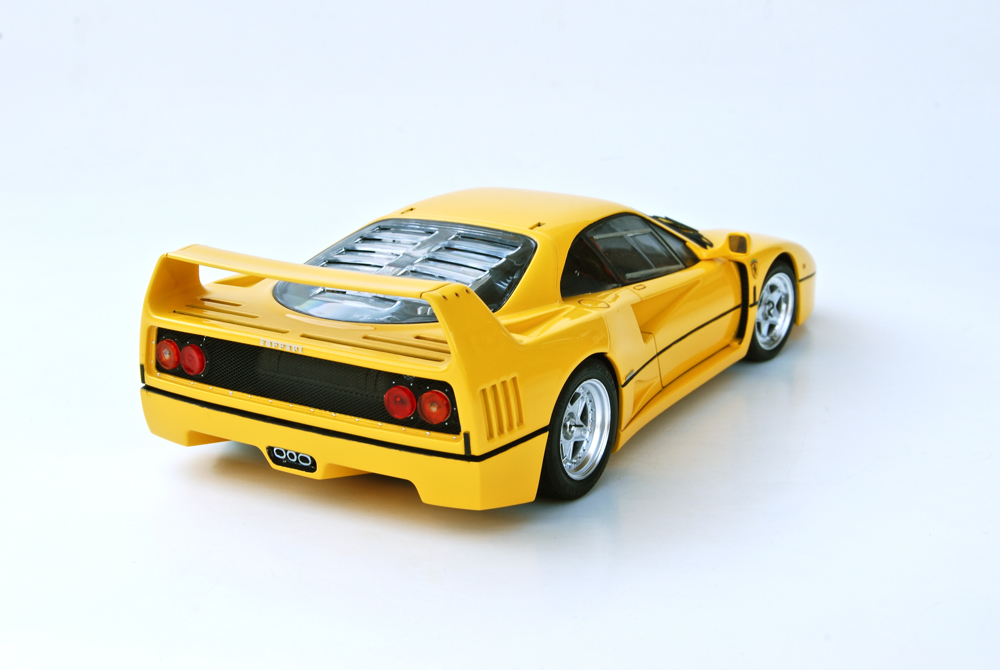
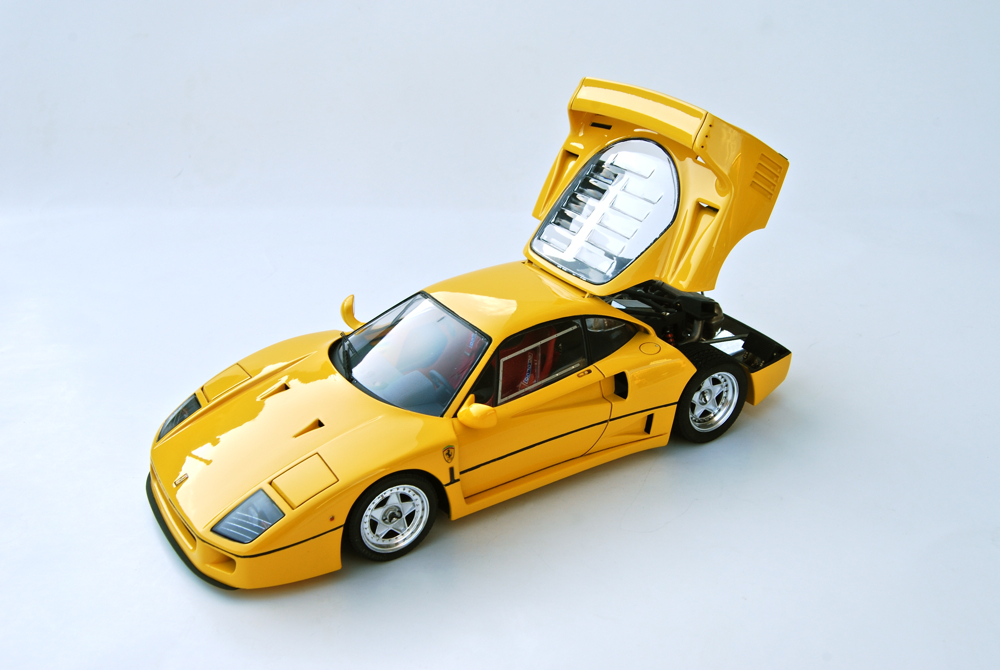
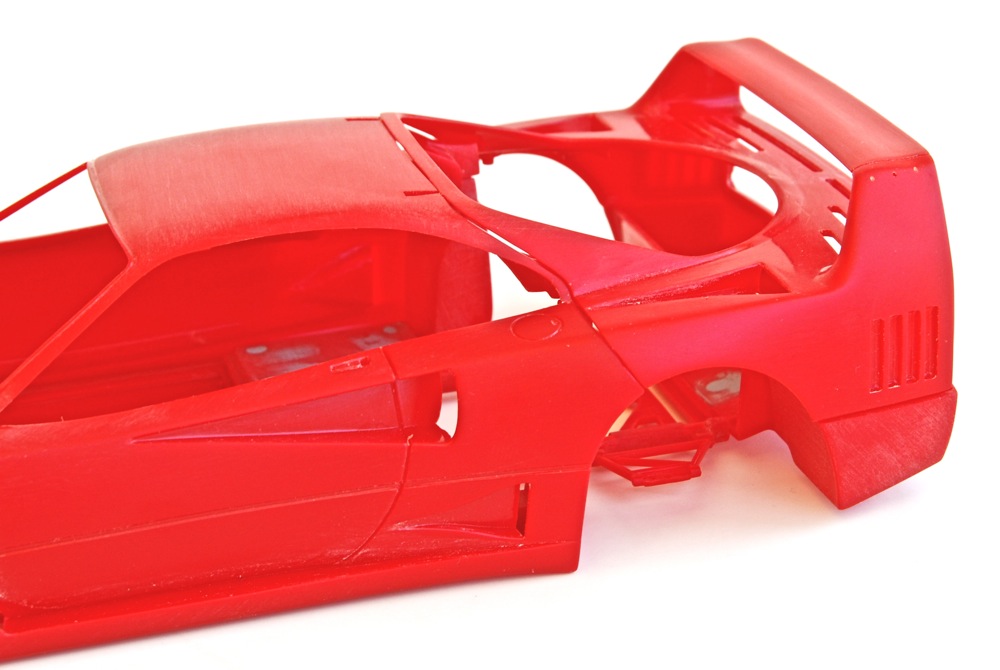
Kit: 1/24 Tamiya Ferrari F40, kit #24040 Pros: This has been said many times before - Tamiya F40 is a great kit. But a kit that was excellent in 1987, is less so nowadays - technology has changed, the mold has worn out, the detail level of modern kits is way up, and in the end we have a kit that is simply not up to modern standards. Still, one of the best (if not the best) kit of the Enzo's last creation, the brutal F40. Correct body shape, very nice wheels and tires (even though a bit on a small-ish side), great interior detail, outstanding engine detail, still crisp details (despite an old tool) and traditional Tamiya packaging. Good engraving on all parts, easy to follow instructions and nice, thin decals. Cons: It seems that this time I noticed a lot more negative things about this kit than when I built it the first time around. The dreaded engine lid fit problem is still there (no surprise really), the fit on some of the parts is still horrible. Some heavy mold lines on the chassis sub-frame, heavy ejector marks on more than few parts. Not very realistic-looking headlight assemblies, glass engraving is very faint and rather toy-like. Very faint panel lines that required re-scribing. Not entirely correct color guide, no mention of placement of composite decals. Verdict: Given the number of mediocre F40 kits on the market, it is unlikely that any plastic kit manufacturer will release a new kit that is better than this Tamiya offering. It still remains one of the best kits to build F40, and the only one that has full detail. With some work, it could be built into a good looking replica of the beast, but fit problems and lots of cleanup required stops me from recommending it for the beginners. Its a great kit for more seasoned modelers though. Enjoy! |
 |
 |
 |
|
 |
 |
 |
|
 |
 |
 |
Buildup
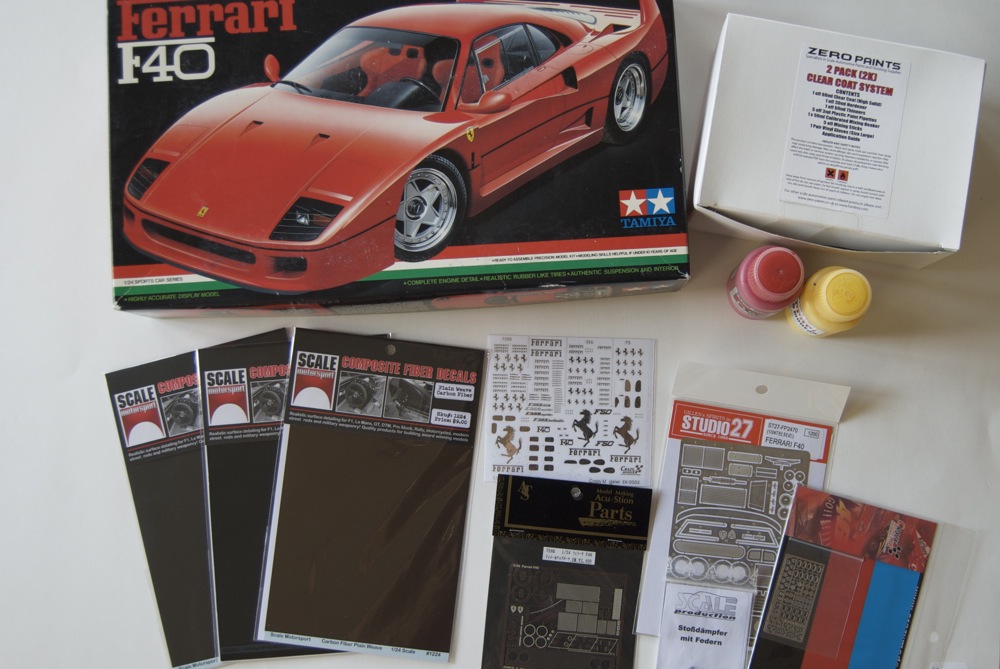 |
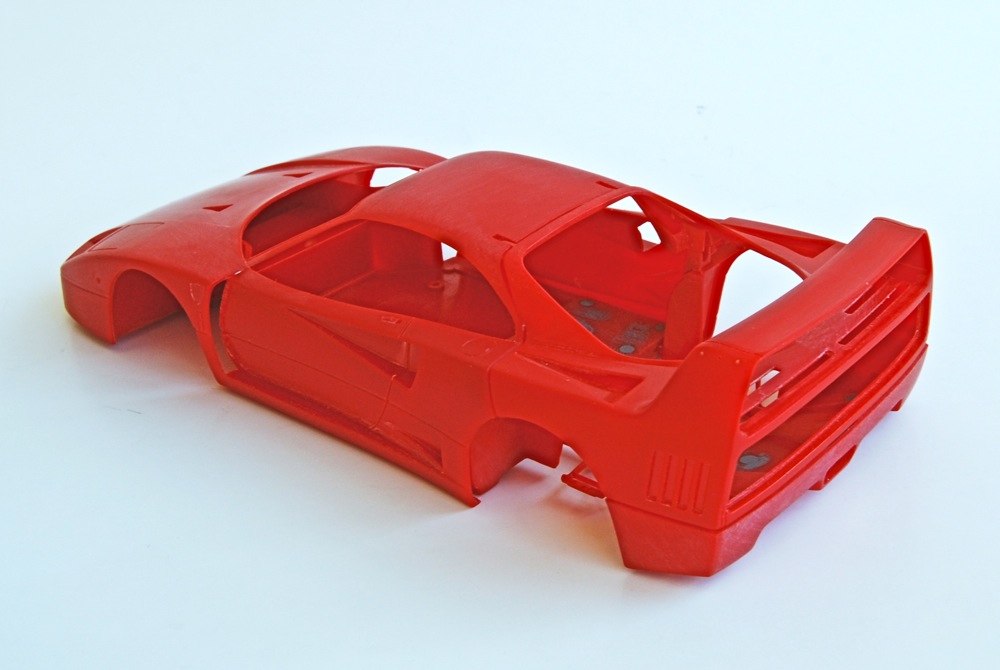
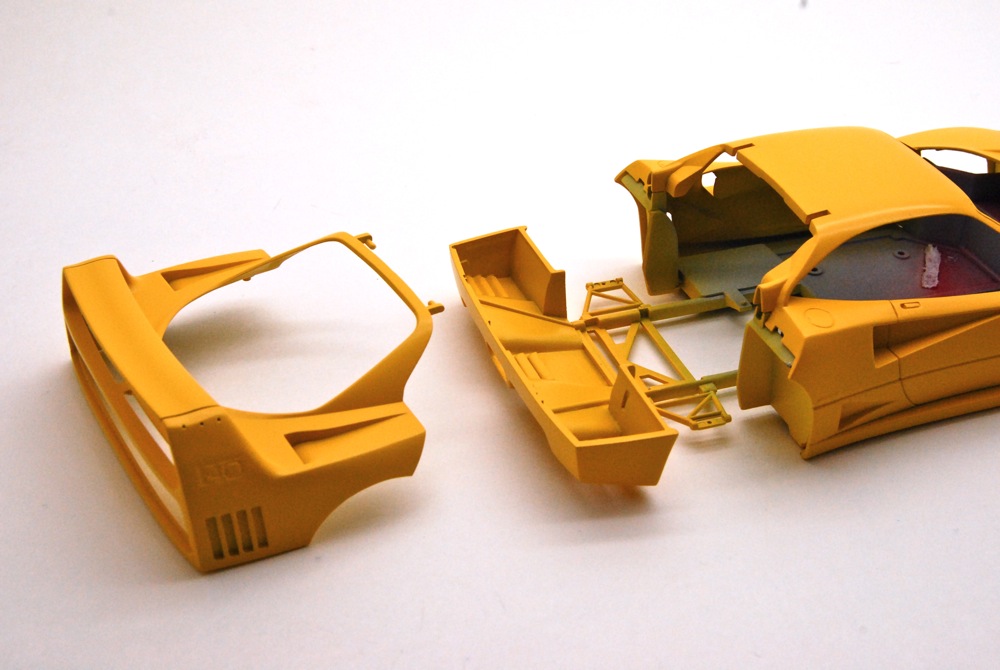
Here is what I started with: Tamiya kit, paints from Zero, few various carbon decals from SMS, Studio 27 and Acu-Stion photoetch sets, Crazy Modeler racing harness set and emblems, ProTech braided lines, Sakatsu fittings, and few other goodies for a nice superdetailed build. |
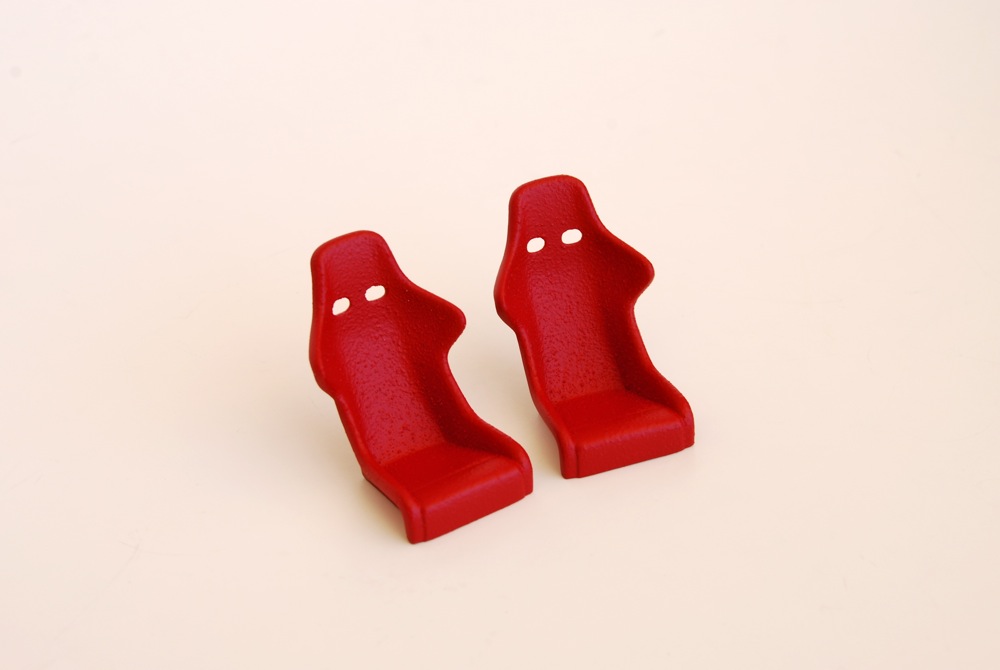 |
Then I painted the seats. While the texture was not quite what I wanted, I think it turned out rather well and convincing. |
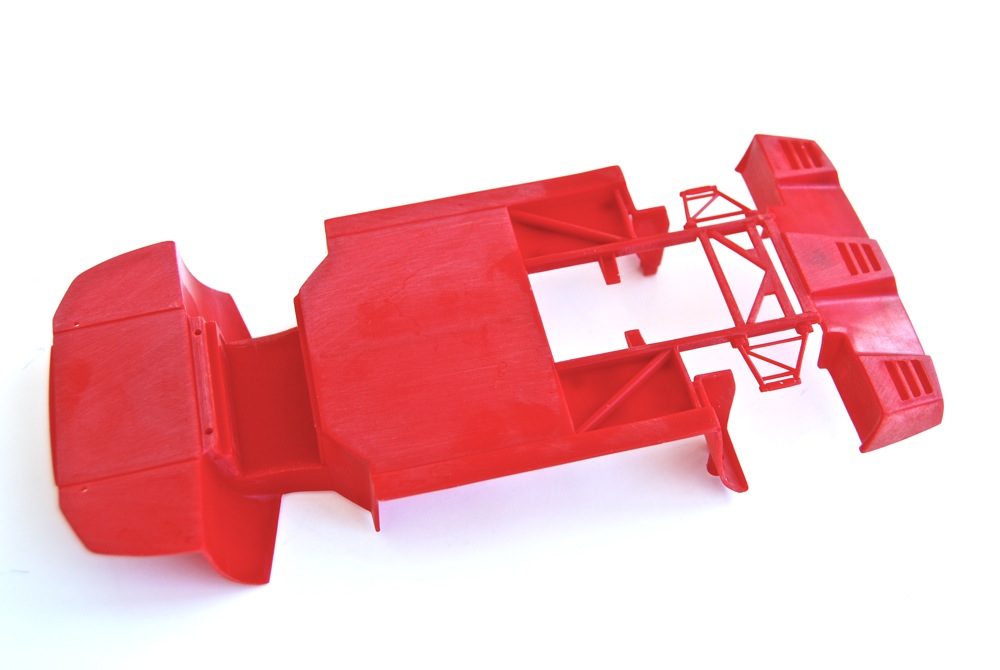 |
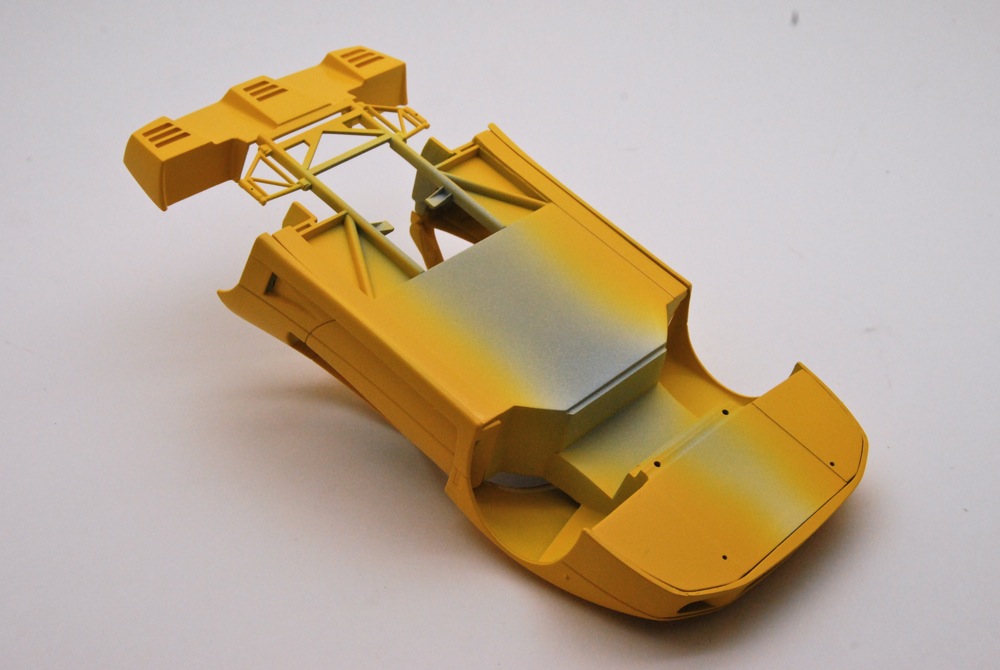
Tamiya kit is a really good and detailed kit, but it is rather old (1987) and it shows. Amount of mold lines, ejector pin marks, and flash was scary! The tool is just plain worn it is quite evident. I started with correcting all little imperfections on the chassis. |
 |
Lower part of the front suspension was covered with carbon fiber decals, clearcoated, and then shocks, hubs, brakes, and steering rack were assembled together. |
 |
All flash and mold lines were cleaned up, pin marks were filled with Tamiya putty, and everything has been lightly sanded and tidied. |
 |
I picked few nuts and bolts here and there and lightly weathered/dry brushed the whole assembly with Model Master metalizers. |
 |
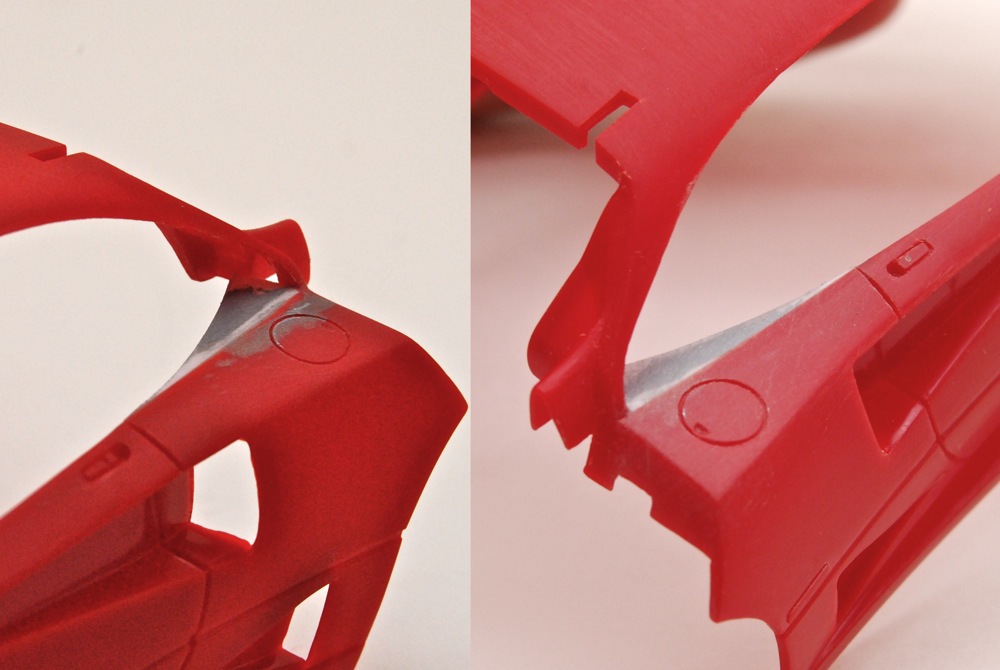
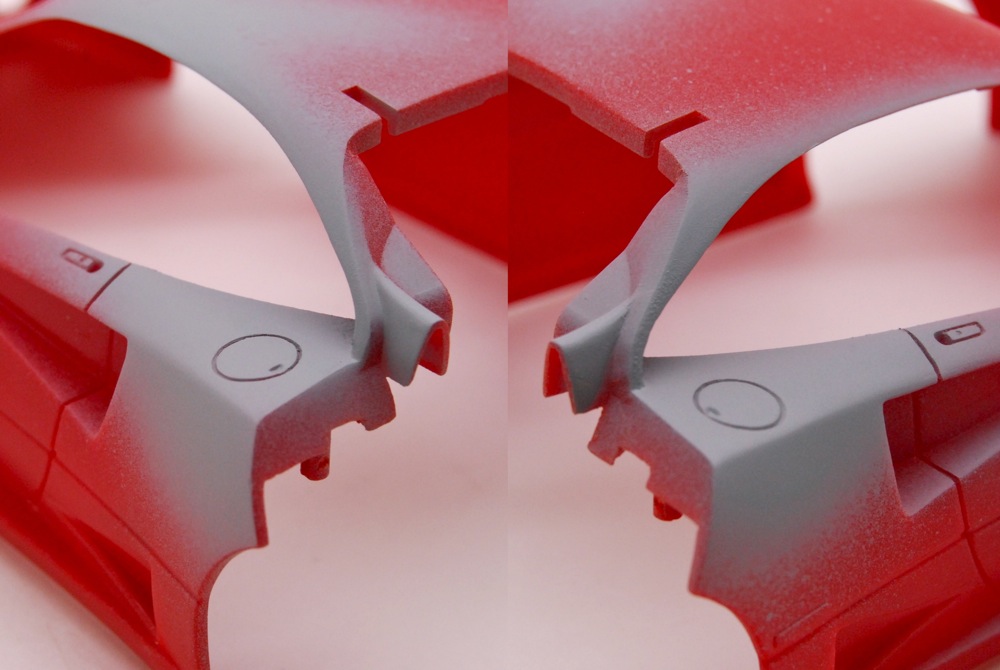
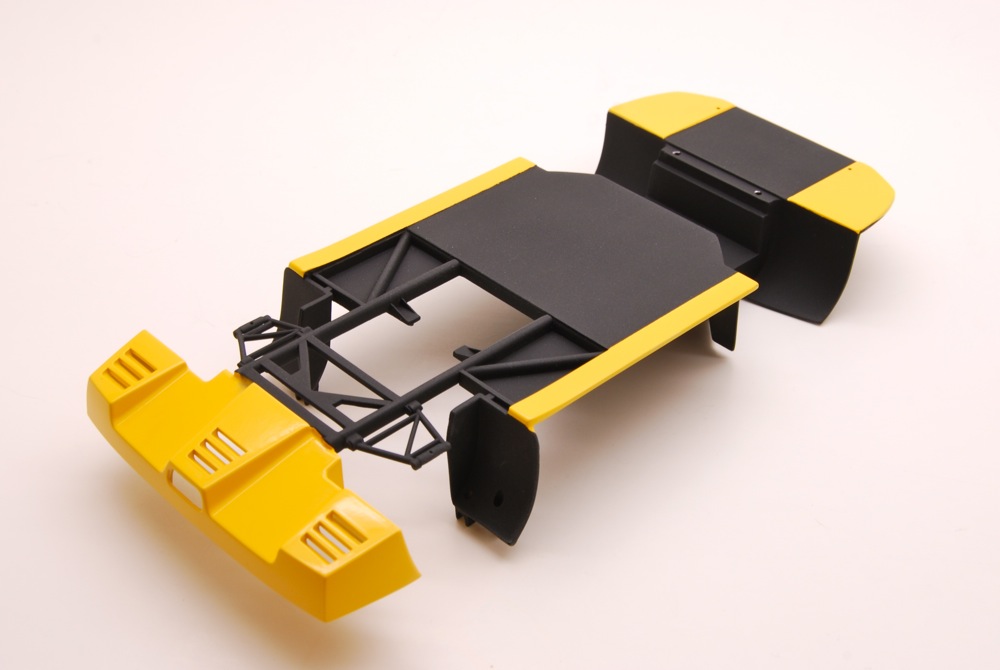
If you are familiar with the kit, you know that rear bodywork is a very ill fit, and requires a bit of massaging to fit right. In fact, even after cleaning the parts and removing all of the imperfections, it was still fitting pretty bad. |
 |
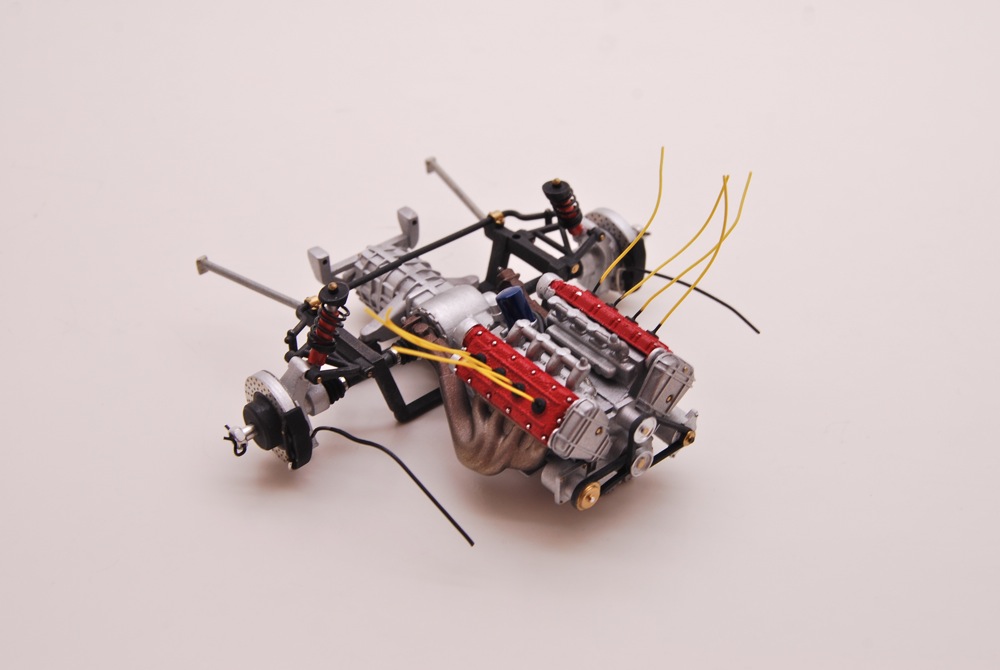
Rear suspension was also assembled, and installed onto the rear sub-frame together with the engine block and brakes. |
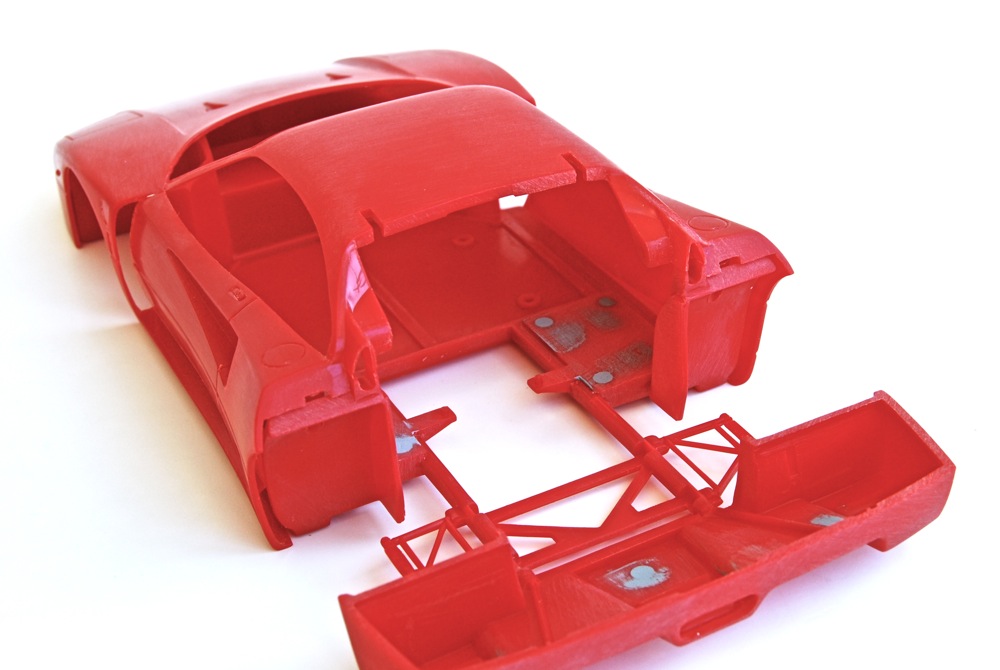 |
I started with some sanding here and there to make the main body fit to the chassis. The fit of the chassis is very important because it will eventually affect the fit of the engine lid. The problem lied in the rear wheel arches, which were adjusted to make the chassis fit correctly. |
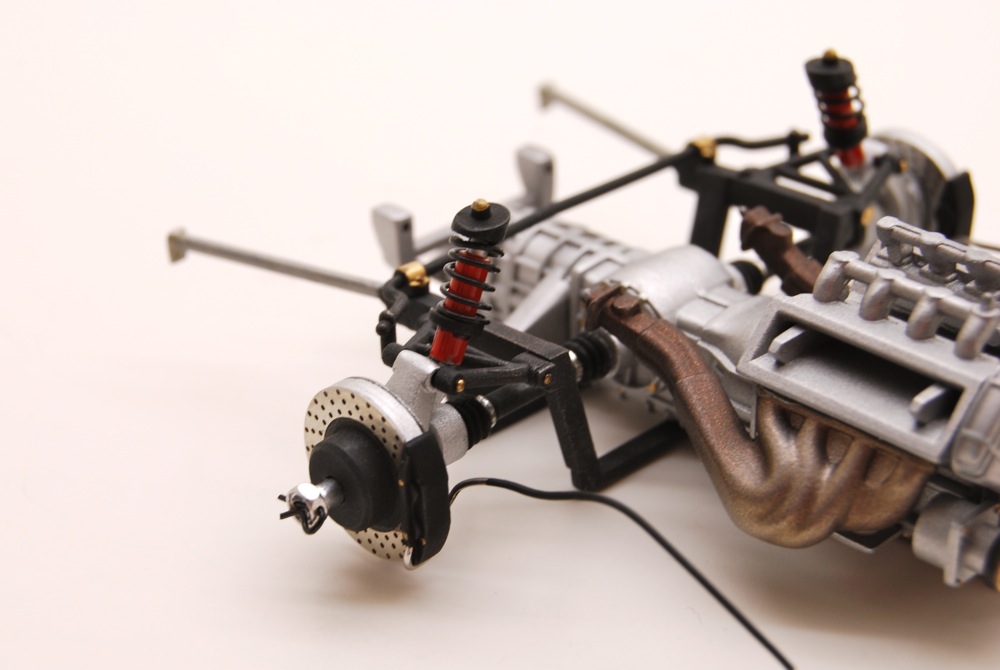 |
For some reason, exhaust manifolds didn't line up correctly, and required a bit of massaging to fit right. I blame it on an old kit tool. |
 |
Finally, the lid was sanded and test fitted to the body and chassis. I had to cut and sand the lid here and there, and finally made it to fit right. |
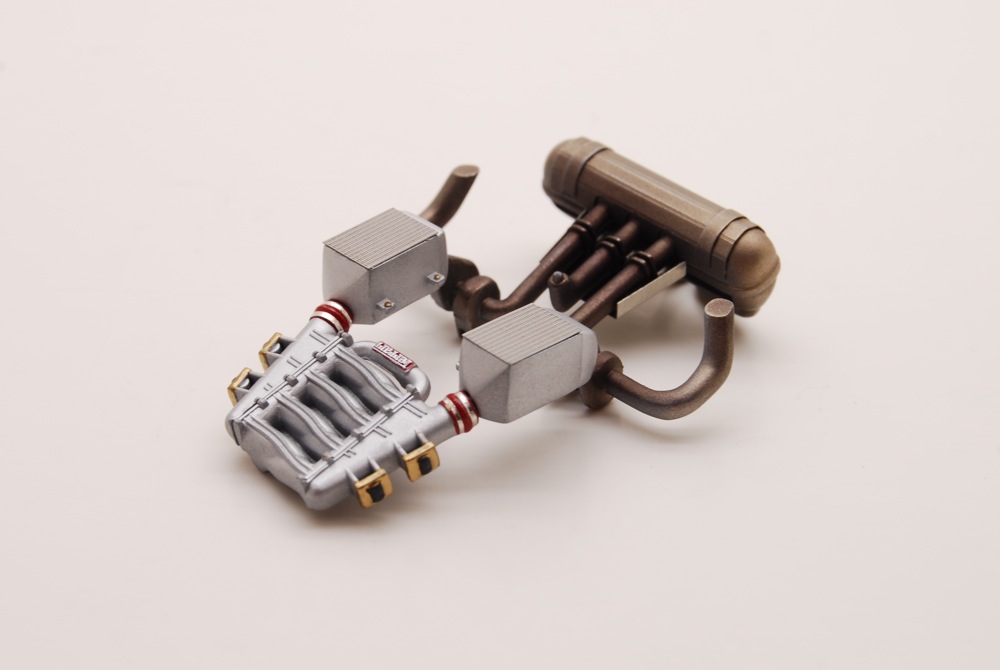 |
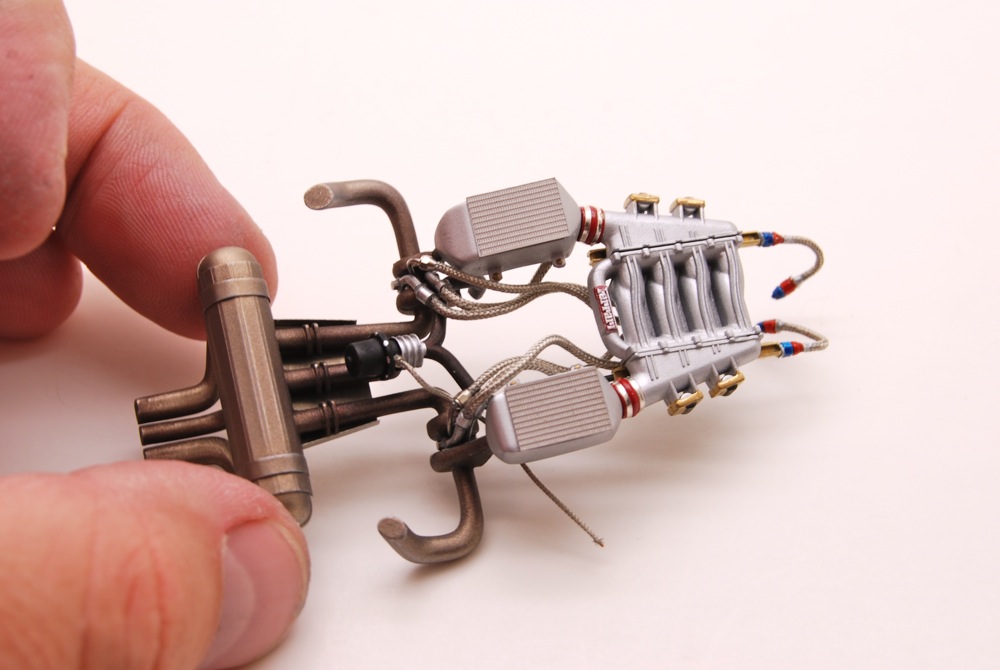
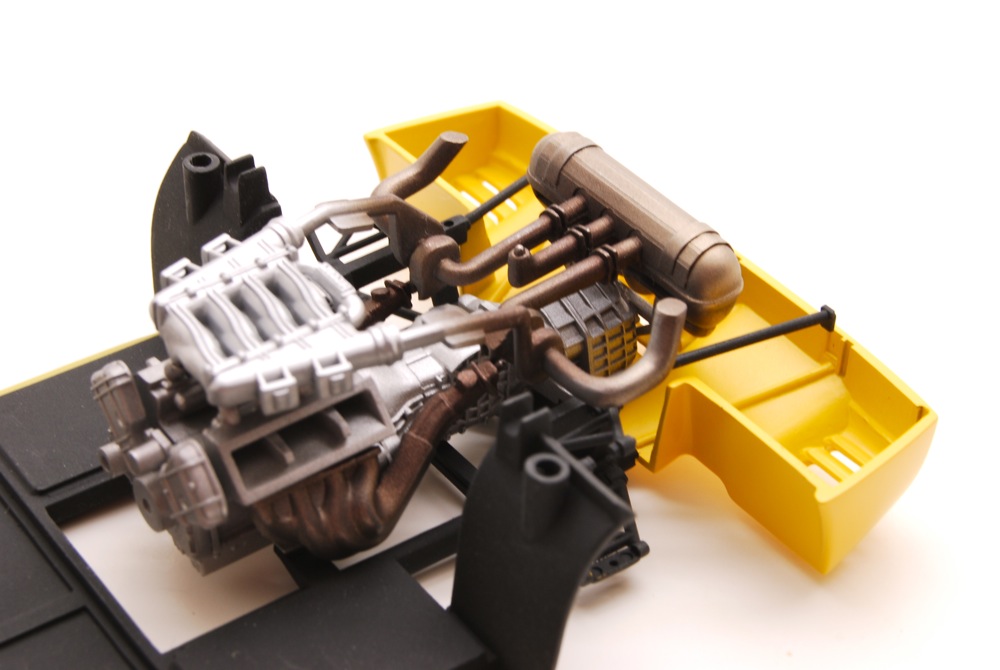
Exhaust was married to the intake assembly with intercoolers. I used S27 P/E pieces for the intercooler mesh, red electric tape with BMF for the clamps, and some careful painting and highlighting for all the little details. |
 |
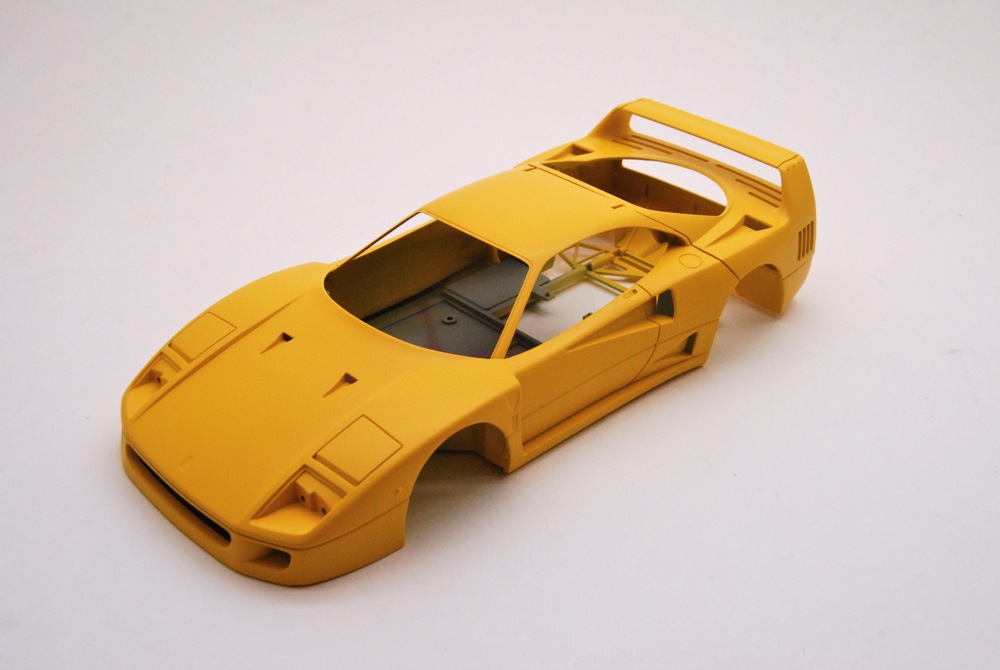
Entire body was lightly sanded and test fitted – I had to heat and bend the lid and body itself in few spots again to make it fit right. This body required the most amount of work I had ever put in a plastic kit body! |
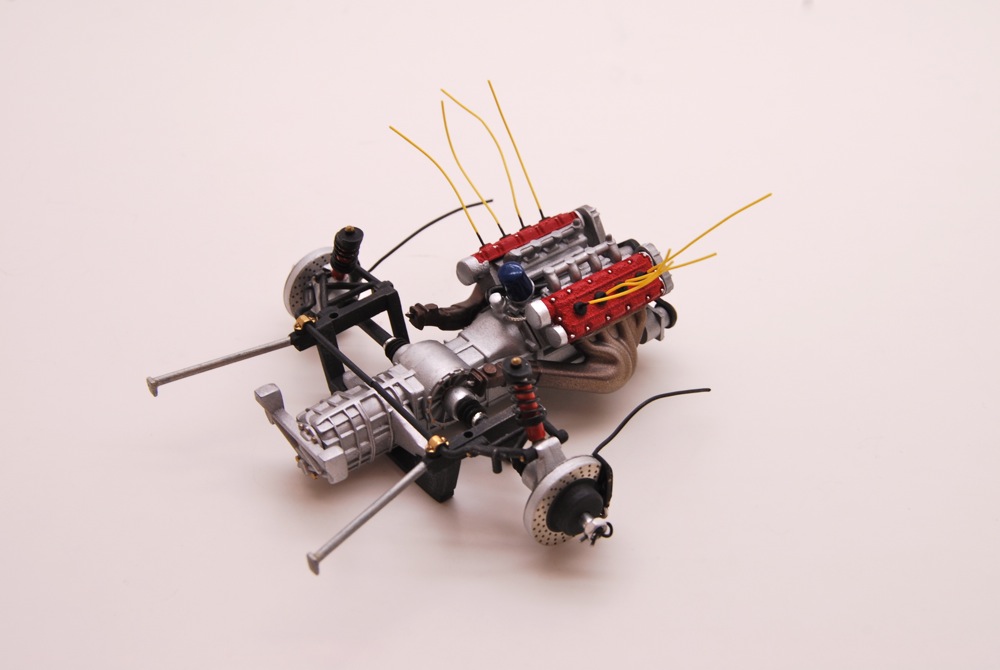 |
Then I started assembling all of the previously finished pieces into one. Cam covers and oil filter were fitted to the block... |
 |
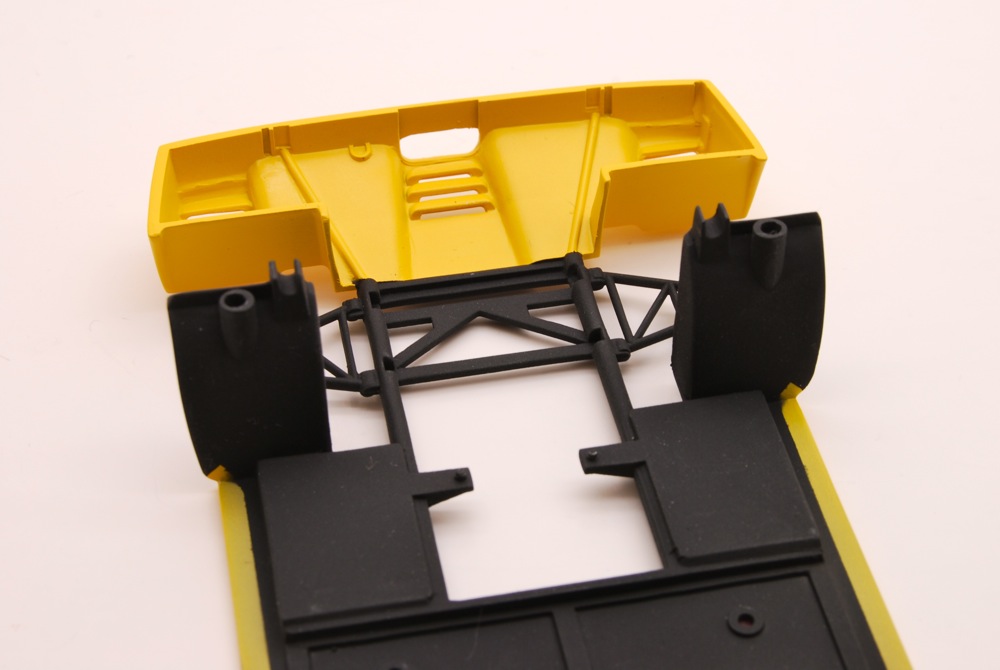
Once the body was more or less corrected in its stock form, I decided to fix couple of things that were just incorrect and annoying. Additional engine cooling ducts behind the rear windows are part of the body on the real car, but given as part of the window in the kit. |
 |
...front cover with pulleys and belts was detail painted and glued to the block. |
 |
So, both sides of the body were extended with sheet styrene and carefully puttied and sanded to make a smooth transition. The real cars' ducts are a bit curved, but I decided not to replicate that curve, simply because it won’t be really visible on the model anyway. |
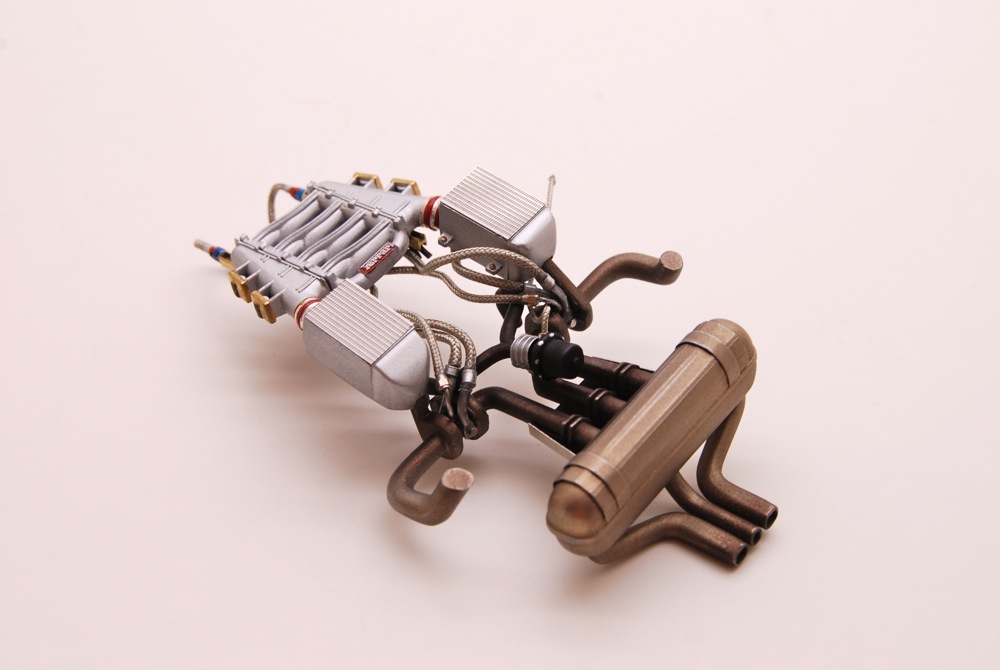 |
Turbos were fully plumbed (I used Scale Hardware bolts to attach the braids). I also fitted fuel rails to the lower part of the intake manifold. |
 |
This modification necessitated changes to the side windows – the “duct” part was shaved off the windows, and windows were carefully sanded and then polished to restore clarity and get rid of the sand marks. |
 |
All the braided lines and wires were carefully bent and routed to the appropriate places. The biggest problem right now was to make it all fit without major interference from the engine block. |
 |
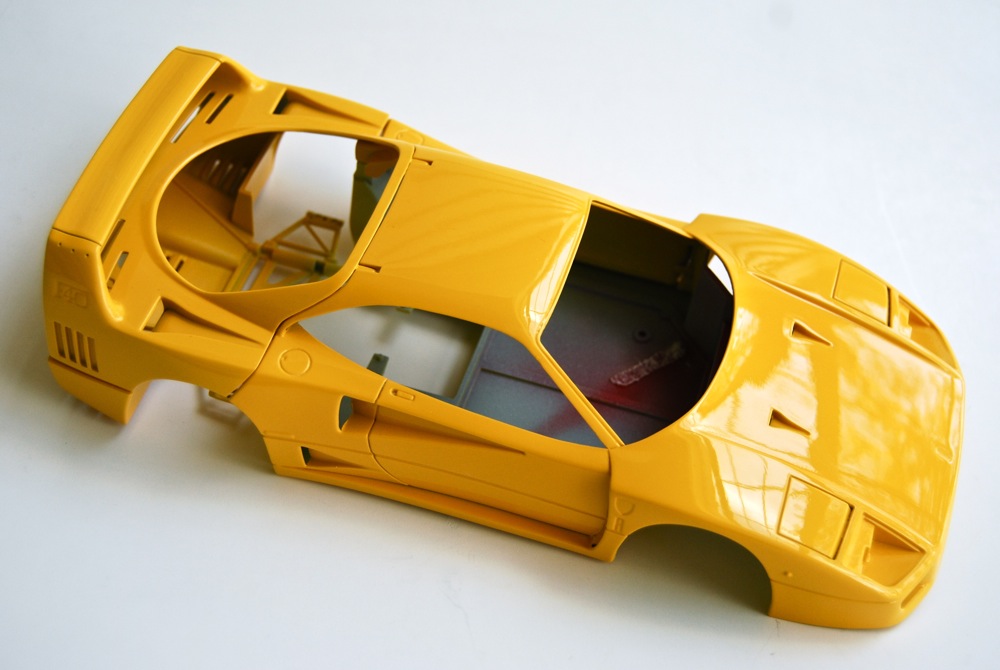
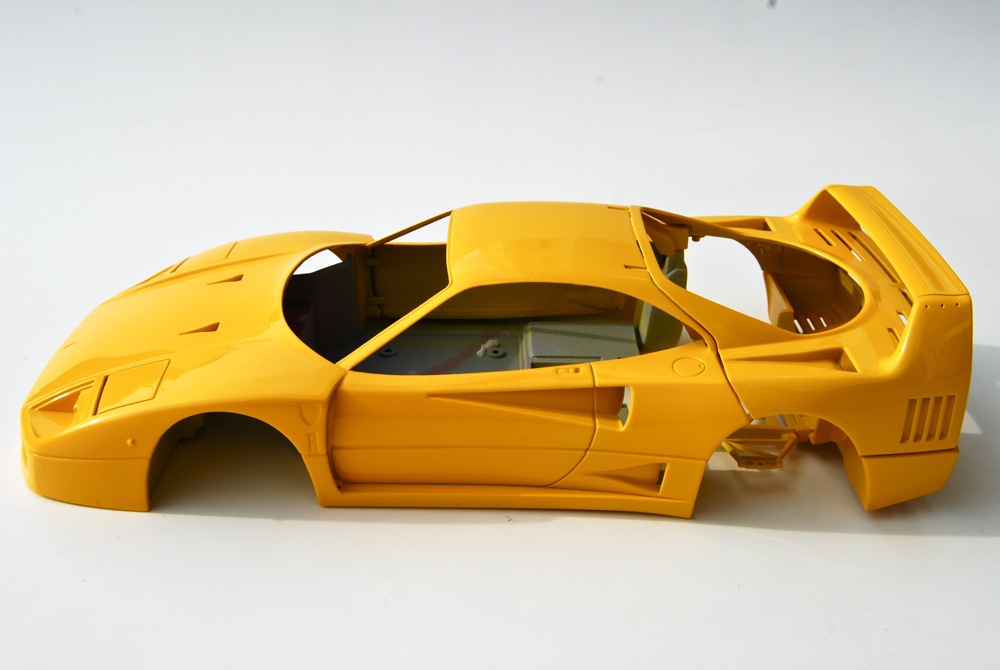
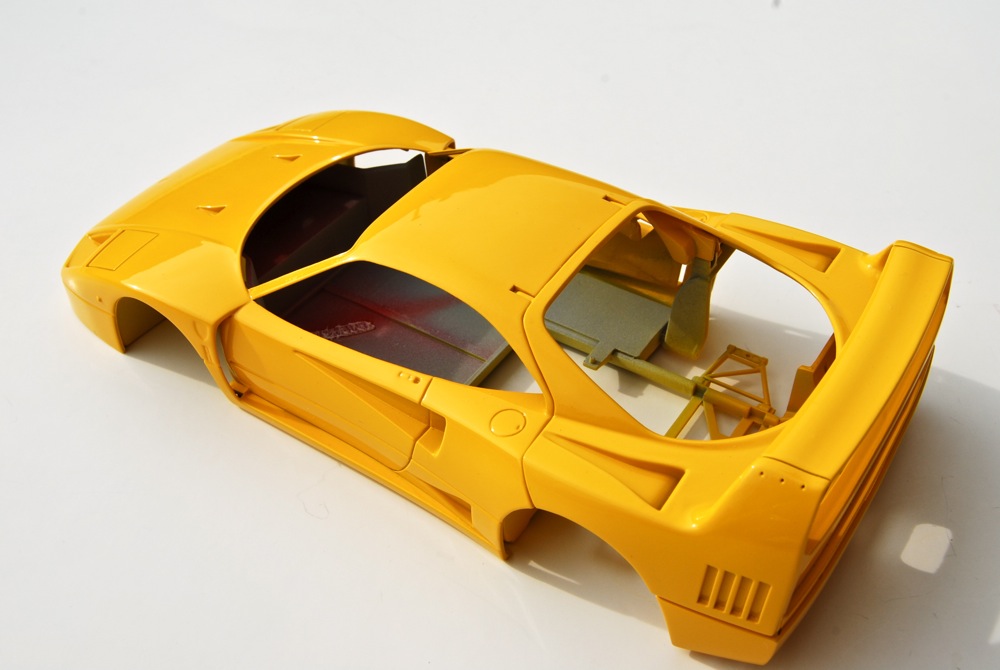
Once the modification was completed, I sprayed a light coat of gray primer to check my work. It looked good so I re-scribed/deepened the panel lines, and followed it with a coat of gray, then coat of white primer over entire body. |
 |
Took a while, but I finally managed it. Braids were routed to the intercoolers and engine block, barely leaving any room to actually glue the intake to the engine. Luckily, exhaust lined up without major problems. |
 |
All F40s left the factory in Maranello painted red. Several were repainted by their owners later, and this model was destined to be painted Giallo Modena. First I painted all internal crevices and inside of the body. Most of these areas will be covered with Kevlar decals later. |
 |
Fuel rails were plumped to the engine, and spark plug wires routed and attached to the coil packs. I used thin wire insulation to replicate the boots on plug wires. |
 |
Then I painted the rest of the body. I used Zero paints, and their Giallo Modena base coat is wonderful and covers really well. I had to wet-sand couple of imperfections, but additional coats blended really well.
|
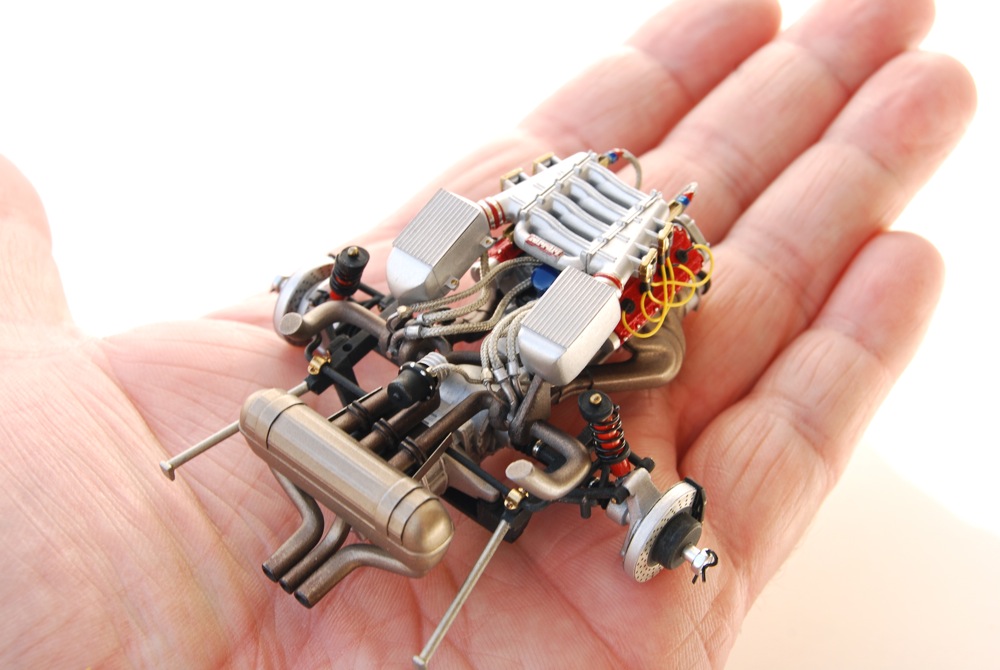 |
Finally, the engine was mostly completed (still missing airboxes in this picture) and looked great! |
 |
Chassis was also painted, wetsanded, and painted again. You can see the amount of work that went into making all these body parts fit. |
 |
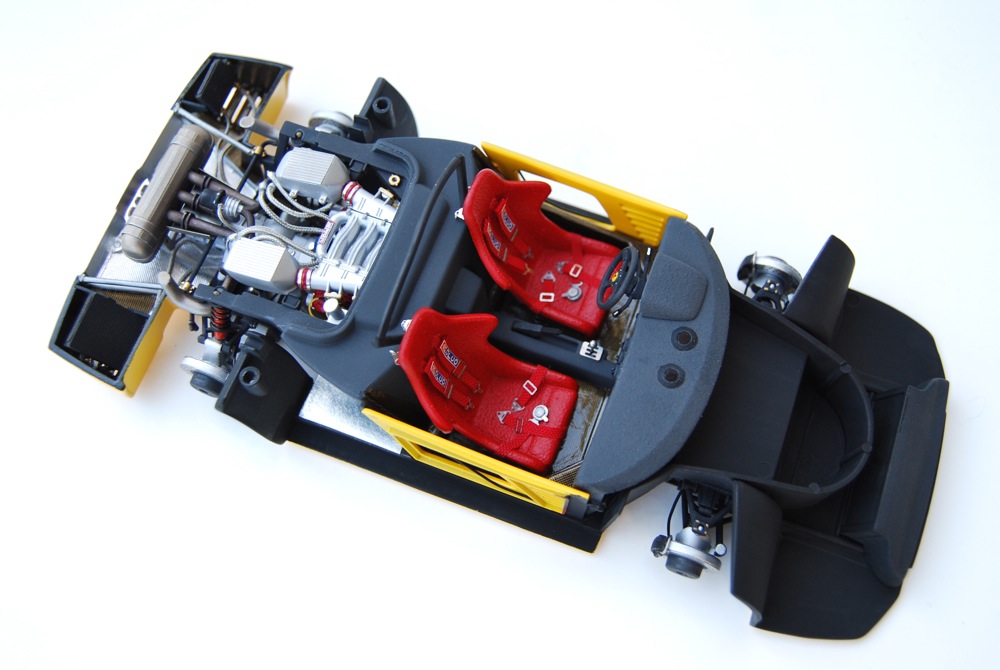
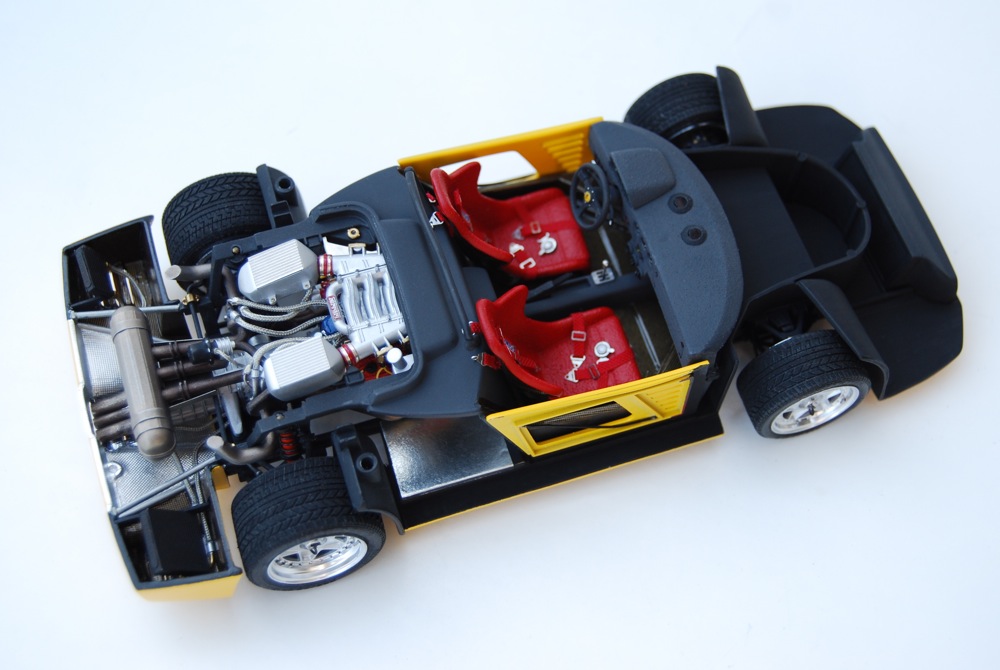
With engine, body, and chassis mostly completed, it was time to move on to the interior. Interior tub was painted black, and covered with SMS Kevlar decals over the period of several long evenings. Then the whole thing was masked off and clearcoated. |
 |
Finally, body was clearcoated with Zero paints pre-mixed clearcoat. For some reason (probably too much thinner in this batch) it cured rather heavily textured. I decided to add another coat to make sure I have enough thickness for polishing. |
 |
Then it was masked again, and firewall was painted flat gray from a slight distance to give it a bit of texture (real car has this part covered with some kind of carpeting/felt material). |
 |
Body was polished with 3M polishing compound, followed by Tamiya Fine compound and that took care of all the texture and made the body really nice and smooth. |
 |
Seat backs were also covered with Kevlar decals, and Crazy Modeler racing harness set was used to make the harnesses for both seats. I also fashioned some hooks from thin wire to hook them up to the interior firewall. |
 |
Finally, body shell was washed, and waxed with Last Detail’s Treatment model wax. |
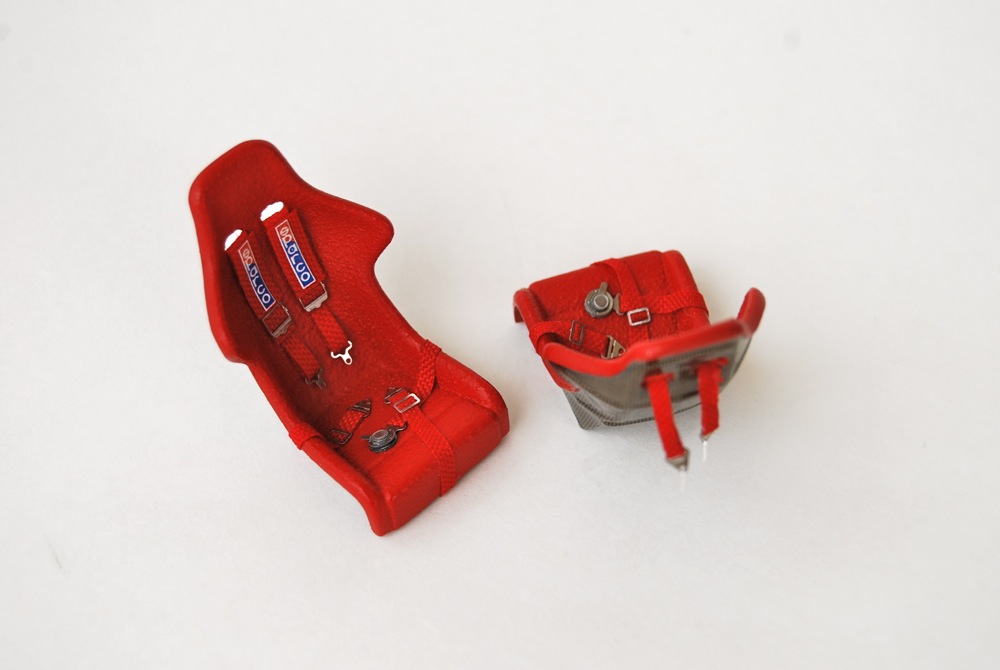 |
Better look at the harnesses. I used ribbon from Hobby Lobby, and belt decals were included with the photoetched set. Aside from painfully complicated assembly, I liked the set, It looks really good when done. |
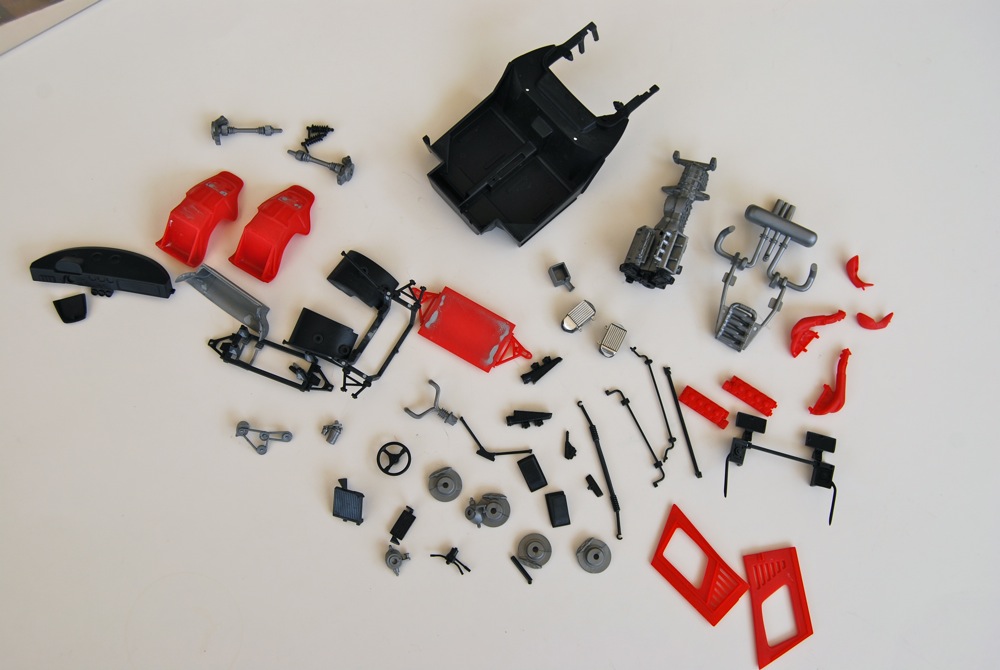 |
Before proceeding with assembly, I have separated most of the parts, and removed all mold lines and tiny imperfections from them. I also pre-drilled necessary holes, etc |
 |
All glass parts were masked, painted, and detailed. I used photoetched frames from Studio 27 set for the side windows. |
 |
Sink marks were filled with Tamiya putty, and sanded smooth. Amount of pin and sink marks is really high for Tamiya kit, and here is where the age of the mold really shows. Took a while to clean and fill all these. |
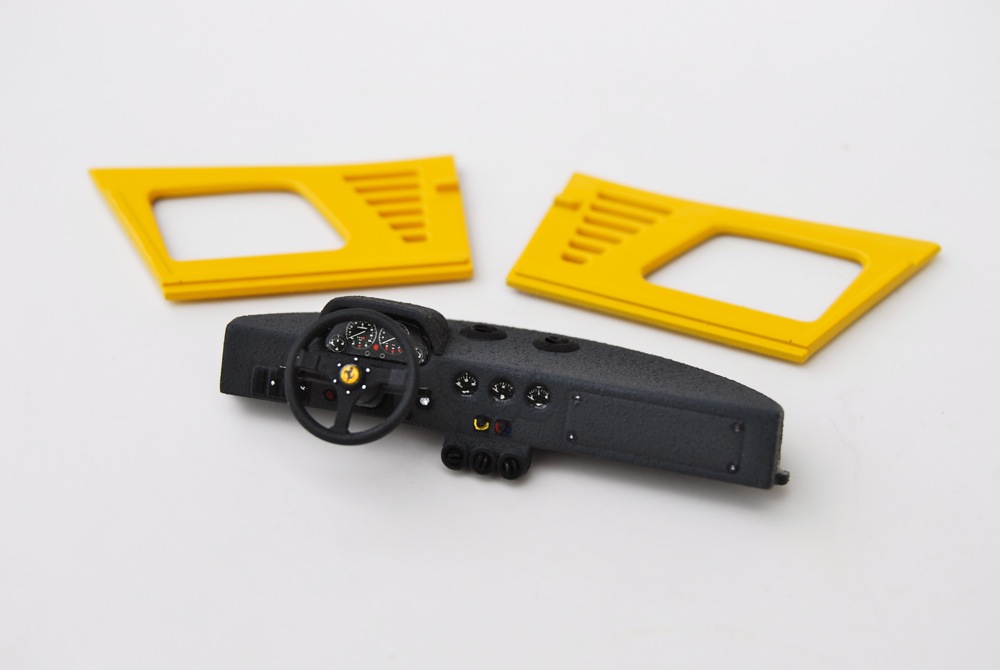 |
Dashboard was painted, detailed, and assembled. I drilled out air vents and replaced them with some scratchbuilt plastic pieces. Door panels were painted to match the body, and clearcoated. |
 |
To replicate texture on the seats, dashboard and cam covers, I used textured paint from Rust Oleum (fine grade). The texture is especially convincing on the cam covers - they look exactly like cast iron covers on the real car! |
 |
Rear bumper/tray was covered with some SMS Kevlar decals, clearcoated with Future, then detailed with MFH self-adhesive heat shielding material. The beauty of this heat shield is that it conforms to curved surfaces so well! Took a while though. |
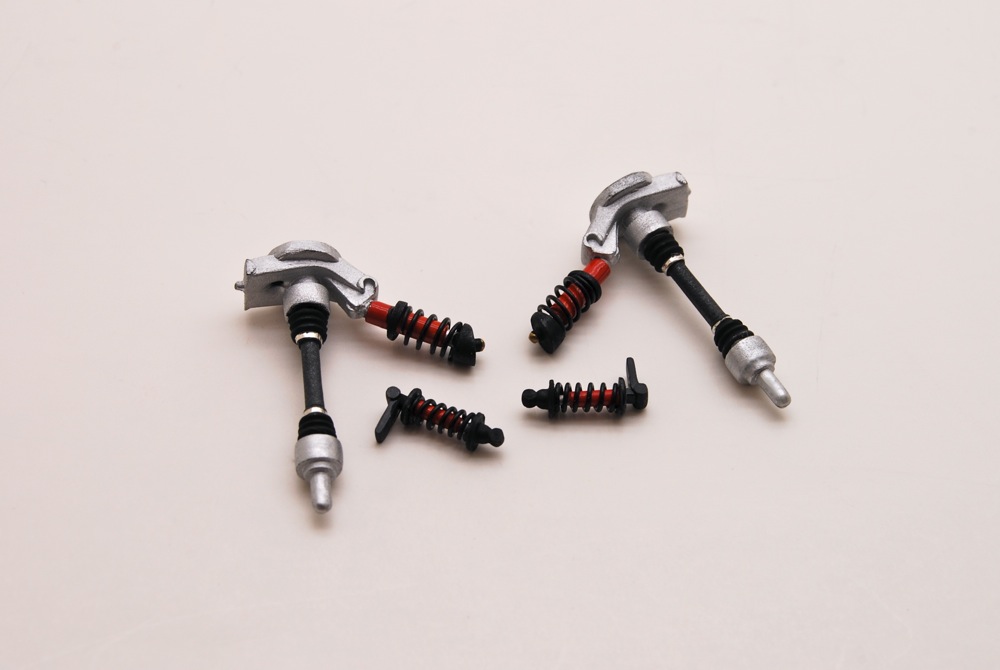 |
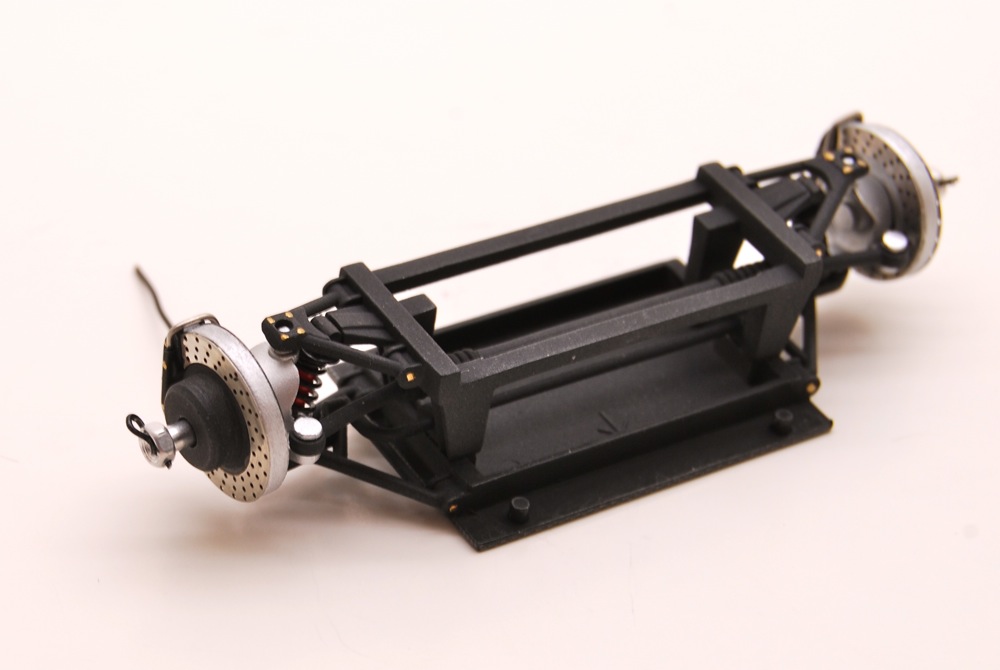
Shock absorbers were cut, springs replaced with metal springs made out of Radio Shack black coated wire (great for this purpose), and absorbers themselves were made out of aluminum tubing of suitable diameter. I used plastic hats from kit shocks. |
 |
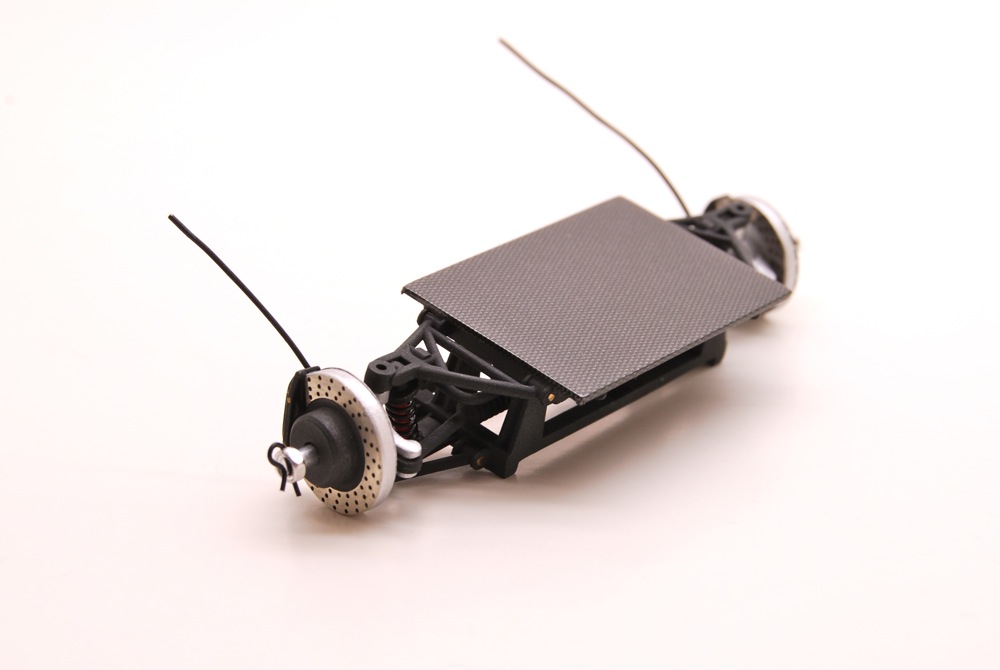
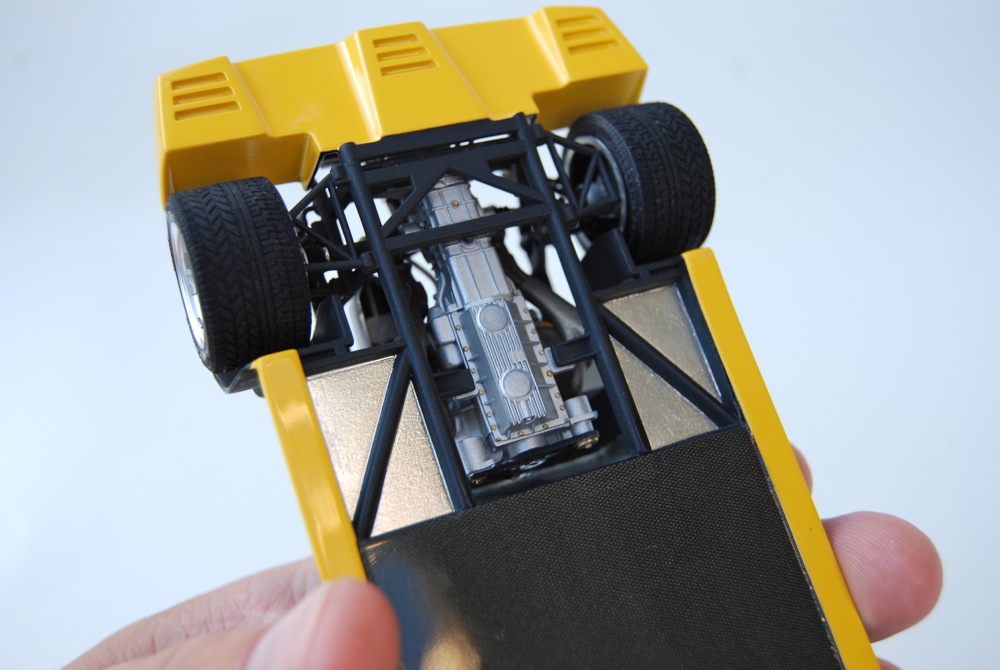
Chassis underside was decaled with SMS carbon fiber and clearcoated. Front suspension was glued to the chassis, and I also added some aluminum BMF to replicate fuel tanks at the back of the plate. |
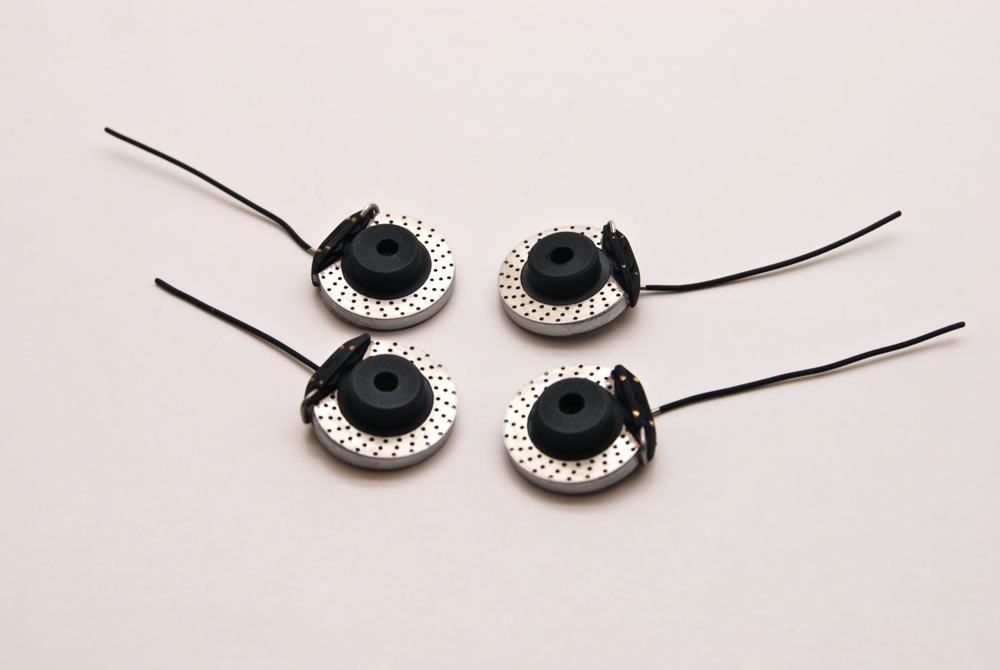 |
Brakes were detailed with photoetched faces from Studio 27 set, and I also drilled the calipers and attached brake lines made out of coated wire. |
 |
Wheels were fitted with air valves, weights, and tires, that I previously lightly sanded as shown in my Tire Tutorial. |
 |
The nut that secures the wheel on the real car has a pin that holds it in place. Tamiya provides these nuts as one piece with wheel shaft. To replicate the pin on the model, I drilled a tiny hole in the nut... |
 |
Radiator and oil cooler were plumbed using various Sakatsu fittings, ProTech braided lines, and some scratchbuilt fittings. Photoetched name plates are from Studio 27 set. |
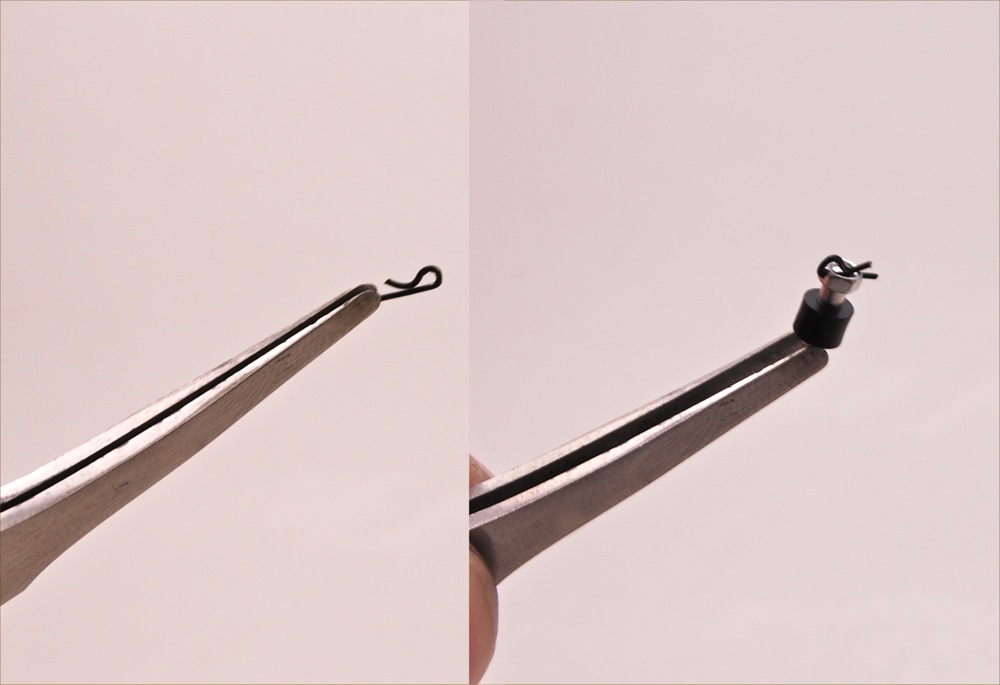 |
..then made a pin from black coated wire. While not quite the same as on the real car, it looks a lot better than plain nut without the pin. |
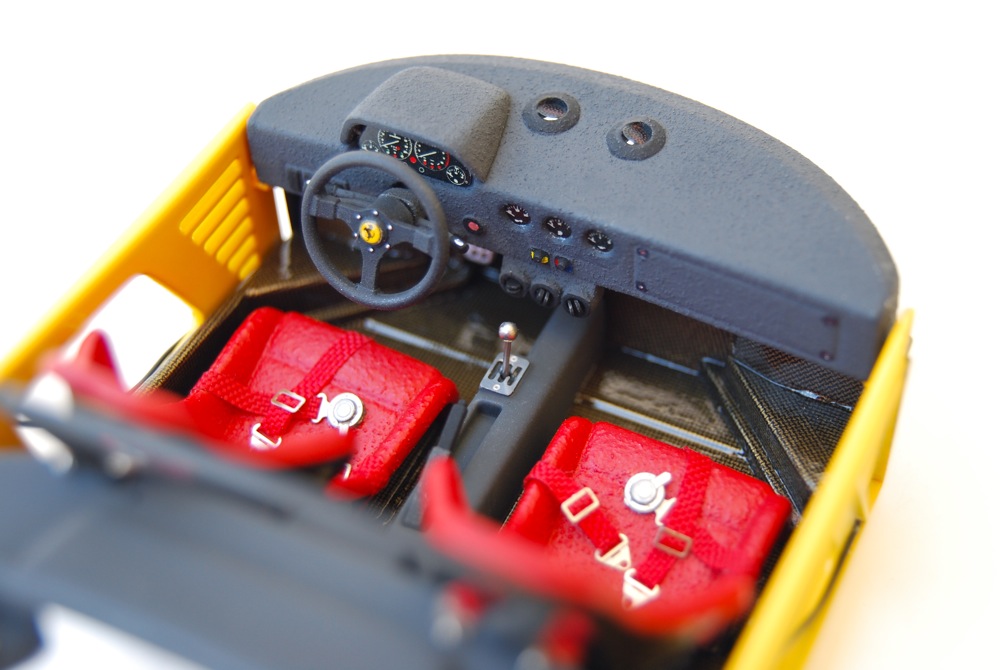 |
Interior was carefully assembled, and detail painted. Few photoetched goodies were added from S27 set, shifter was made from solder, door pulls from thin black coated wire. |
 |
After repeating the procedure 4 times, I had four pins, four nuts, four disks - the brakes were ready to install on the chassis. |
 |
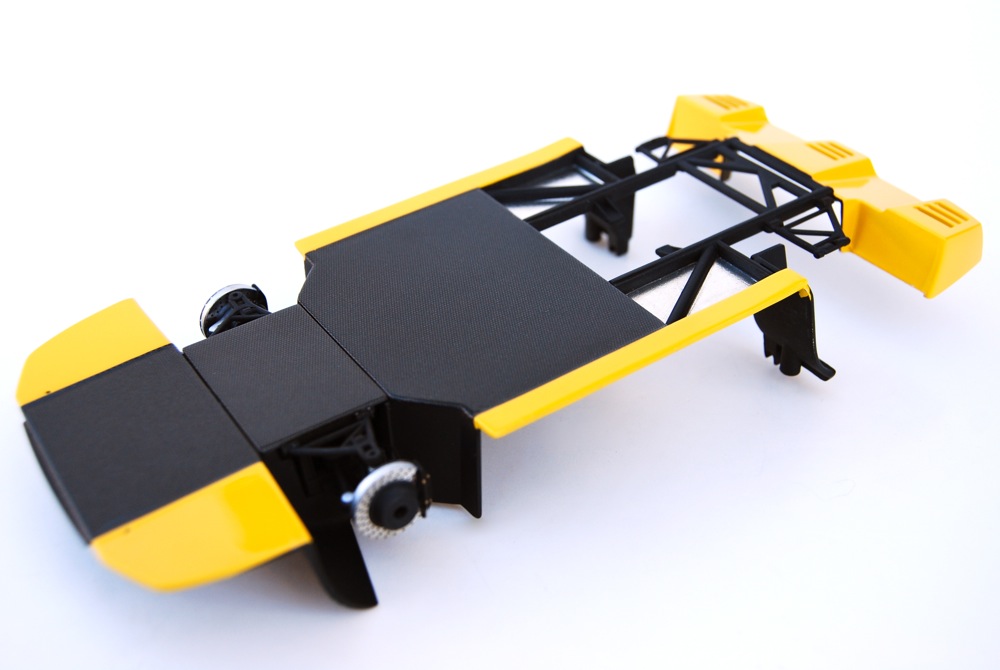
Then finally, chassis, suspension, engine, and interior were put together. Let me tell you, even though it is a Tamiya kit, the fit was less than perfect and took a fair share of curse words to pull this one off. |
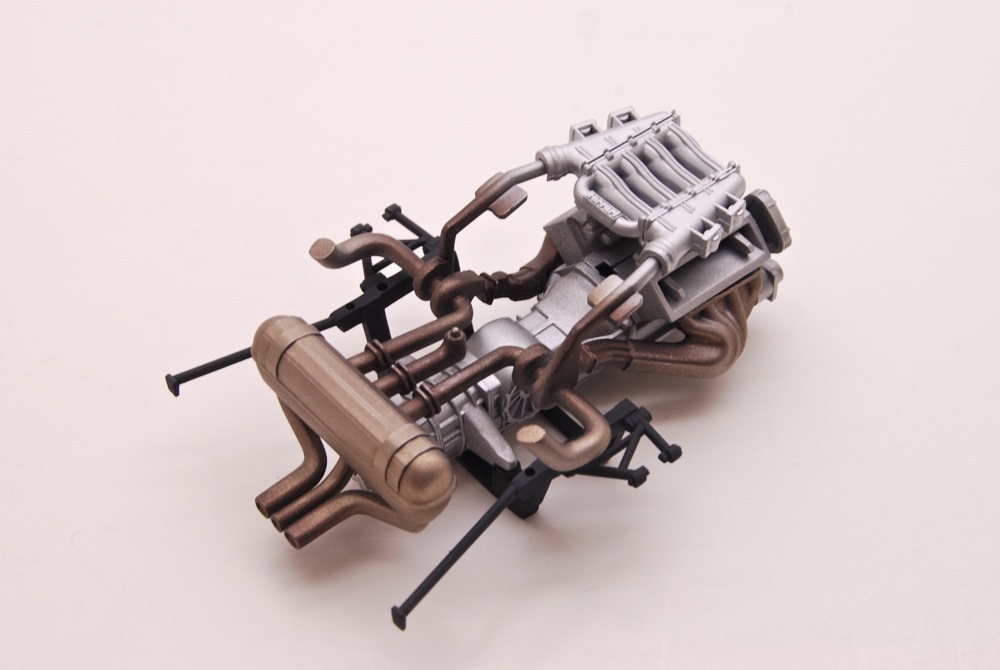 |
Then I continued with my favorite part - the engine of the beast. Block was put together, filled, sanded, primed and painted Model Master Aluminum metalizer, then buffed. Exhaust system was fitted with S27 P/E shield, then painted with various MM metalizers, then also buffed. |
 |
But the end result looks great - now I had to make sure all this would fit into the body, and have correct stance too! |
 |
Chassis plate was carefully masked, and black portions of were painted with Tamiya acrylic flat black. |
 |
Radiators and oil cooler were installed and plumbed to the engine before engine installation. I had to test fit them several times to make sure they will clear the engine lid and let it fully close after the model is assembled. |
 |
The insides of the chassis were also carefully painted since parts of it will be visible after assembly. Rear bumper/tray was not painted since it will receive heat shielding/carbon kevlar treatment later. |
 |
Wheels were fitted to the model - the chassis was ready to be installed into the body. |
 |
Engine was test fitted to he chassis to make sure it fits properly. Trimming after decals are applied and sealed is very risky proposition. |
 |
Engine block was also detail painted and lightly weathered on the other side. |
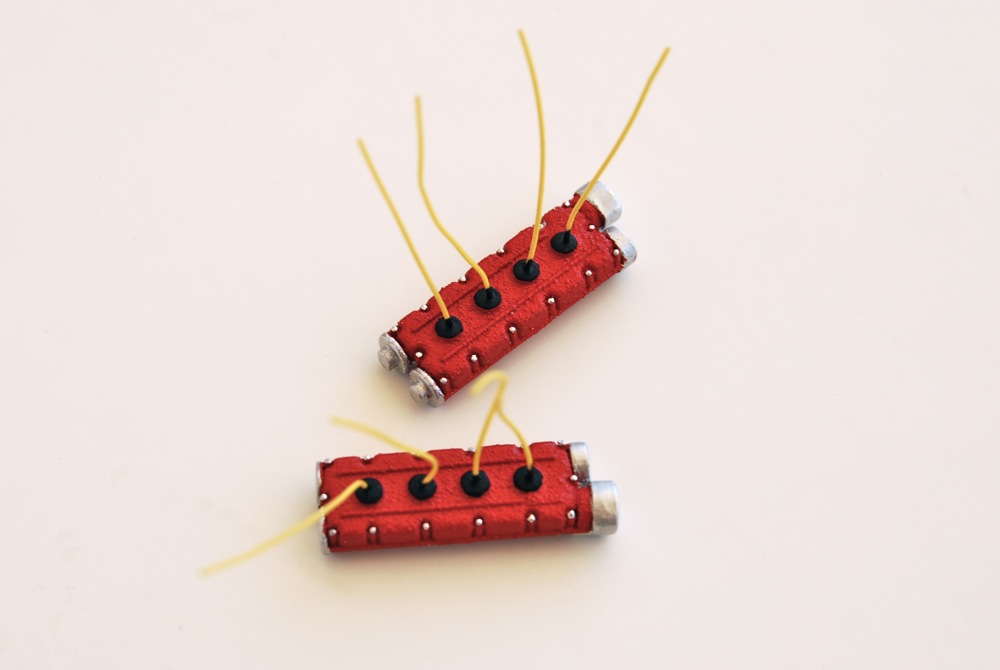 |
Cam covers were painted red, wired and detail painted, This picture shows the awesome texture from Rust Oleum paint very well. |
 |
Firewall was fitted with some heat shielding on the engine side. |
 |
I wanted to add some more detail to the engine and decided to fully plumb the turbos, etc. Used various ProTech braids, Sakatsu fittings, scratchbuilt fuel rails, and some additional plumbing on oil and turbo hardware. Clamps are made with BMF. |
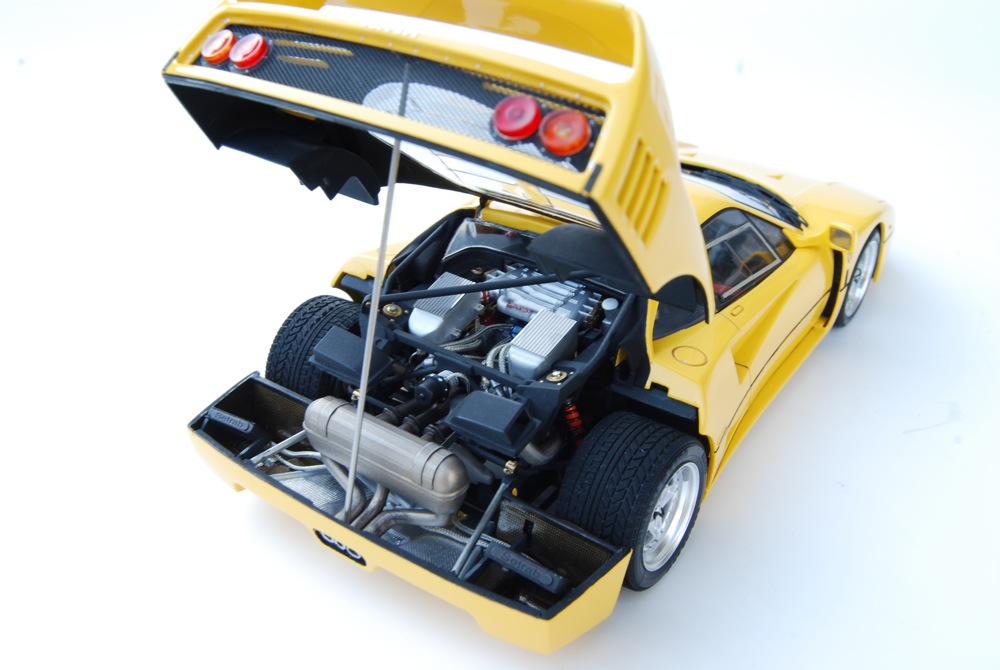 |
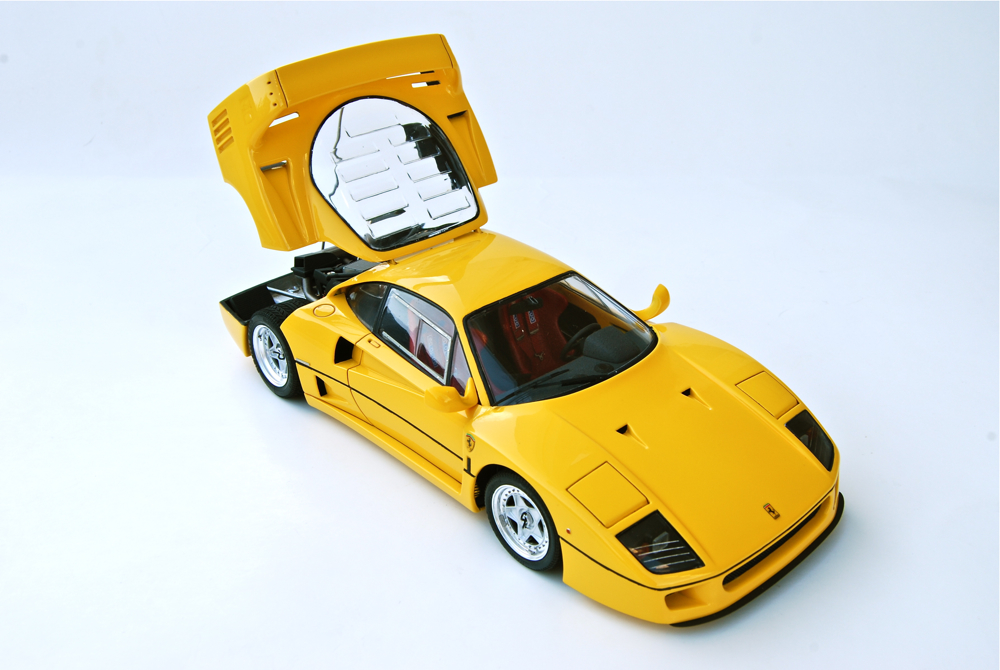
Finally, windows were glued in, headliner decaled with Kevlar, and chassis inserted into the body. Luckily there were no fitment problems. I then added the airboxes, engine lid (rear mesh is from Acu-Stion set) and carefully waxed the model. |
Copyright 2009, 2010 Alex Kustov. No copying or reproduction in any shape or form without written permission of the author.