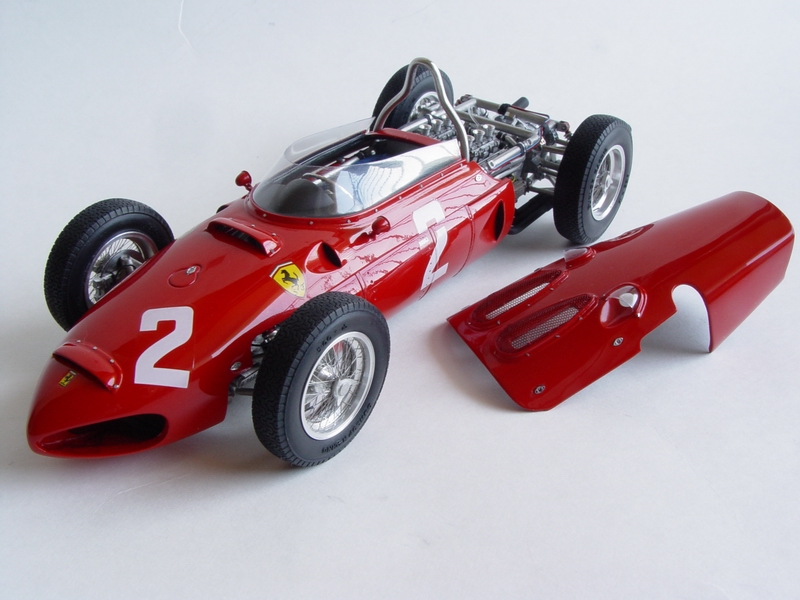
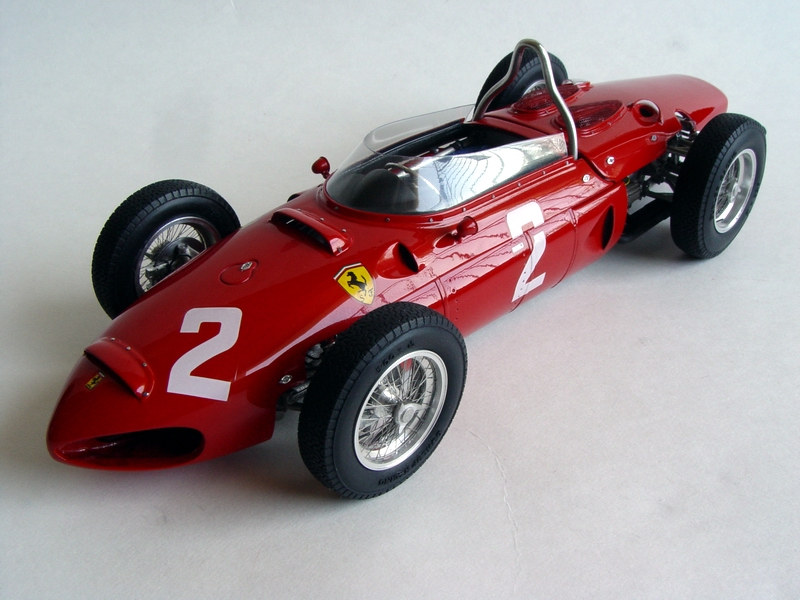
F e r r a r i F156 "Sharknose" 1961 Monza GP winner
 |
 |
 |
 |
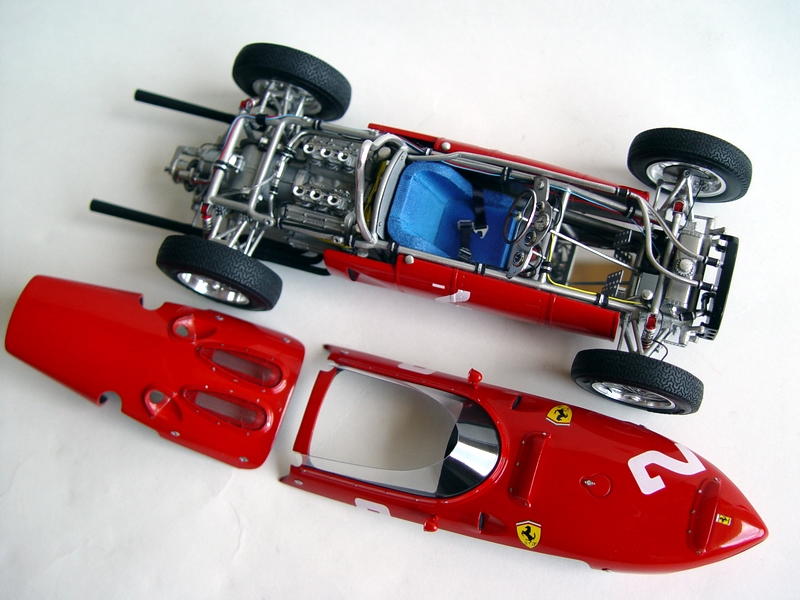
Kit: 1/20 Model Factory Hiro Ferrari F156 "Sharknose", kit # MFHK032 Pros: White metal body is very accurate and nicely cast. Fit is mostly good, and every little rivet is faithfully reproduced. Frame is as close to the real thing as it can be in a 1/20 scale model. Great wheels and tires. White metal engine is a work of art - very detailed! Detailed suspension and chassis - every single fuel, oil, and water line is recreated in white metal. Photoetched parts are made from very thin sheet of soft metal, and will pose no problem with their removal. Engraving is top-notch too. Great instructions with excellent color guide. Decals provided for four different cars that run at 1961 Monza Grand Prix. Decals are very nice, with almost no clear film around the images, and very well registered. As usual, Hiro decals are very opaque, and respond well to setting solutions. Cons: Price, complexity, availability. White metal parts cleanup is very complicated and time consuming. Quite a bit of mold lines and other molding defects in small parts. Some minor fit issues. Several important parts are missing (battery, water tank, etc), and the model is inaccurate in some areas. Verdict: Despite some shortcomings, the kit is breathtaking! Once again Hiro Model Factory done an outstanding job in recreating very significant F1 Ferrari, the famous "Sharknose". The kit could be built into amazing replica, but not recommended for beginners, mostly due to its complexity. |
 |
 |
 |
 |
|
 |
 |
 |
 |
Buildup
This buildup was also published in Contest Cars Scale Auto Special Issue, Spring 2003-2004, Red-Hot White-Metal Racecar
 |
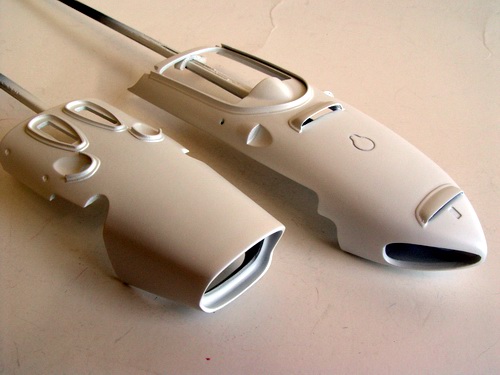
The biggest disadvantage of white metal body, is that parts require a lot of prep work before paint can be applied. Although moldings were relatively clean, it still took a while to clean and block-sand the body panels. After the surface was prepared to my liking, I sprayed a coat of Tamiya etching primer, and then a coat of Tamiya Gray primer. |
|
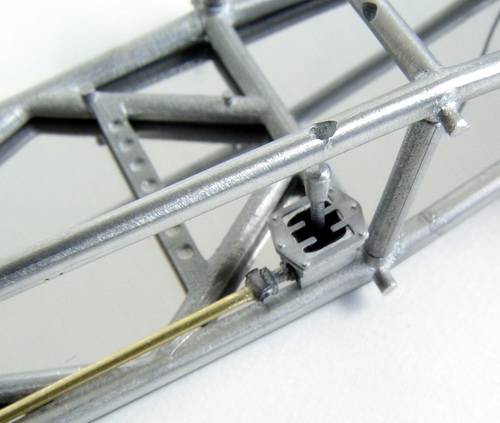
Metal gearshift body was installed on the lower frame, together with the shifter, and photoetched gate. I also used thin brass rod for the shifter linkage. |
 |
After fixing some minor imperfections, I sprayed a coat of Tamiya white sandable primer, and when it completely dried, I wet-sanded it smooth with 2000 grit sandpaper. |
|
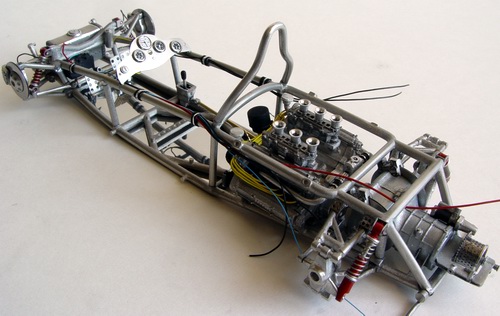
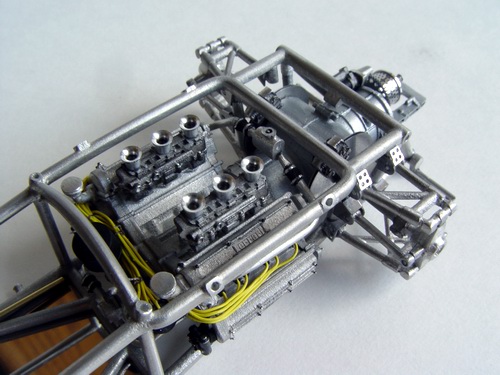
On this picture you can see entire chassis with both front and rear suspensions almost completed, and engine installed. One of the advantages of this kit being all white metal is a very natural "metal" look - with proper detailing it looks quite real! |
 |
Then three mist coats and two wet coats of Tamiya TS-8 Italian Red were sprayed on the body through the airbrush. After paint cured, I polished the paint with Tamiya polishing compound to remove light paint texture, and polished it to a high shine with Treatment's Last Detail model wax. |
|
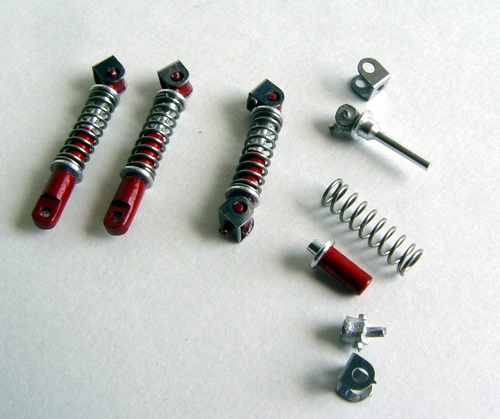
Shock absorbers are a work of art! Each absorber is assembled from 6-7 separate parts, and looks extremely realistic. It is crucial to check the length of the shocks during the assembly - front socks are slightly shorter than the rear. |
 |
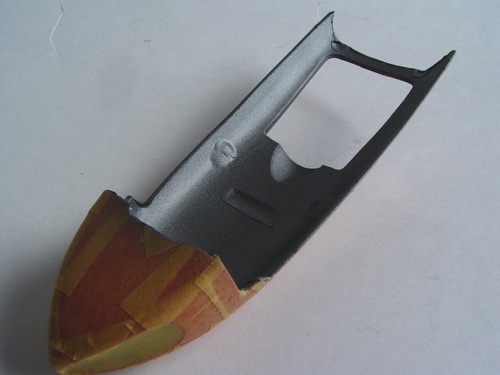
Then front cowl was masked with Tamiya 18mm masking tape. I wanted to spray the insides dark gray metallic and cockpit area with flat black. |
|
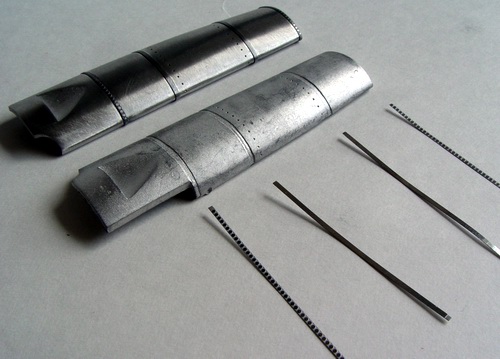
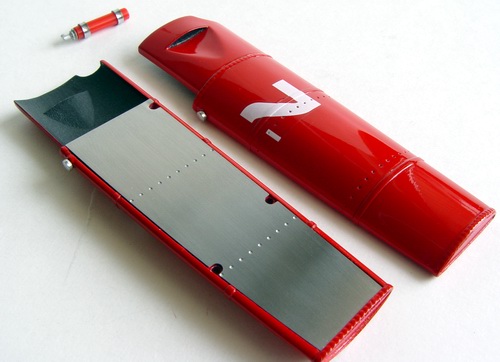
Gas tanks were cleaned and block-sanded. Then I glued tiny photoetched bands - two with rivets, and two plain (these tie down tanks to the frame on the real car). First tank is completed and ready for primer. |
 |
I decided to paint the insides first, so the cockpit area was masked off. After painting, I removed the masks and sprayed cockpit with flat black, allowing some (very little) of the overspray to get on the inside of the cowl, just like on some of the pictures of the real cars back in 1961. |
|
This picture shows chassis with installed front and rear shock absorbers and test-fitted right gas tank. The chassis started to take shape. |
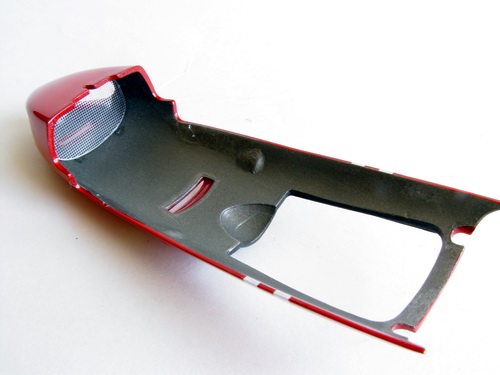 |
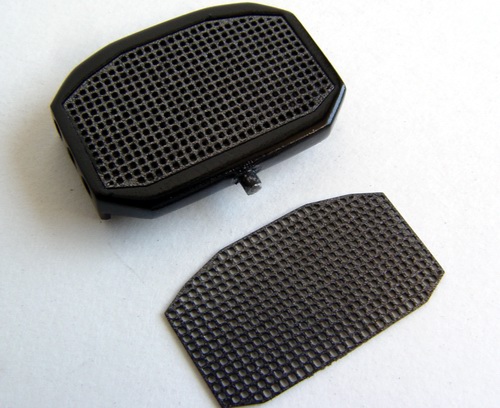
After paint was completely dry, I removed the masks and installed photoetched mesh in the nose of the cowl. Edges of the cowl were touched up, and paint lightly waxed to remove masking tape residue. |
|
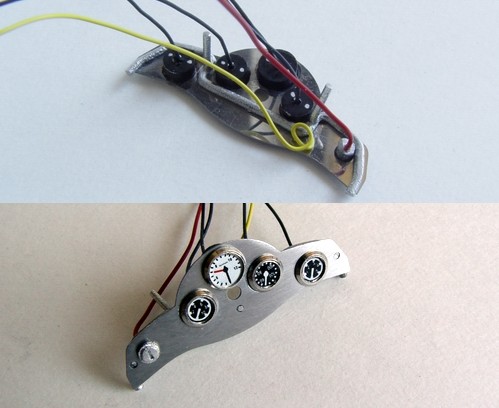
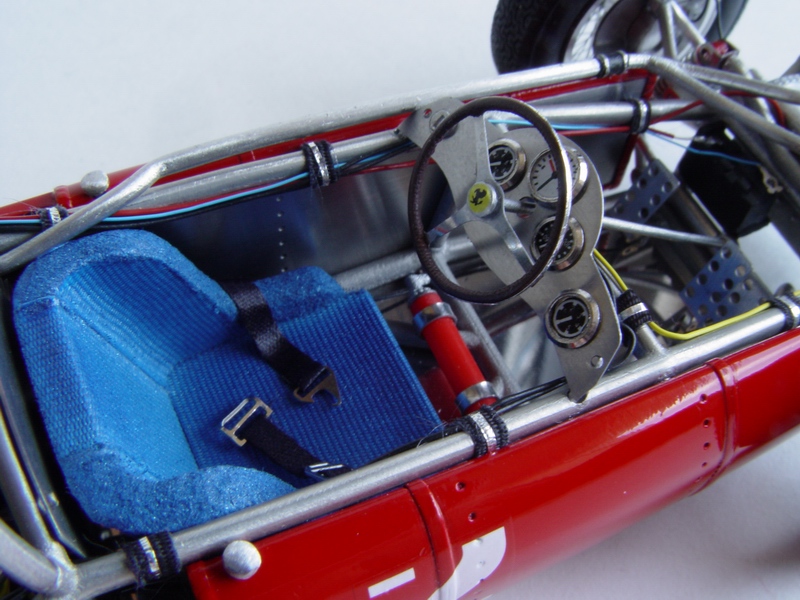
Dashboard was fitted with four turned aluminum instruments, and metal ignition switch. Dashboard was sanded to make it look less shiny, and glued to the dash frame. Instruments were wired with Detail Master wires and detailed with kit decals. |
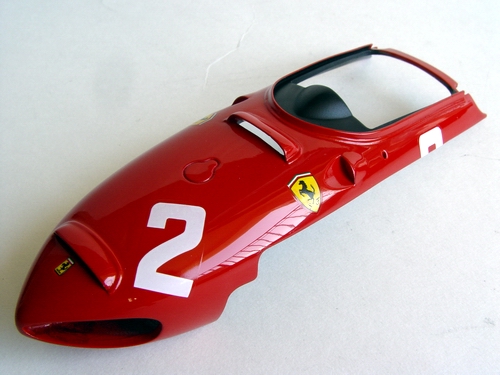 |
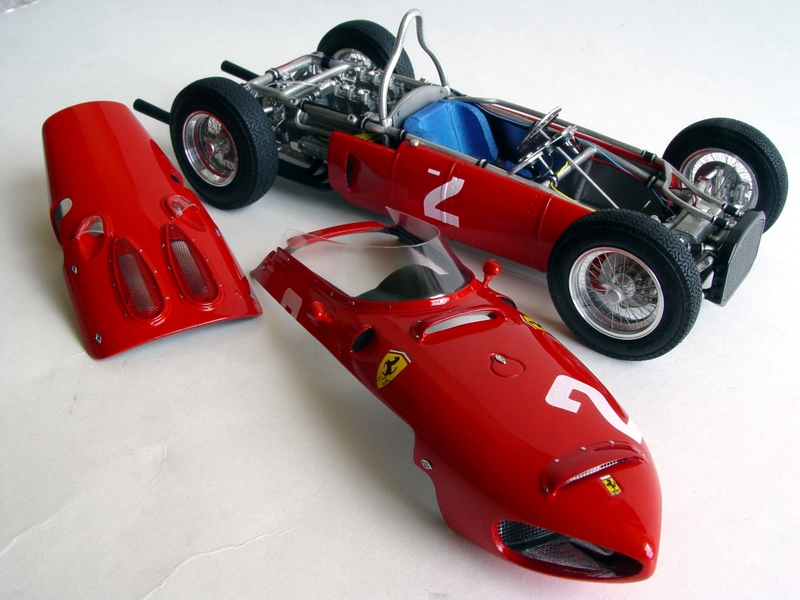
Finally, I applied Phil Hill's chassis #2 decals to the front cowl. Decals are very thin and respond very well to setting solution (Miscrosol). After decals were dry, I waxed them with Last Detail wax for protection. |
|
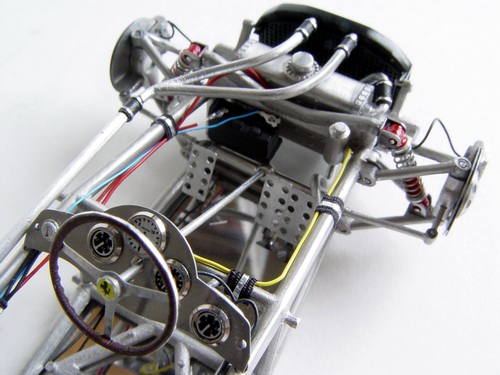
Then I started wiring the chassis. I attached and wired the battery using Detail Master photoetched battery kit, and connected all the instrument wires from the dashboard. Wires were strapped to the frame using tiny strips of electrical tape and clamps made from BMF. |
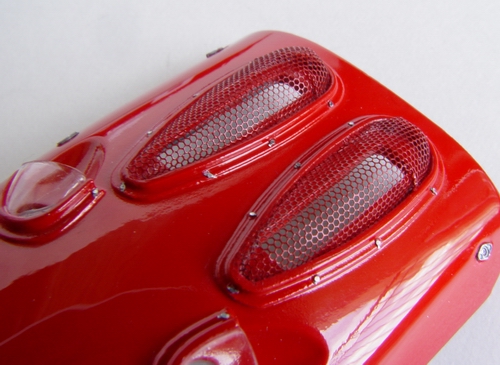 |
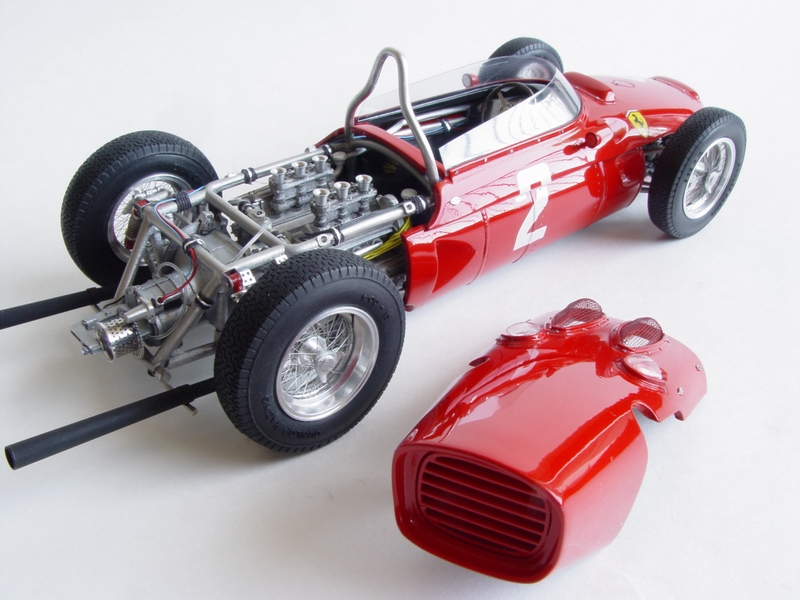
After polishing and waxing paint on the rear cowl, I installed metal mesh on the air intakes (kit provides a tool for shaping intake mesh), clear brake cooling ducts, photoetched rivets, and rear ventilation mesh. |
|
Than I also connected brake lines, assembled and installed photoetched pedals (clutch pedal was also connected to the linkage), oil tank with separate lid, and other small details. |
 |
Rear cowl was also masked and painted with dark gray metallic from the inside. Then I drilled some holes and installed metal rivets that hold both cowls in place on the frame. |
|
Radiator body was drilled for all the hoses, cleaned, sanded, primed and painted semi-gloss black, then fitted with two photoetched mesh parts painted gun metal. |
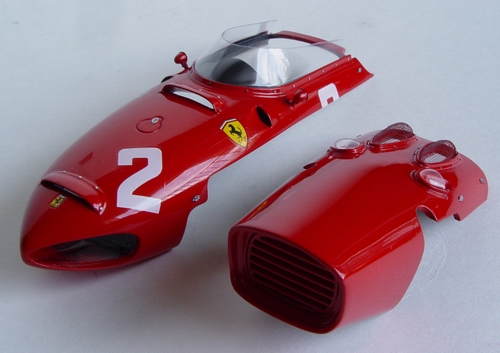 |
Finally I assembled and glued side mirrors with PE faces, installed the windscreen, photoetched rivets and quick-release fasteners, and both cowls were completed. Moving to the chassis and engine. |
|
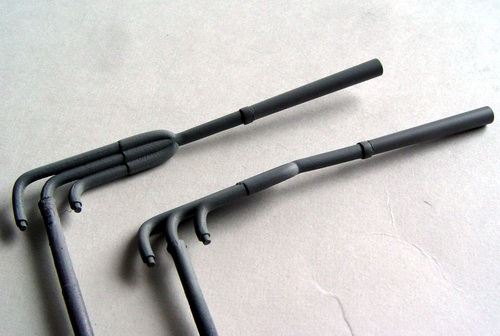
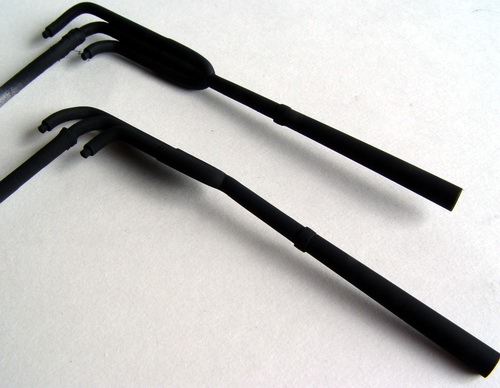
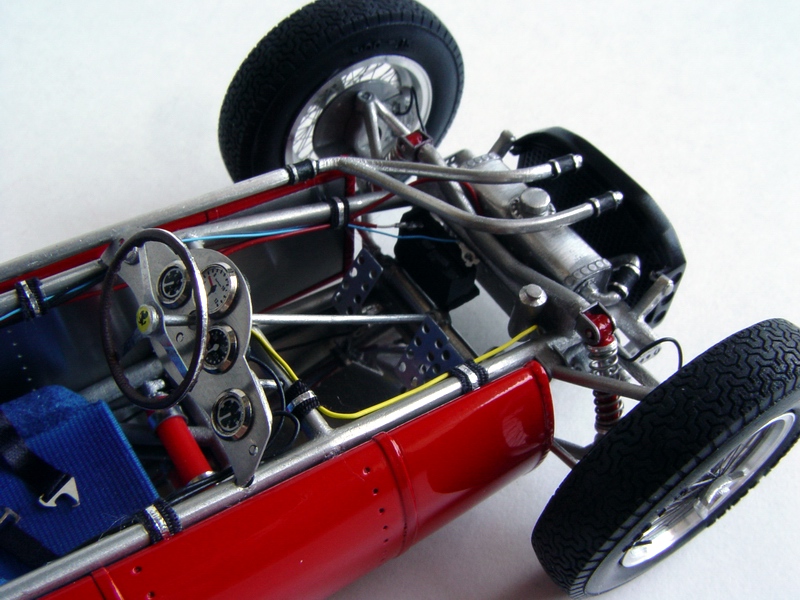
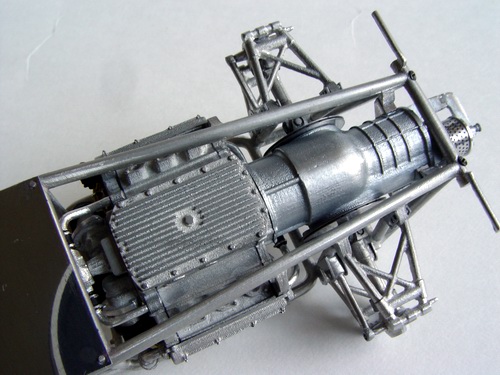
Steering wheel was assembled from several parts, painted flat brown, detailed with BMF (aluminum rim) and glued to the steering rack. I also installed radiator and connected all the water and oil hoses going back and forth to radiator and oil tank. |
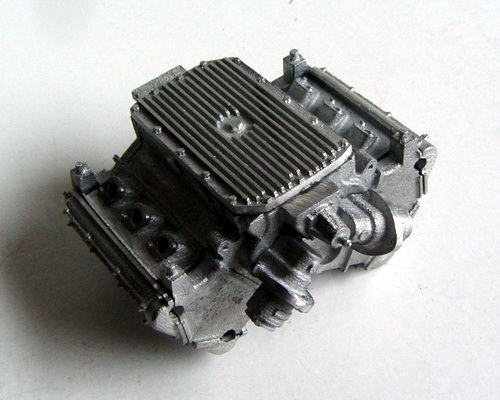 |
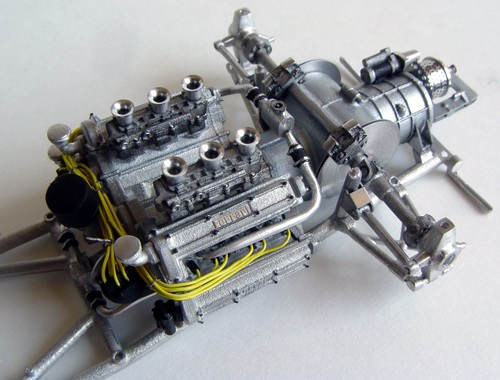
120 degree engine block parts were thoroughly cleaned and assembled. Parts are very detailed, with good engraving, but require a lot of cleanup to look decent. After the block was assembled, I polished it with metal polish to bring out natural metal sheen. Distributors were drilled out for plug wires and attached to the engine. |
|
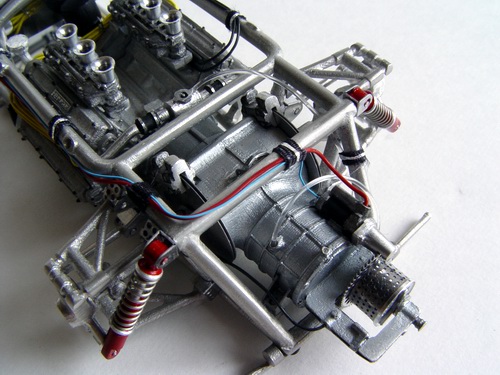
Then I finished wiring the rear of the chassis: fluid bottles were detailed with clear hoses, then clutch linkage, starter motor. All small hoses were also attached to the engine. |
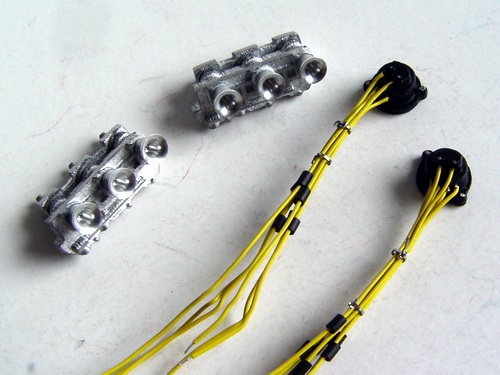 |
Carburetors received their velocity stacks, and distributors were wired with Detail Master wire. Note small photoetched clamps on wire bunches - very nice touch! I also added plug boots made from thin wire insulation. |
|
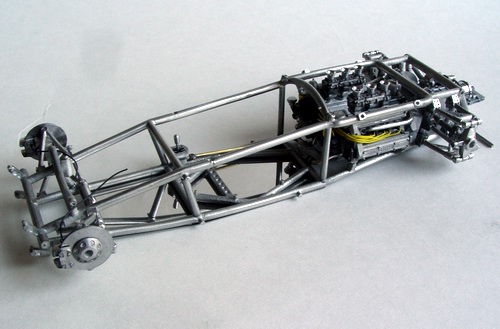
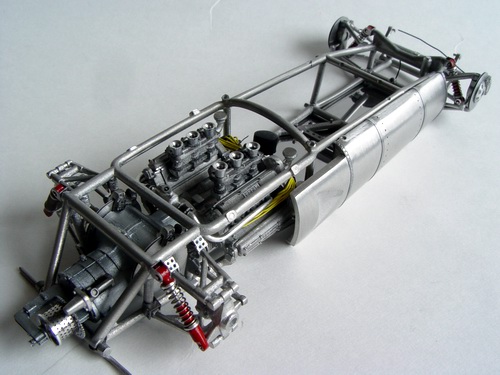
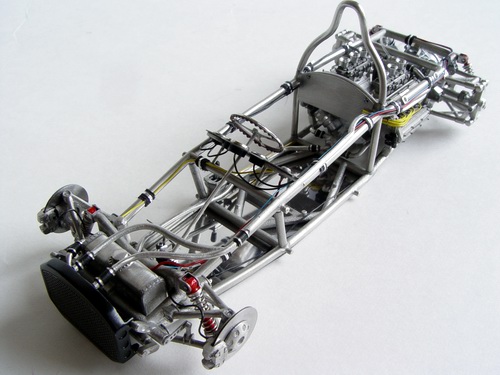
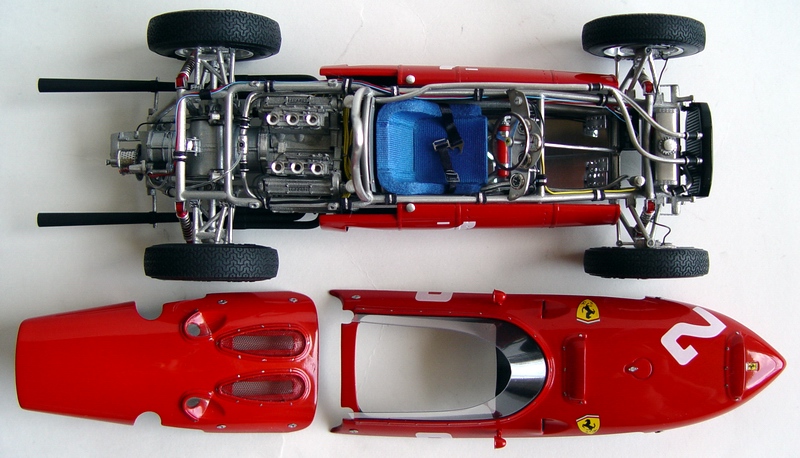
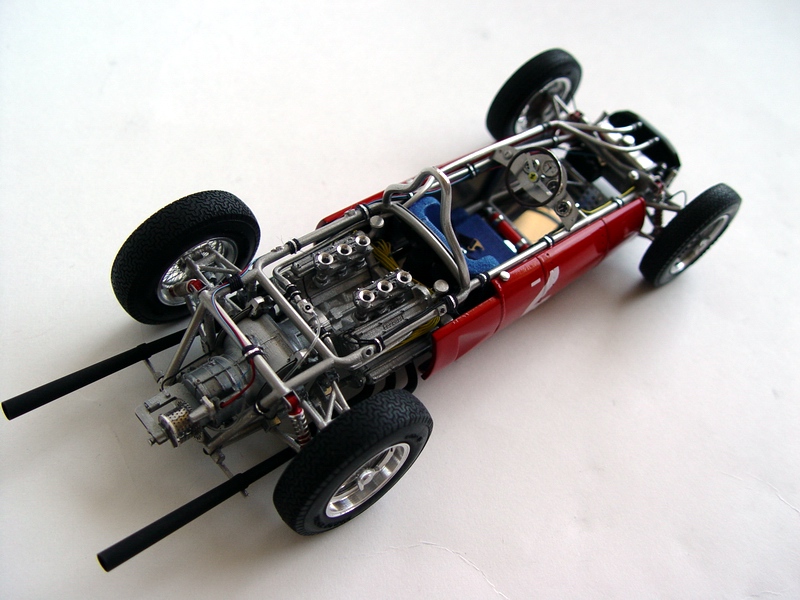
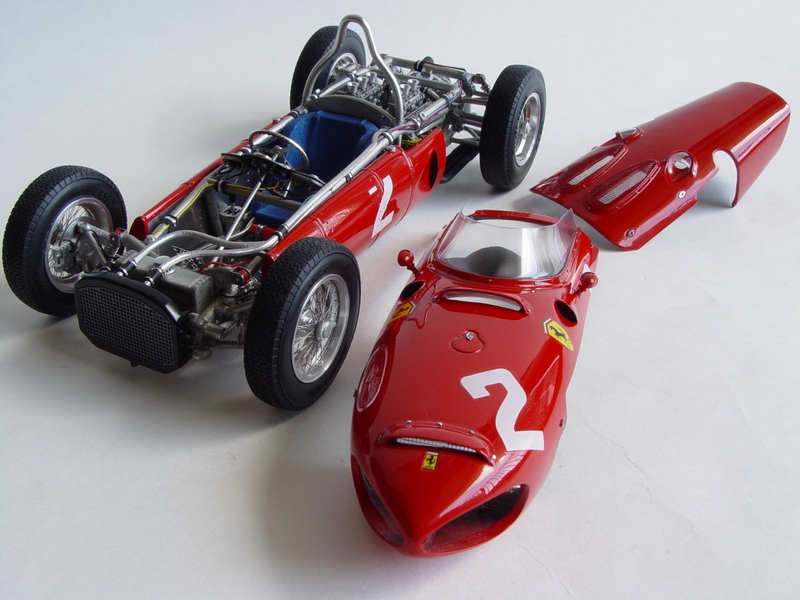
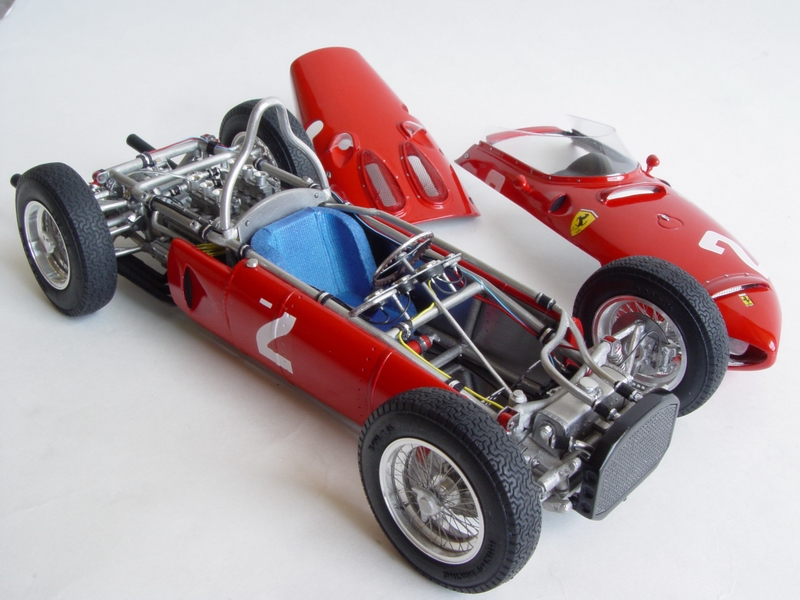
Here is the picture of the completed chassis, with all components (except gas tanks, wheels, and the seat) installed, fully wired and plumbed. |
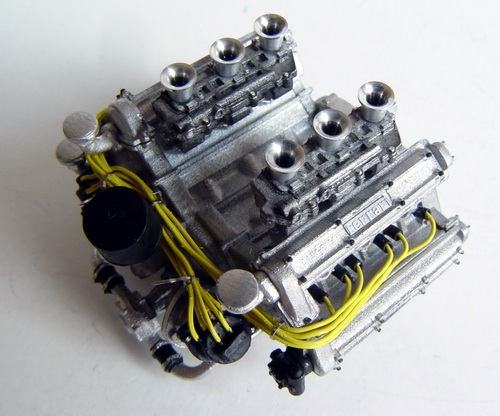 |
Engine received its cam covers, carburetors, oil breather pipes, pumps, oil filter, and distributors. Each plug was wired and boots glued on top. Completed engine was detailed with various metallic paints and washes. |
|
Gas tanks were primed with metal primer, then with gray and white primers. Finally I sprayed them with 2 mist coats and 2 wet coats of Italian Red (Tamiya TS-8). The tanks were polished with polishing compound and waxed with model wax. |
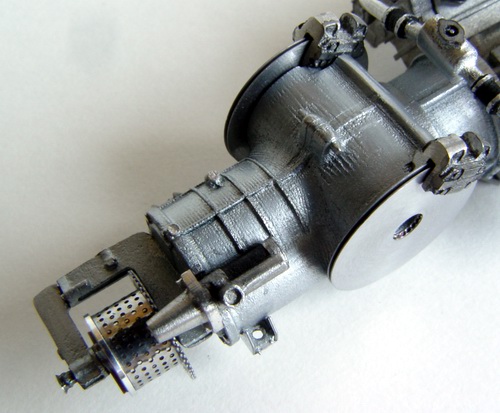 |
Gearbox body was glued together and painted with Testors Steel metalizer. Then I attached 2-piece PE brake disks with metal calipers, starter, and complex turned aluminum, metal and photoetch clutch assembly. |
|
Inner sides of the tanks received polished steel photoetched backs, and tanks were decorated with #2 racing numbers and small metal gas caps. I also scratchbuilt a fire extinguisher from a piece of round styrene rod, and photoetched frame pieces as straps - kit part looked awful. |
 |
Transmission was attached to the engine, and various small details added. Thoroughly cleaned and properly assembled, the drivetrain looks very realistic and accurate. |
|
Exhausts were assembled, cleaned and primed with etching metal primer, and then with 2 coats of gray primer. |
 |
Then I installed the engine on the lower frame and glued together parts of the rear suspension, driveshafts, and rear hubs. Most complicated part was.... cleanup of the frame! With very complex tubular architecture (and mold lines from both sides of every tube), it took hours of sanding and filing before both upper and lower frames looked good. |
|
When dry, exhausts were painted with Tamiya flat black, and slightly weathered with semi-gloss black and gun metal washes. |
 |
Both frames were polished with metal polish, and upper frame and lower frames were glued together, securing the engine in between them. This step required a lot of test-fitting to make sure everything was fitting correctly. |
|
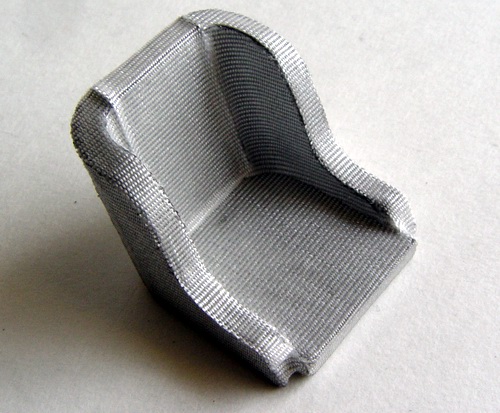
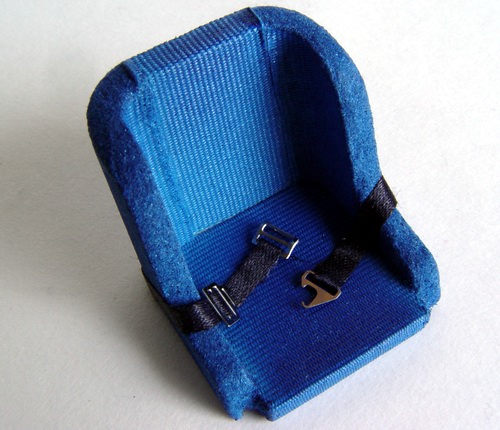
Seat was cleaned, block sanded and upholstered with self-adhesive cloth tape. All the patterns were cut from the paper and then transferred onto the tape. I then cut the tape, peeled it off and stuck it on the seat. |
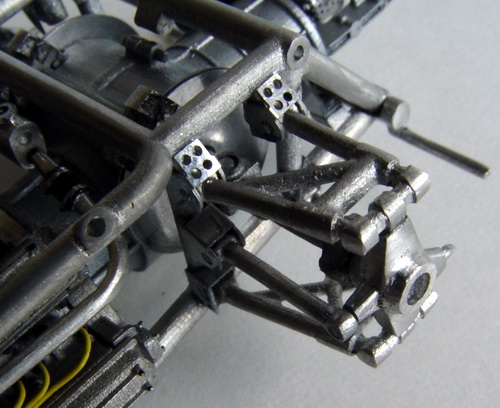 |
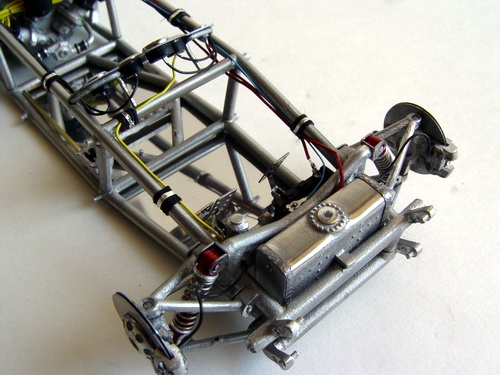
Rear suspension was completed, with many white metal and photoetched parts added. When cleaned and assembled right, it looks very realistic! |
|
I used little bit of flocking to cover the seams, and then I sprayed white primer to create even color coverage on entire seat surface. Then seat was painted with flat blue acrylic paint. Seatbelts and buckles are Studio 27 items from their Seatbelt Hardware set. |
 |
Both frames were secured together with small screws, and I also attached photoetched cockpit floor panel at this time. With so much metal parts on the chassis, you really start to feel the model weight! |
|
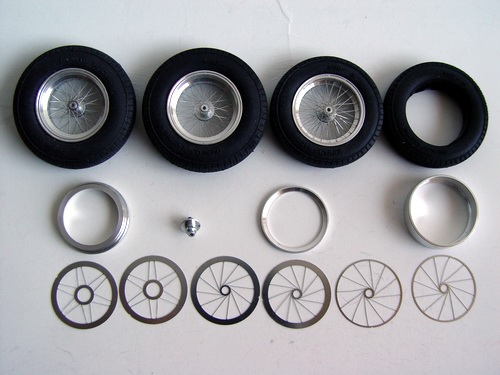
Excellent and delicate wire wheels were assembled from 11 parts each! I later added metal knock-offs and tire valves. |
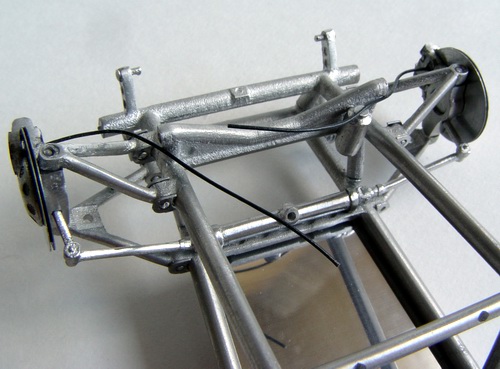 |
Front suspension was also cleaned and assembled, together with steering rack, fluid bottles, and photoetched brake rotors and metal calipers. You can also see loose brake lines on this picture, they will be attached later. |
|
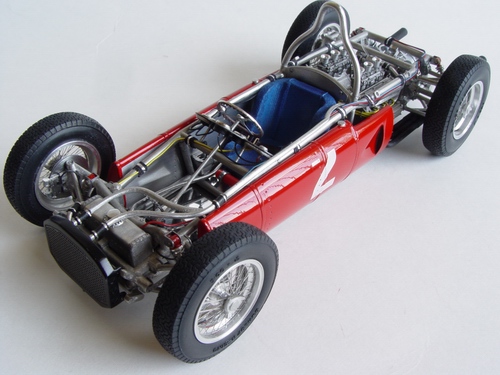
Finally, I attached gas thanks, all four wheels (rear wheels have negative camber, just like on the real car), and the seat. Cowls were not an exact fit at first, but I played a little bit with the rivets that hold them in place, and everything lined up. Completed model is a real stunner! |
Copyright 2003 Alex Kustov. No copying or reproduction in any shape or form without written permission of the author.