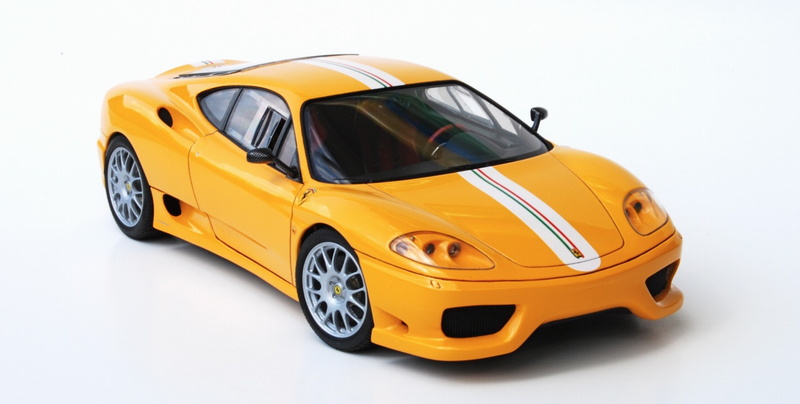
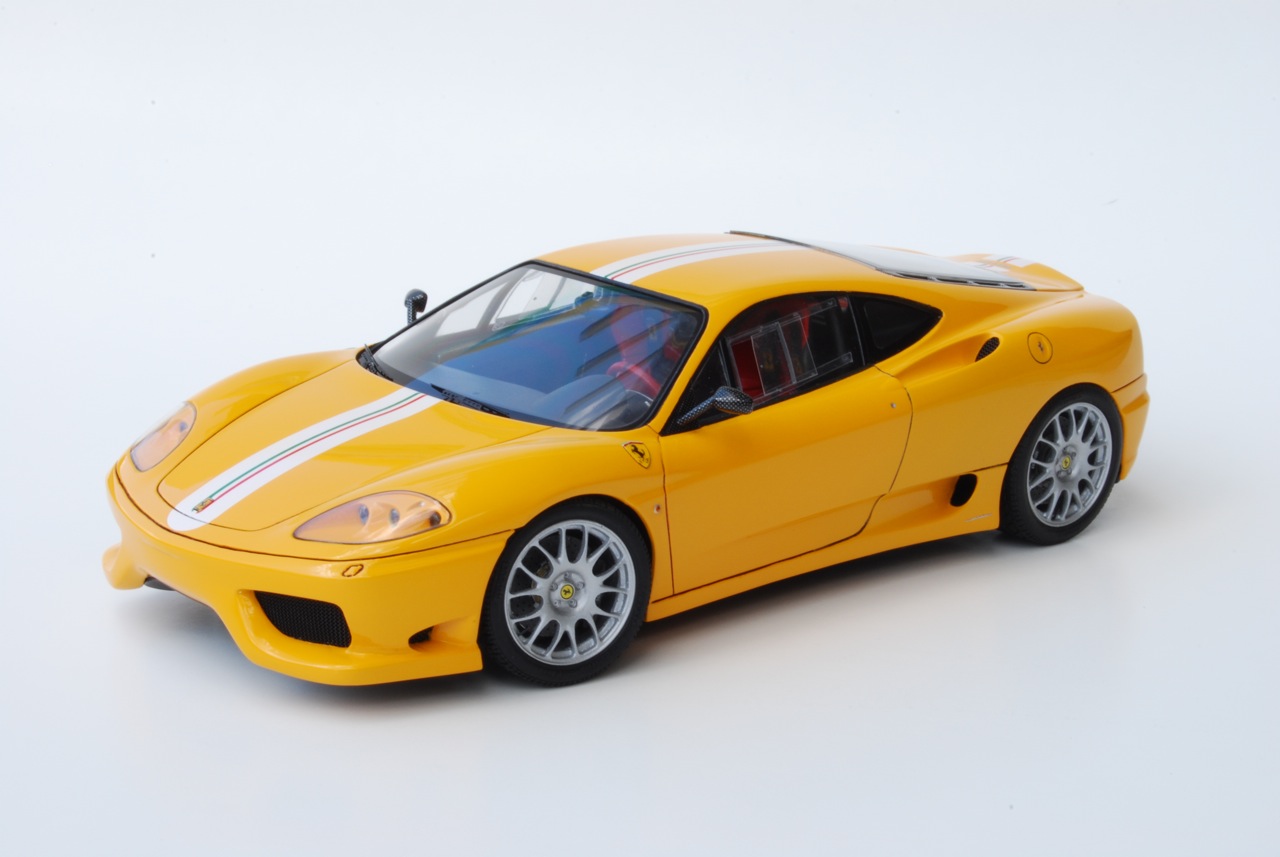
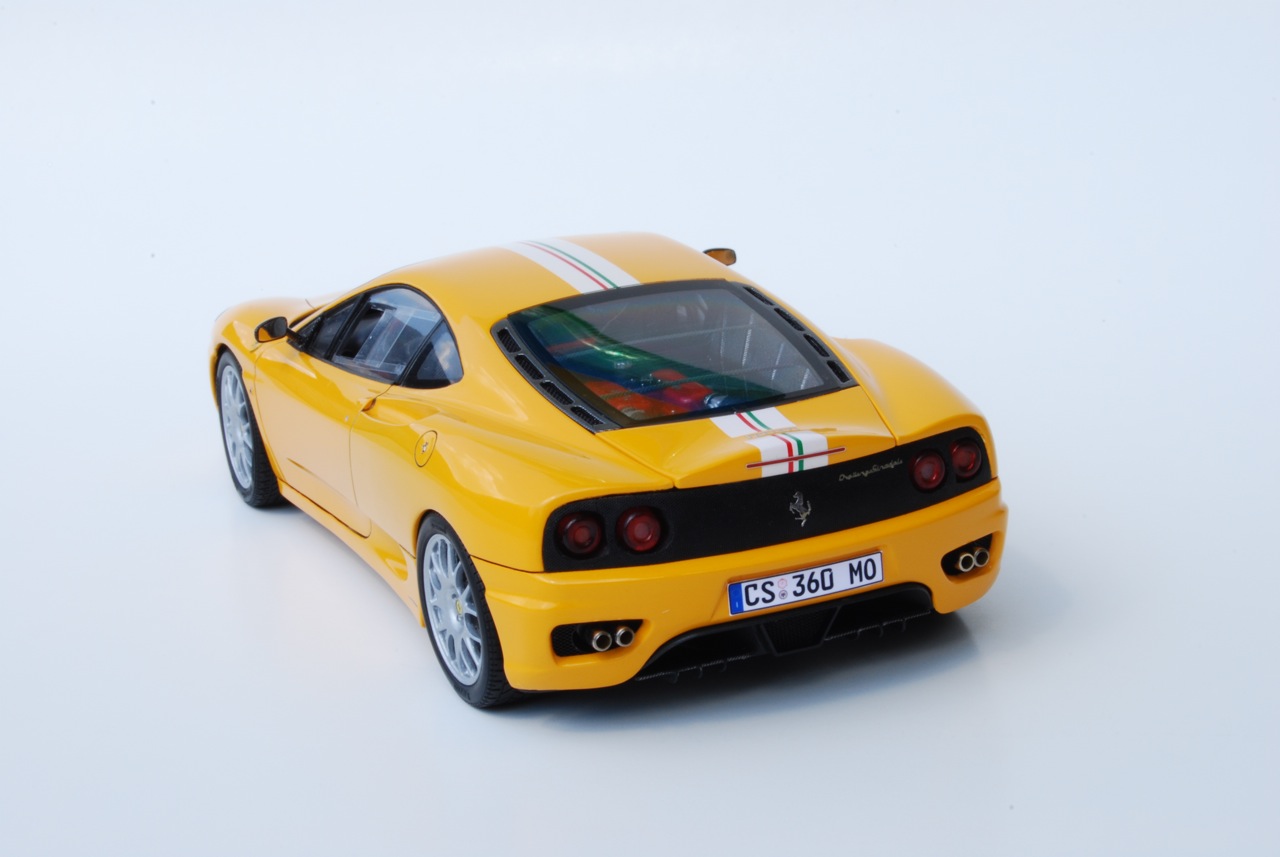
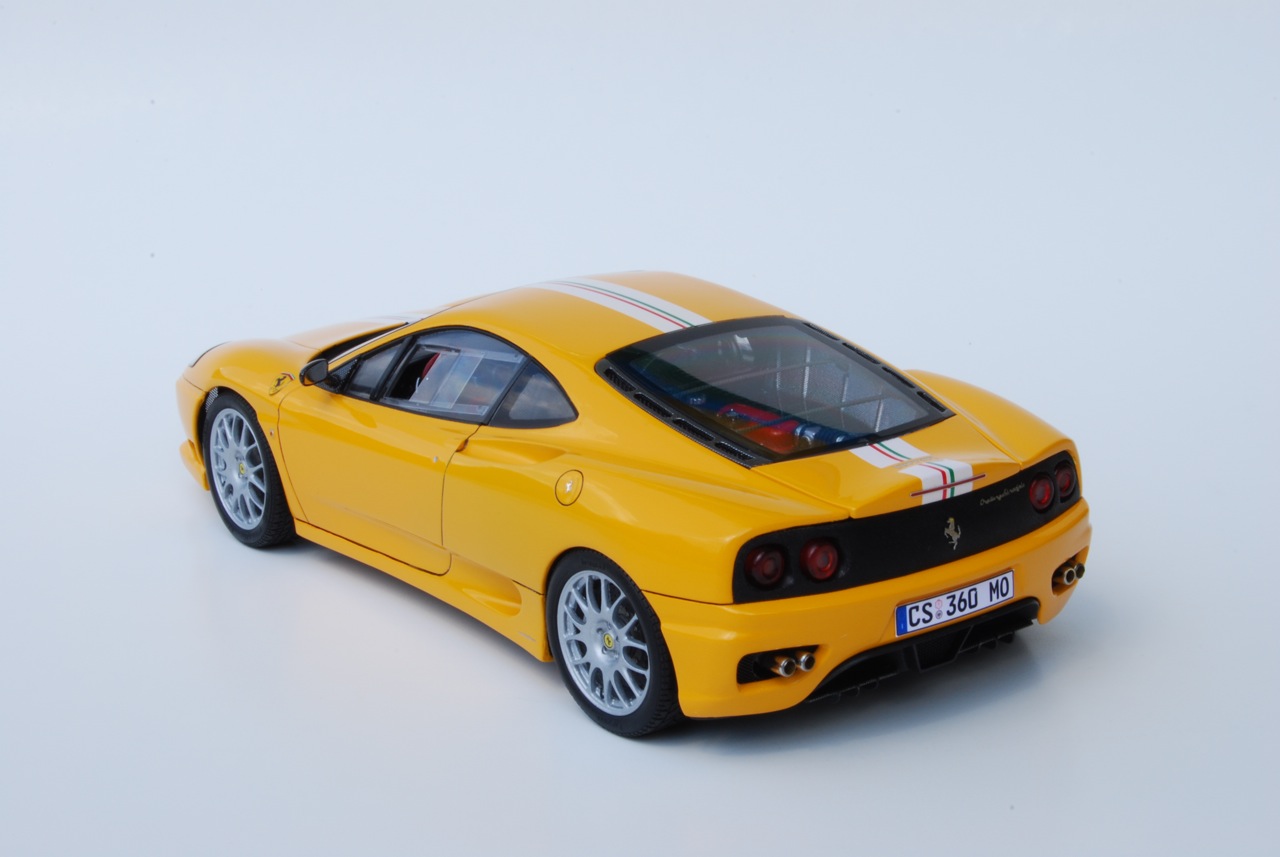
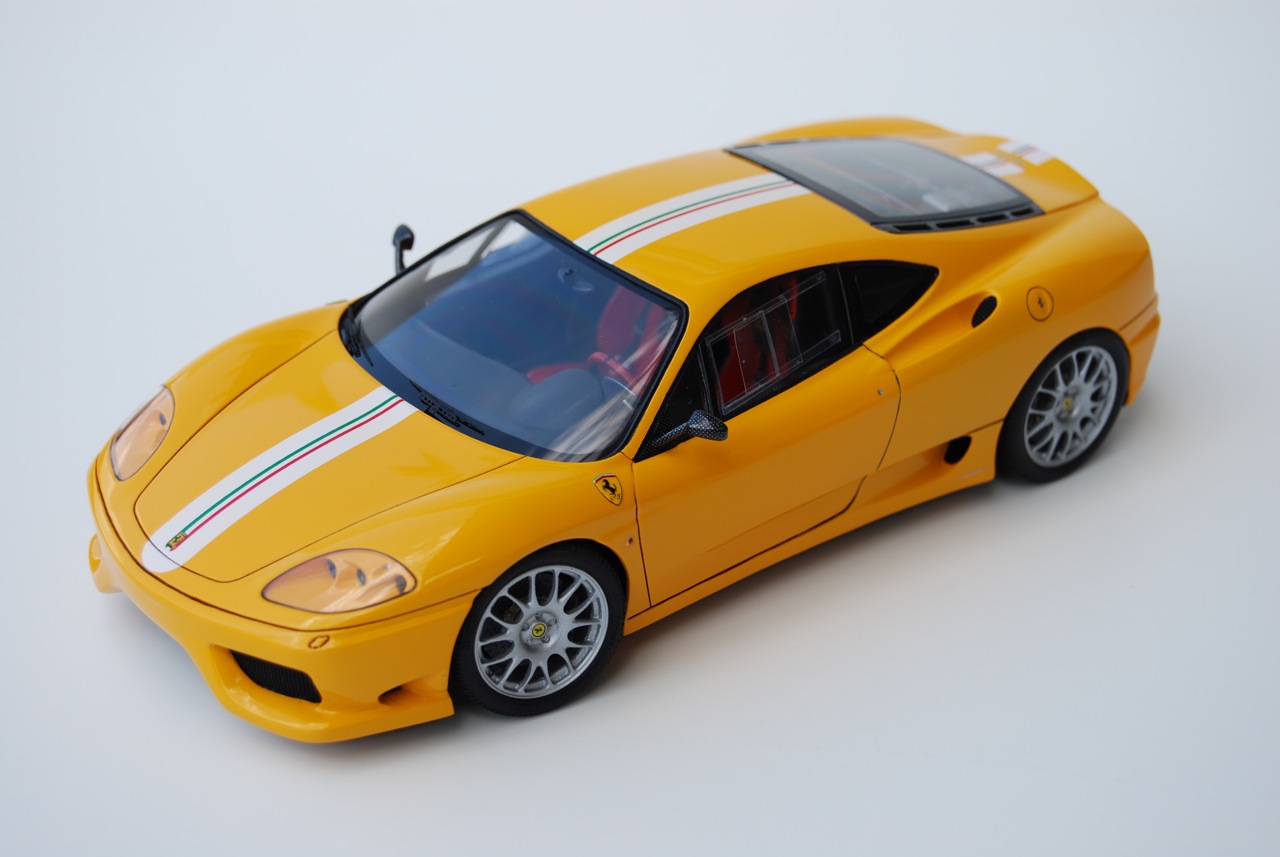
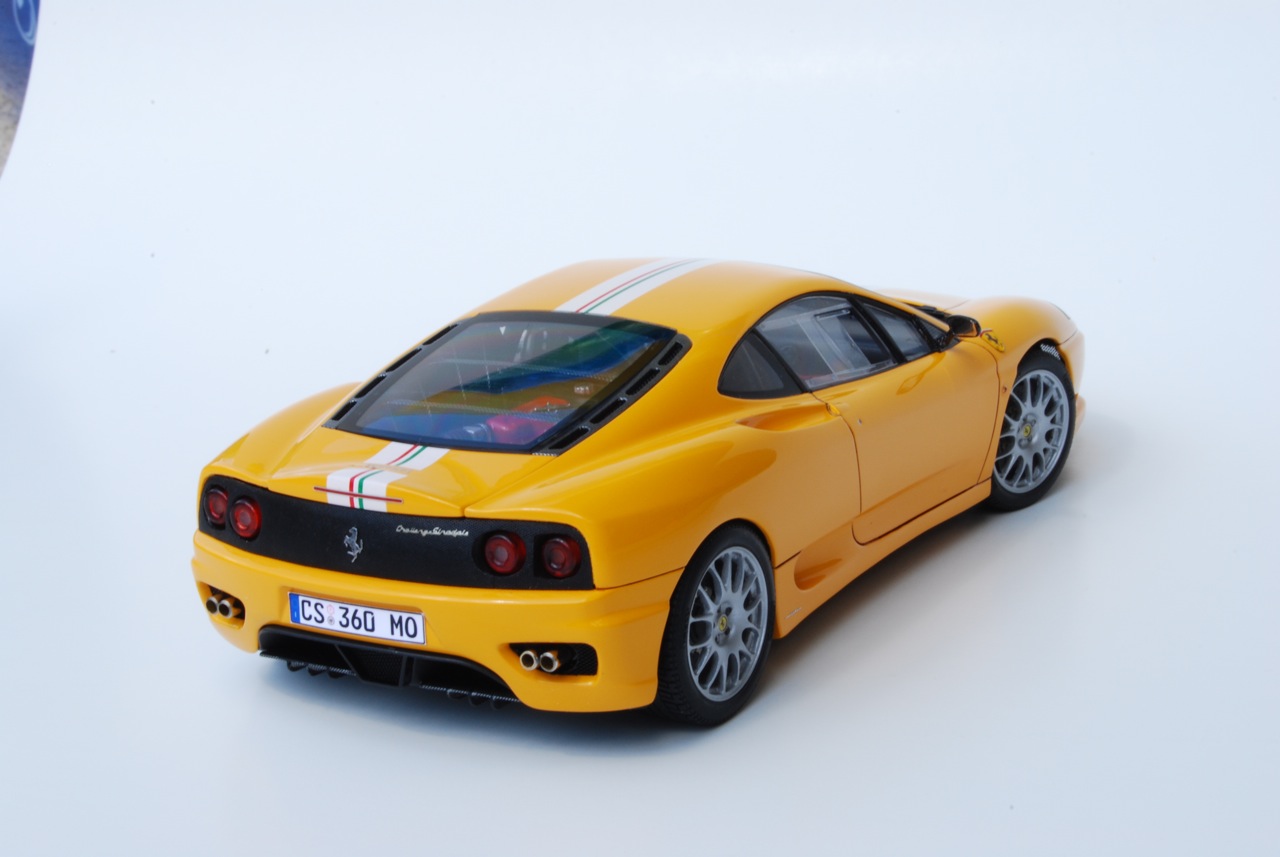
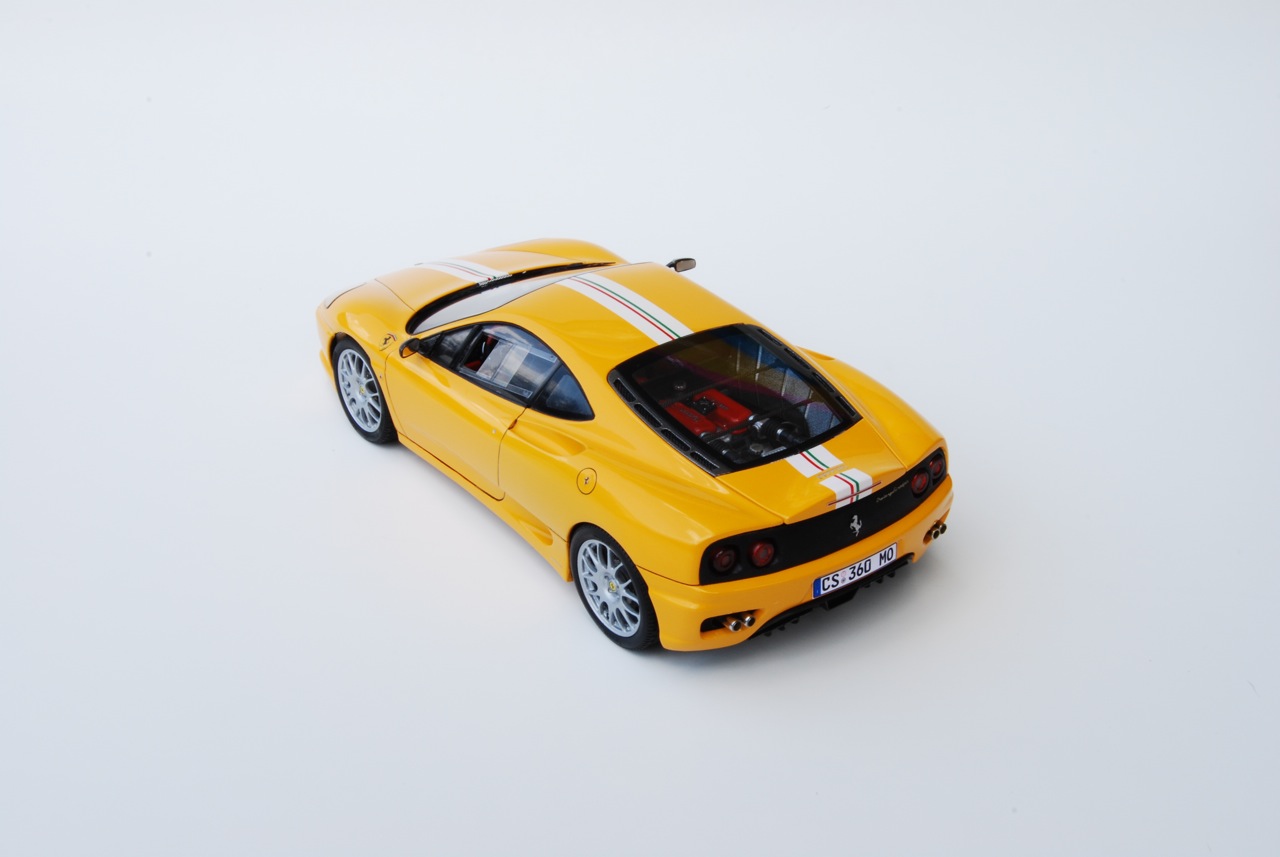
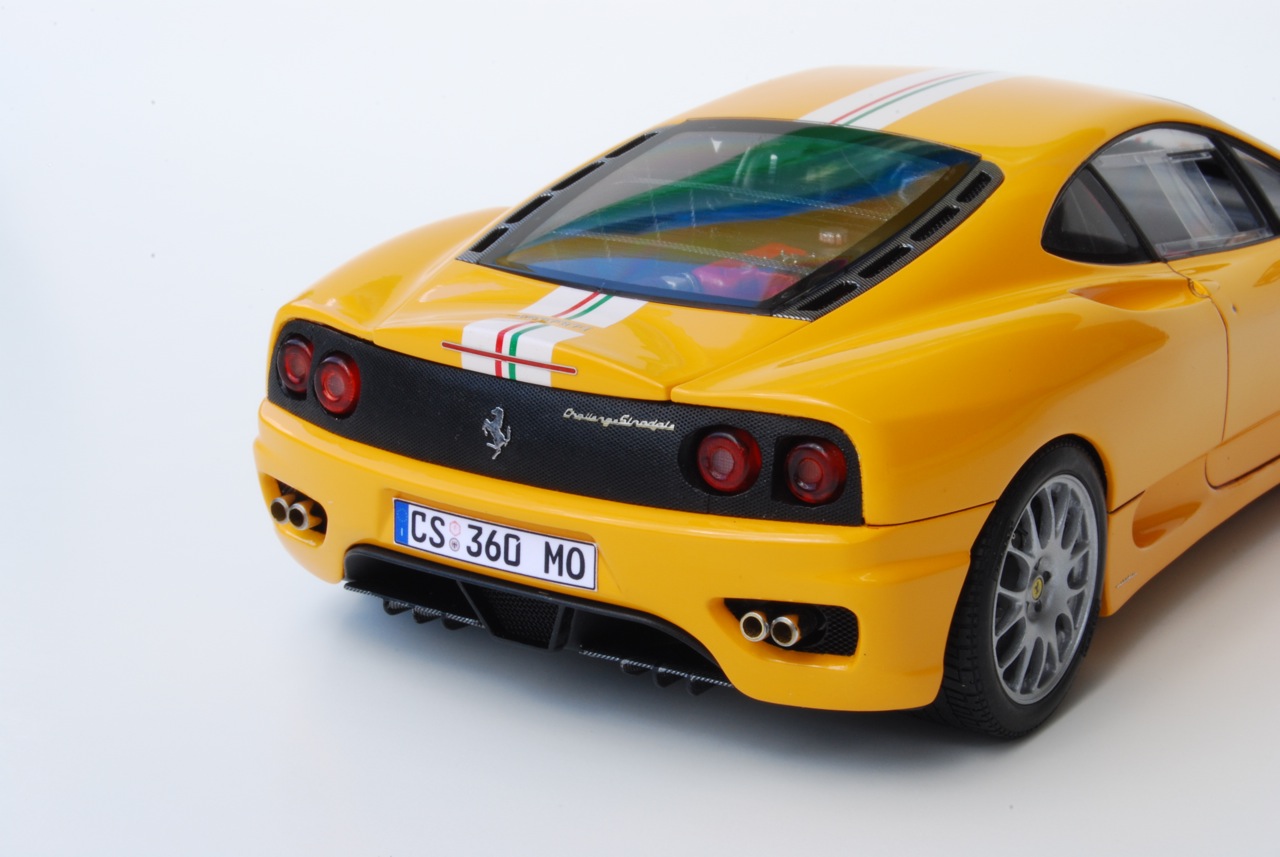
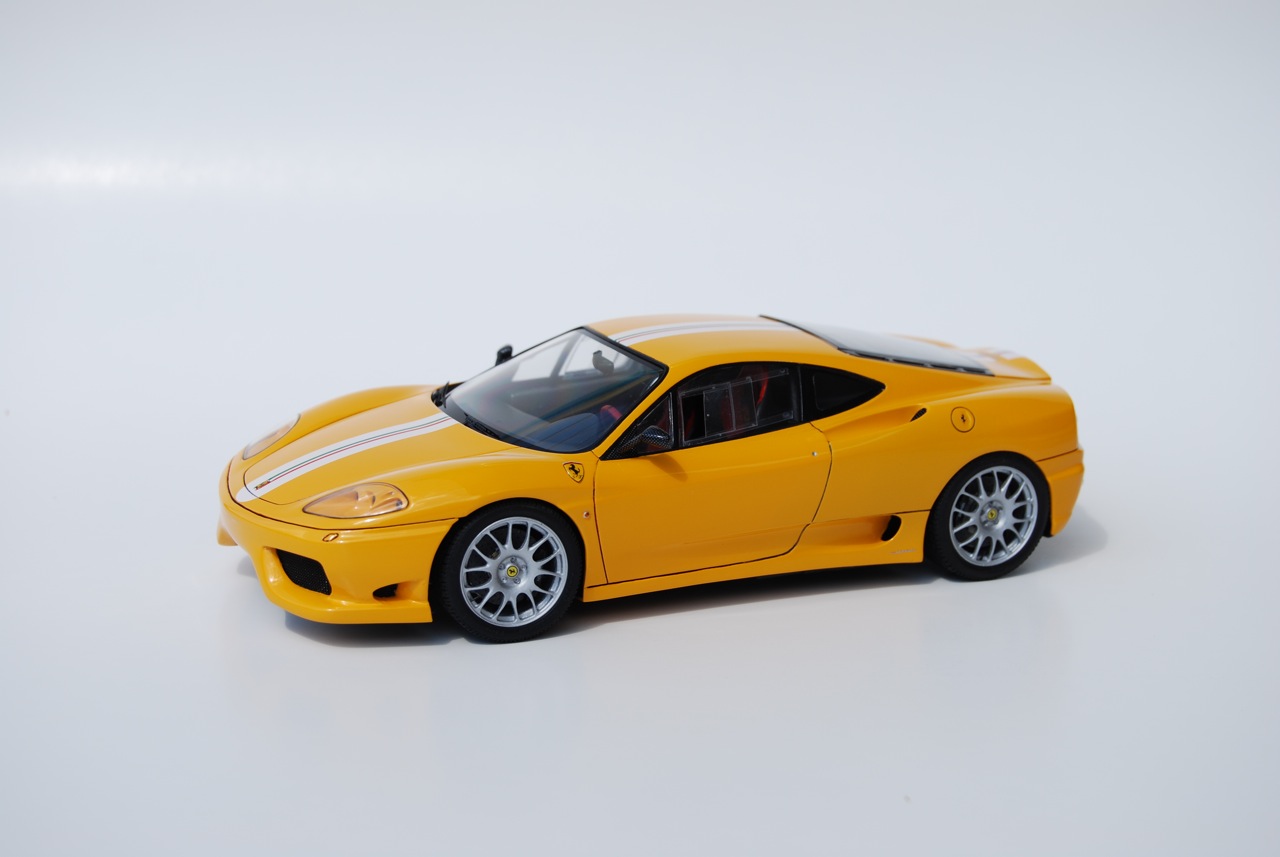
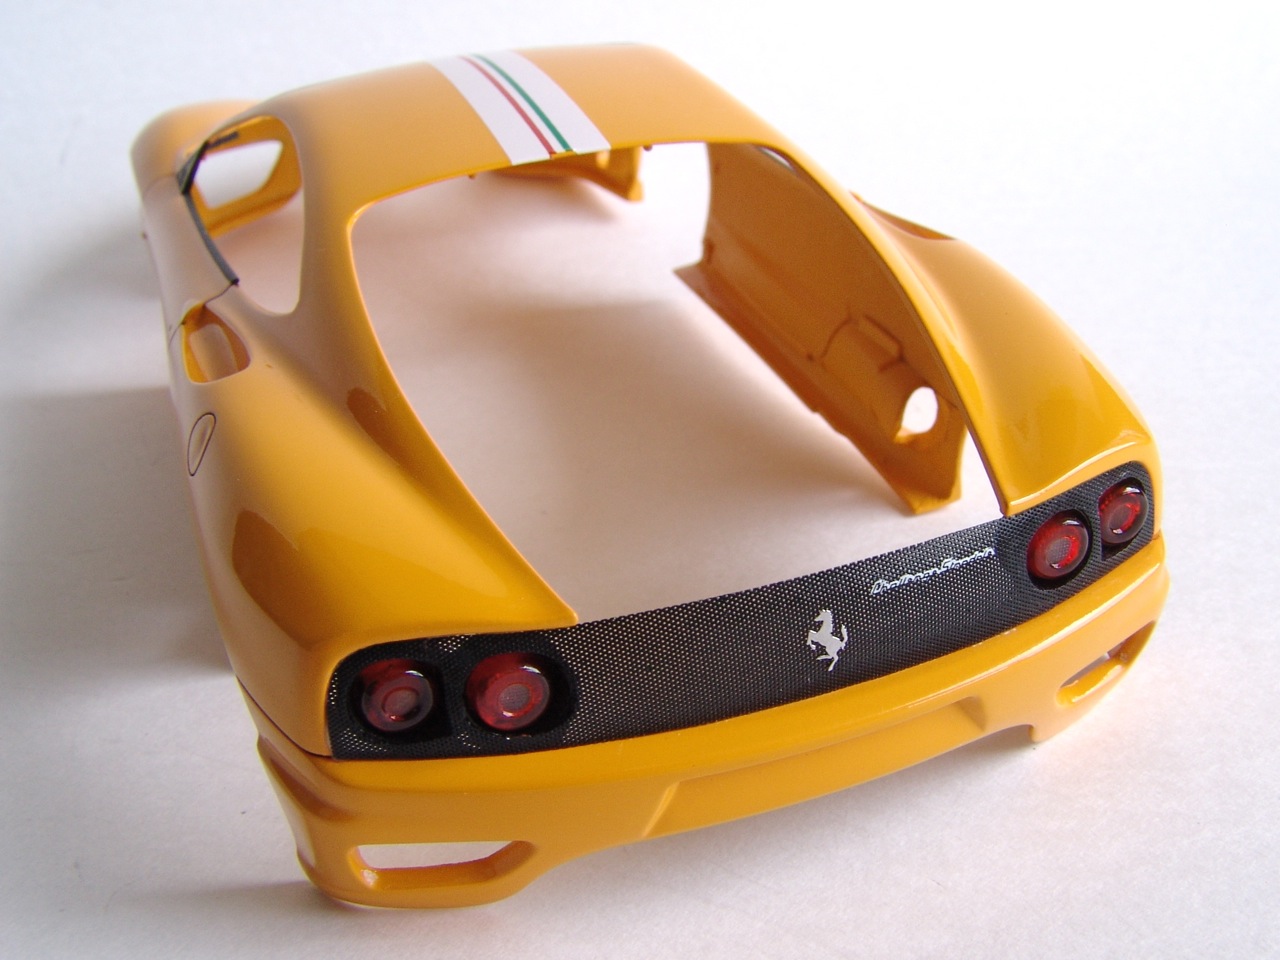
F e r r a r i Challenge Stradale
 |
 |
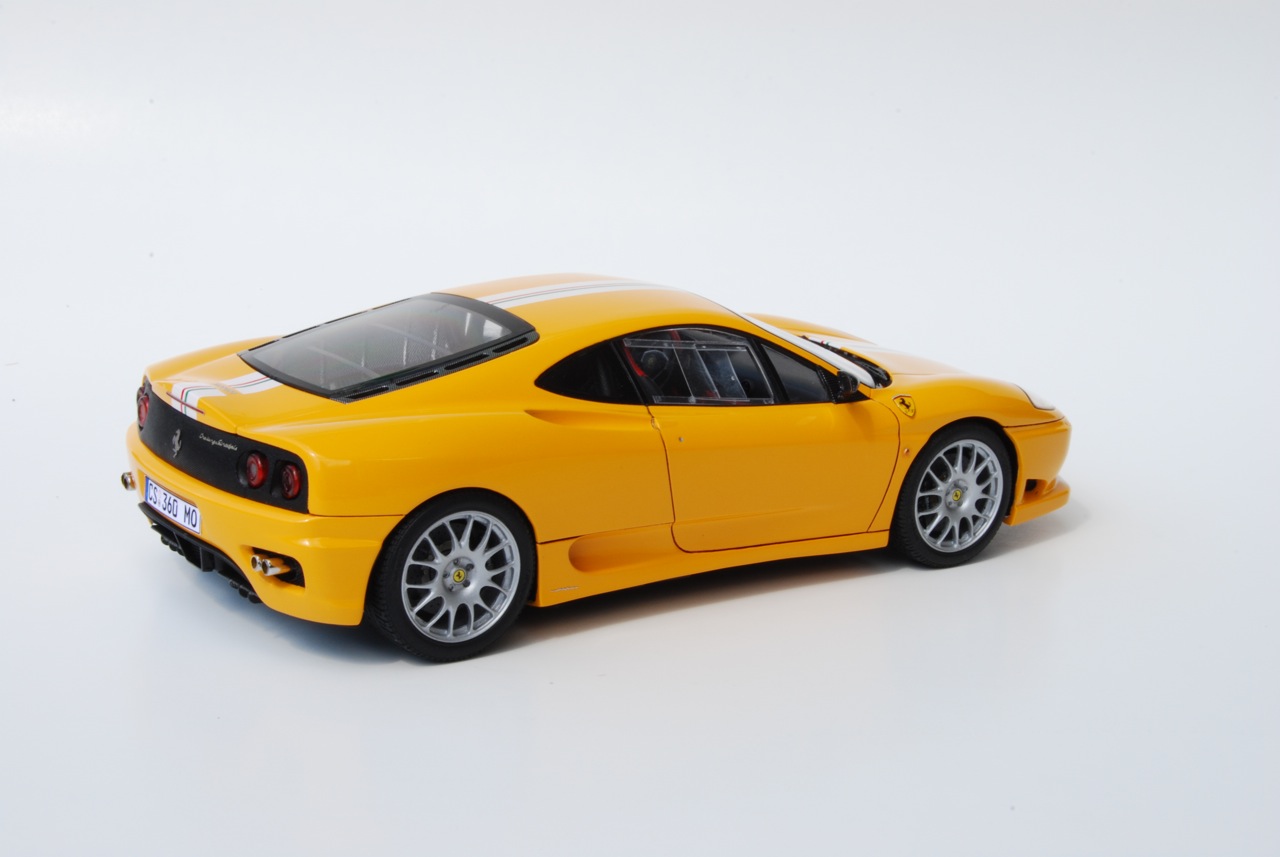 |
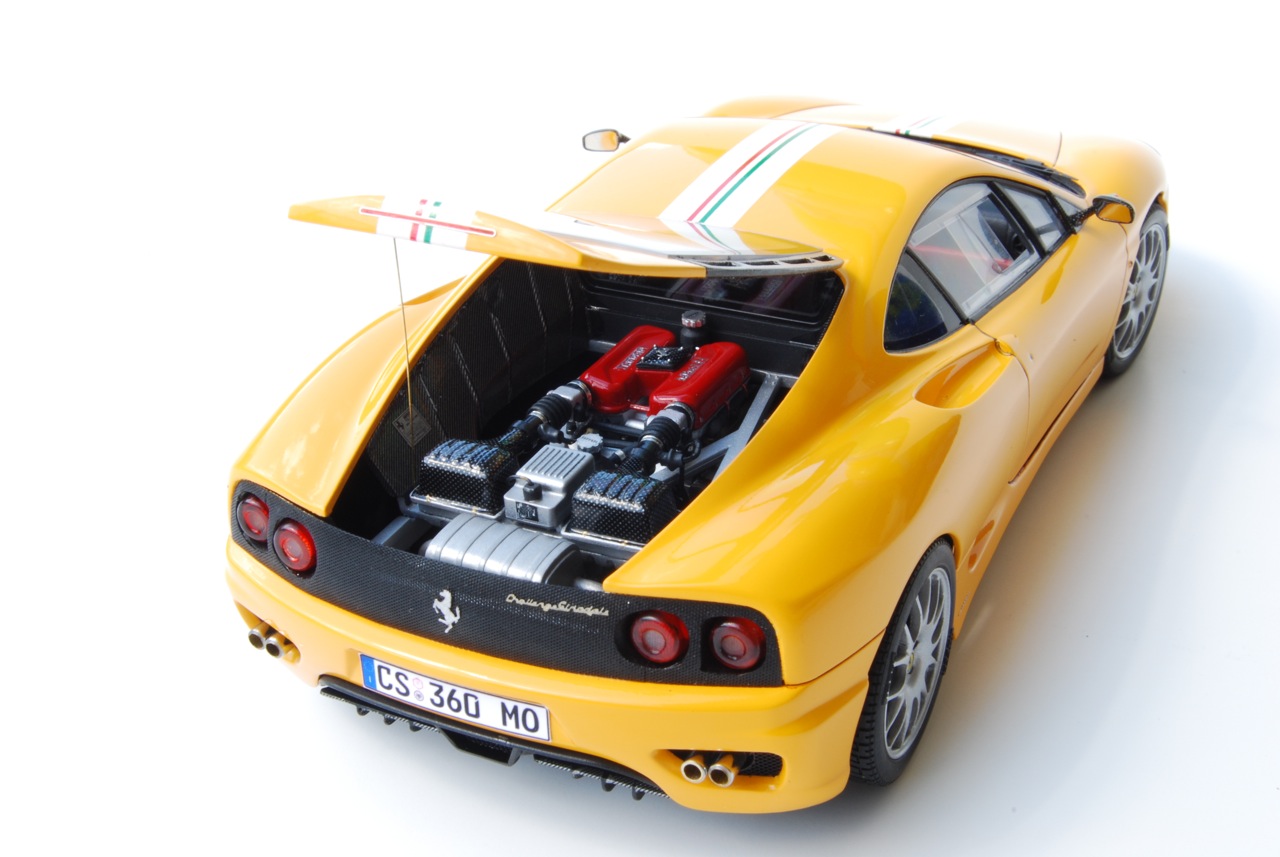
Kit: 1/24 Tamiya Ferrari 360 Modena w/MSM Creation Transkit + various other parts/kits. Pros: It is hard to write about positive things in this conversion since not very many people will actually attempt to do this exactly as I did it. Tamiya's 360 Modena kit is excellent, but since I had modified it so much, I faced few fit problems during final assembly. SAS wheels were excellent, its a shame SAS is no more. I wish I could get more of these wheel sets. I was very pleased with KA Models C/F decals, great stuff. I learned a lot from this build, especially some new techniques to use on clear parts. MSM Decals were great. Cons: MSM transkit was nicely molded, but incorrect and incomplete. I would not recommend buying it, especially hearing how quality actually went downhill since the first batch. I also hear MSM corrected the seats and door panels since the first release. The amount of modifications required for this conversion was overwhelming, and very time consuming. Verdict: Overall it was very long, difficult, and taxing buildup. I wanted to build this model as true to the original as possible, and none of the transkits were offering enough detail to do it out-of-the-box. So maybe this is why it took me almost 4 years to complete this conversion. I'm very satisfied with the end result, simply because I have the most detailed and most accurate Challenge Stradale in 1/24th scale, but if I was asked to do it again, I would most likely refuse. Definitely not for the beginners! |
 |
 |
 |
|
 |
 |
 |
Buildup
 |
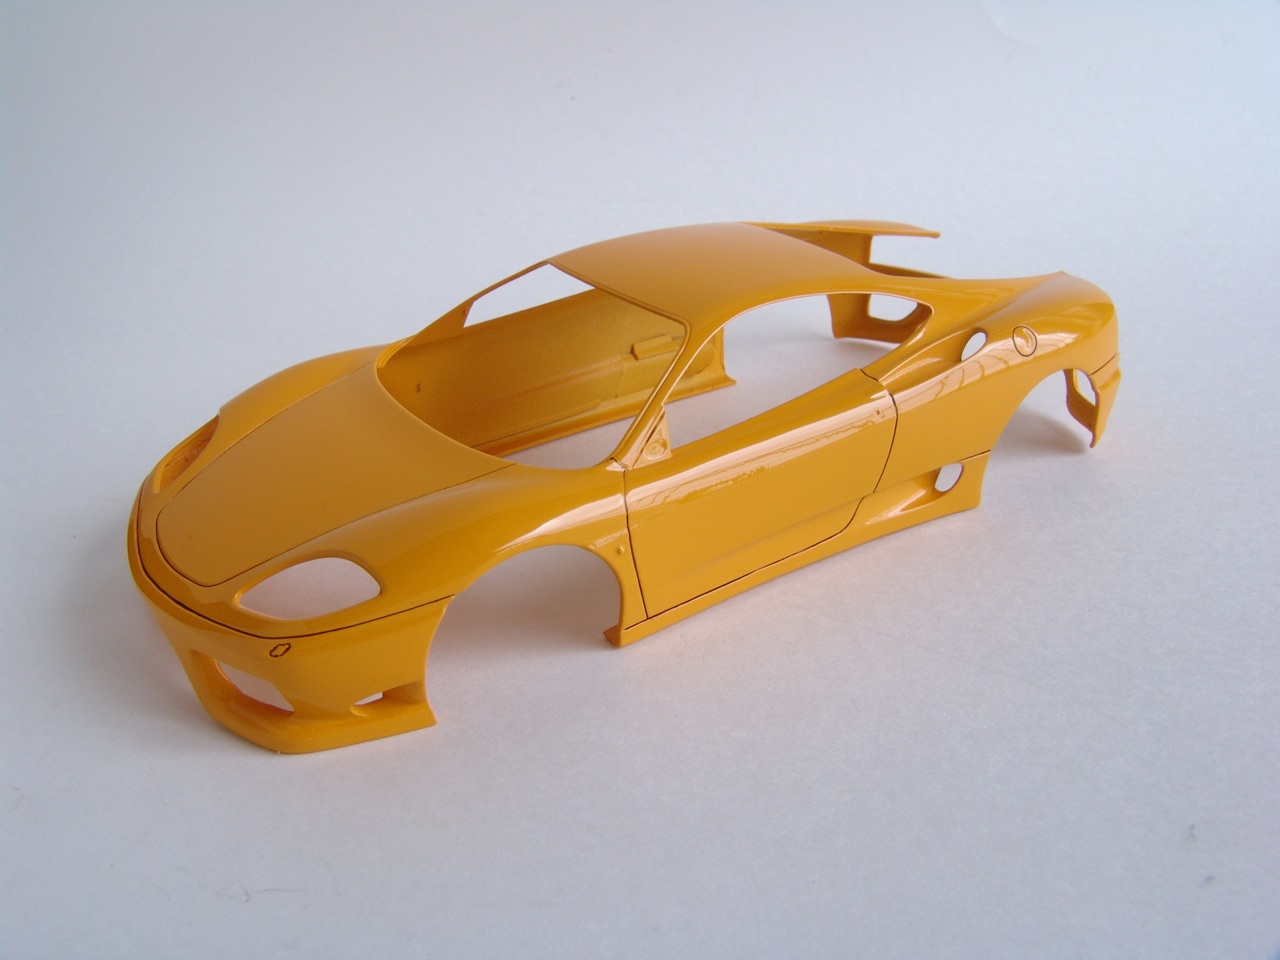
Ever since Ferrari released Challenge Stradale I wanted to convert Tamiya's 360 Modena into CS. When first CS transkits started appearing on the market, I decided to give project a go with the help of MSM Creation transkit, Renaissance 360N-GT parts, SAS wheels, SMS C/F decals, Acu-STion P/E detail set, and few modifications of my own. |
 |
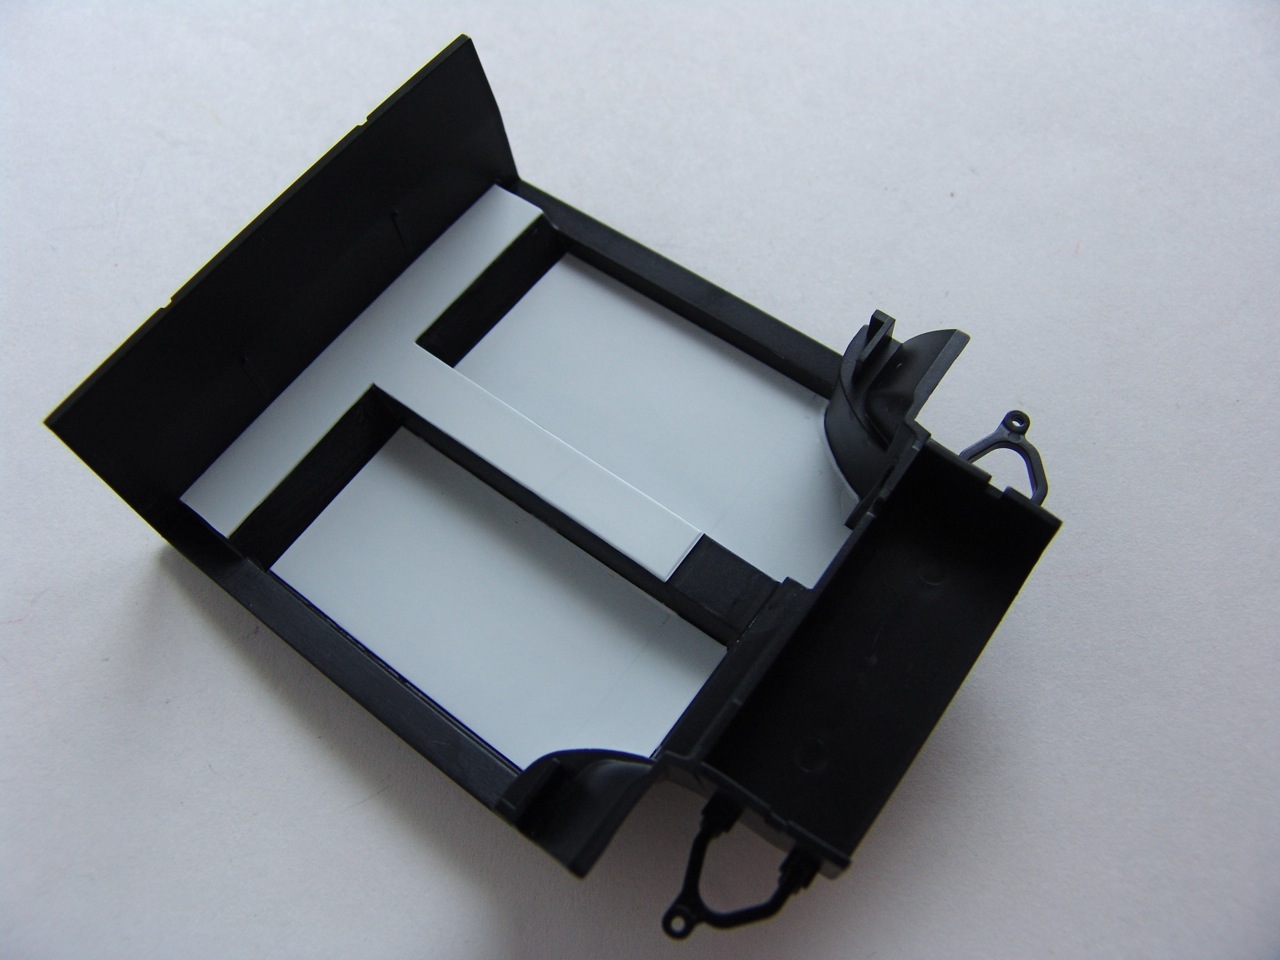
After completion, roll bar was installed into the interior pan. I had to measure very carefully to make sure the roll bar will clear the roof once the model is assembled. |
 |
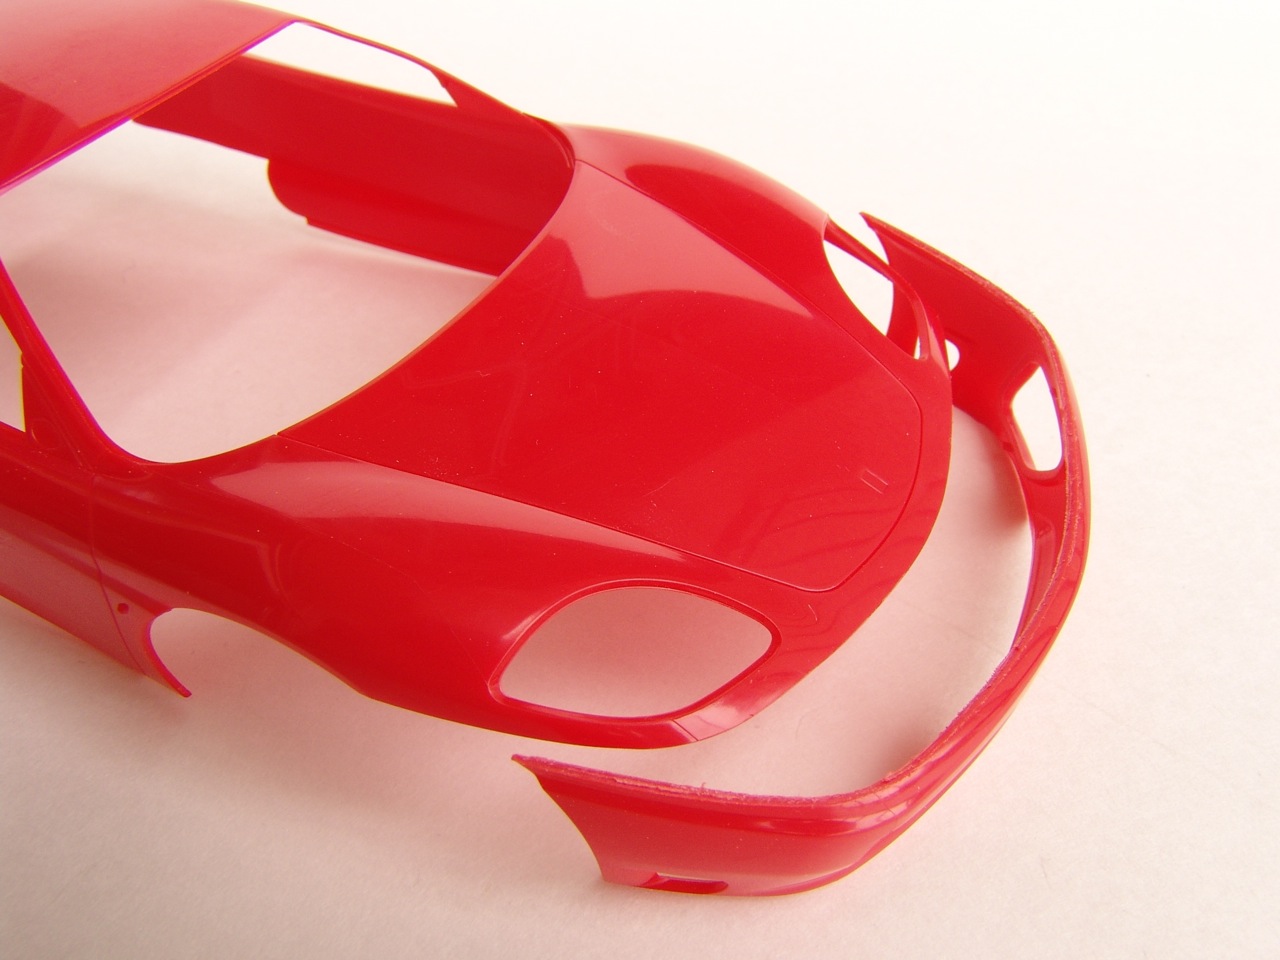
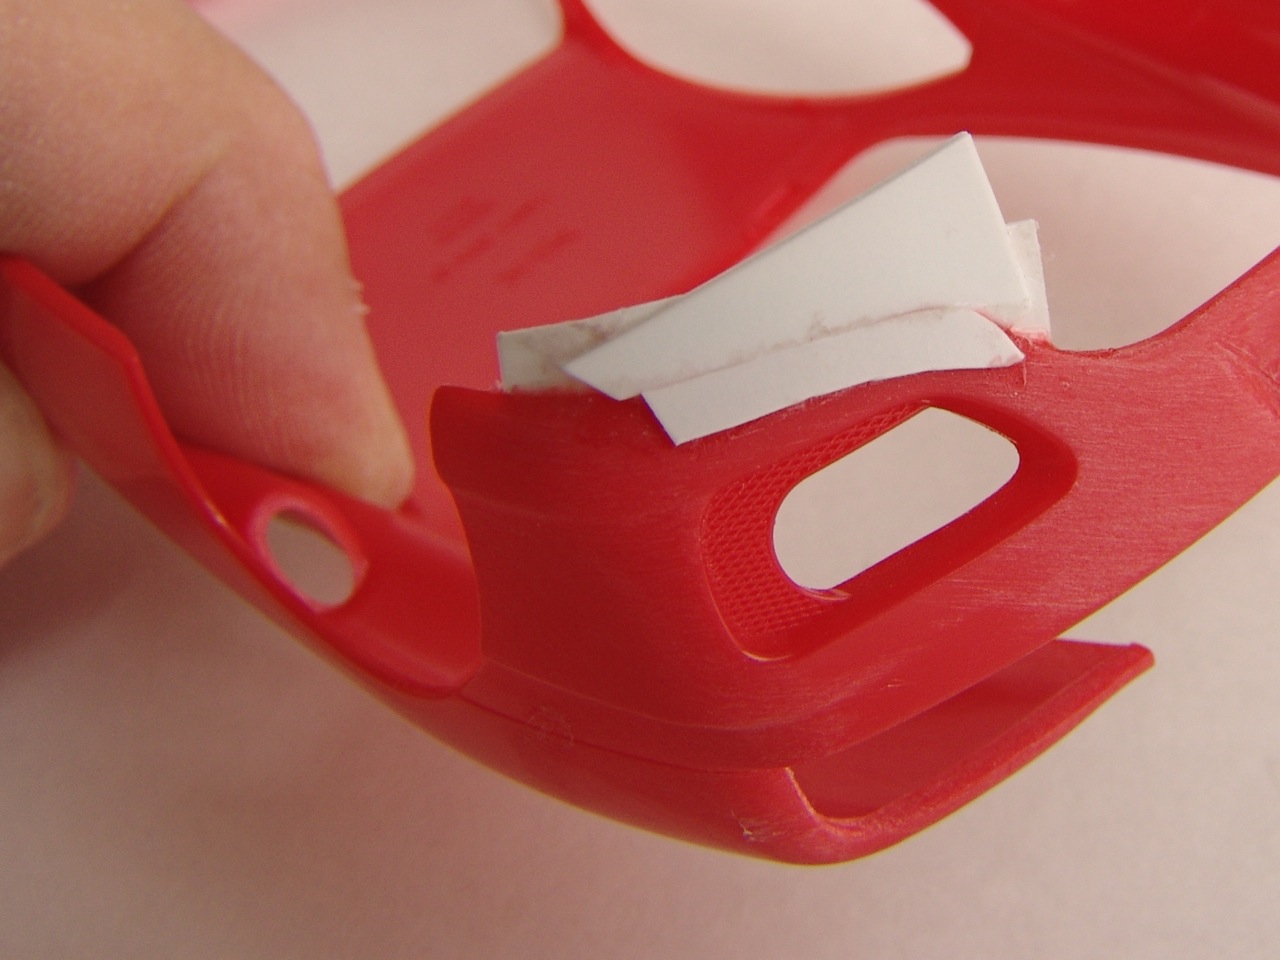
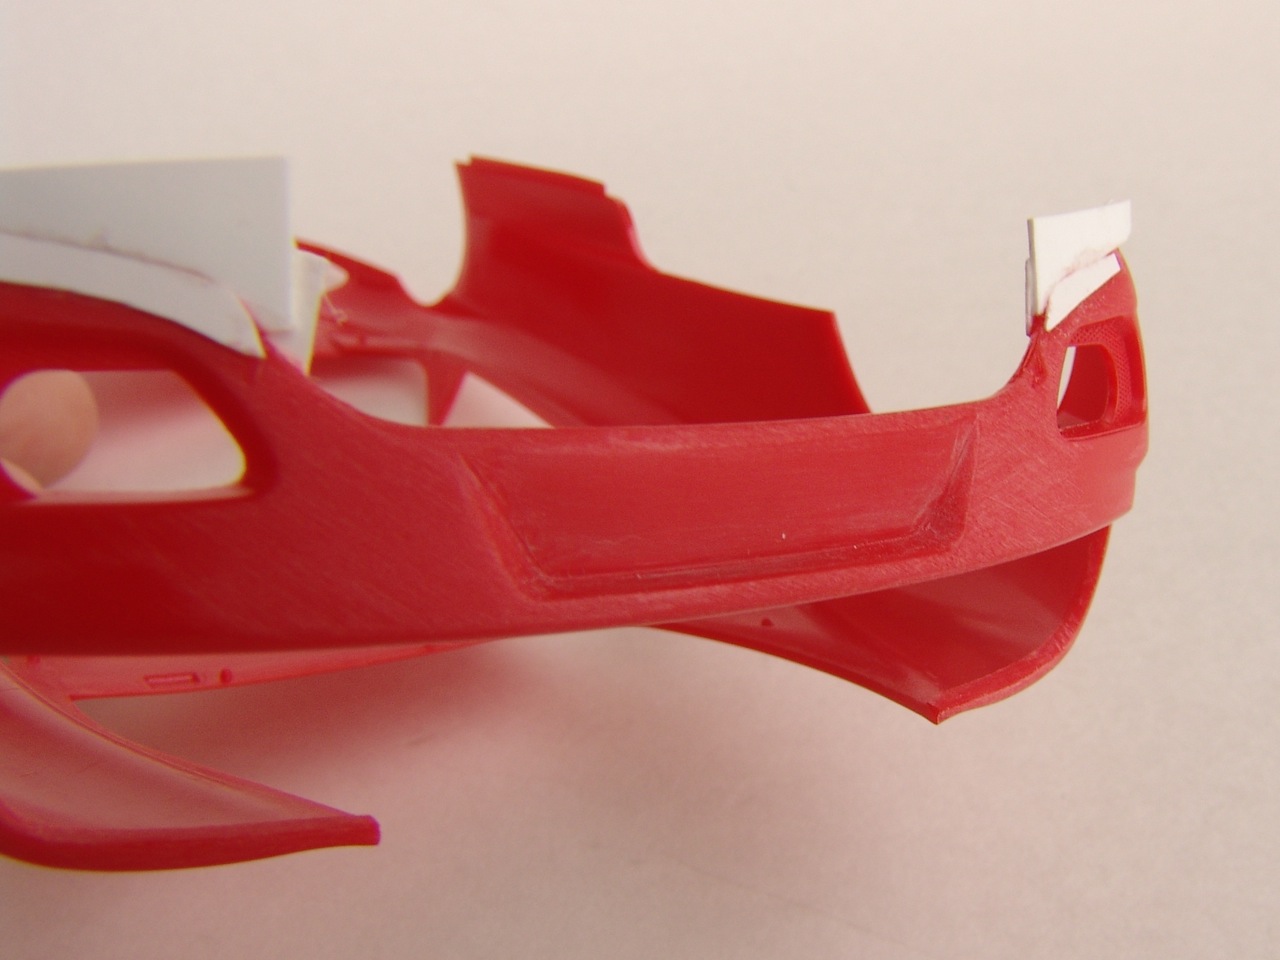
I started with fitting MSM transkit to the body. Front bumper was cut off and edge was carefully sanded to make sure it fits resin part. MSM transkit was still pretty good quality when I bought it since it was one of the first runs - I heard later copies were not that good. |
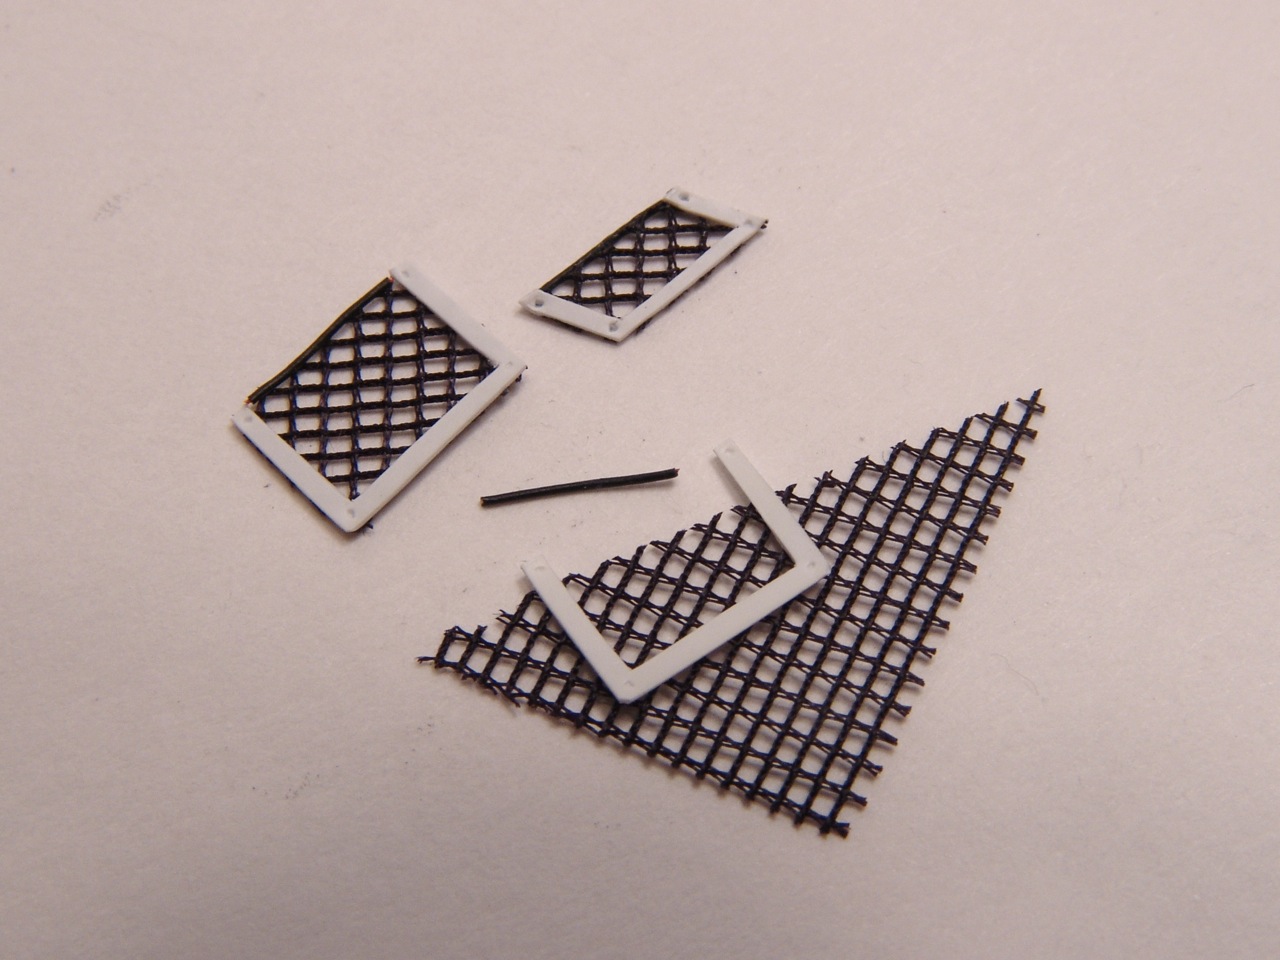 |
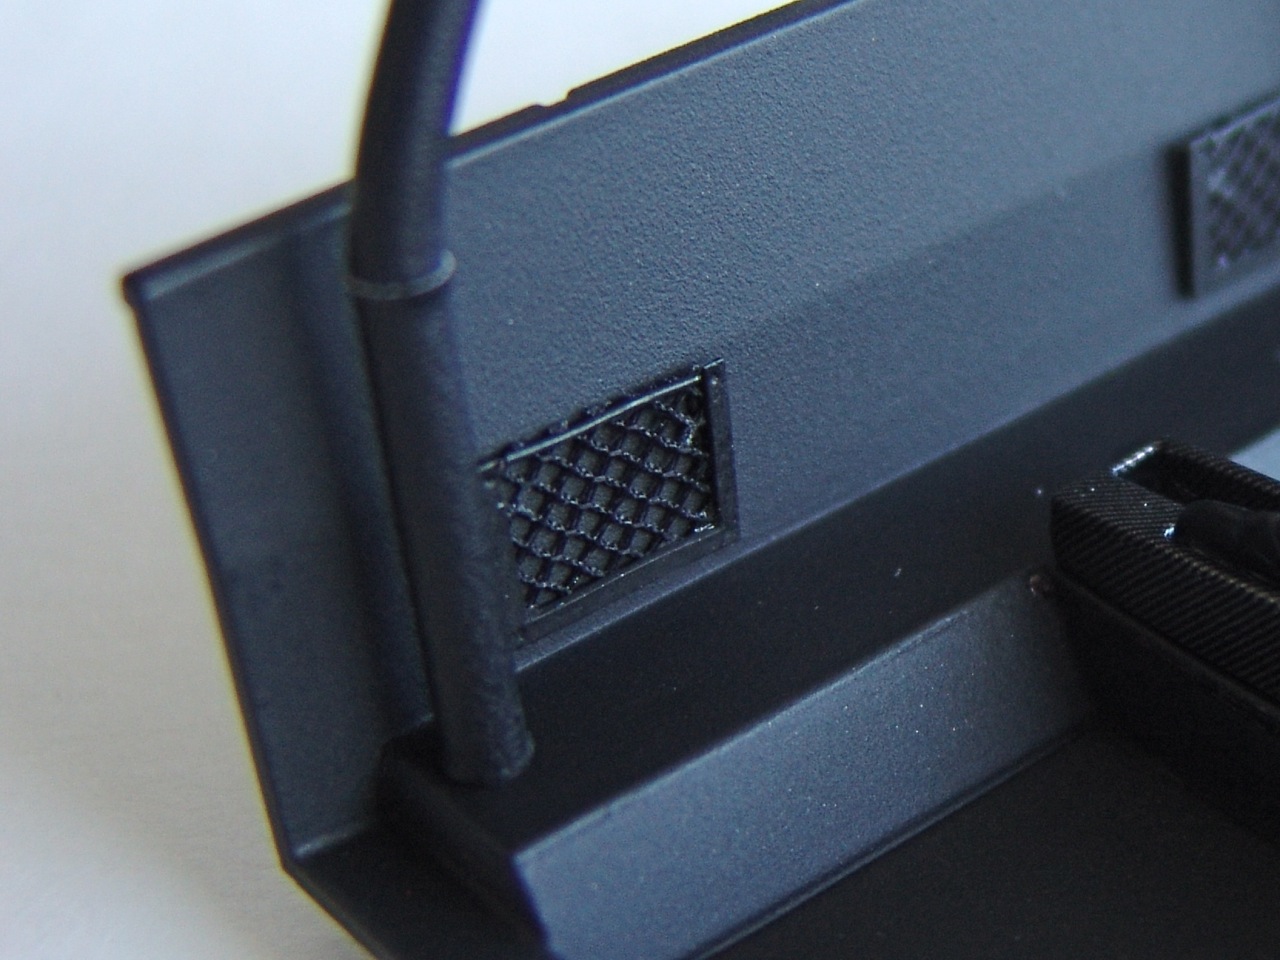
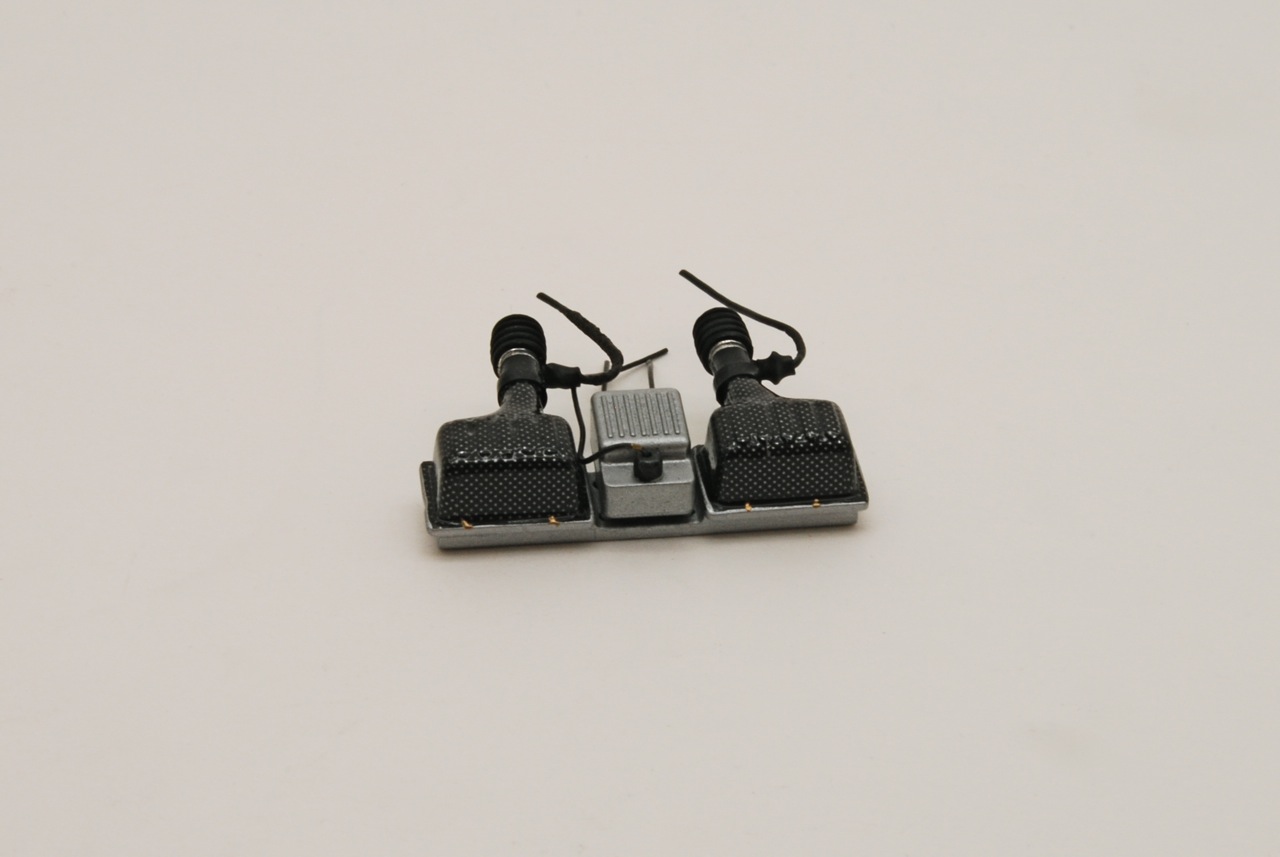
Then I continued to replicate small interior details of the original car - two rectangular mesh pockets behind the seats, and one for the central tunnel were made from sheet styrene, Tamiya synthetic mesh, and some black wire. |
 |
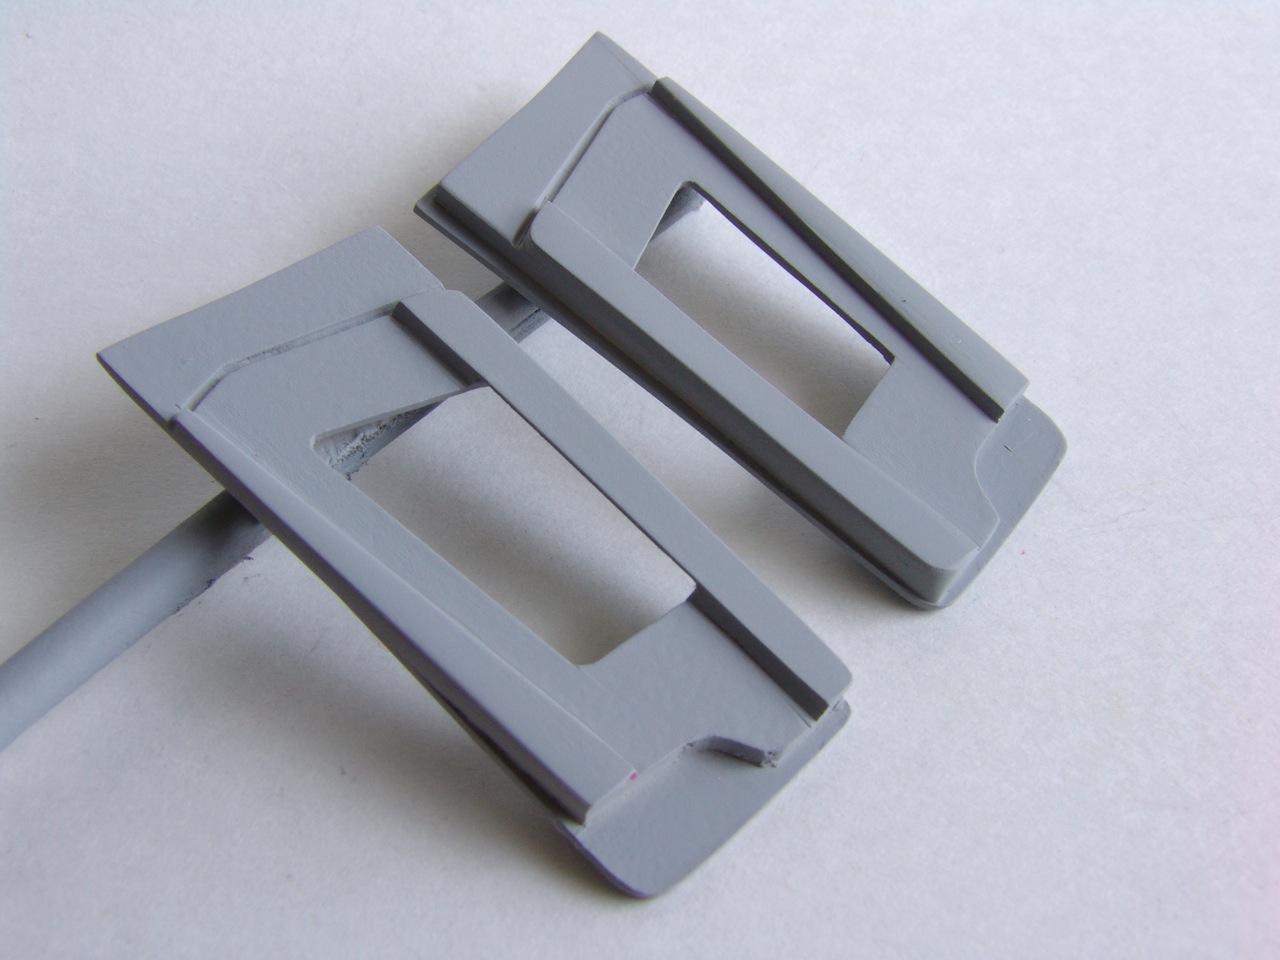
Even though MSM kit was one of the best available at the time, it was still far from complete or accurate. Rear bumper had to be modified with sheet styrene to correct length and shape. |
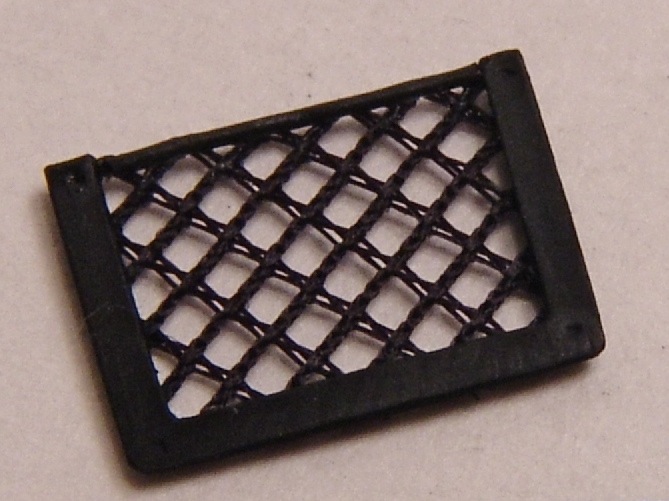 |
Completed assemblies were painted black... |
 |
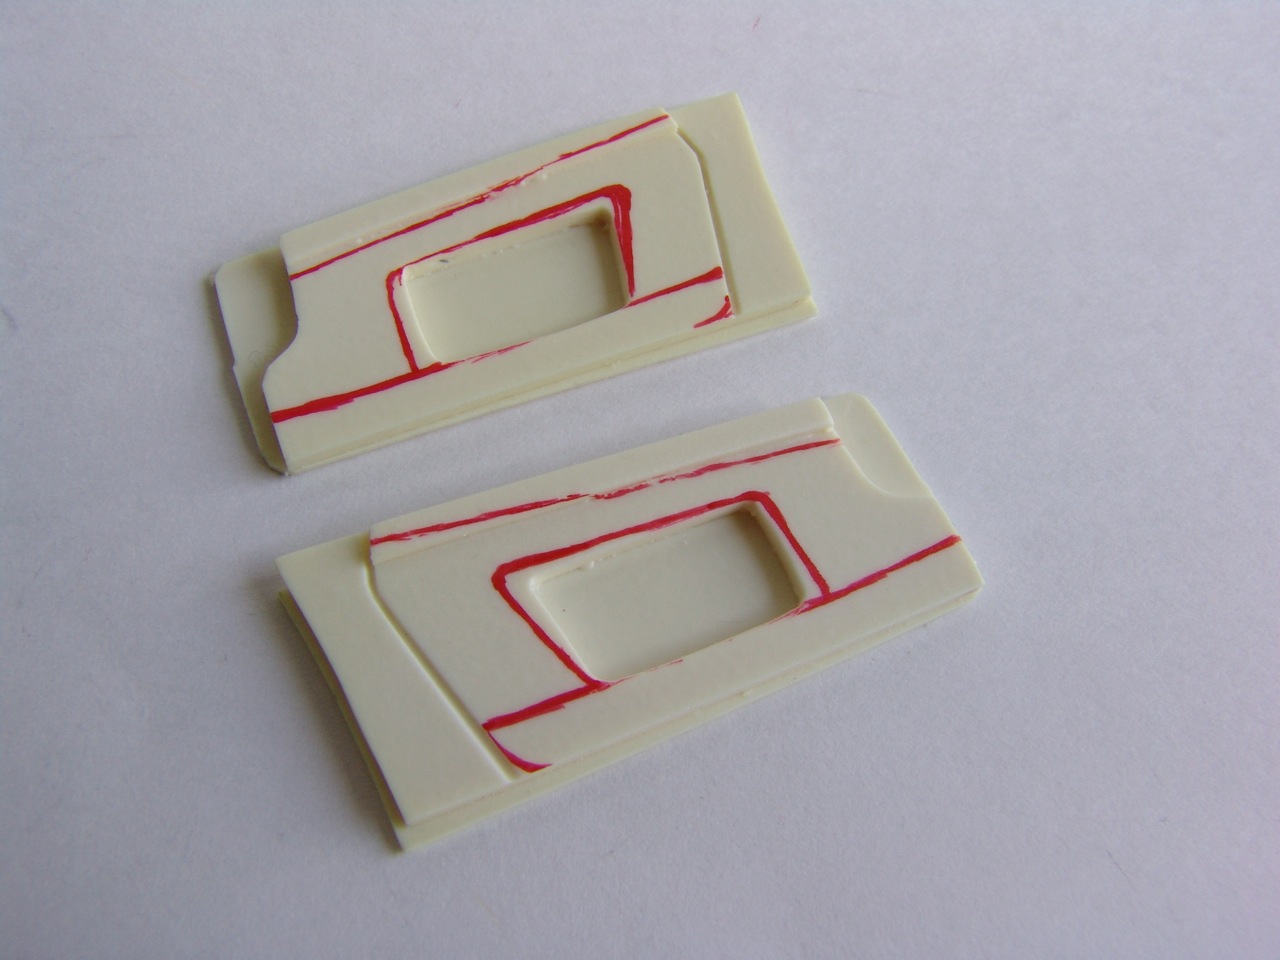
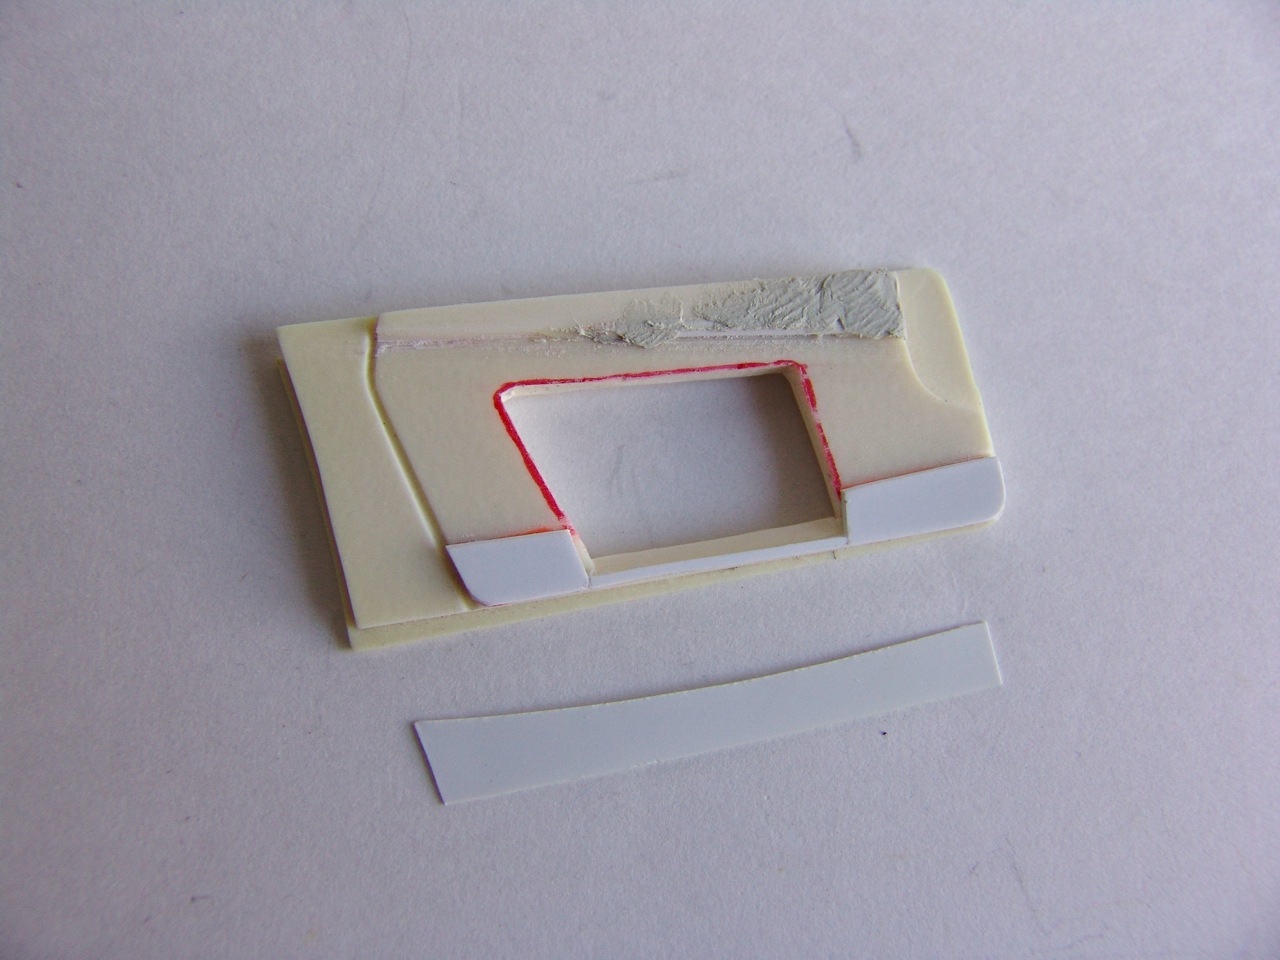
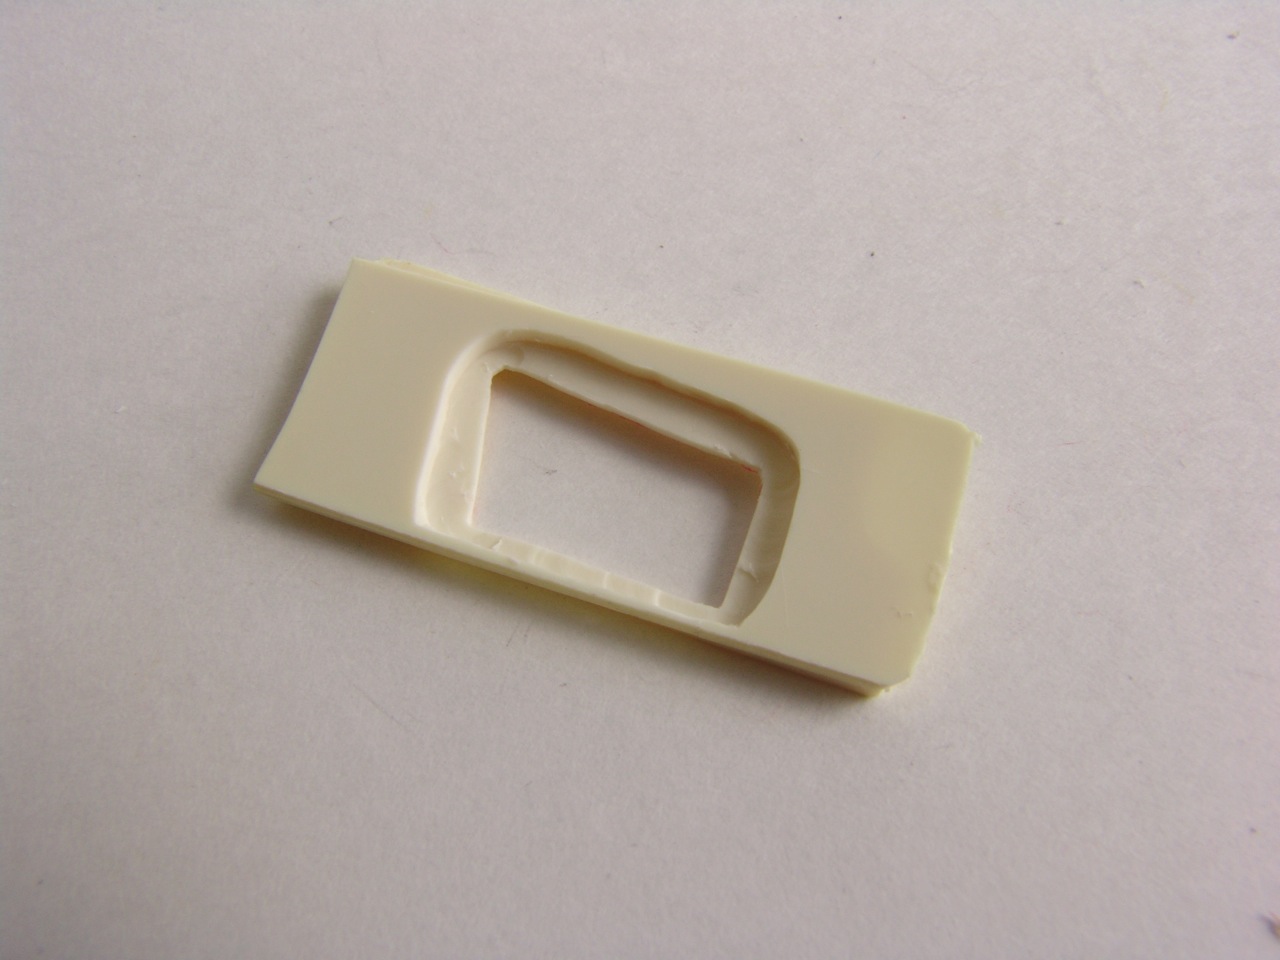
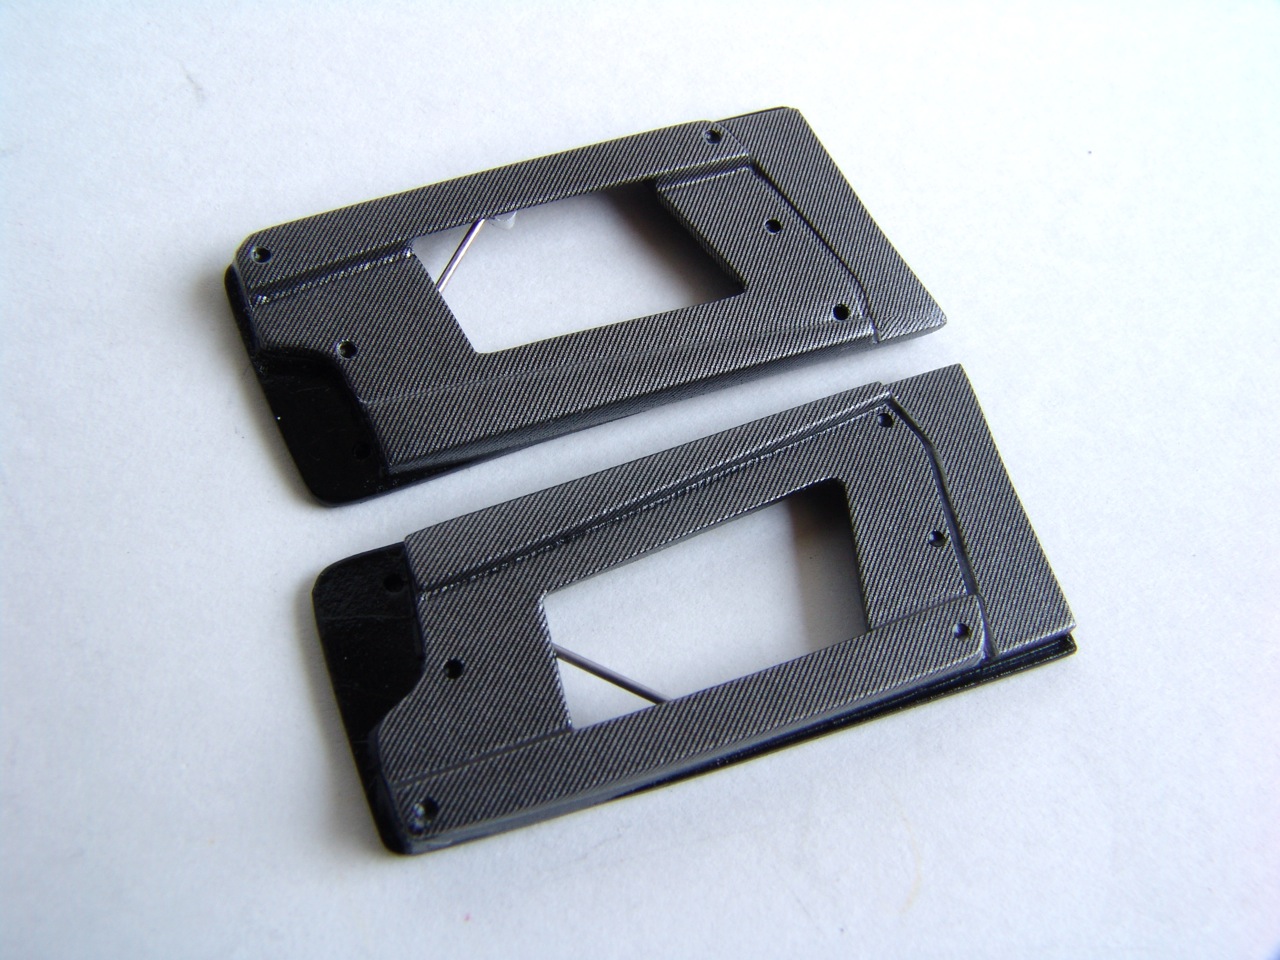
License plate opening was also modified since it is completely different on Stradale. Luckily, modifications were easy and straightforward. |
 |
...and attached to the interior back wall - behind the roll bar and on the central tunnel. |
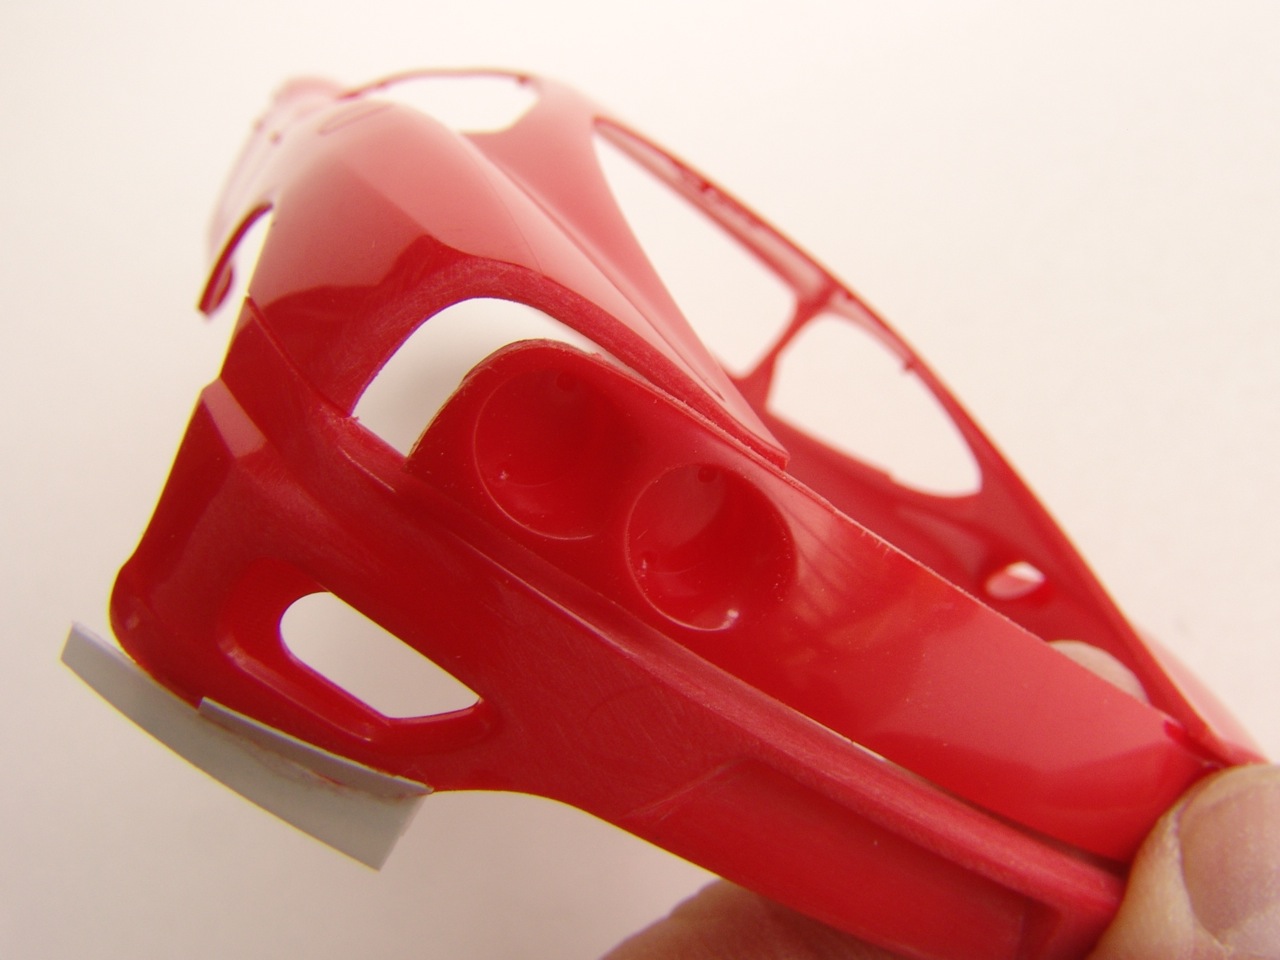 |
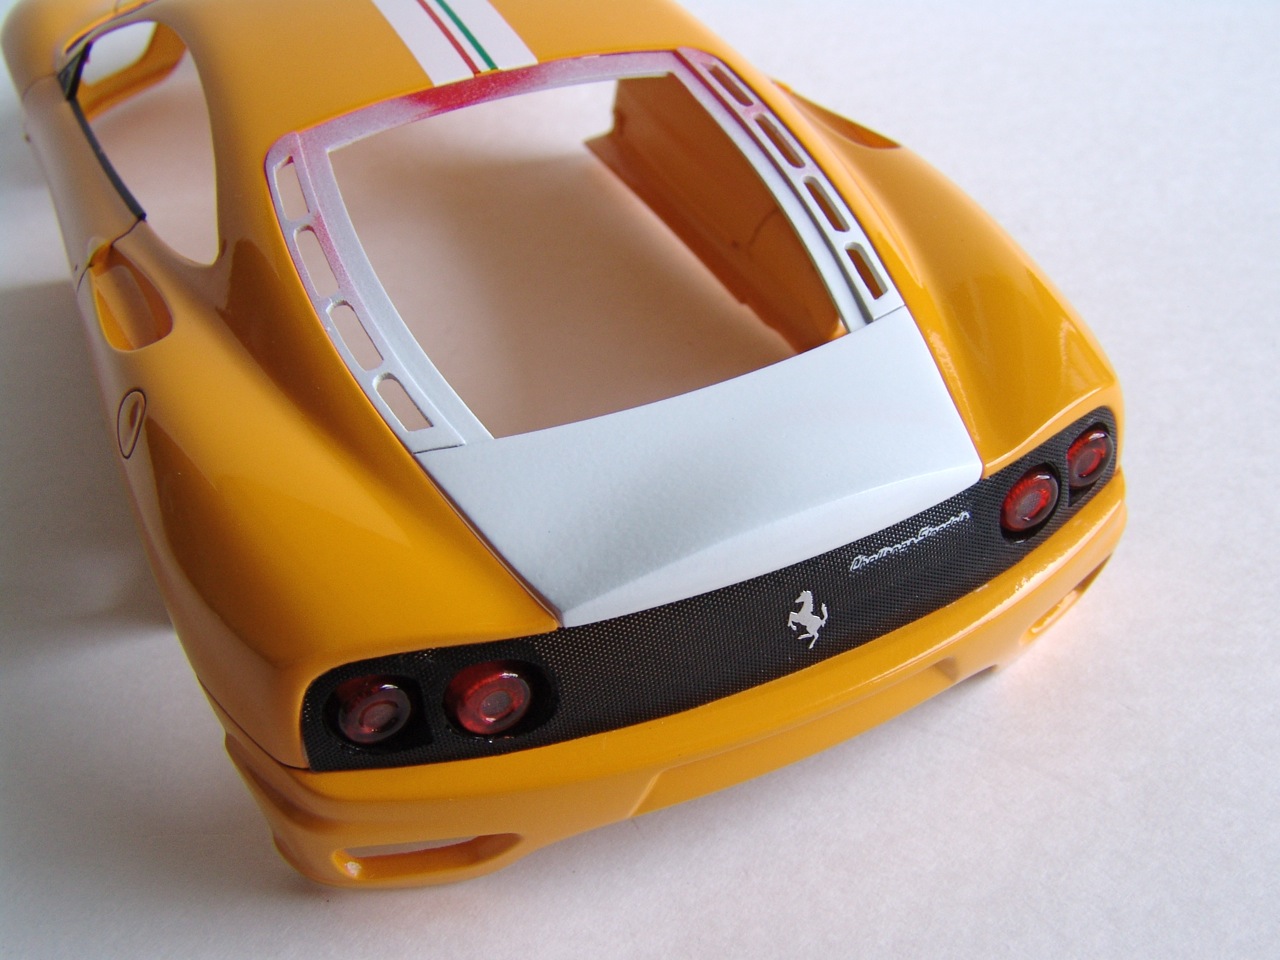
I wanted to make realistic challenge grille on this model, so rear panel was carefully cut out together with taillight housings, and edges smoothed with needle files. |
 |
The I practiced my long forgotten C/F decaling skills, screwed up couple of decals, but fingers still remembered how to hold hairdryer and a brush loaded with Microsol! Both rear diffusers and central console are MSM resin parts. |
 |
Openings for the exhaust pipes were opened up (I will use photoetched mesh there from AST set), bumper was reshaped, and everything sanded smooth and readied for first coat of primer. |
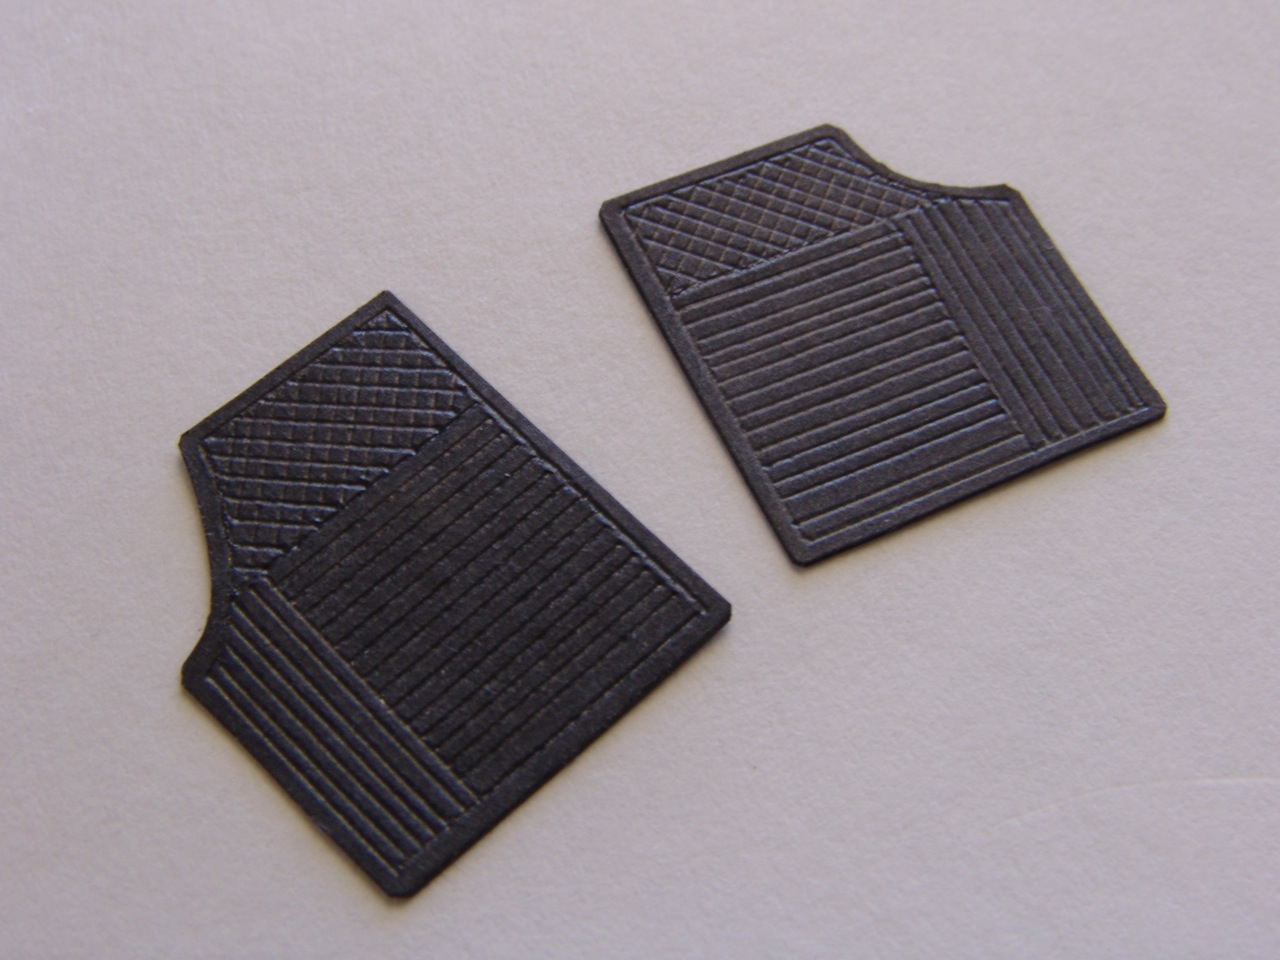 |
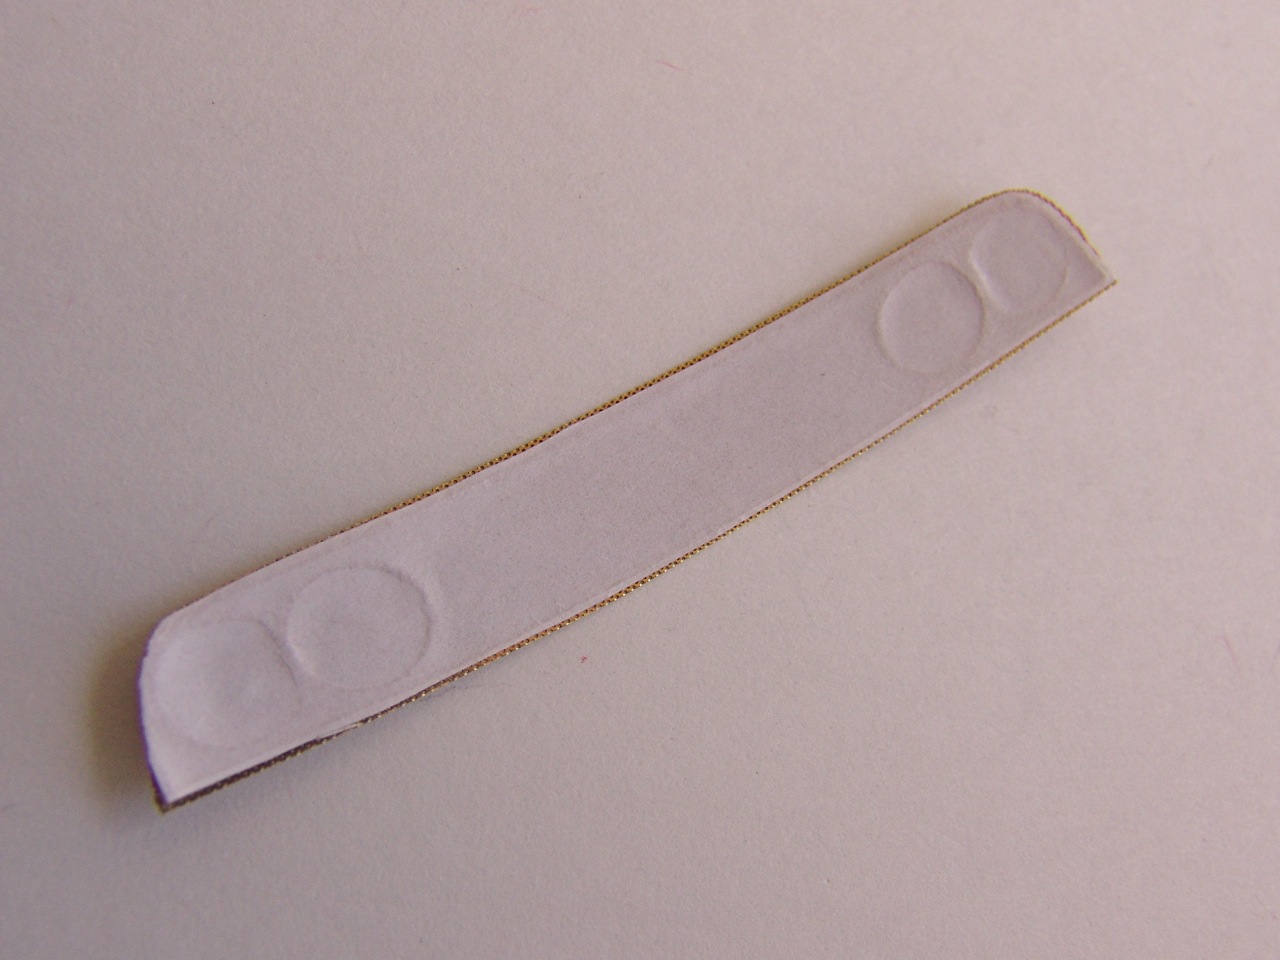
Then I made some floor mats for the cockpit - they are made from thin rubber on a real car, so I used thick black paper and embossed the pattern with sharp burnishing tool - they looked pretty convincing to me. |
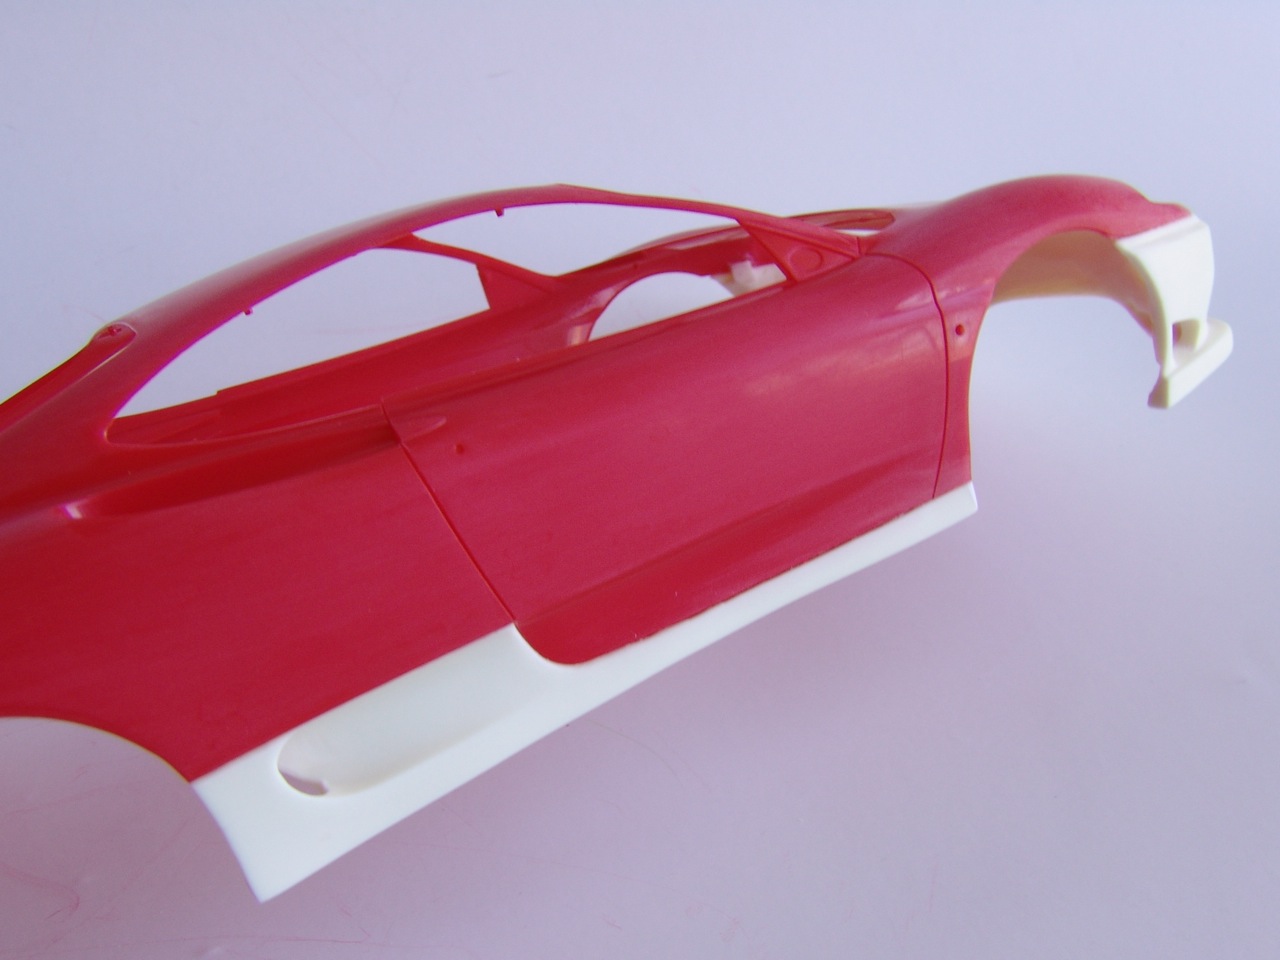 |
Side panels were fitted to the body - the fit was good, even though the panels were a bit short. I had to cut the body a bit here and there to make them fit. |
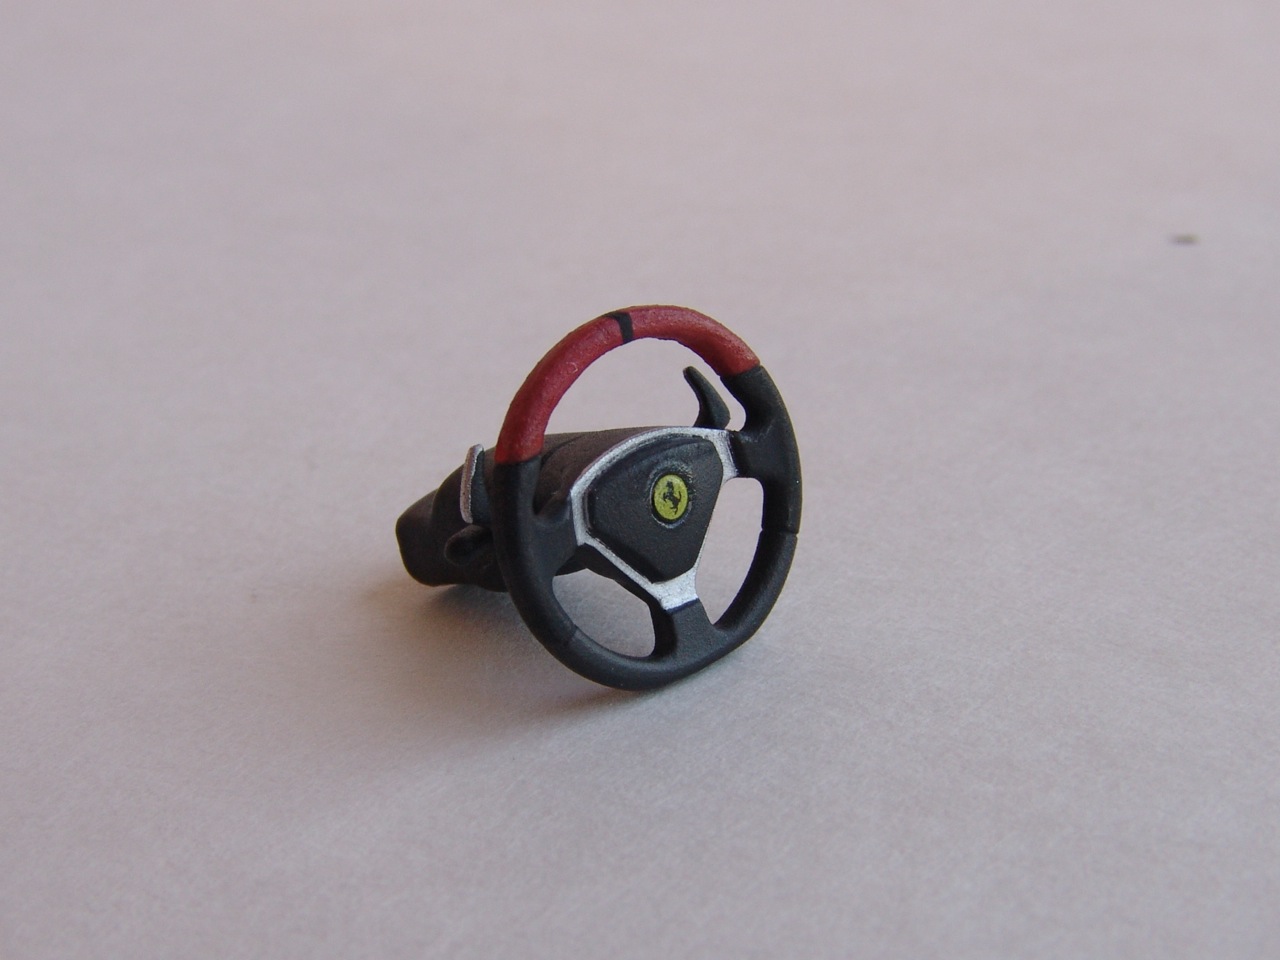 |
Steering wheel was slightly modified (cut and reshaped at the bottom), painted, and decaled. |
 |
Front bumper was attached to the body and panel lines adjusted and re-scribed. |
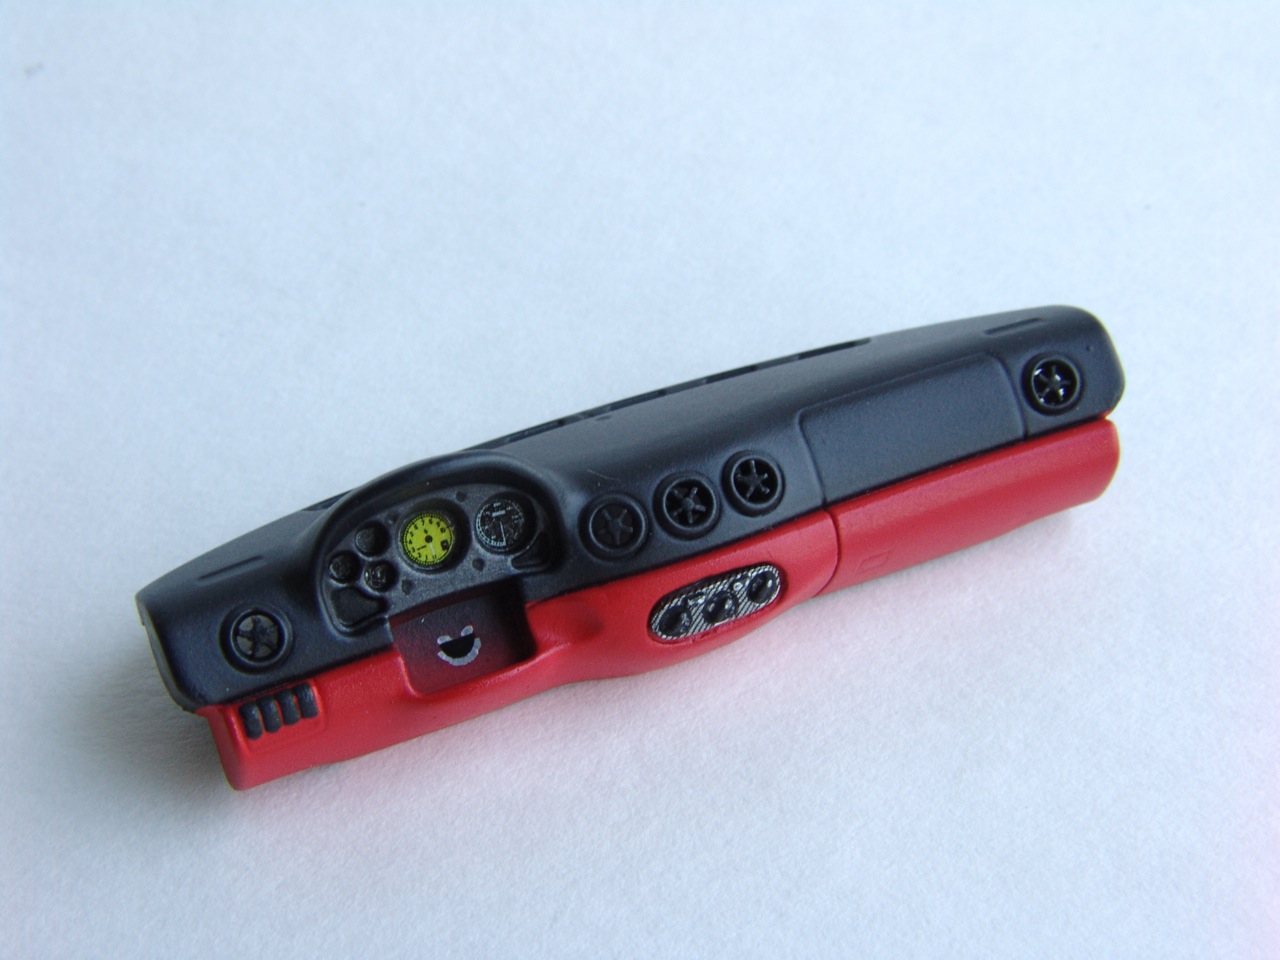 |
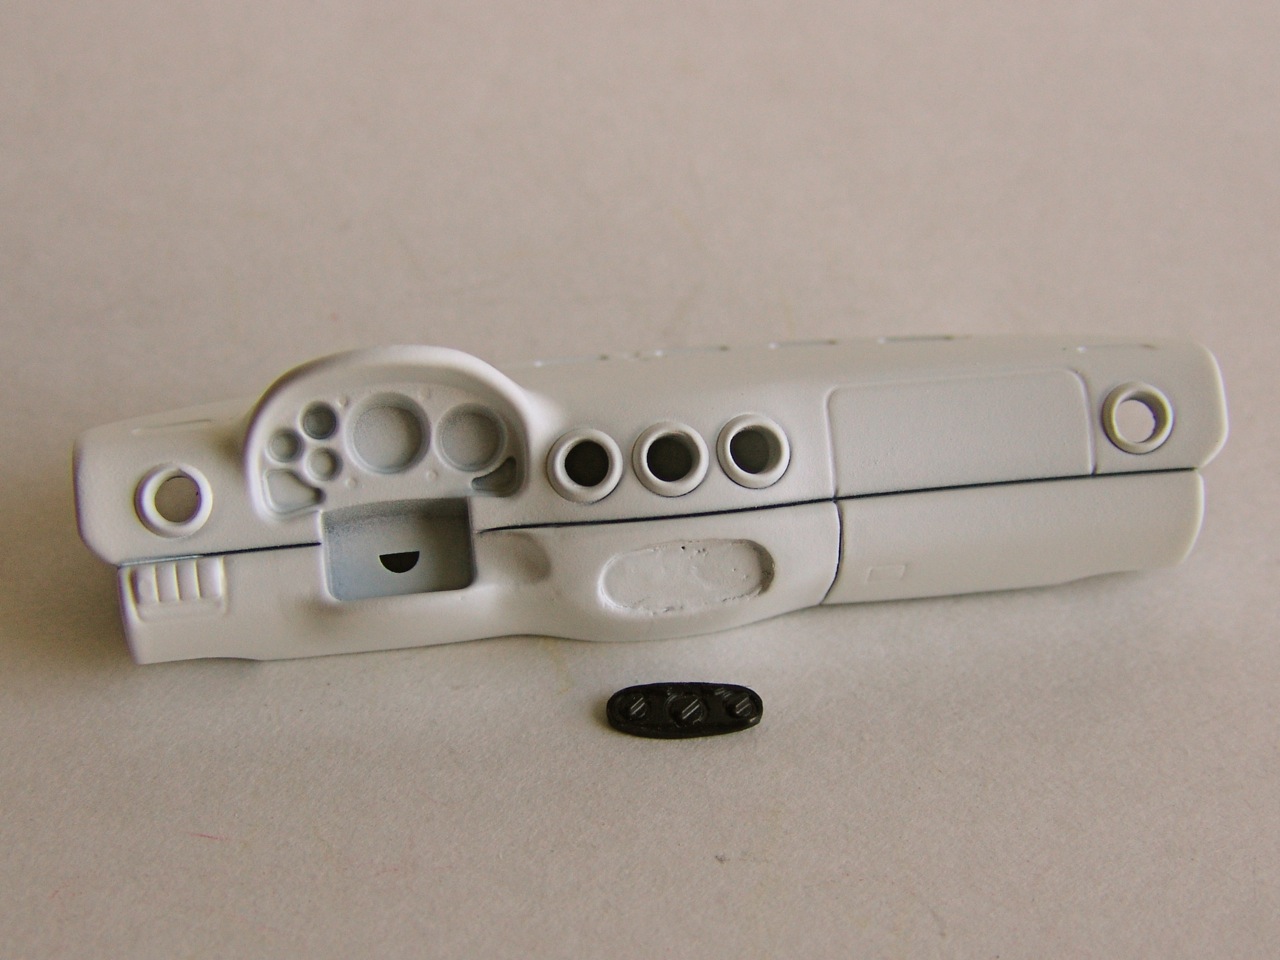
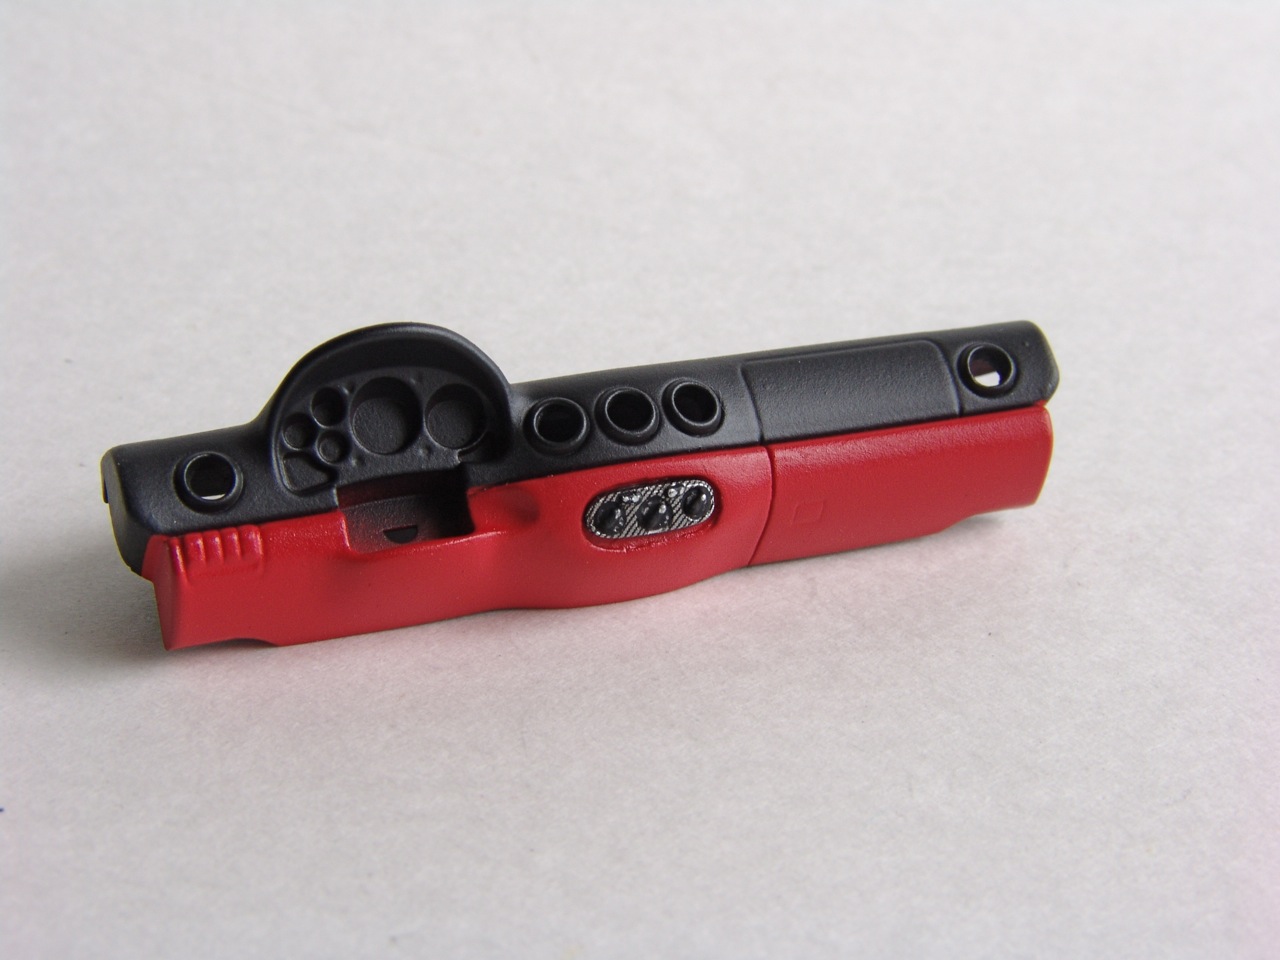
Finally, I added gauges (yellow Stradale speedometer in the middle!) to the dash, and painted the vents. |
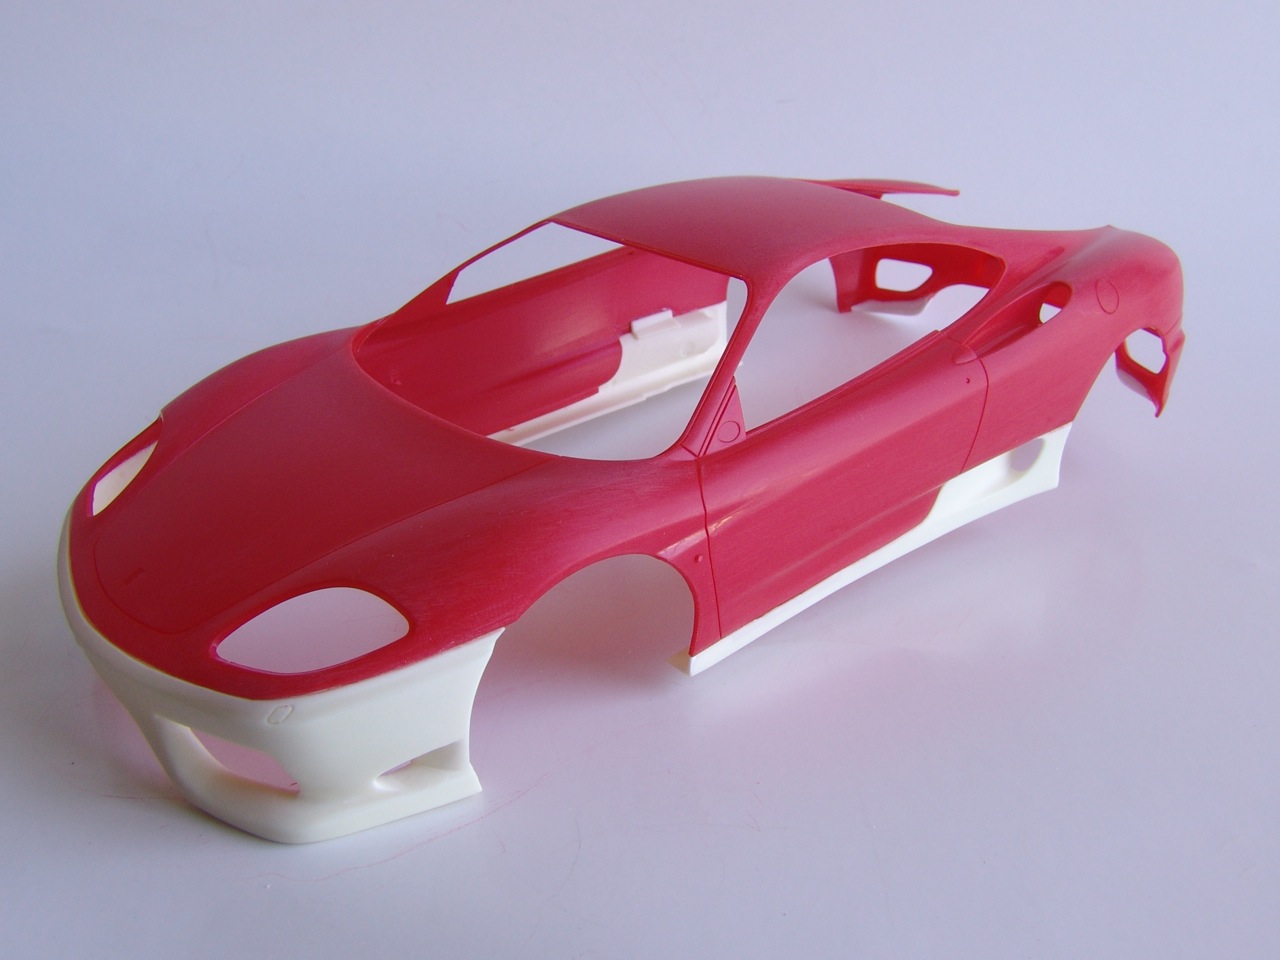 |
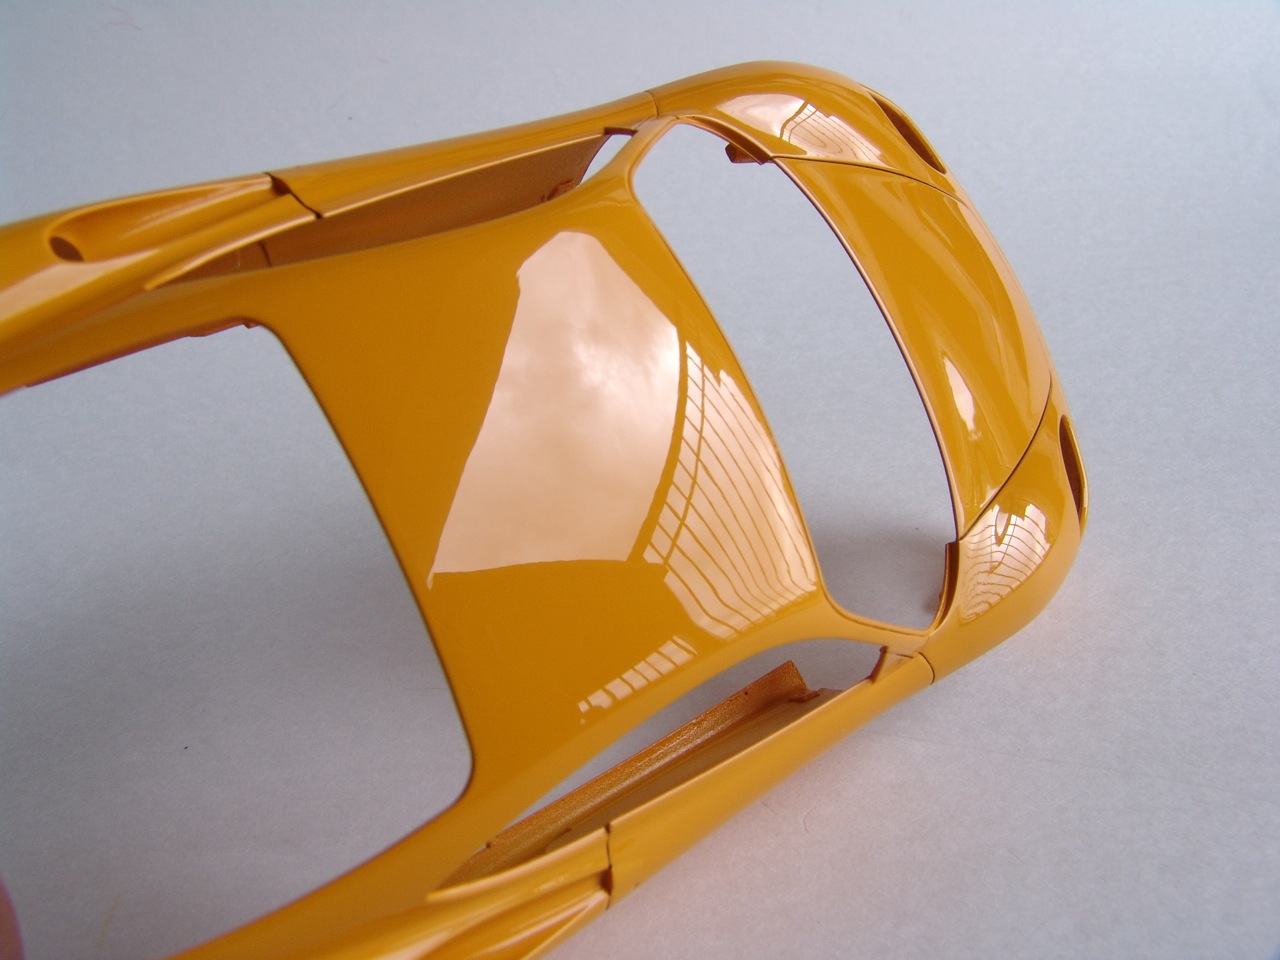
Finally, all panels were fitted, all mold lines and other little flaws sanded off, body cleaned and ready for primer. I also wet-sanded entire body with 1500 grit paper to create uniform surface. |
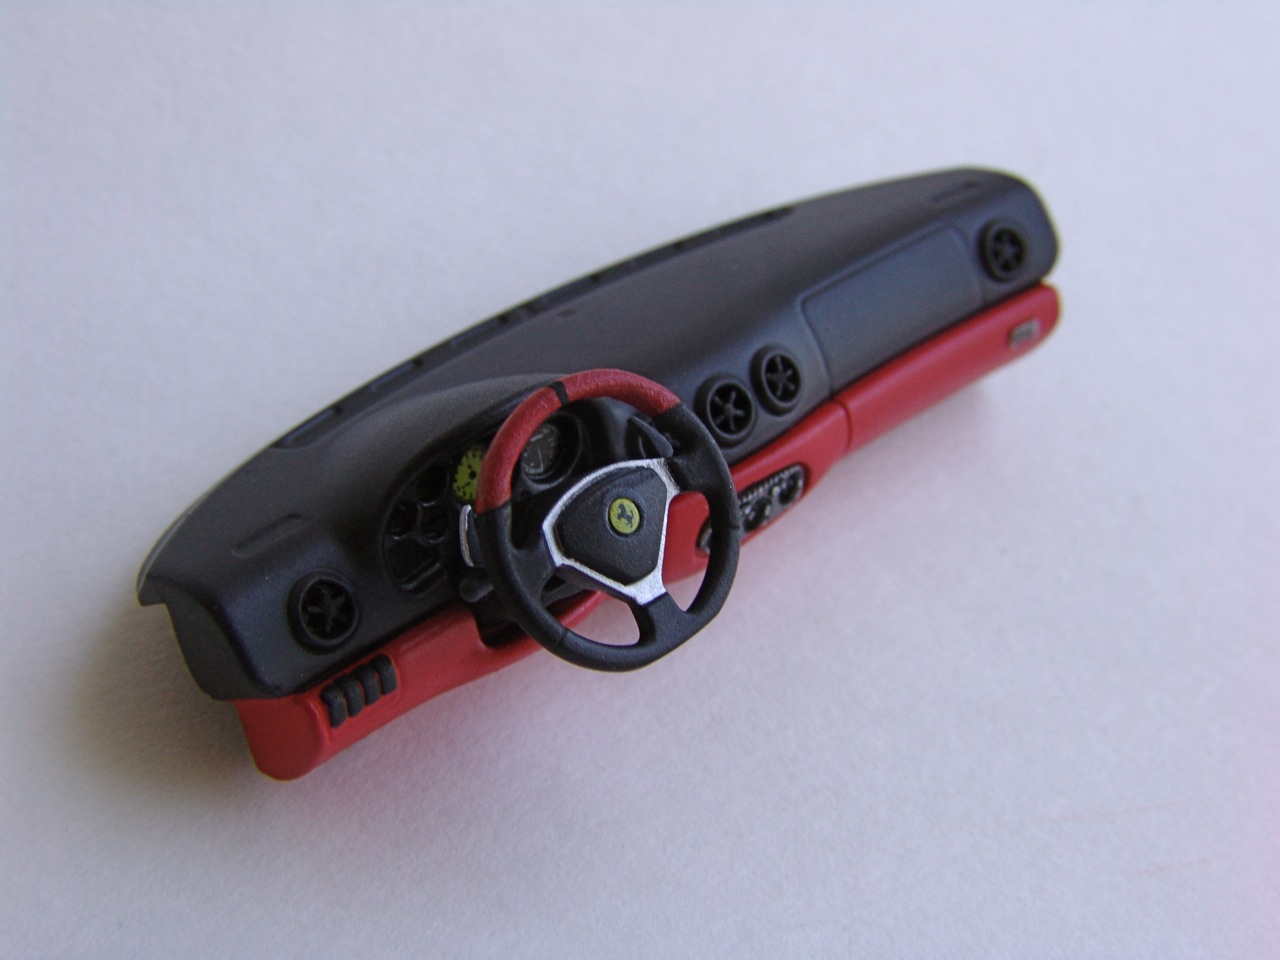 |
Dash was detail painted and fitted with the steering column and Challenge Stradale plaque on the passenger side. |
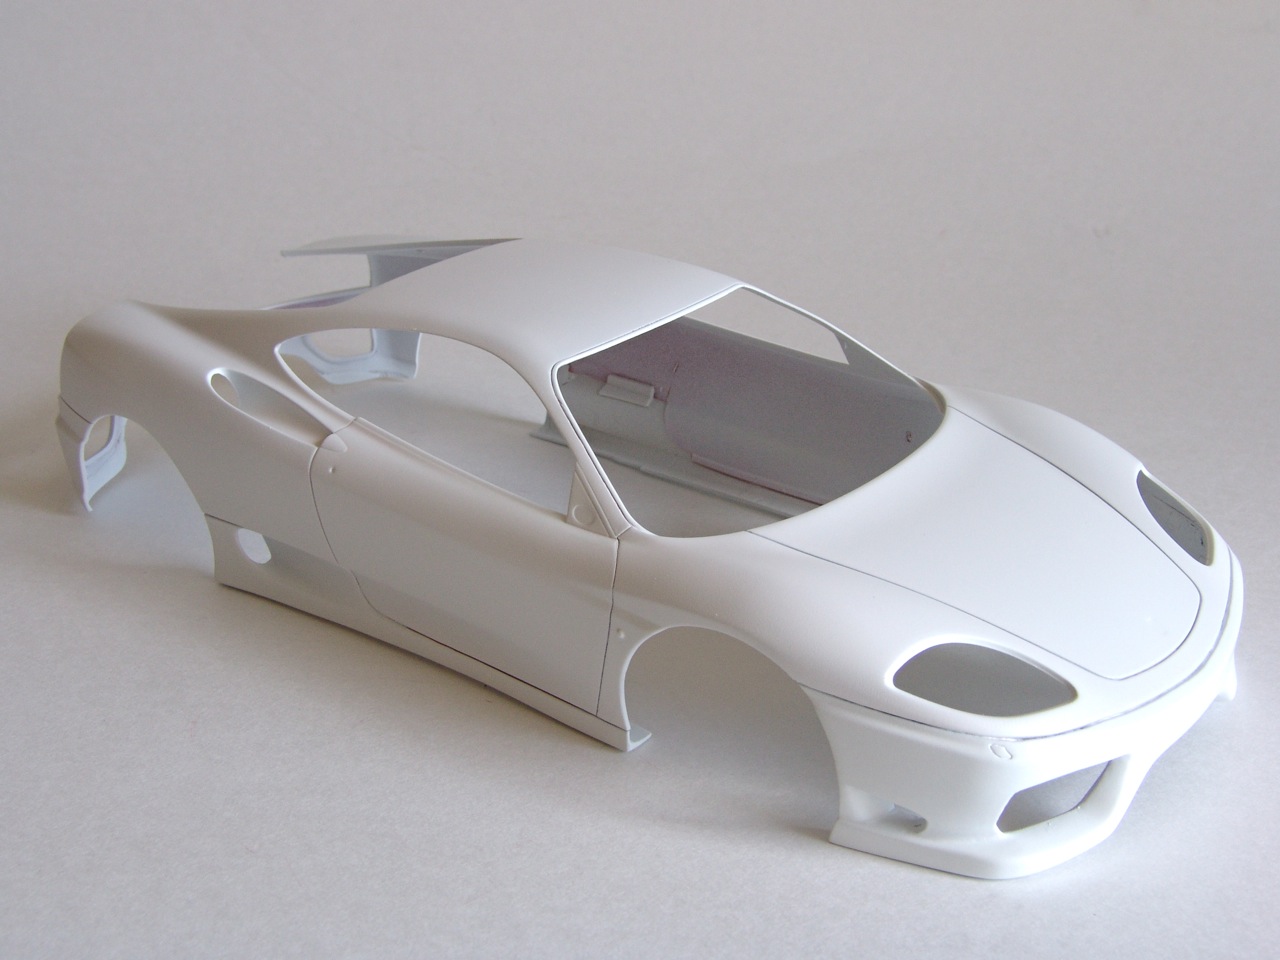 |
In order to check for imperfections I lightly covered the body in gray primer, but it looked good so I continued with two coats of Tamiya white primer 15 minutes apart. In about an hour, body was ready for paint coats. |
 |
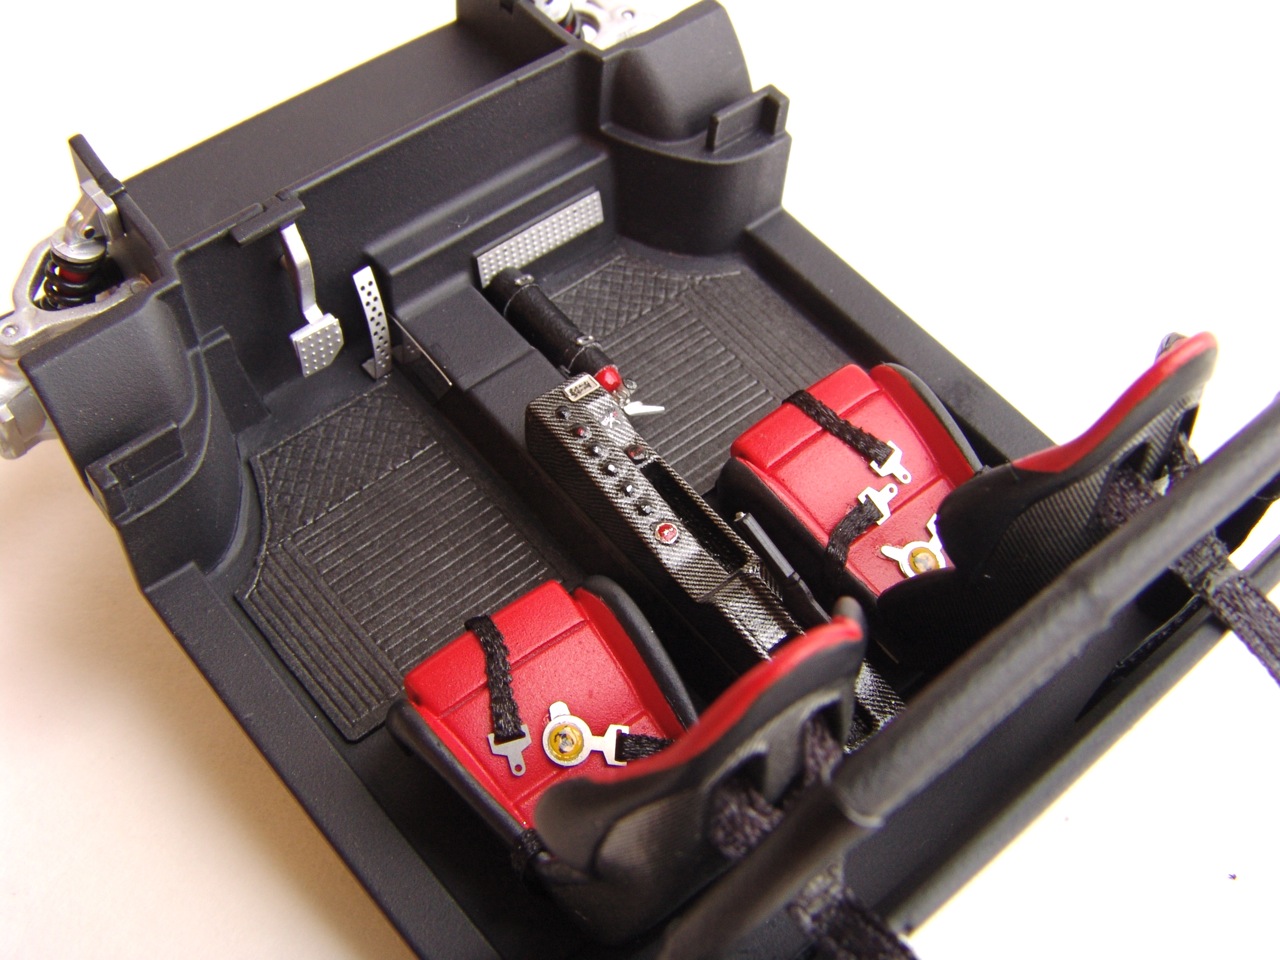
After all the work I've done to modify the interior, it would have been simply wrong to just glue the seats to the floor, so I made seat rails from the I-shaped brass rod, painted them black, and glued them to the seats. |
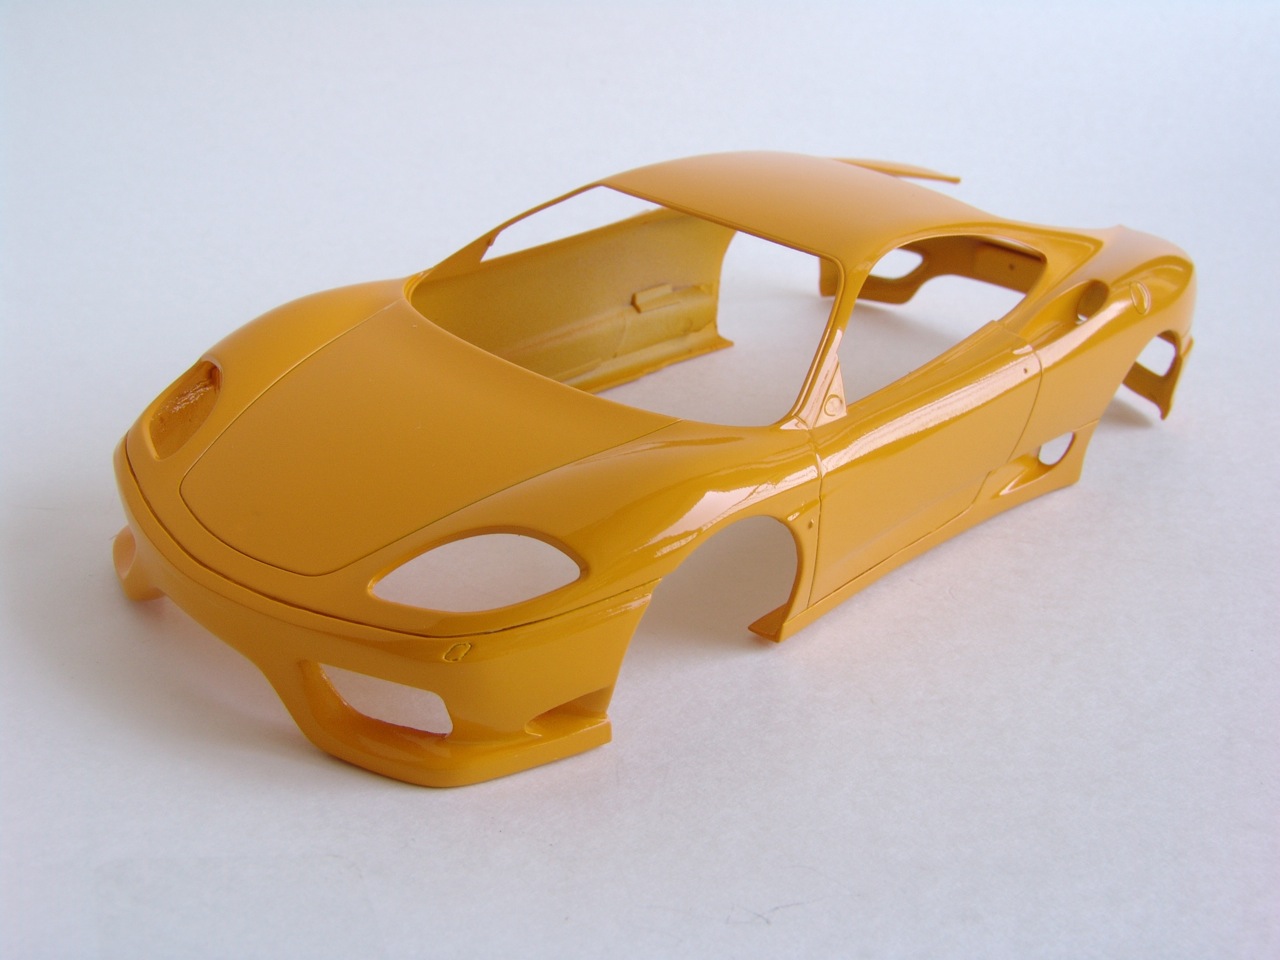 |
I used Tamiya Camel Yellow drained from spray can and sprayed 2 mist coats and 2 wet-coats with my airbrush. Tamiya paints are good for spraying straight from the can, require no additional thinners and cover really well. This is how body shell looked after second wet coat - almost no texture. |
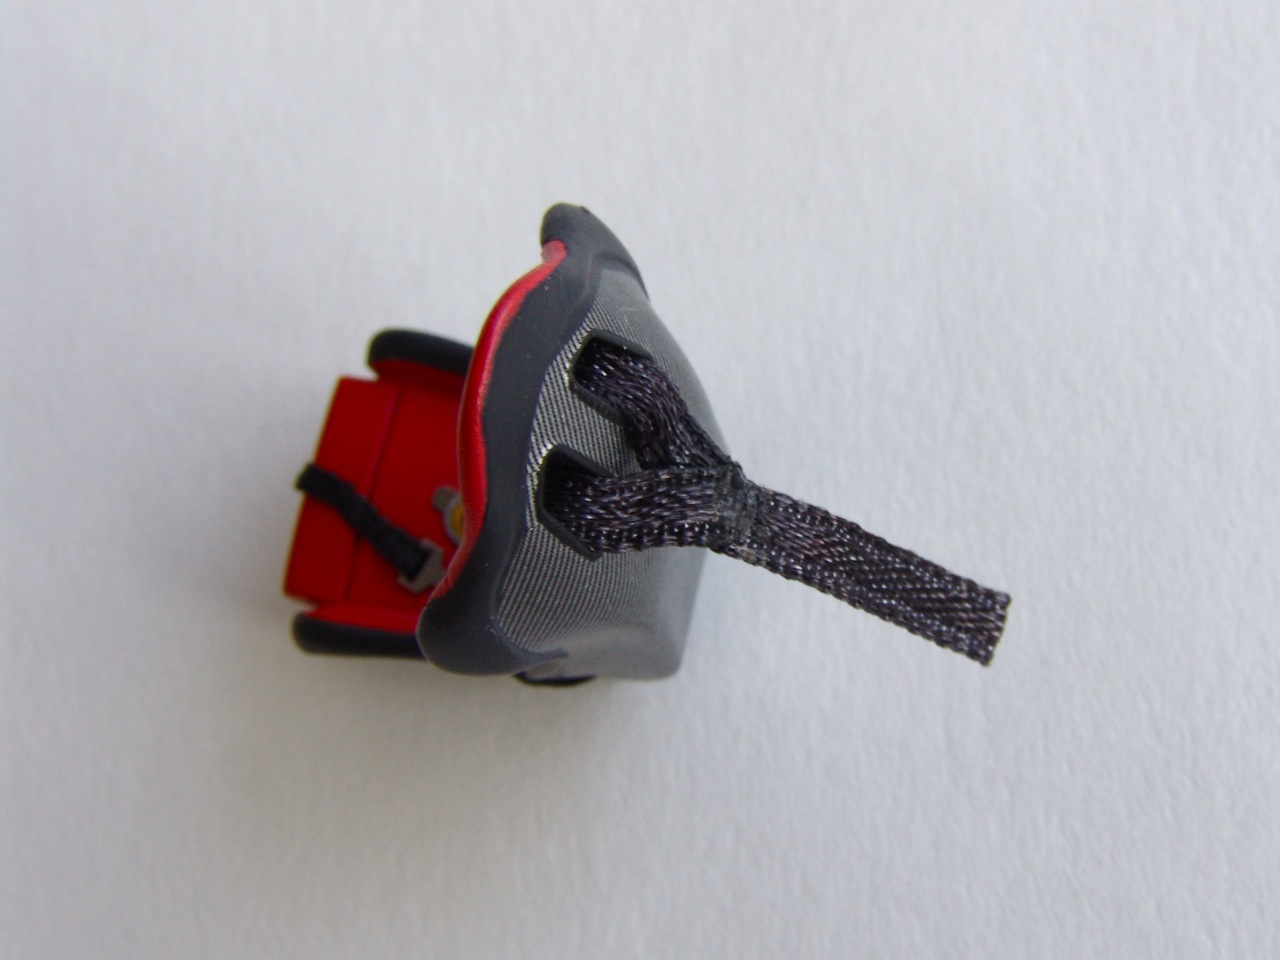 |
Racing harness ends were joined (melted with hot tweezers) together and extended with the piece of the belt. |
 |
Finally the body was polished with Tamiya polishing compounds and panel lines were given a wash with a mix of Tamiya acrylics. |
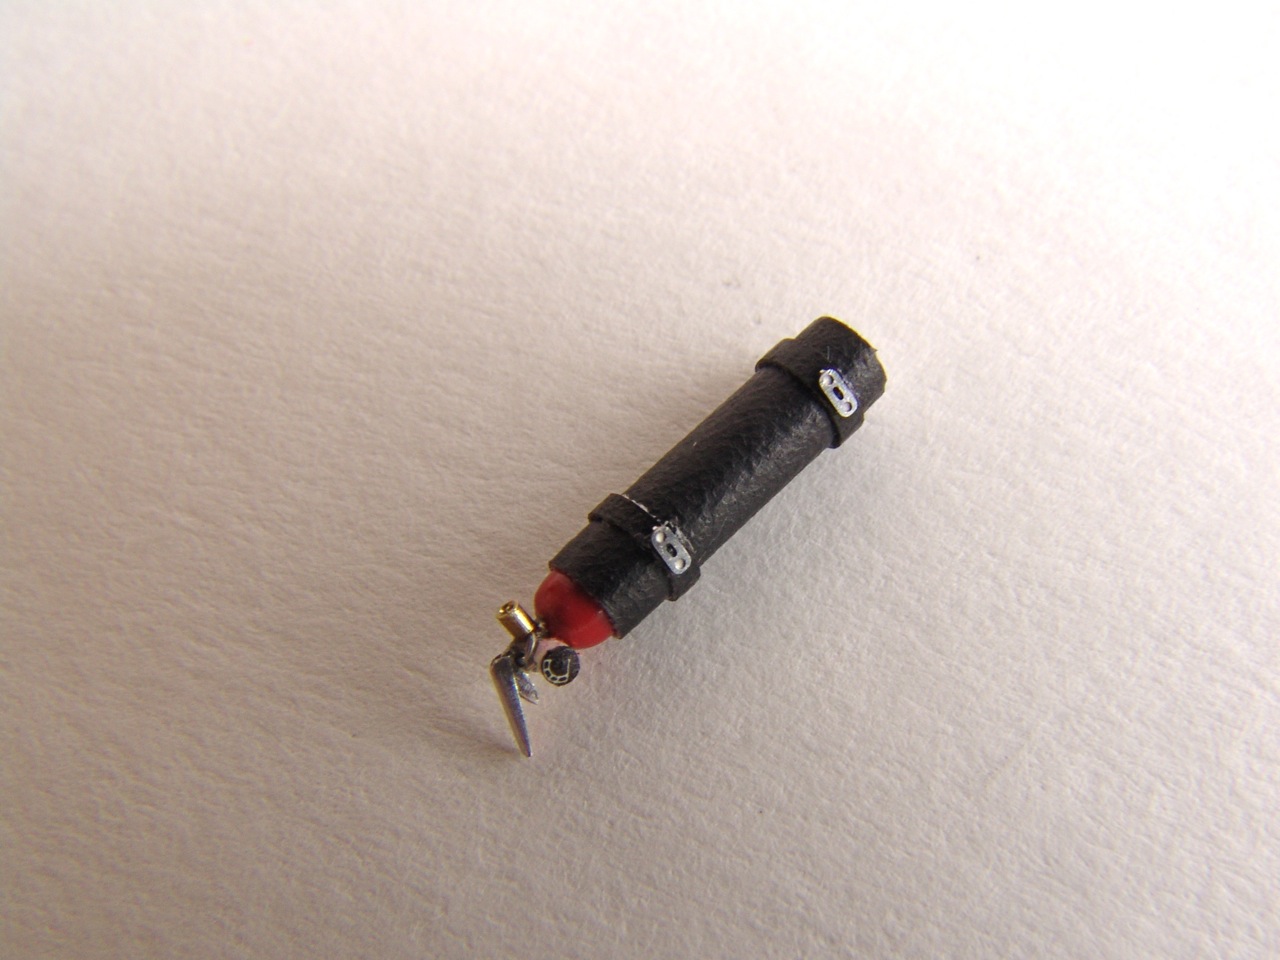 |
Then I scratch-built fire extinguisher for the passenger seat - piece of sprue was fitted with white metal neck, a piece of tube (nozzle) and a handle made from soda can. I also fitted a gauge made from styrene rod and topped it with home made gauge decal. Finally, it was encased into black leather case with two straps with photoetched locks. It is tiny! |
 |
After wash was completely dry, I waxed bodyshell with Treatment model wax to a high shine. The color was spot-on match for real CS! |
 |
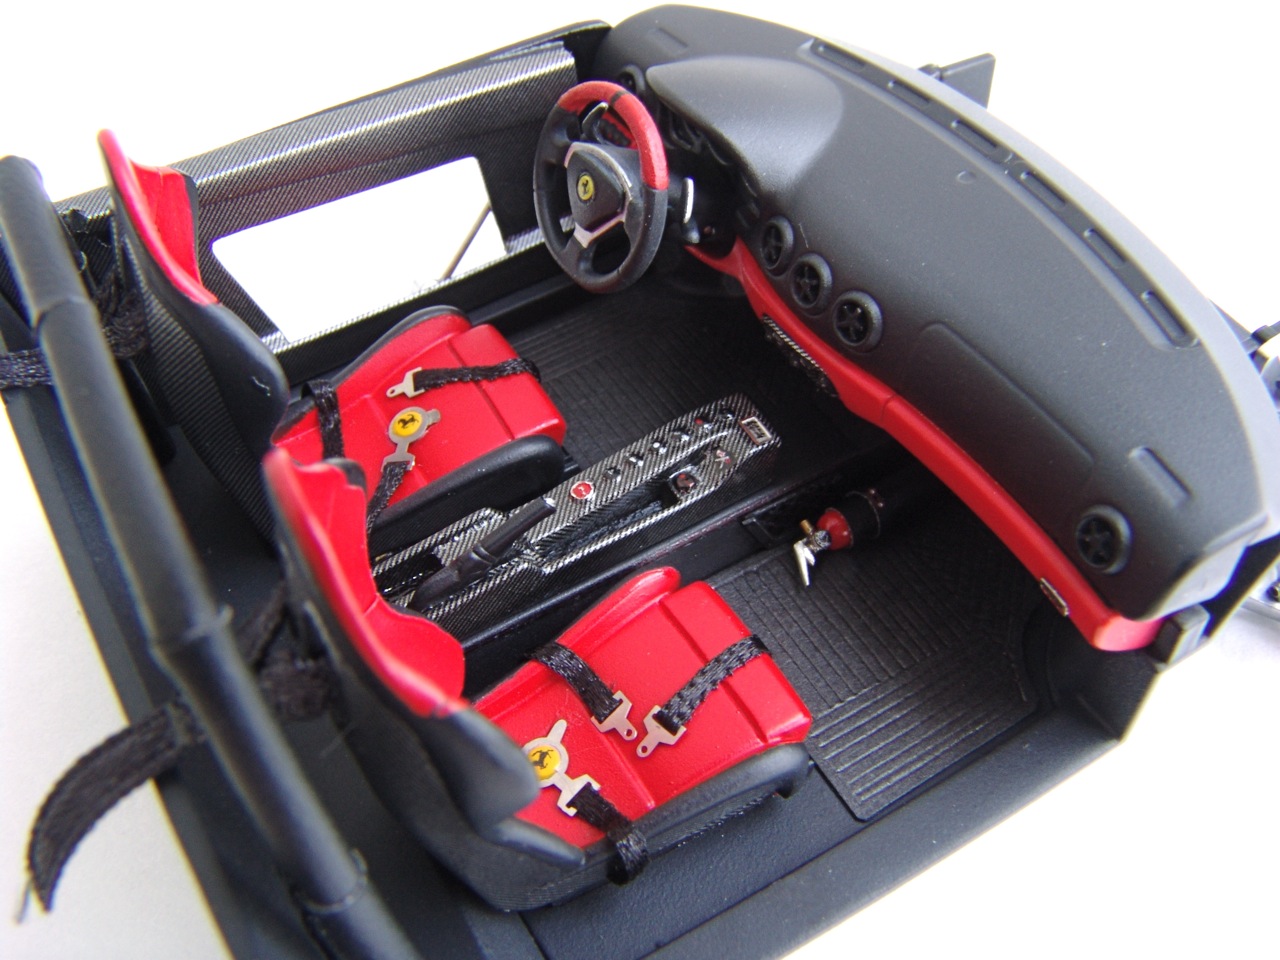
Seats, floor mats, central console, pedals, etc were attached to interior tub. Central console was detail-painted - the flags are painted free hand, little name plate on top is P/E part. (Edit: Both name plate and flags were replaced with custom-made P/E pieces later). |
 |
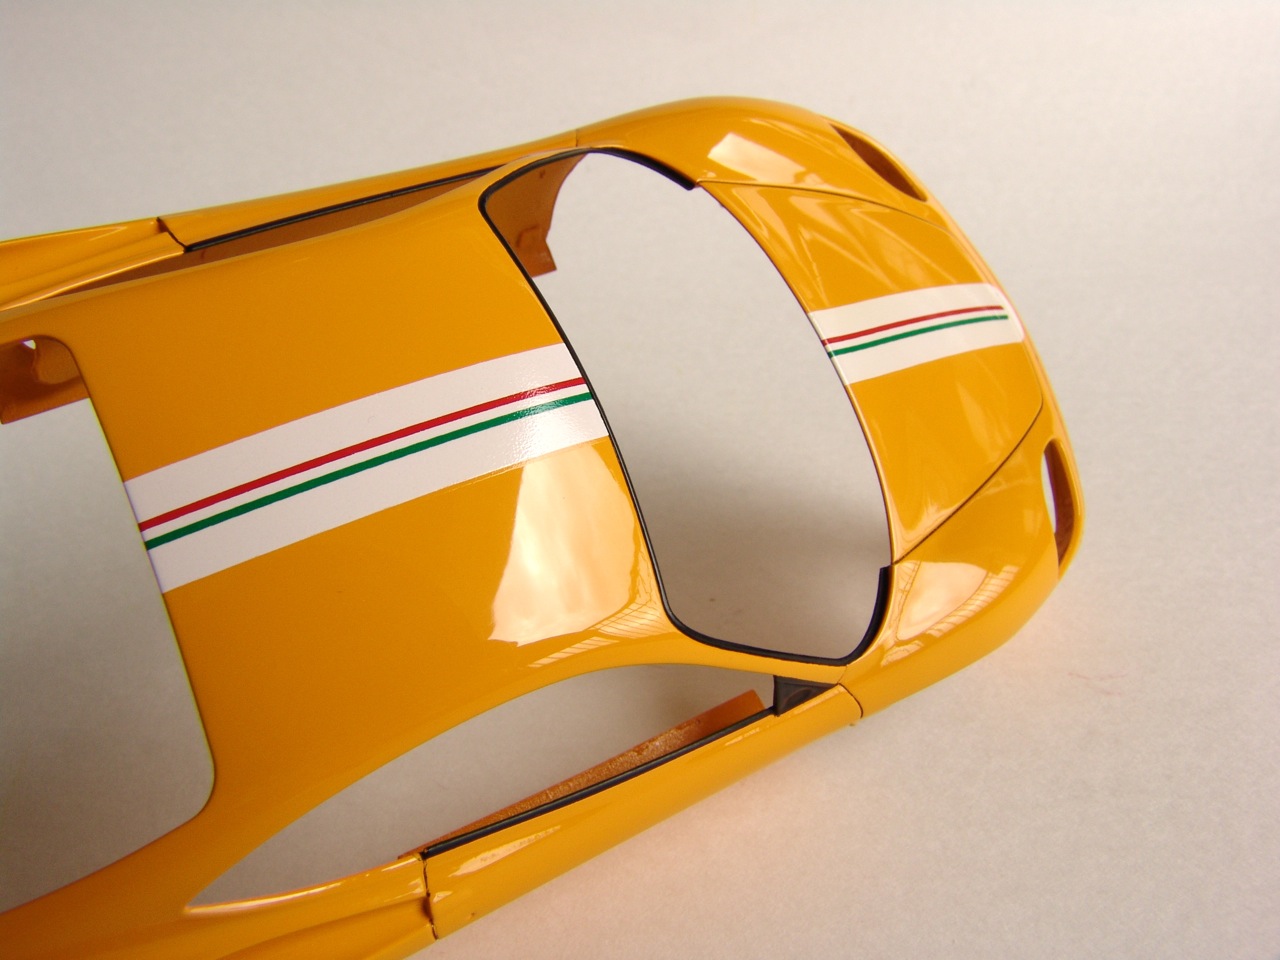
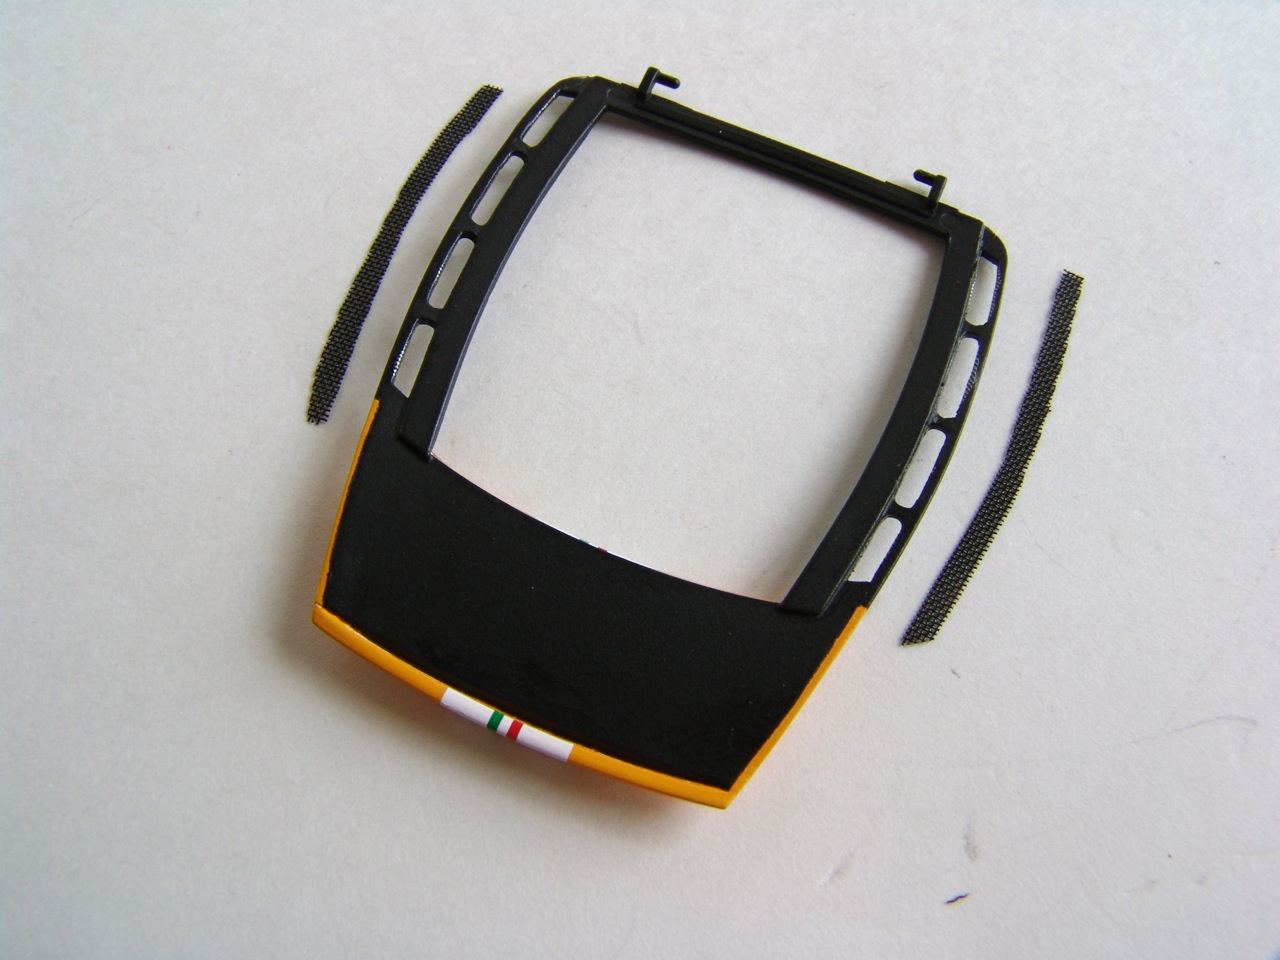
Finally, CS stripe from MSM transkit was applied to the body (using lots of Microsol to conform to the curve) and window trim was painted free-hand with Tamiya semi-gloss black acrylic paint. |
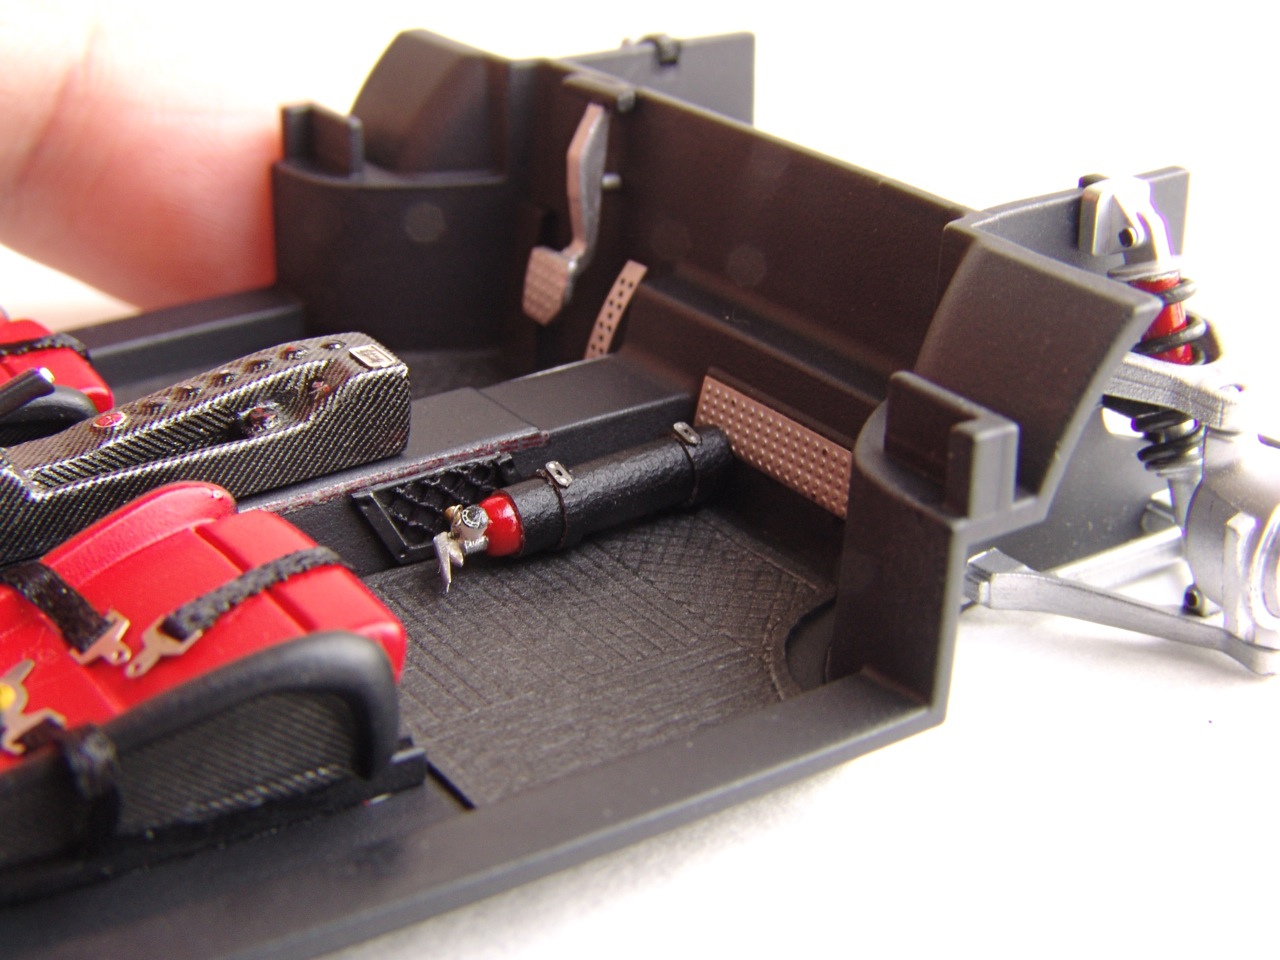 |
Fire extinguisher was installed in the passenger foot well next to the mesh pocket. |
 |
After decals were completely dry, I waxed the paint once again with Treatment wax to seal the decals. |
 |
I also added photoetched kick panel for the gas pedal and one in the passenger footwell. |
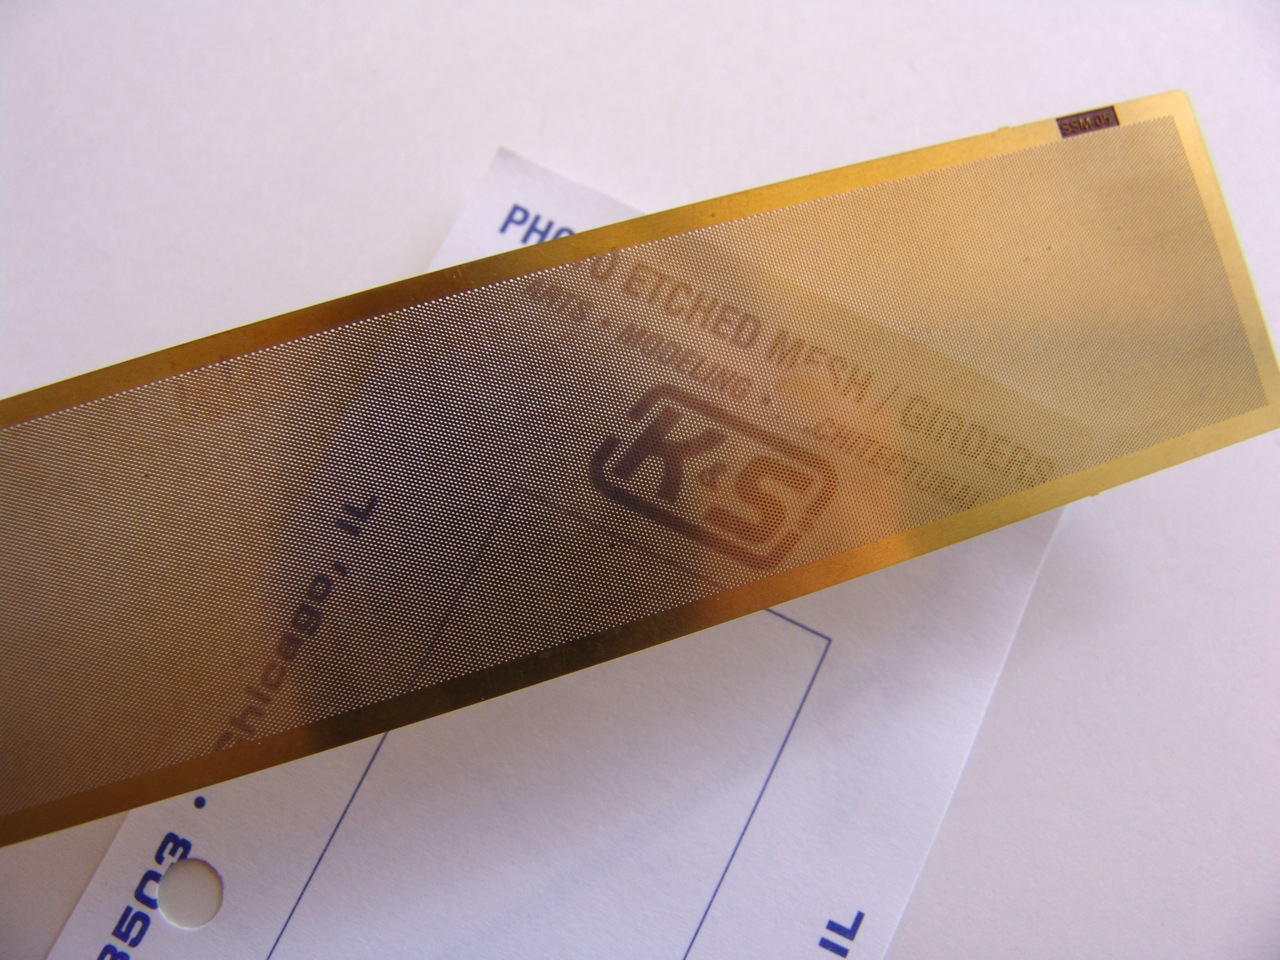 |
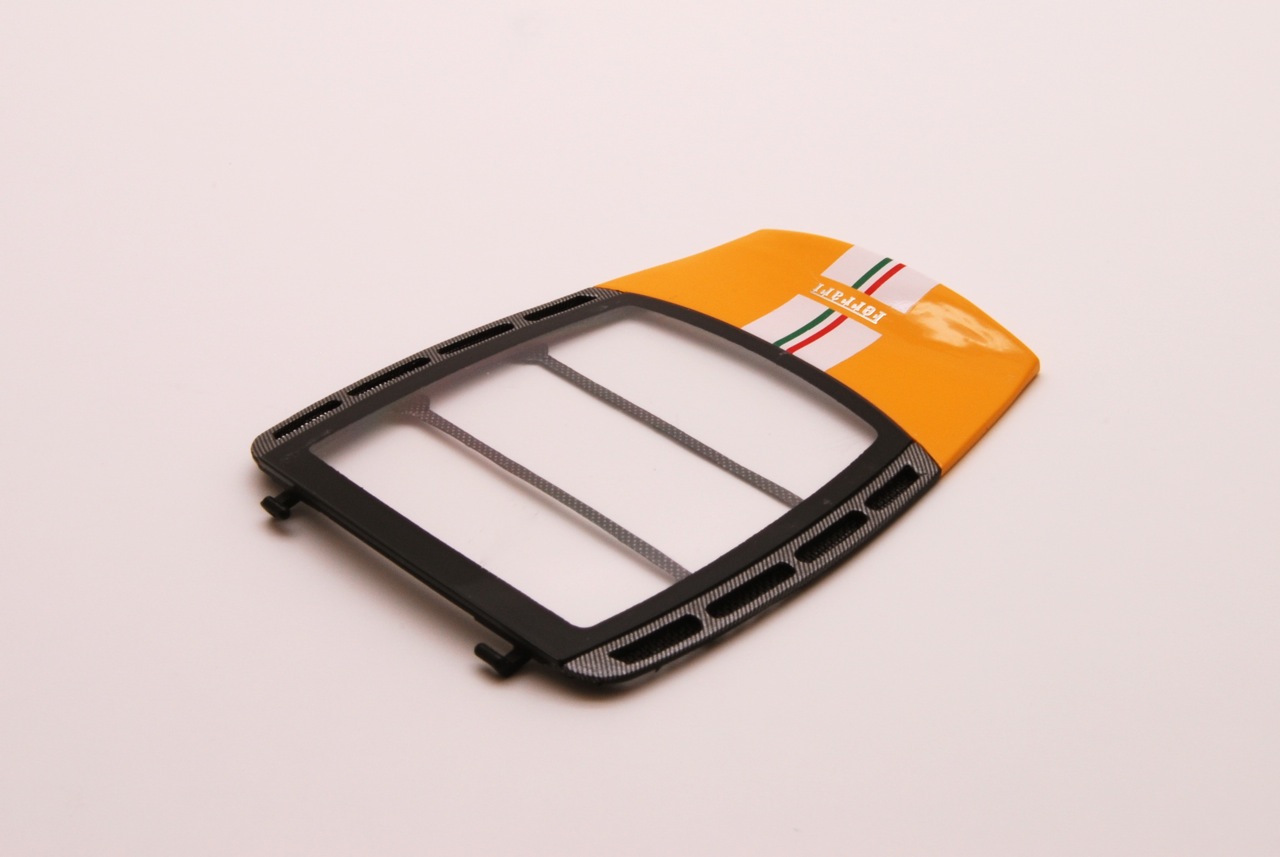
Then it was time to figure out how to make a challenge grille. On real car it is a fine round-hole mesh painted satin black. After looking high and low I found some K&S photoetched mesh with round holes at my local hobby store. I though it might work. |
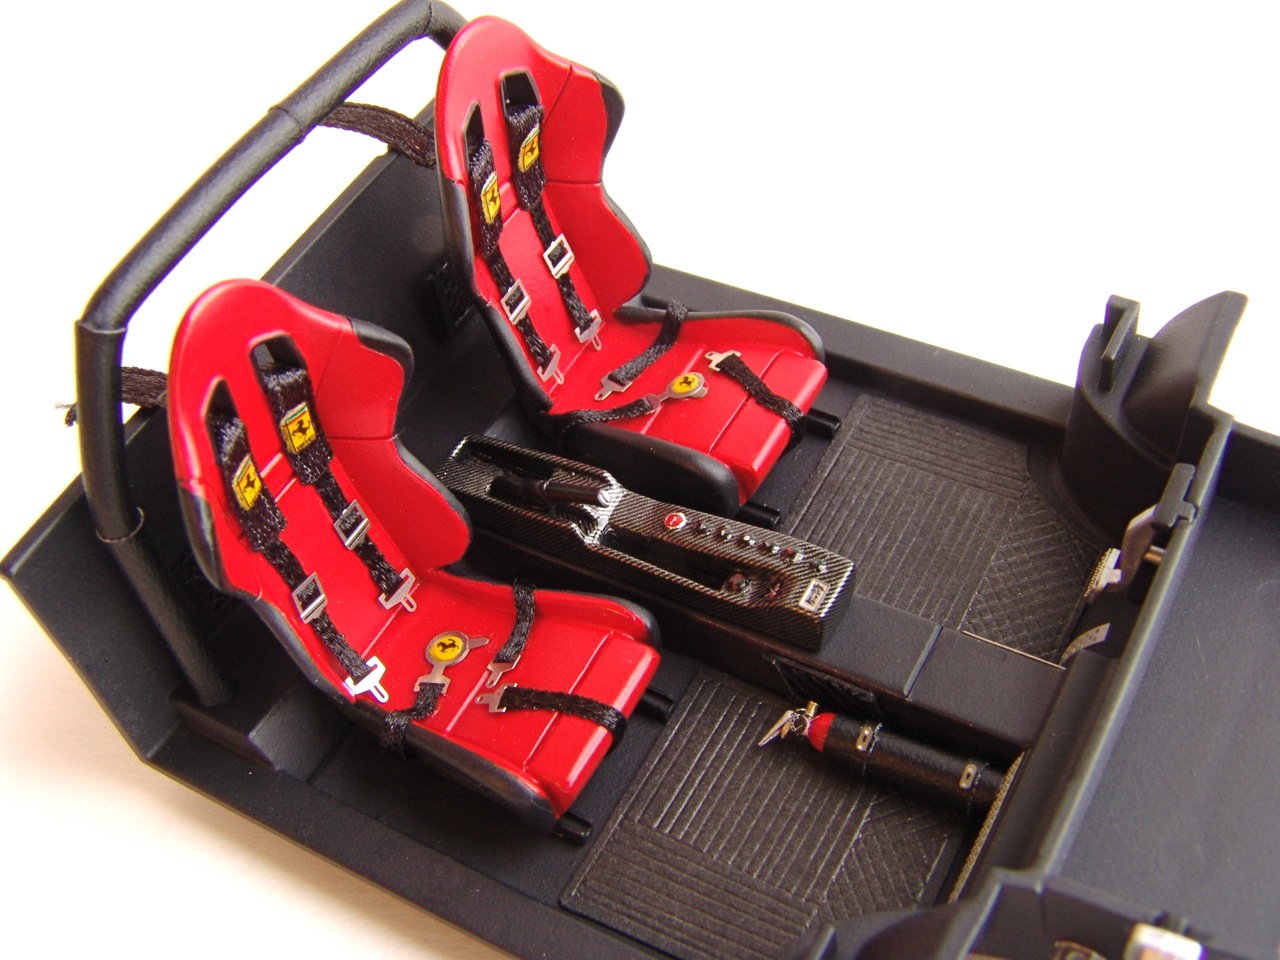 |
Another picture of the semi-assembled interior. |
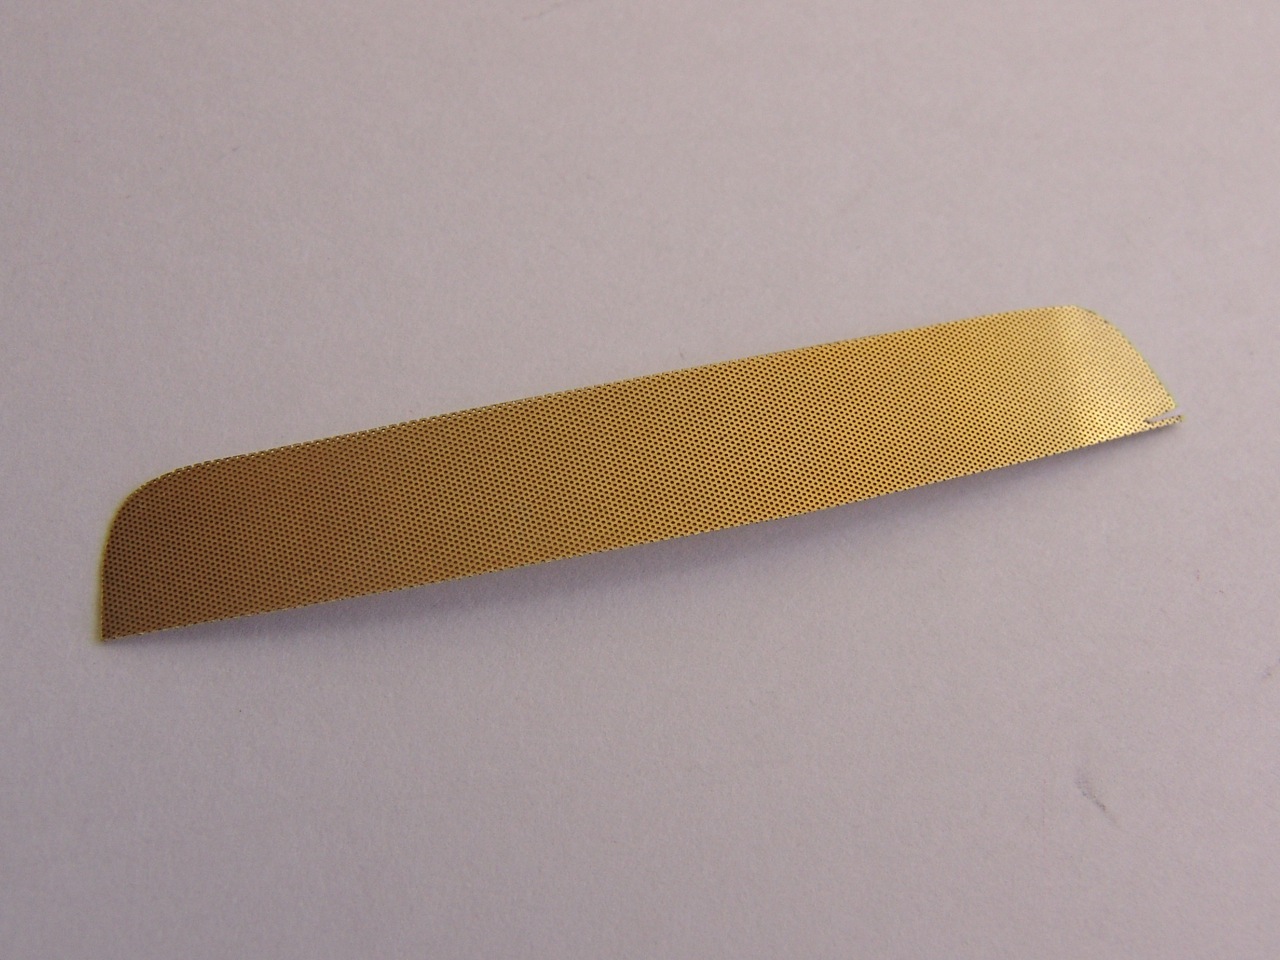 |
I cut a rough shape of the grille and started shaping it up. The downside of this mesh was the fact that it was very stiff - very hard material. But it was correct scale! |
 |
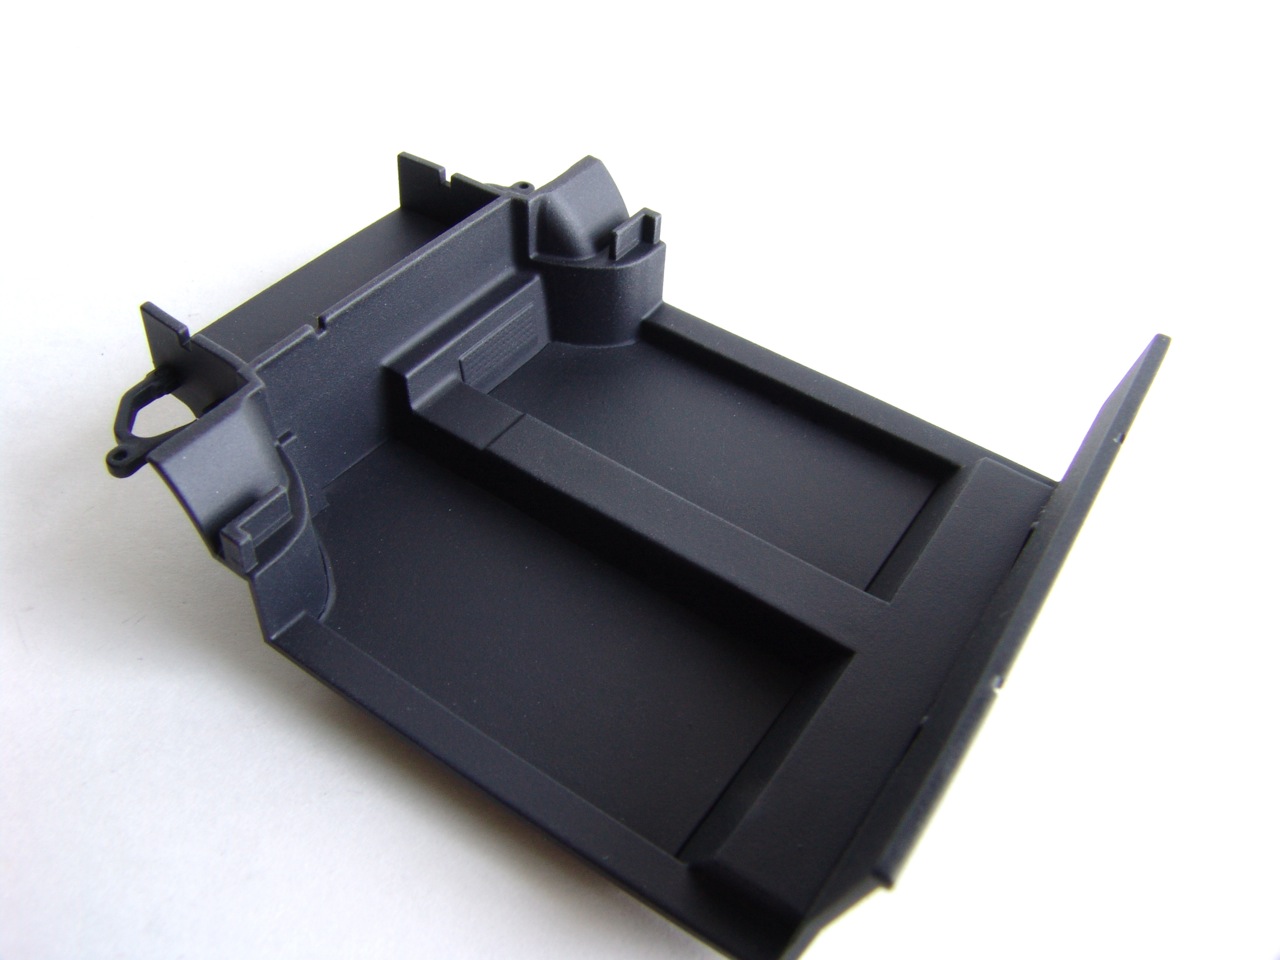
Finally, I added dashboard and door panels to the interior. |
 |
I made a mask using plastic part that I cut out earlier and transferred it to the mesh. I also made indents in the mesh where the taillights would go. |
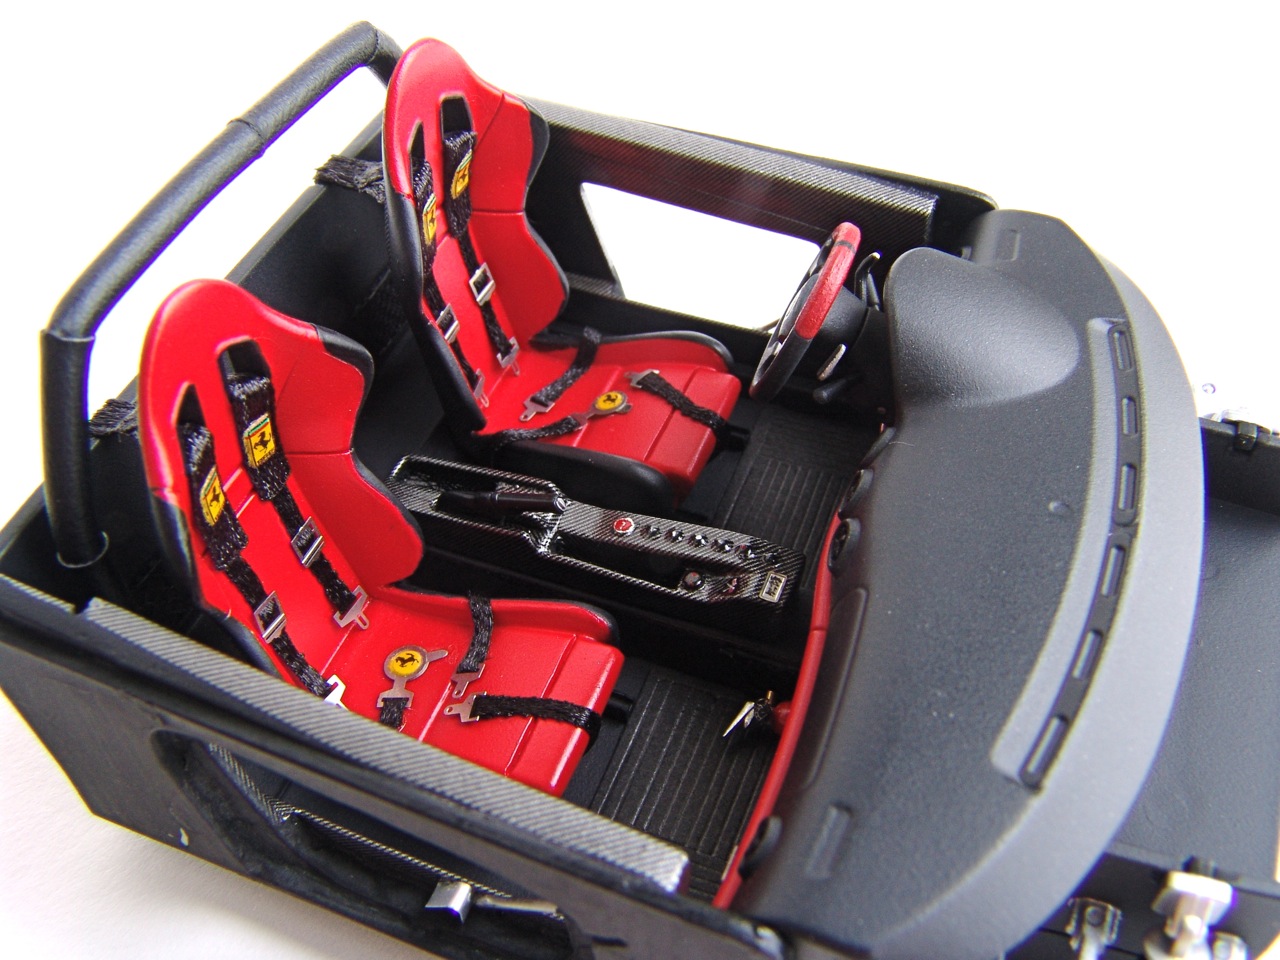 |
Finished interior! I decided that stop adding stuff to it cause I think I've added everything except for the radio (which I decided to skip - pretend its the racing version and radio and speakers were dumped to save weight!) |
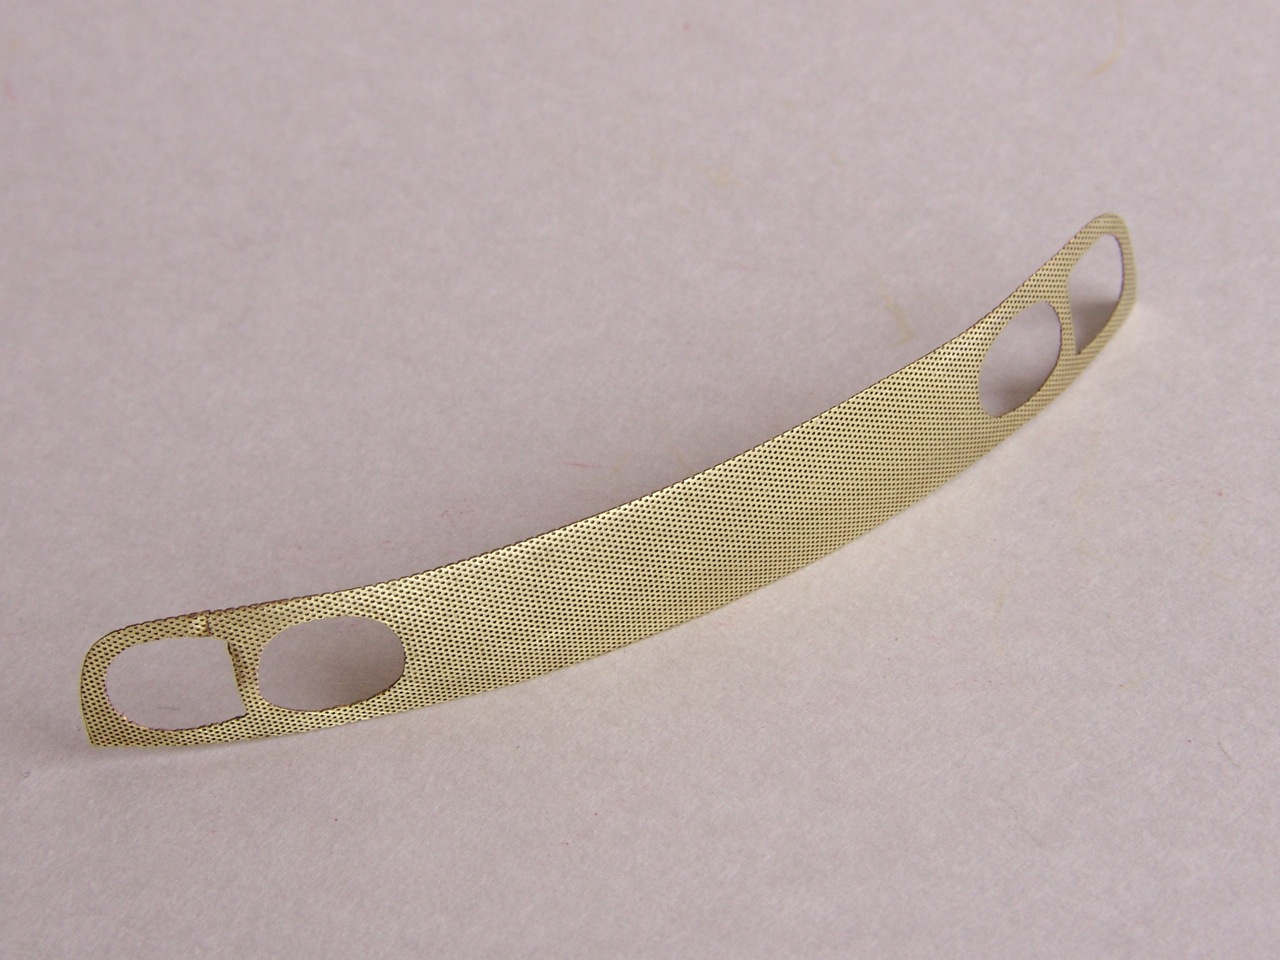 |
After HOURS with needle files and sanding sticks I had a very fragile piece of brass mesh that was looking similar to CS grille. Now I needed to make it black! Painting the thing was not an option, since paint would simply fill such tiny holes. |
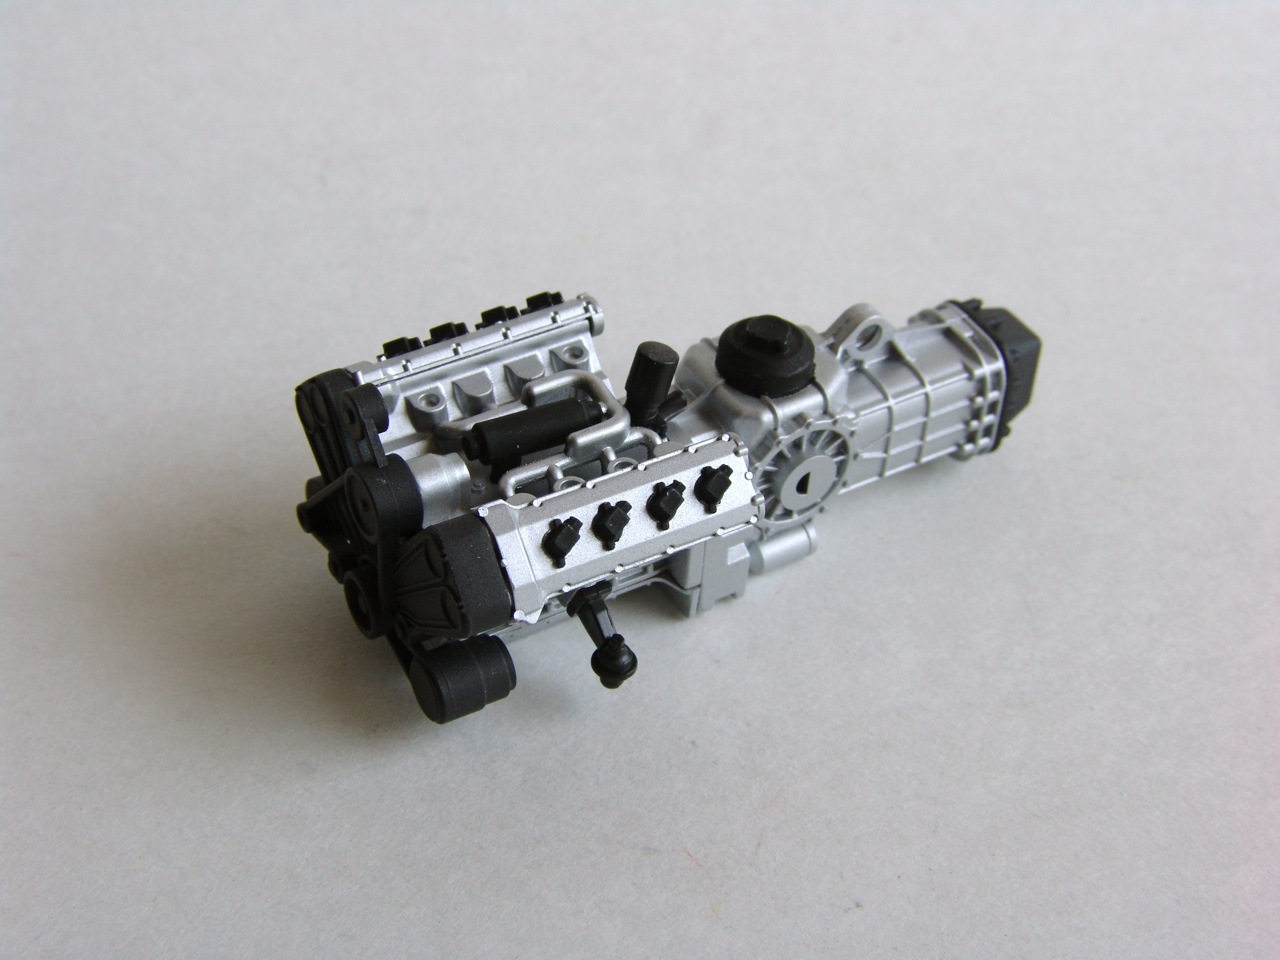 |
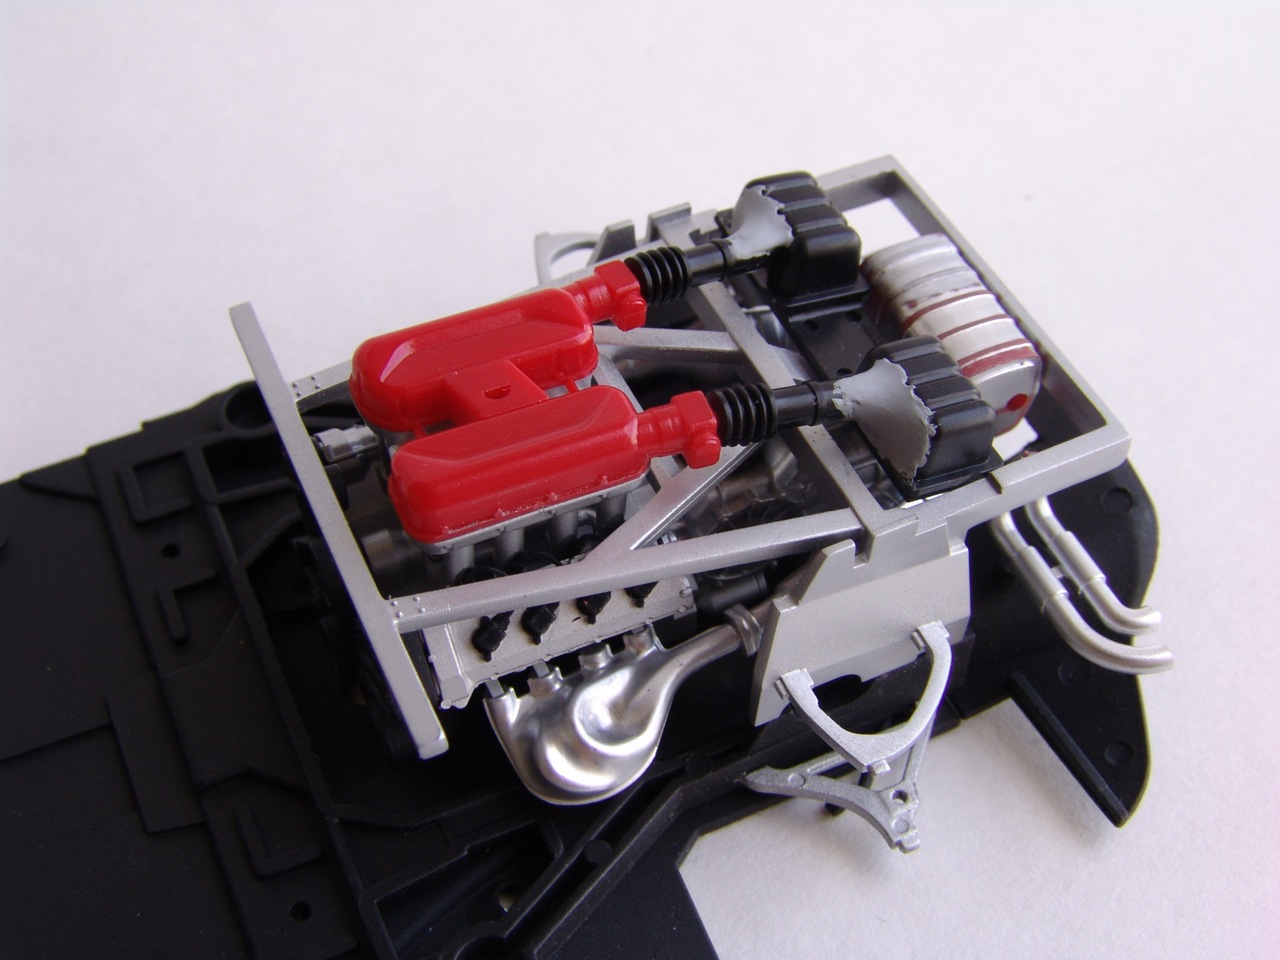
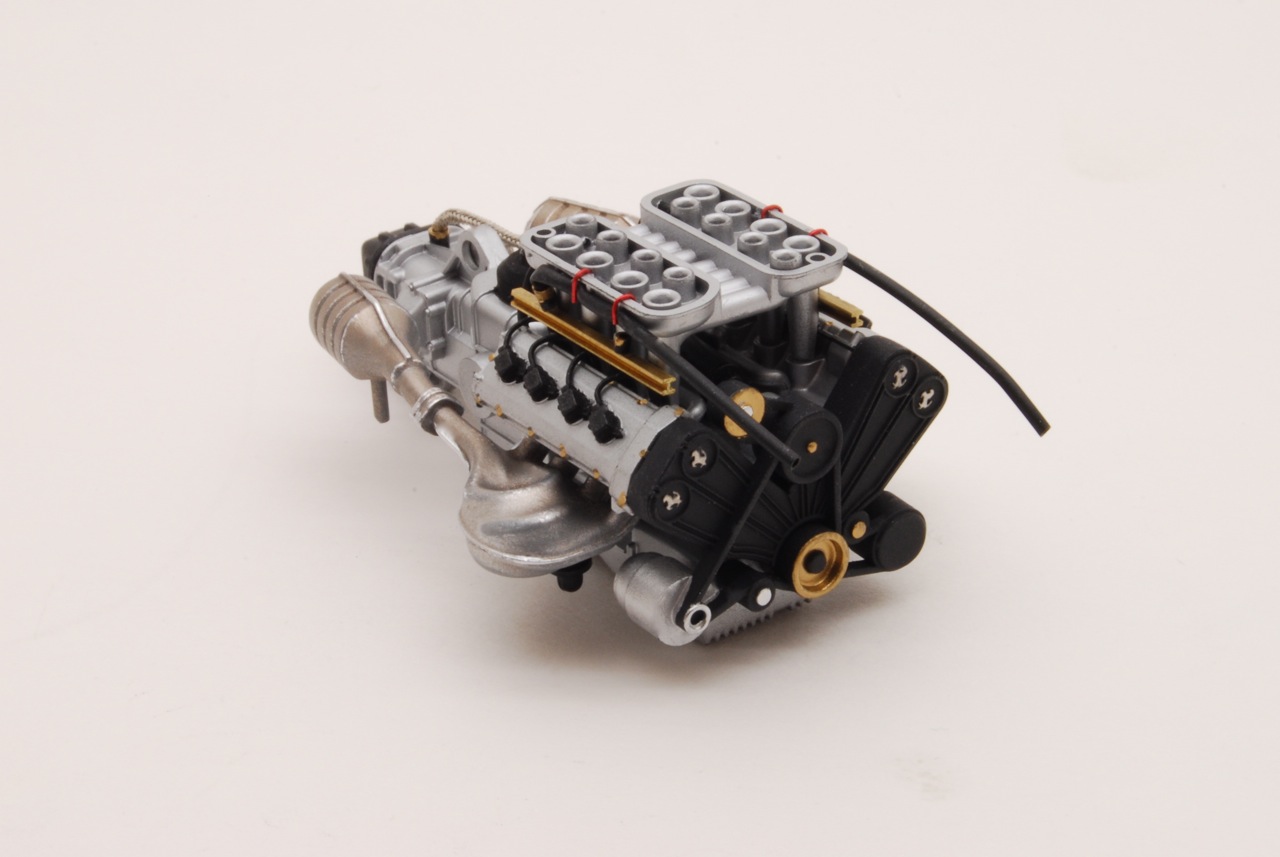
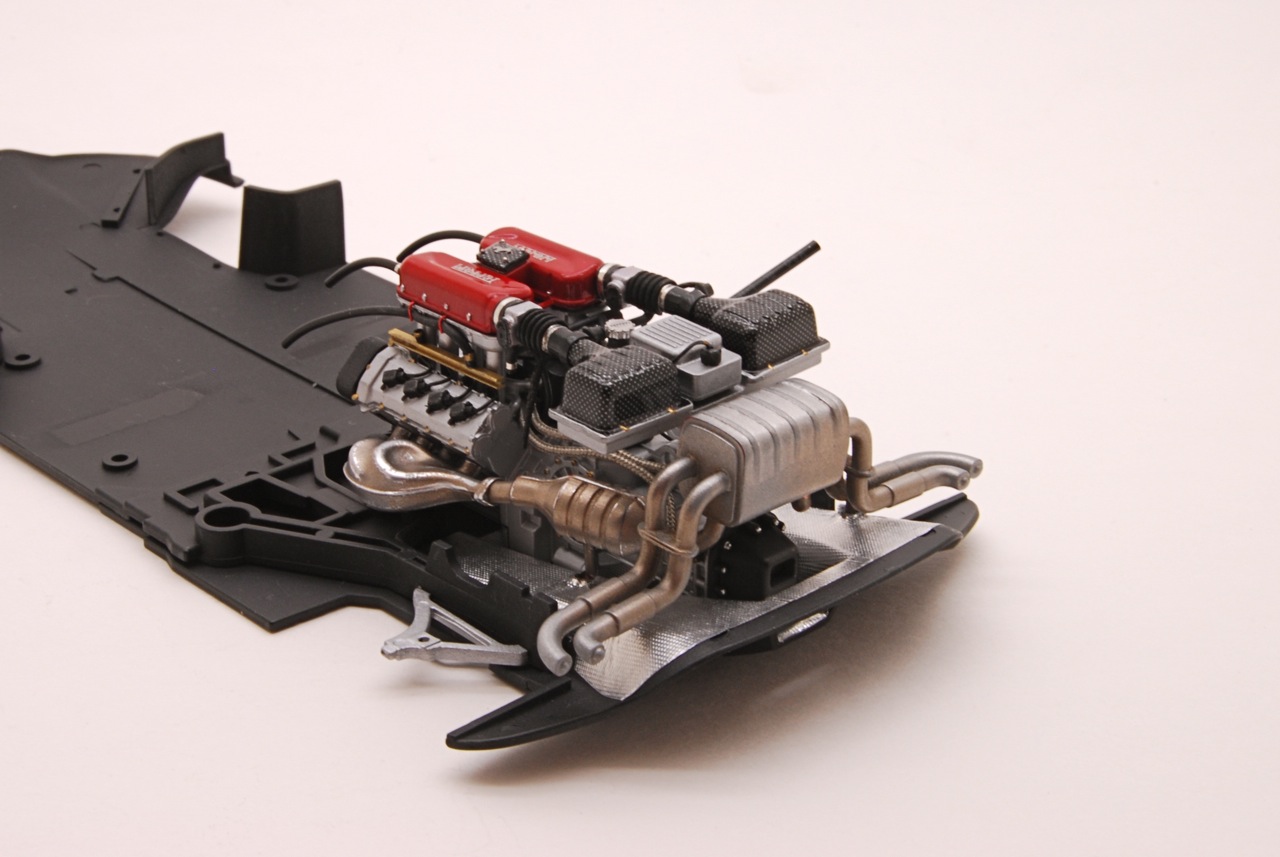
After interior was complete, I started working on the last big component - the engine. Modena engine required a lot of modifications to imitate CS, but the main block is virtually the same. It was painted flat aluminum, and then I started detailing it. |
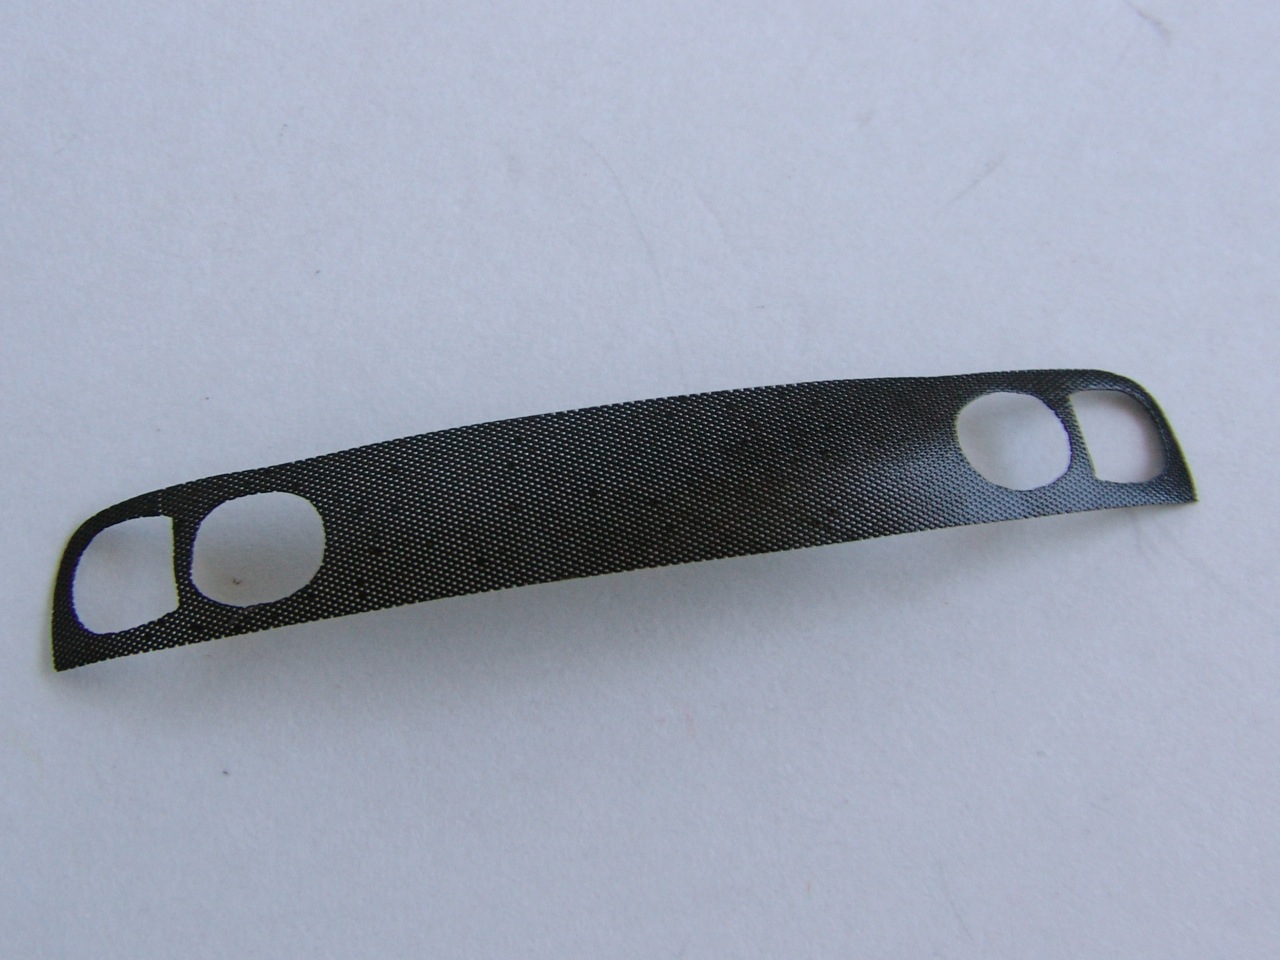 |
Somebody told me about a product called Blacken-It - a chemical blackener that train guys use to blacken worn out tracks. I bought a bottle of this stuff and dipped the grille in it - it worked perfectly! I lightly clear-coated the grille to give it that semi-gloss sheen. |
 |
Coil packs were wired, and small pieces of insulation were glued to the other ends - these will imitate fuel injectors (fuel rail will mount on top of them, and that was the only way to mount them there, since "real estate" is very limited...) |
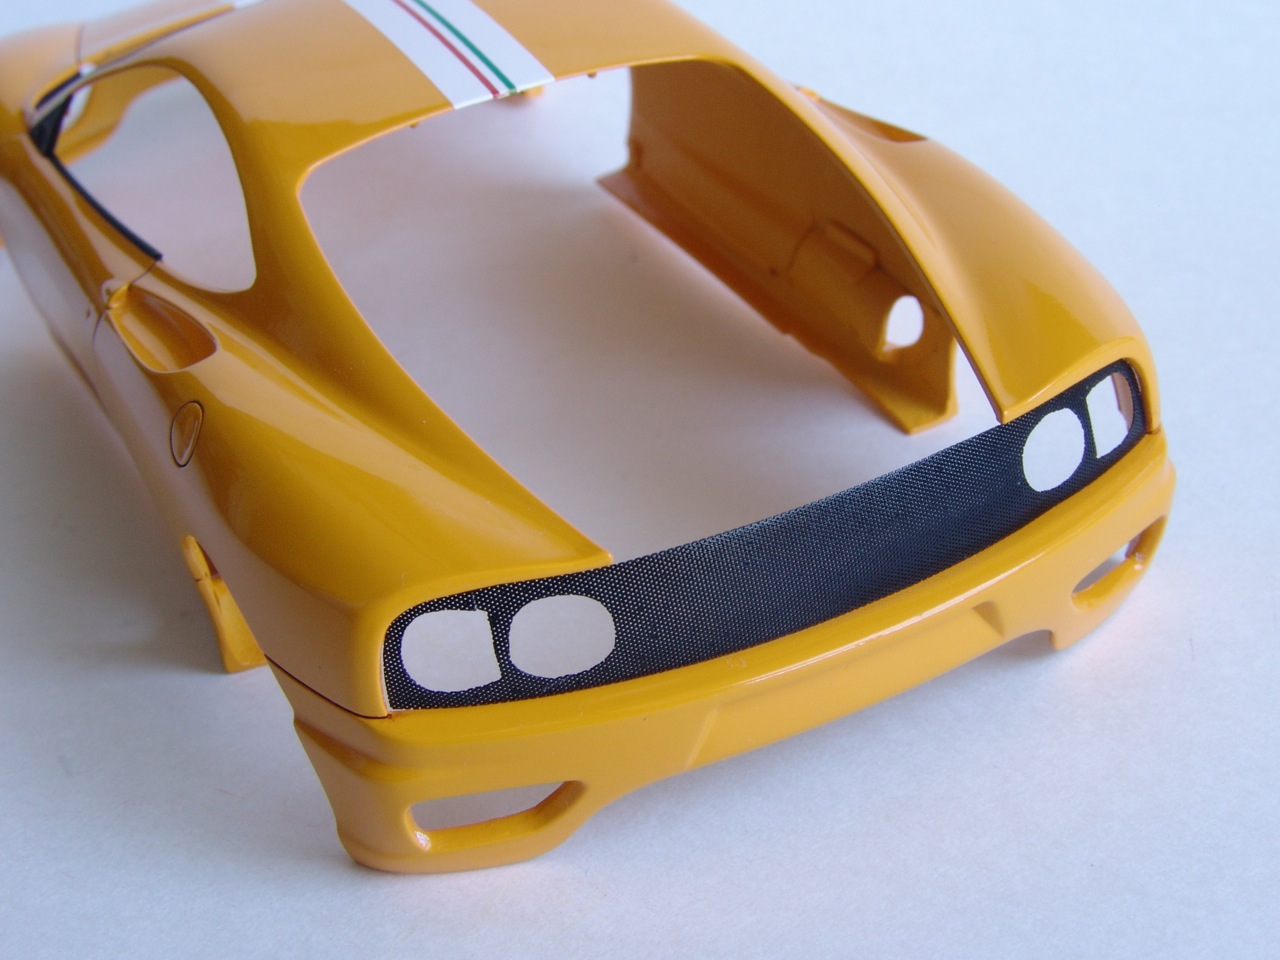 |
Then grille was test-fitted to the body to make sure it fits right. Finally, I popped out few holes that filled with paint using very fine needle. |
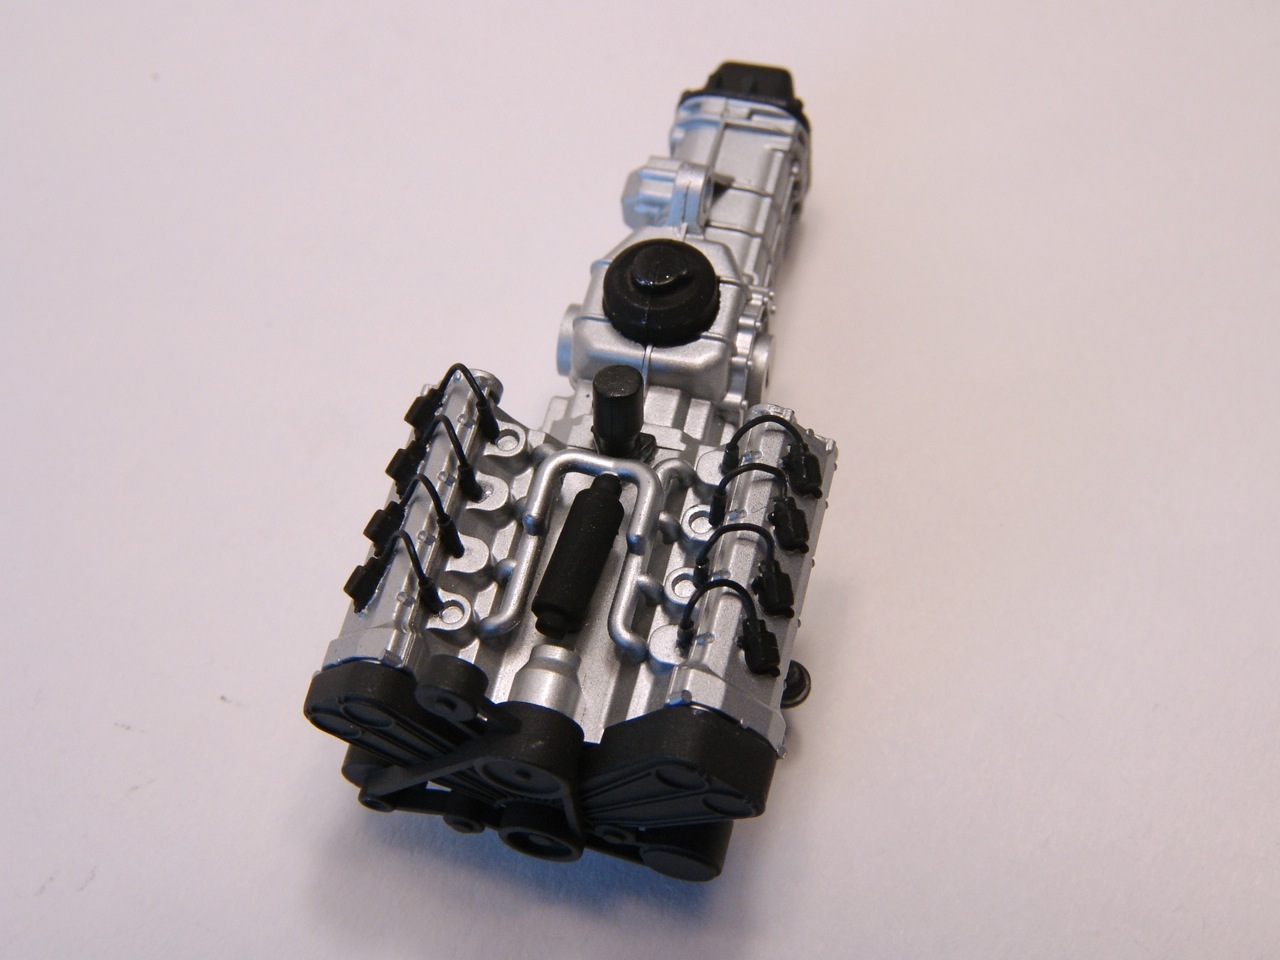 |
Injectors were glued to the block, and intake manifolds fitted into place. |
 |
Taillight housings were cut out of the plastic grille, painted black, and glued to the photoetched mesh. This was the easiest way to do it, even though not completely correct (they are made out of mesh on a real car as well). |
 |
Intake velocity stacks were painted and glued to the engine block. I still needed to apply a wash to the engine block - it was looking too clean! |
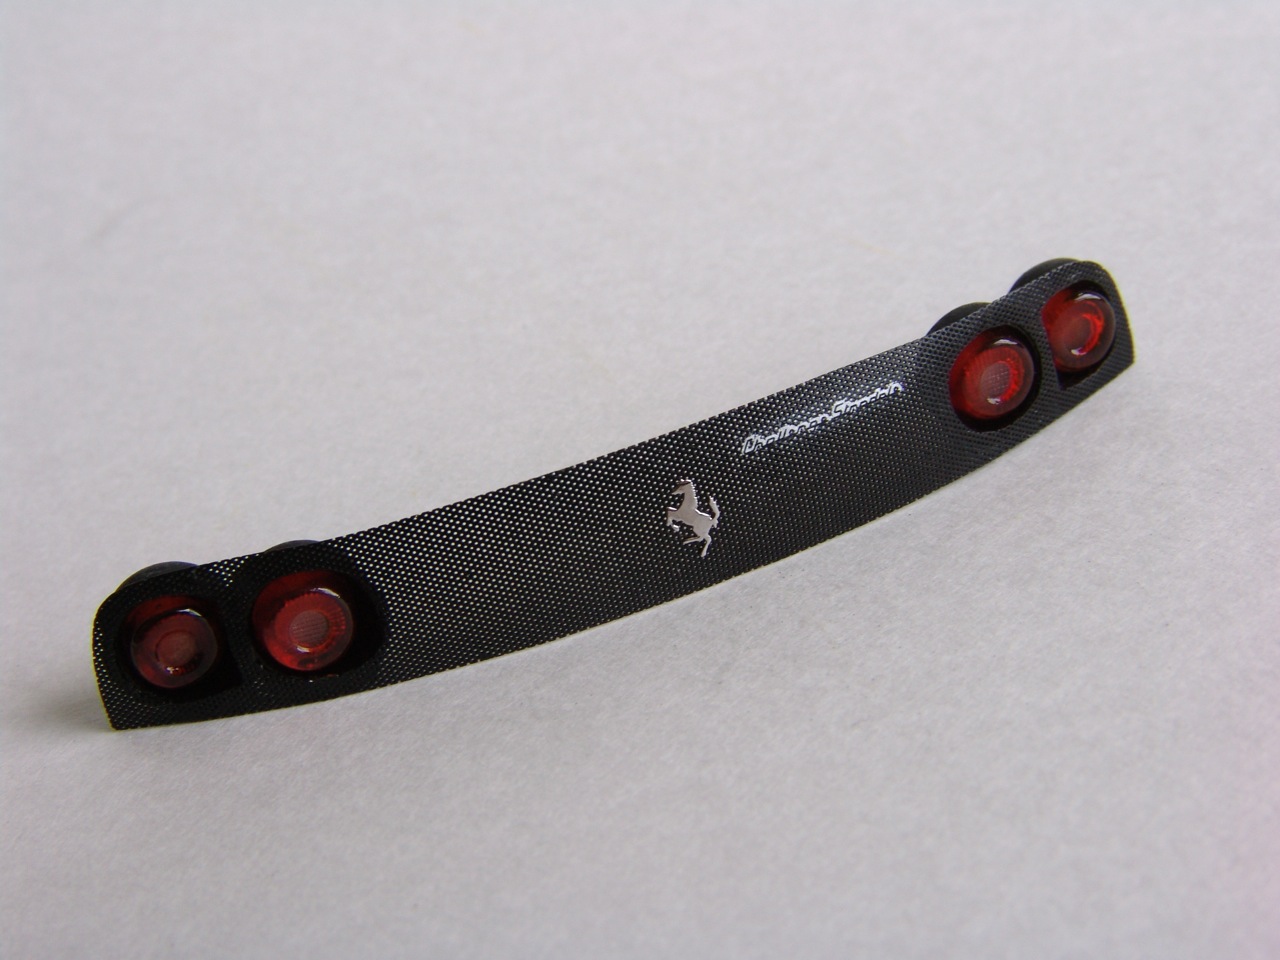 |
Taillights were painted with Tamiya clears, and installed into the grille. I topped it off with photoetched Cavallino and Challenge Stradale decal from MSM transkit (that was later replaced by custom-made P/E badge). |
 |
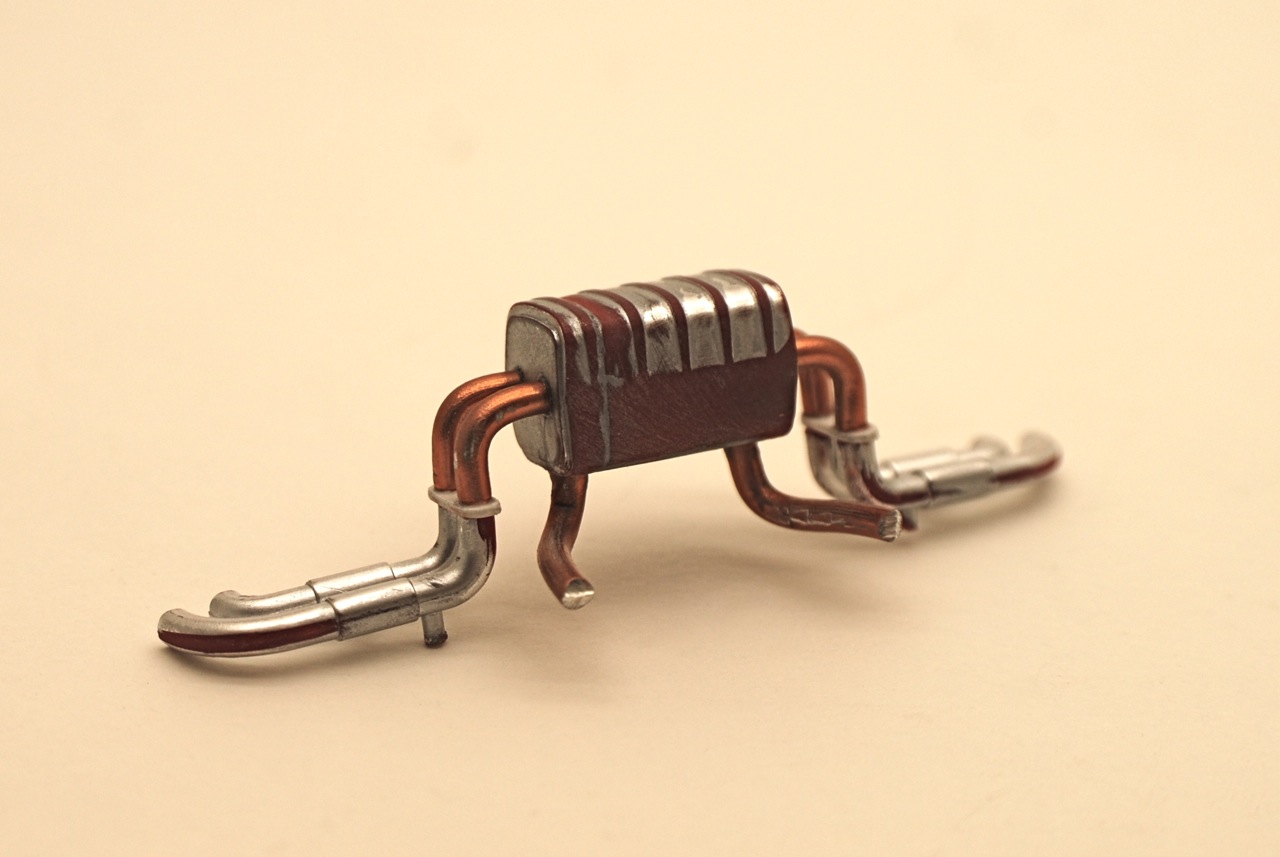
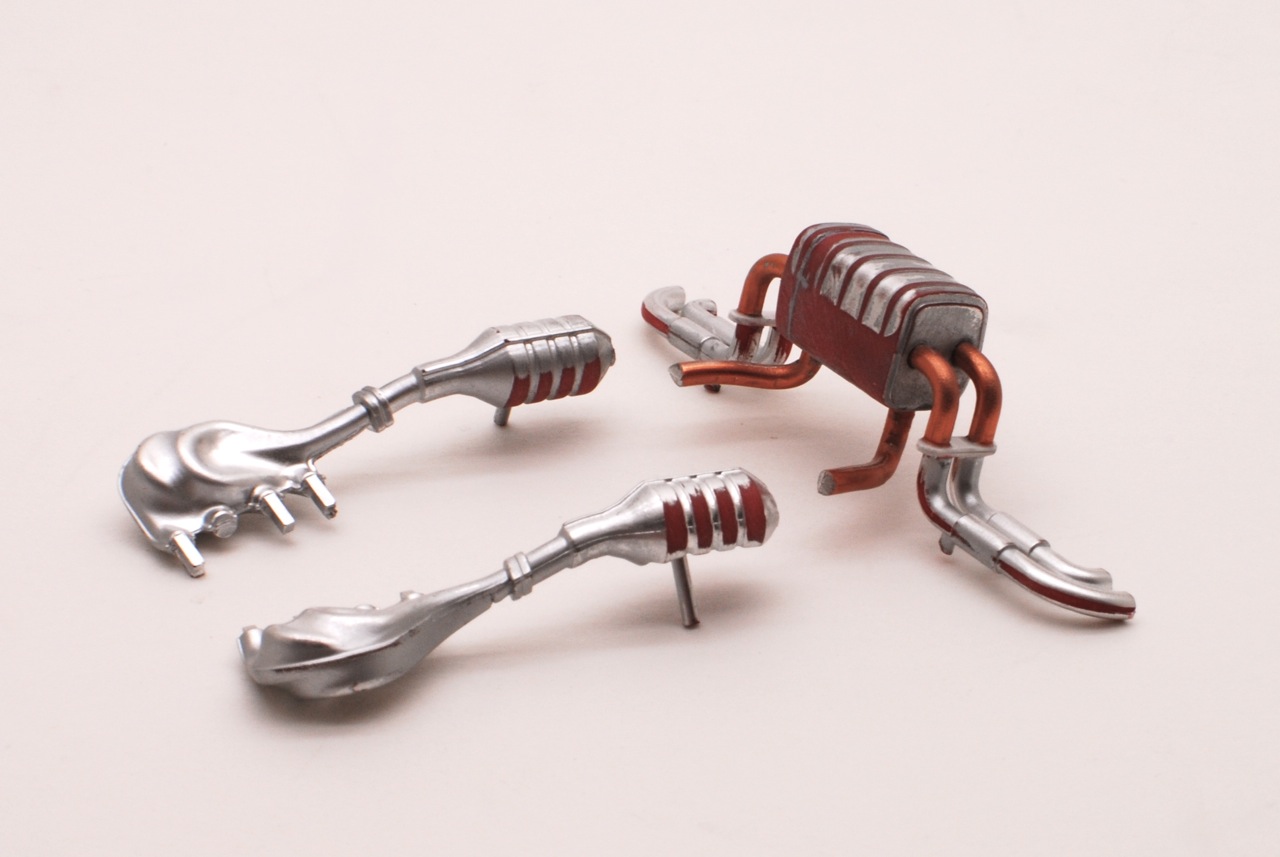
Exhaust system is completely different on CS too, so I started modifications with the muffler can. It is shorter on the real car, so it was cut and shortened. |
 |
The grille was glued to the body with CA glue and gaps were filled with some diluted Elmer's white glue. |
 |
Then I pieced it back together and brushed on some silver paint to check the seam. Once I completed my modifications, this was repainted with various metalizers. |
 |
CS engine lid is different from 360 Modena, but the one provided with MSM transkit was too narrow. I guess resin has shrunk over time. There was no way I could use this part on the model. As a result of this shrinkage, Tamiya glass piece wouldn't fit to the lid anymore. |
 |
Air boxes are also different on CS, in shape and color, so I started modifying these as well. General shape was corrected using Tamiya putty. Since the putty layer was very thick, I let it dry completely before adding more putty. |
 |
So I decided to make my own lid using original Tamiya part. The area where CS "hump" should be was built-up with some scrap plastic pieces and covered with Tamiya liquid cement. |
 |
Rough engine assembly/mock up was done to check the fit and clearances. Still a lot of work to make it look like CS engine bay! |
 |
I also drilled and carved out the side vents and carefully rounded them up with round needle files and sandpaper. |
 |
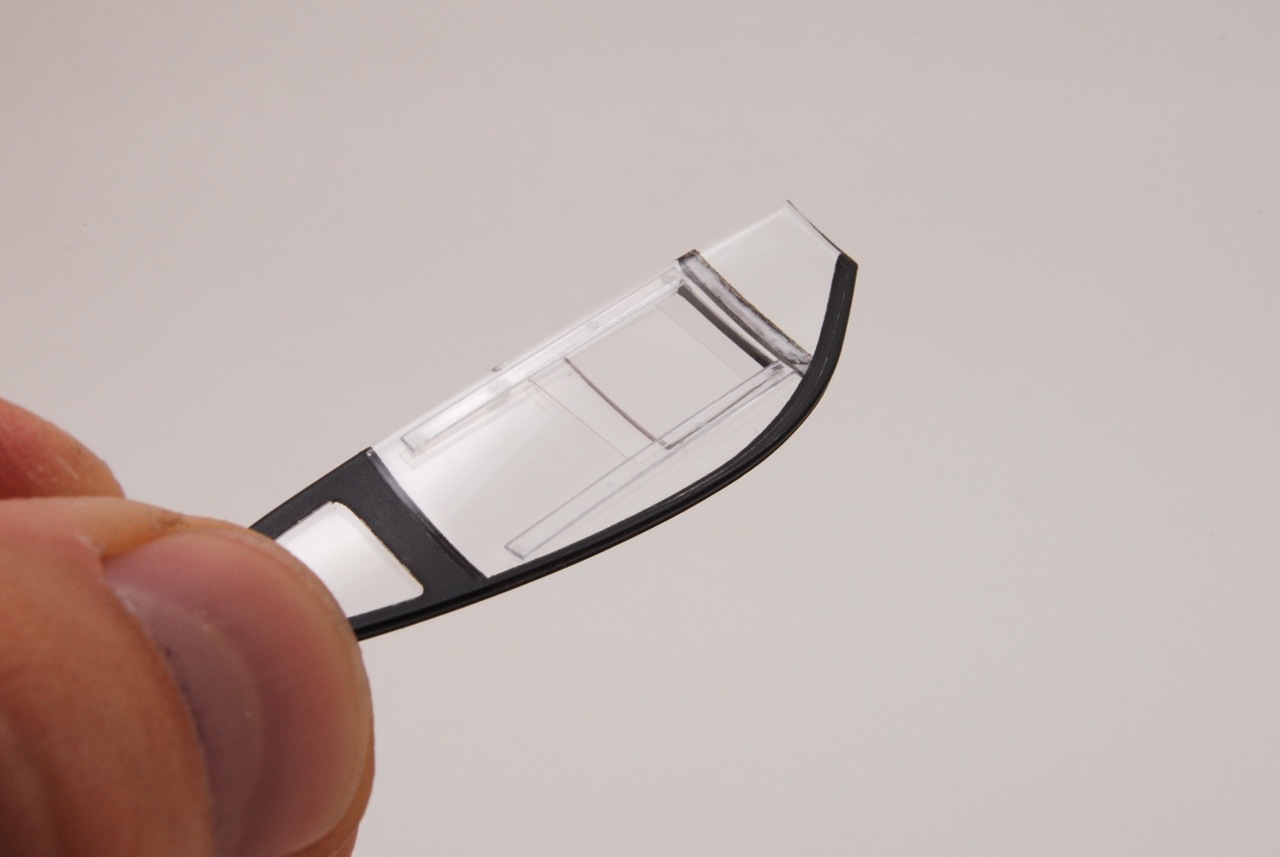
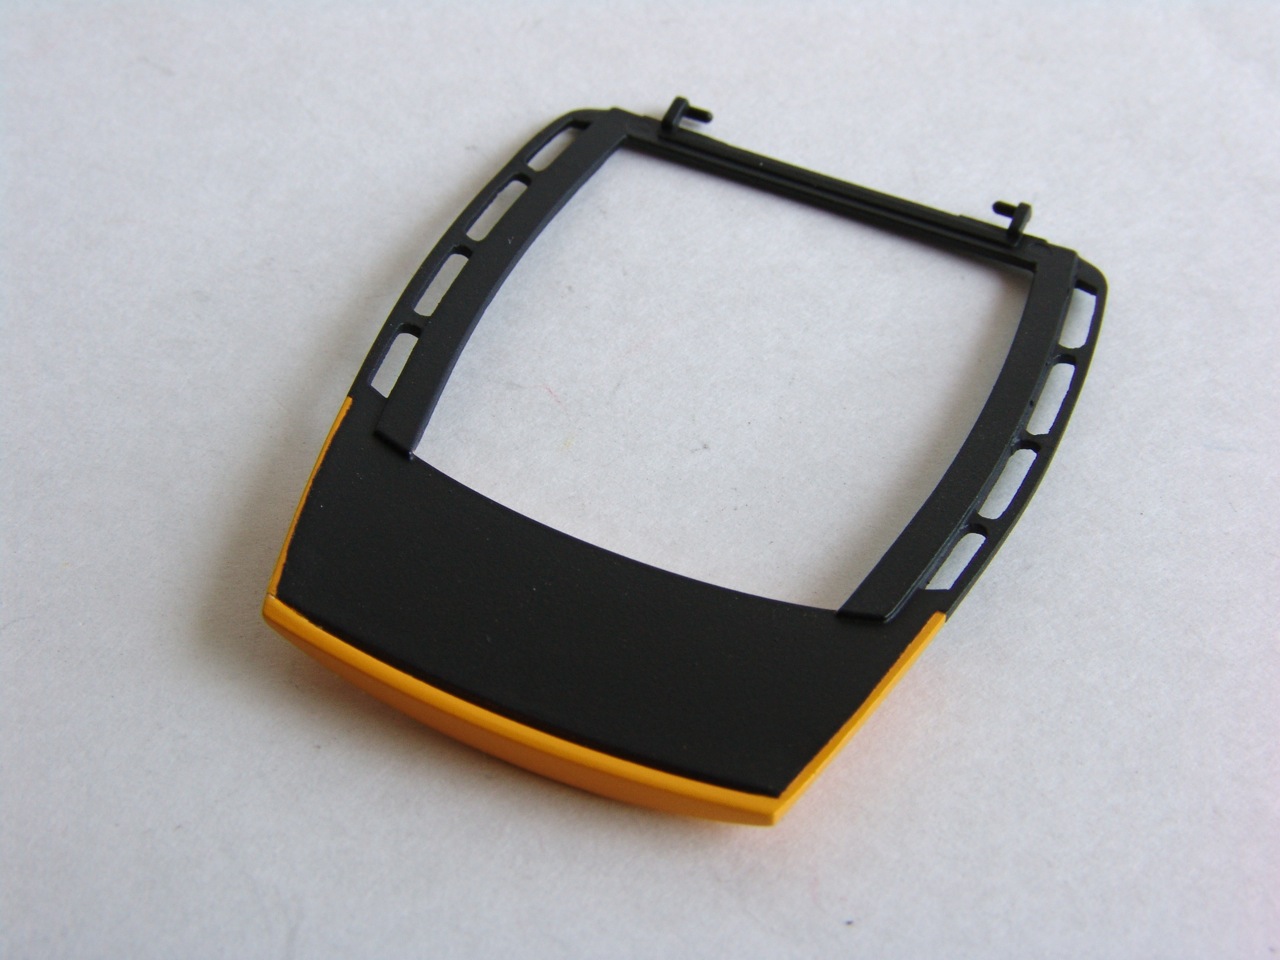
Side windows on Stradale are completely different than on Modena, they are similar to original F40 design and made from Plexiglas, with plastic vent windows sliding on plastic "rails". I wanted to replicate this design, but couldn't think of a way to make it work on clear parts - it is extremely hard to cut them without breaking, or glue without hazing... |
 |
Side-by side comparison also revealed that MSM engine lid was warped/twisted! I guess modifying Tamiya part was the right way to go! |
 |
After a lot of
thinking, I came up with the following design: |
 |
After putty had completely cured, the "hump" was shaped with sanding sticks and lightly sprayed with gray primer to check for flaws. |
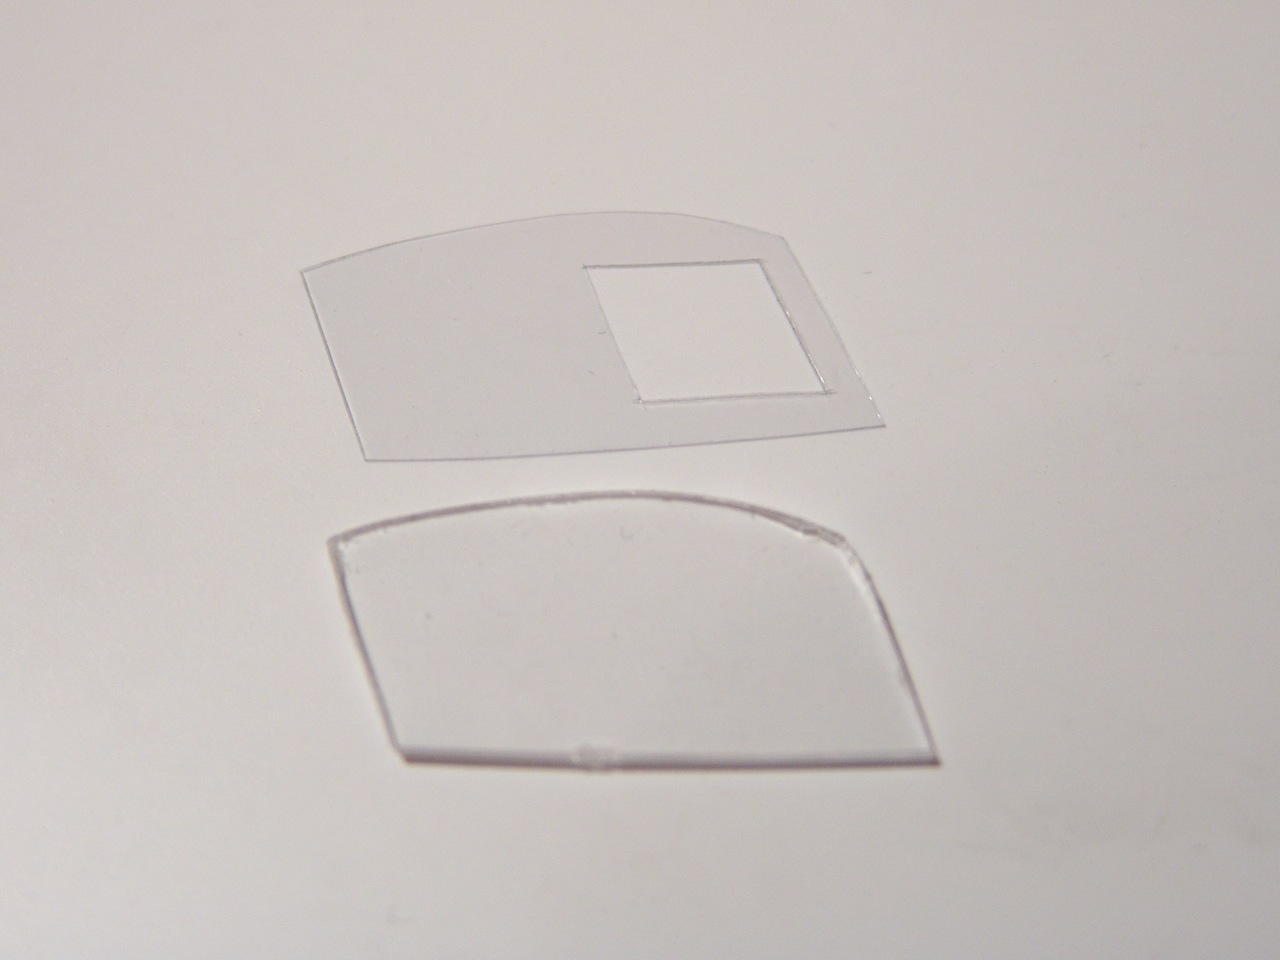 |
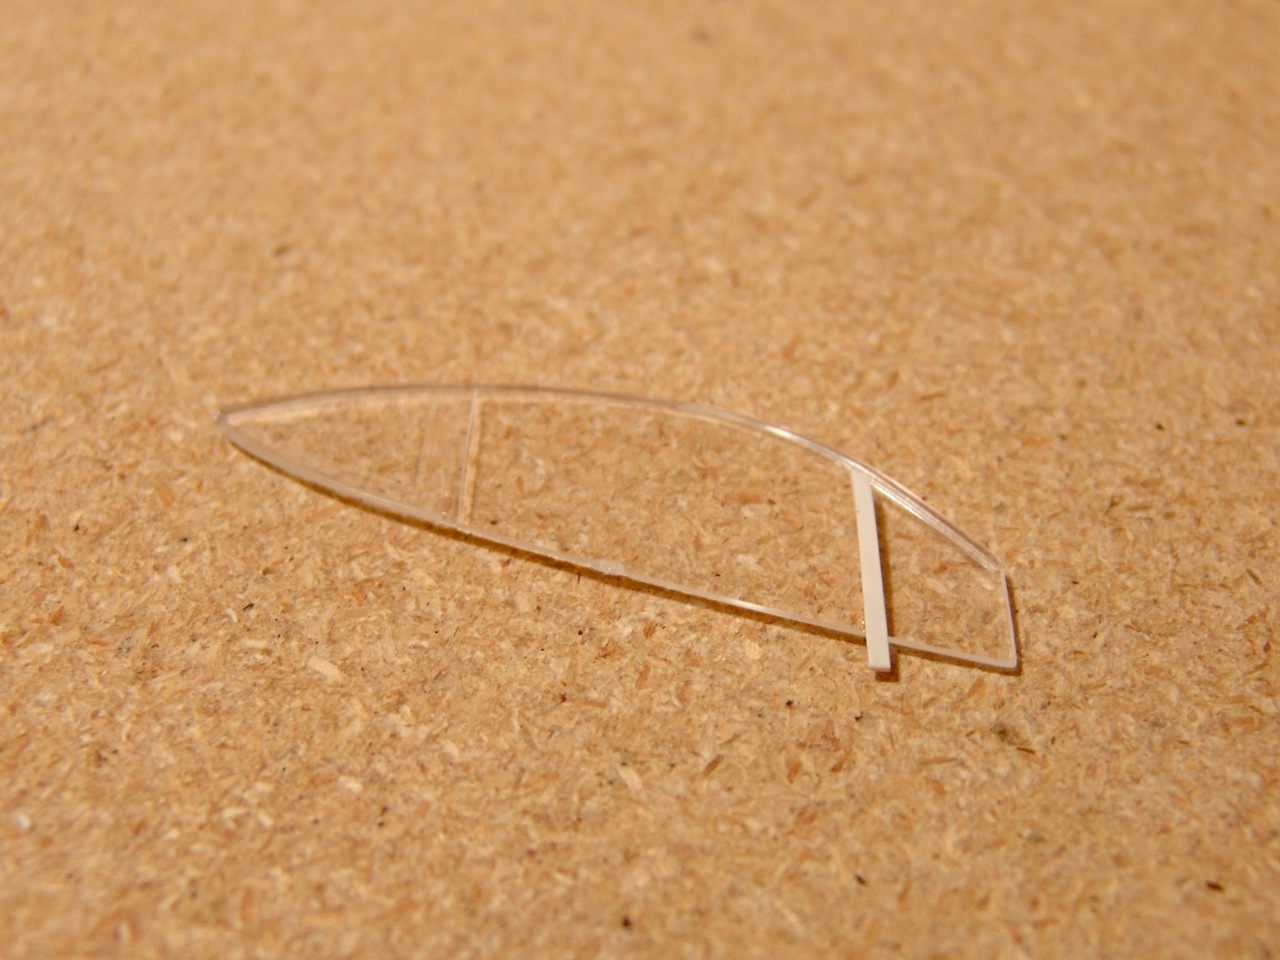
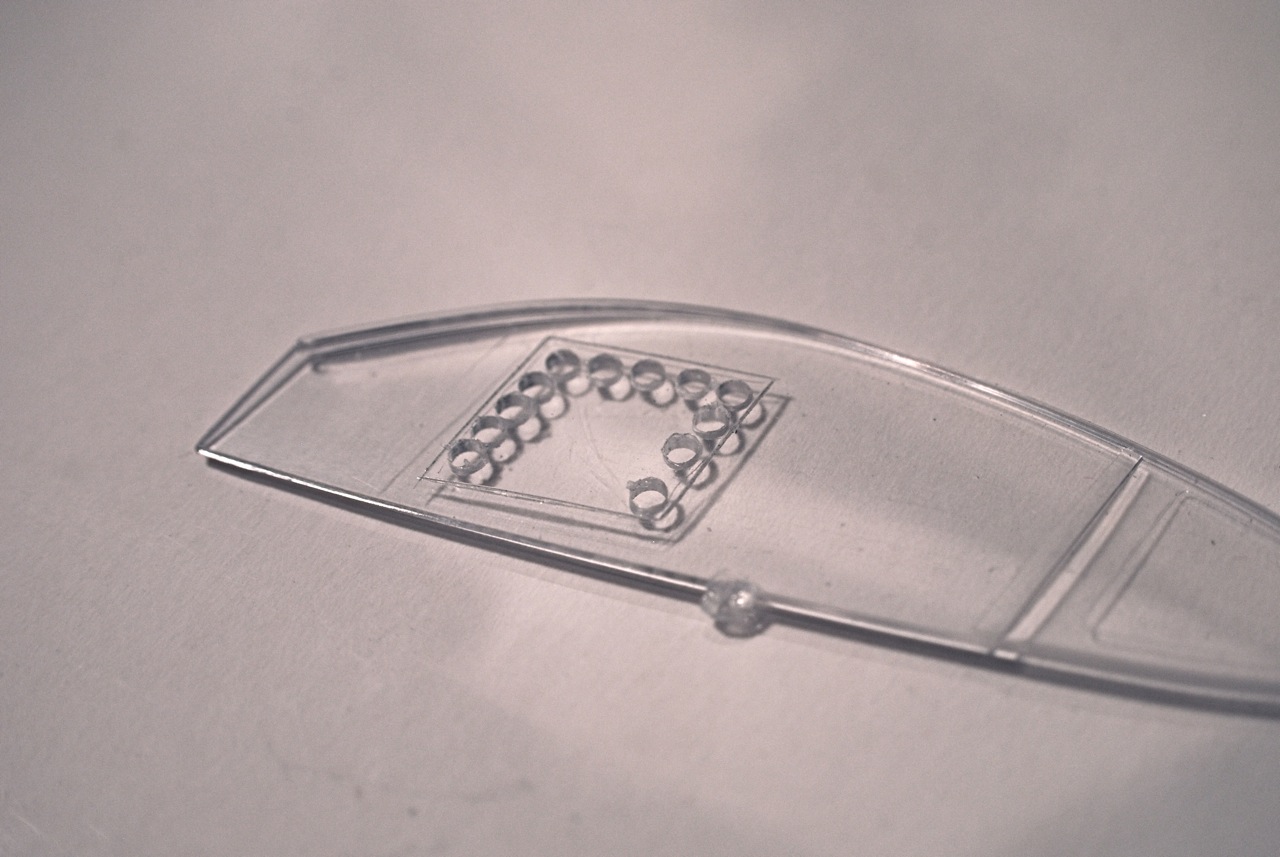
New side window was made using the original one from very thin (to scale) clear styrene sheet. Then I cut the opening with very sharp blade. |
 |
After few minor corrections, a coat of white primer followed gray, and engine lid was test-fitted to the body. The fit was much better than MSM part! |
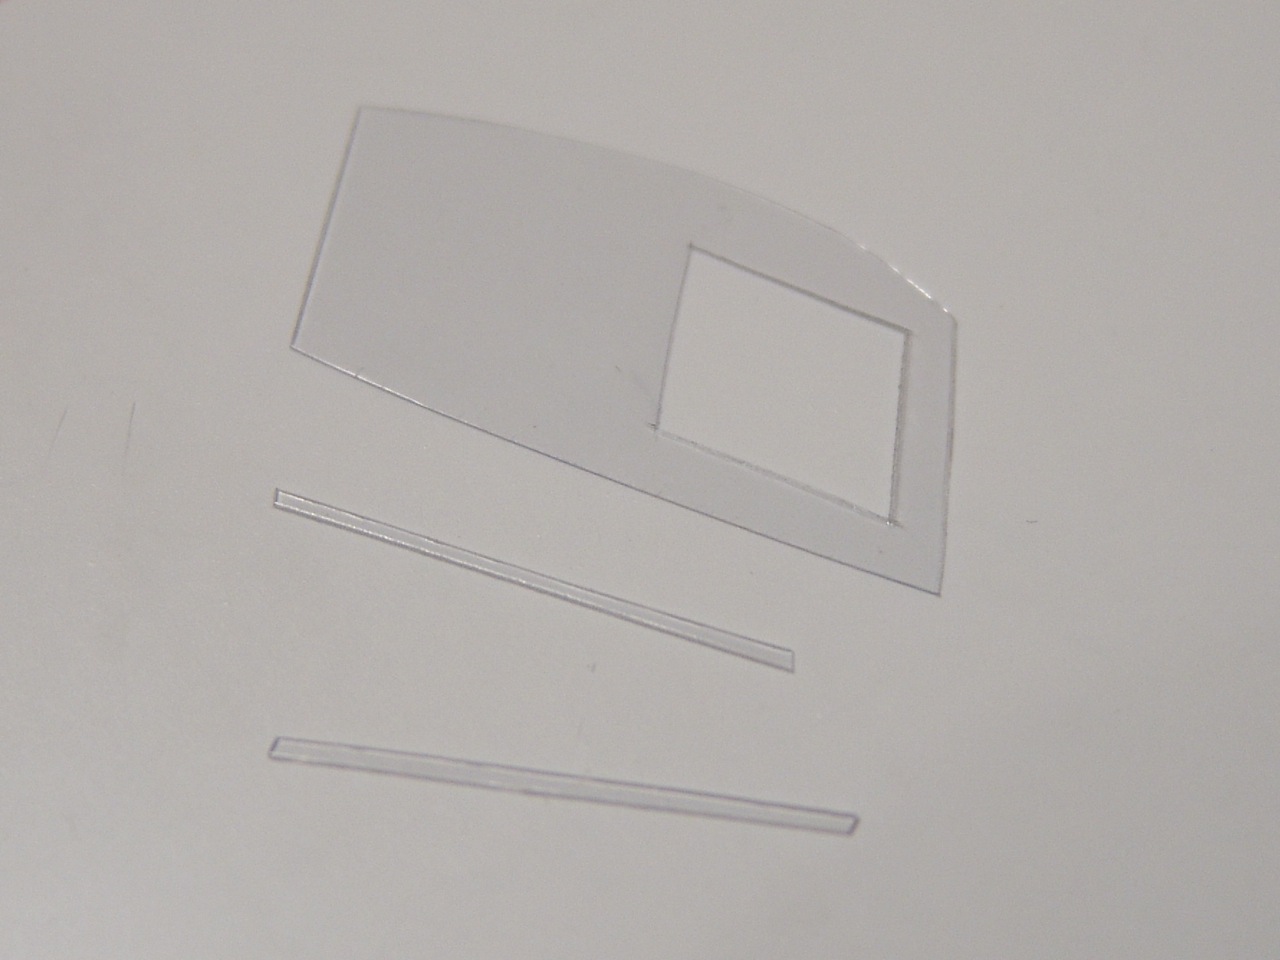 |
Window "rails" were made from clear styrene as well, and everything was glued together and then to the frame. |
 |
Interior tub had to be modified to fit new seats and central tunnel console, so I removed seat guides and the console with my motor tool. That left some nasty scratches.... |
 |
Finally, the whole assembly was clear-coated with acrylic clear to hide small scratches. Separate sliding window was to be fixed to the glass from the inside, and then the frame to be masked and sprayed flat black. But then I realized that the window was too flexible to safely glue it to the body... |
 |
I decided that rather than trying to sand them smooth I'd cover them with thin sheet styrene! |
 |
So I came up with a different design: Instead of replacing the side window with a piece of clear plastic, I just cut the hole in the kit piece. This way it will be easier to make the sliding mechanism (I actually wanted to make it working!), and the window will not flex when I glue it in the body. |
 |
Interior was primed with Tamiya gray primer and then the tub was painted with semi-gloss black. |
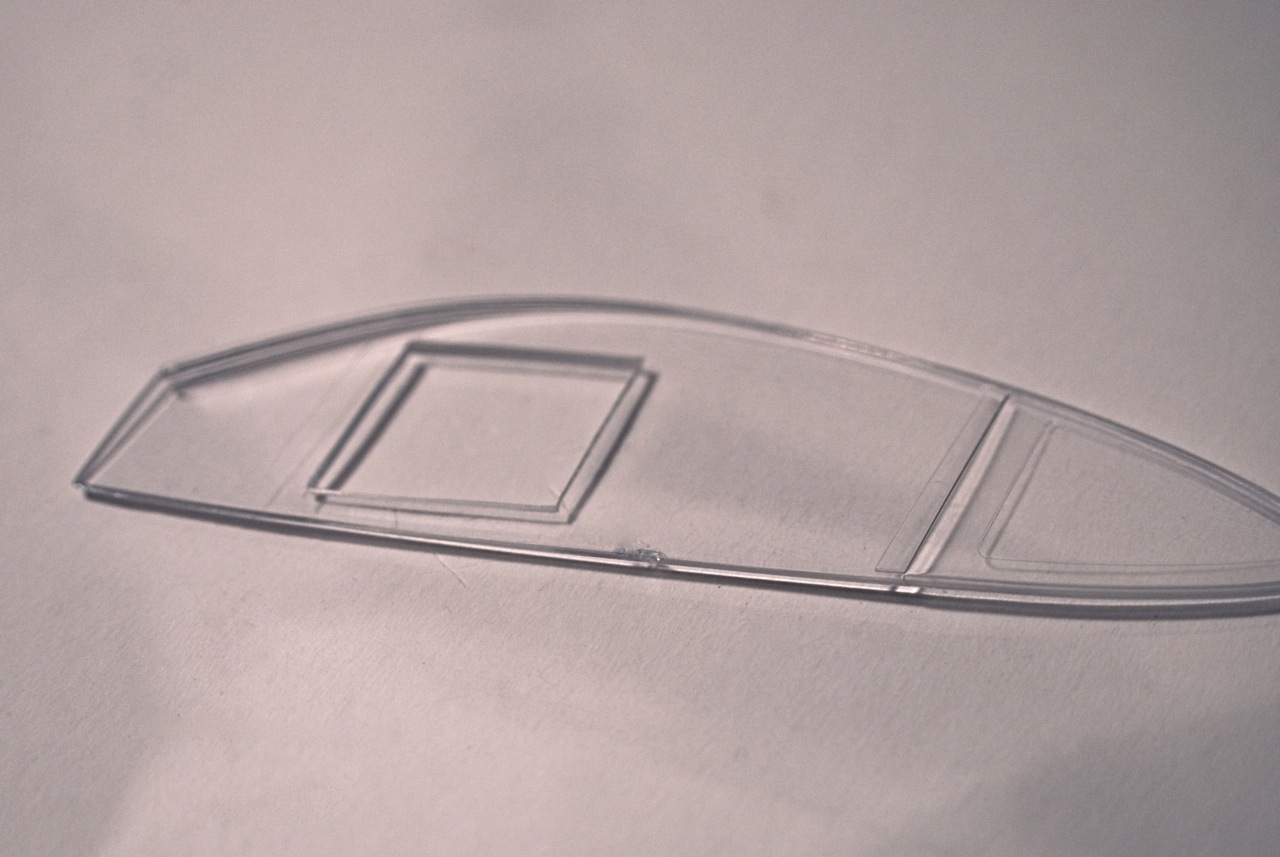 |
The opening was cleaned with sanding sticks and needle files and polished with Tamiya compound. It is a bit thick (not to scale), but I can live with it. |
 |
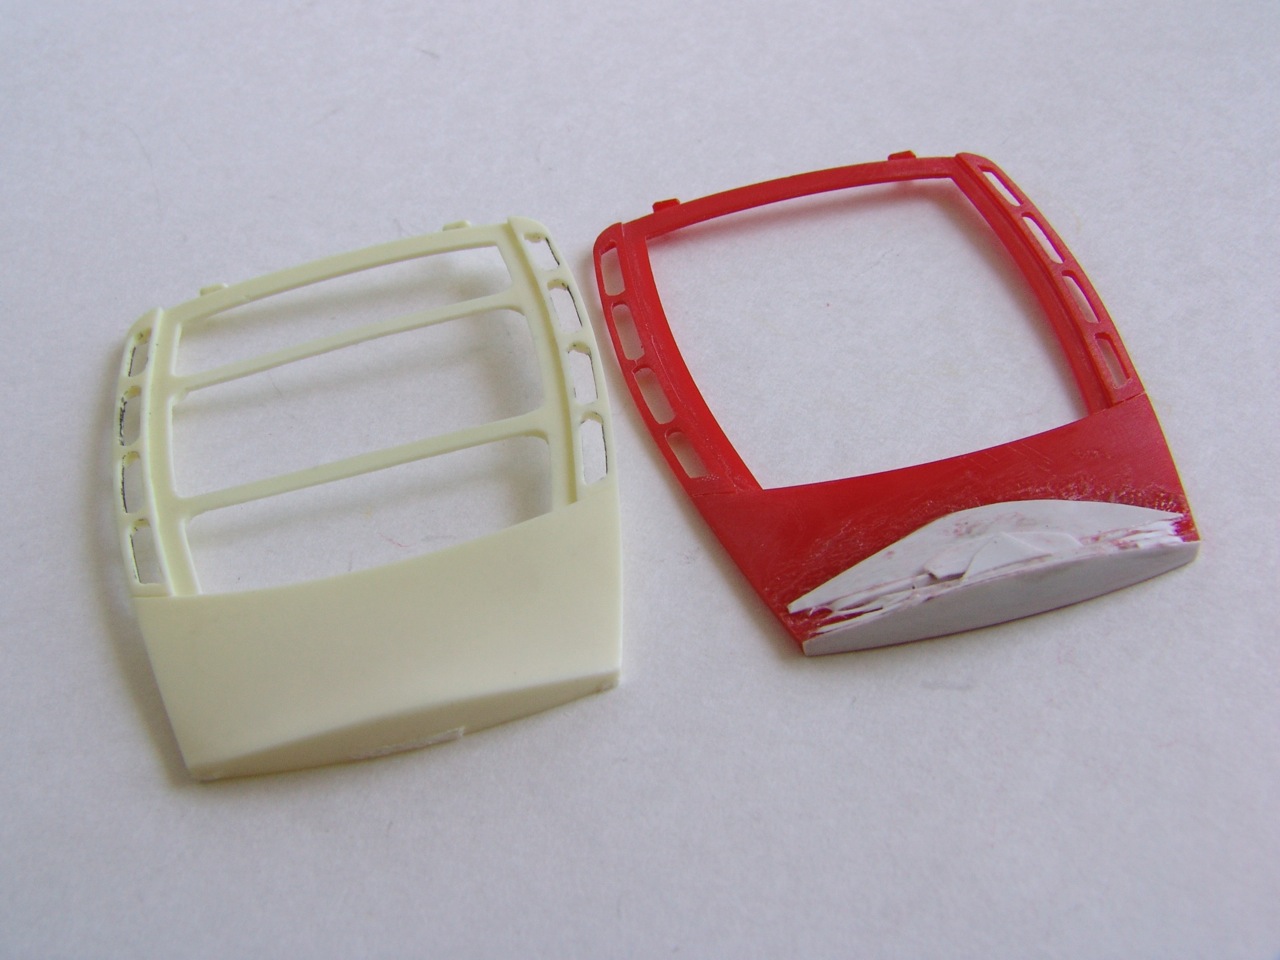
Then I started to work on the rest of the interior - and let me tell you - at this point I was really disappointed with MSM transkit - it turned out to be absolutely inaccurate, and basically unusable, despite looking so good in the beginning. When I looked at the door panels... they were nothing like Stradale. More work reshaping the panels! |
 |
Then I did the sliding mechanism the same way as I did on my previous window - the rails were glued to the body with tiny dots of CA glue, and sliding window was "sandwiched" between the rail and the plastic window. |
 |
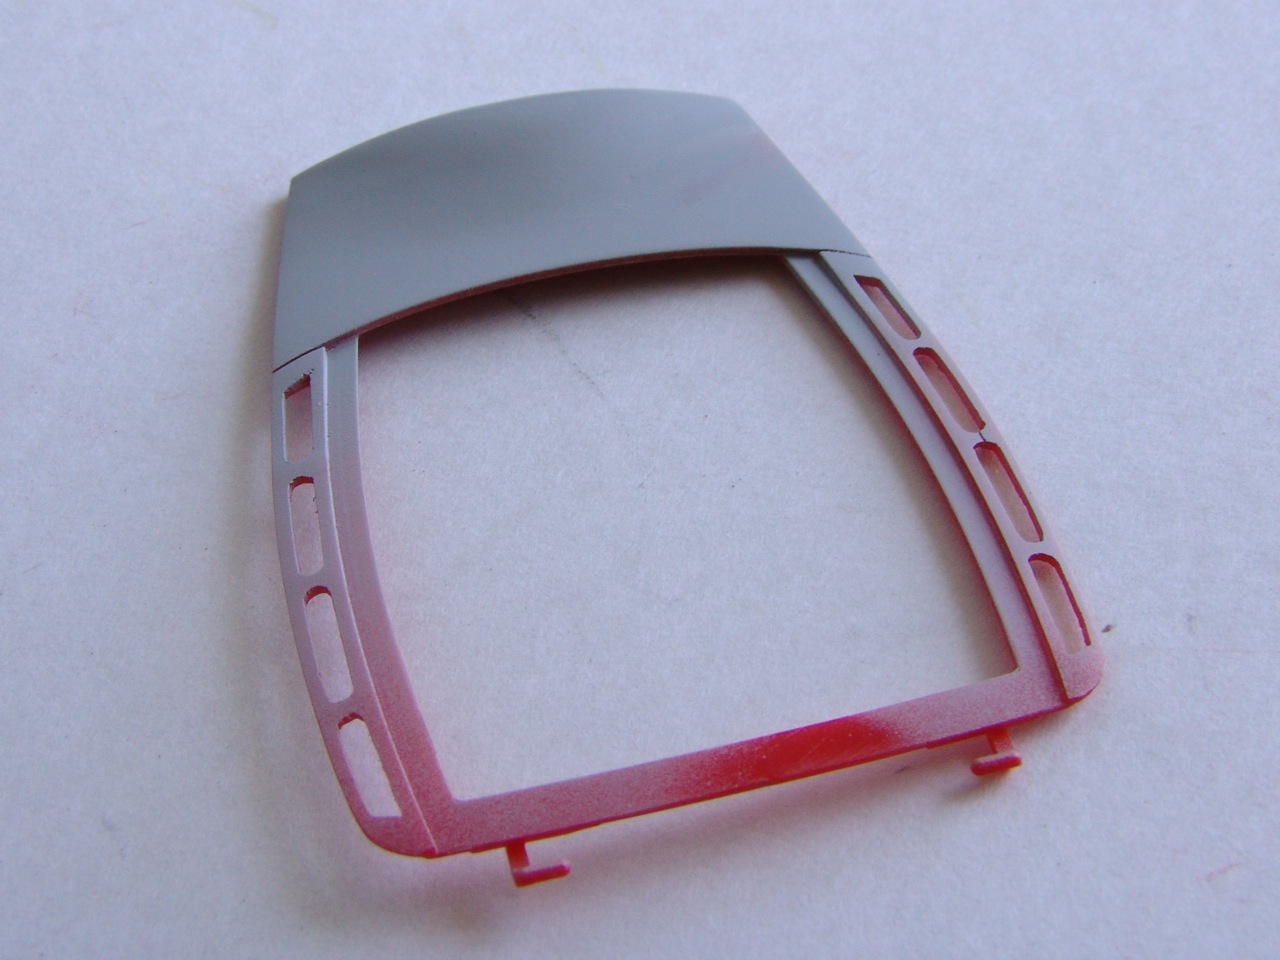
Rather than building new panels I decided it would be faster to modify existing ones, so I started with marking them according to the pictures of the real thing. Upper part was reshaped, then I cut larger/different shape opening, and built up the lower part to create door pocket and a place to install the door handle. |
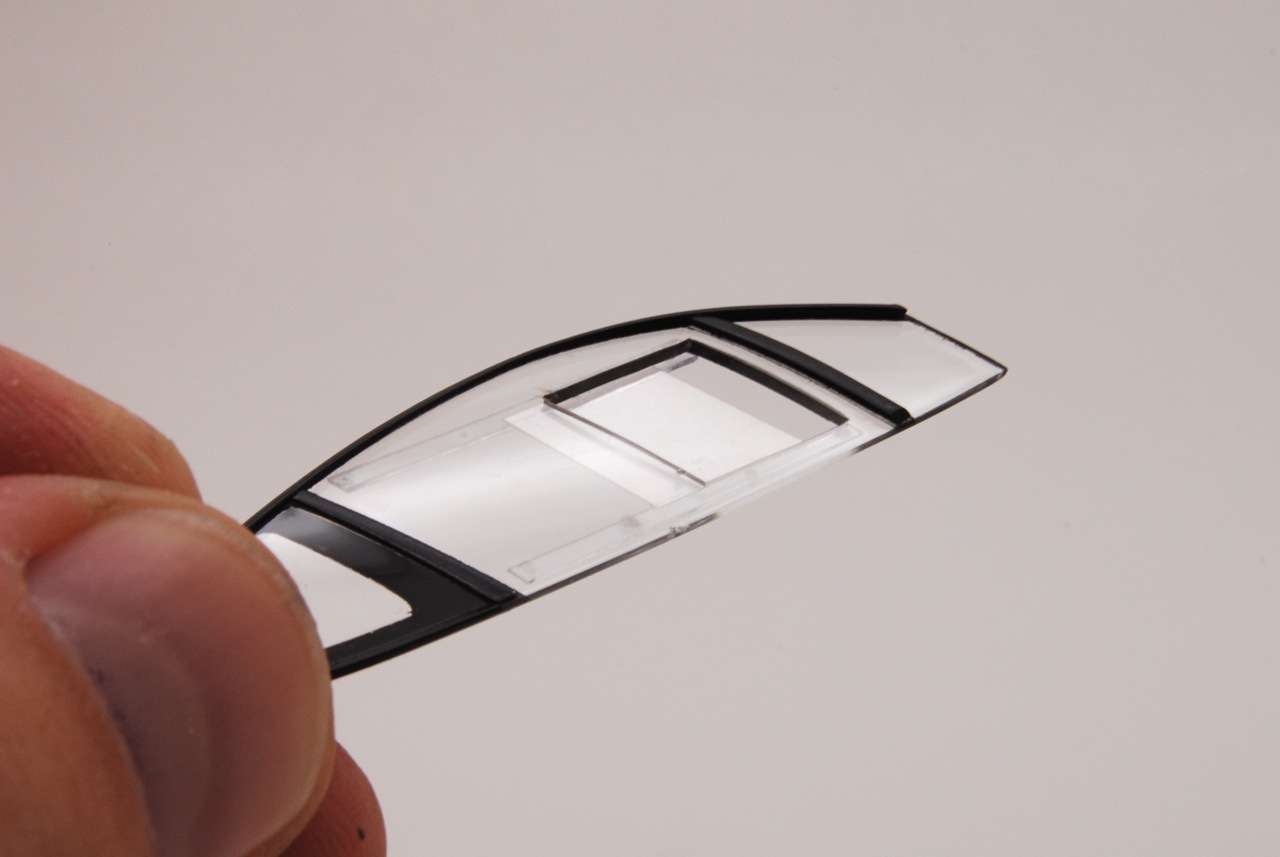 |
Frame was painted flat black and window was polished with Treatment model wax. Not perfect, but I was satisfied. it actually looks much better in person than on the pictures. |
 |
To make the panel look to scale, I thinned it down with the motor tool to scale thickness from the inside. |
 |
Next were airboxes. They were reshaped, puttied, reshaped again, sanded, puttied again - until they looked like CS airboxes. |
 |
Then everything was assembled, carefully sanded and cleaned, and primed with a couple of coats of Tamiya gray primer. |
 |
360 Modena airboxes are indented, CS's are ribbed, so I had to fill the indentations and add ribs to the boxes. Ribs were made from strips of thin styrene and glued to the boxes. |
 |
After panels were painted black, I realized that I forgot to drill holes for the mounting bolts. This omission was quickly fixed with pin-vise and a suitable drill bit. |
 |
Finally the airboxes were decaled with KA Models C/F, painted, and wired. I also added clamps made electric tape, and airflow sensors (made from styrene, and then wrapped into heat-shrink tube. |
 |
Finally, door panels were decaled with SMS C/F and fitted with door handles made from steel rod. Now they looked more like CS! |
 |
Another view of the completed airbox assembly. |
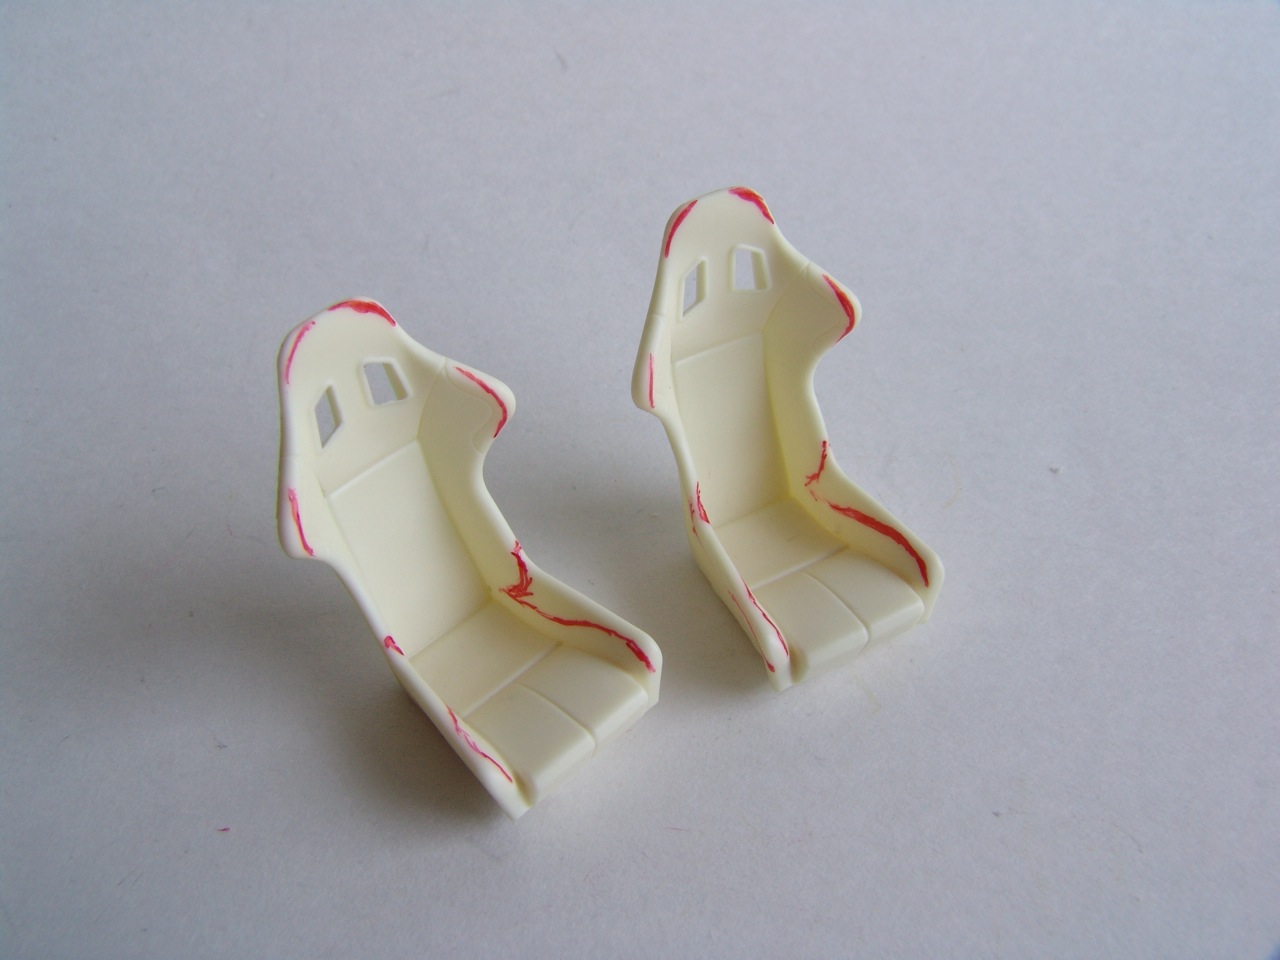 |
Seats were as much of a disappointment as everything else proved to be in MSM set so far (well, except decals and a front bumper) - they were totally wrong! Seats were exact copies of Tamiya Subaru WRC seats (there even pin marks on the backs) - this is not only unethical piracy, but also illegal, if used without permission from Tamiya. |
 |
Exhaust system and muffler were reworked as shown earlier, and then I made the piping using aluminum wire and some sheet styrene. |
 |
But anyway, the seats were one piece buckets, while CS has seat/back type buckets. They were also too thin and narrow. I had to modify the seats! First, I marked the areas that had to be removed, and cut them off using my motor tool. |
 |
Everything was puttied, sanded, test fitted, and adjusted to fit the chassis and engine frame. |
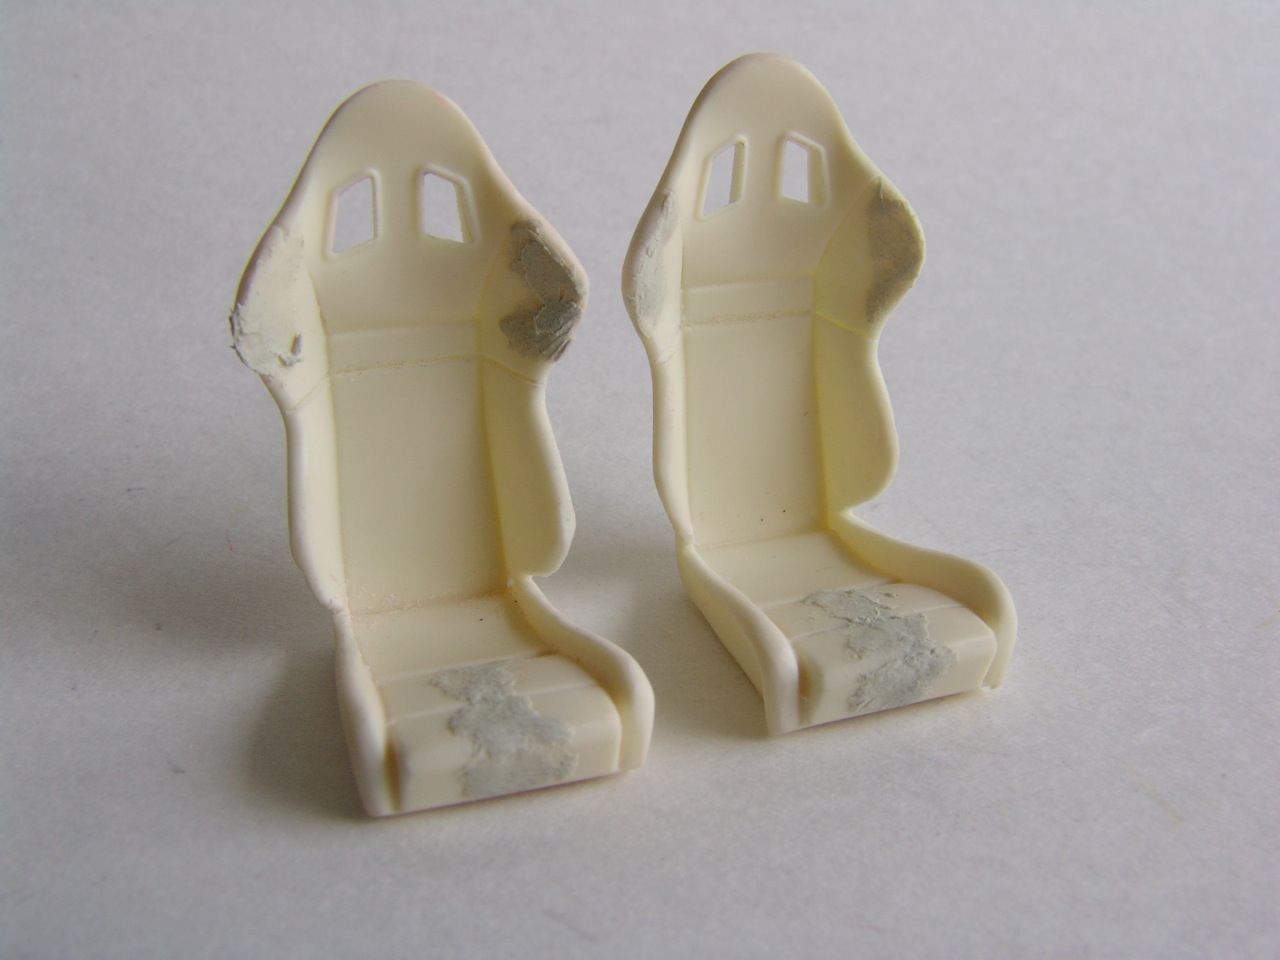 |
Then I puttied all the wrong seams, and scribed new, correct seams on the cushions and seat backs. Finally, I boiled the resin in water, and widened the back and the cushion while it was hot to make the seats wider! After complete cleanup and lots of sanding, seats started to look like CS seats |
 |
Then everything was primed, painted and weathered. Coat of MM stainless steel buffing metalizer was followed by Alclad white aluminum, then accented with MM burnt metal. Paint was lightly scraped from places to reveal original Tamiya chrome plating for worn/used effect. |
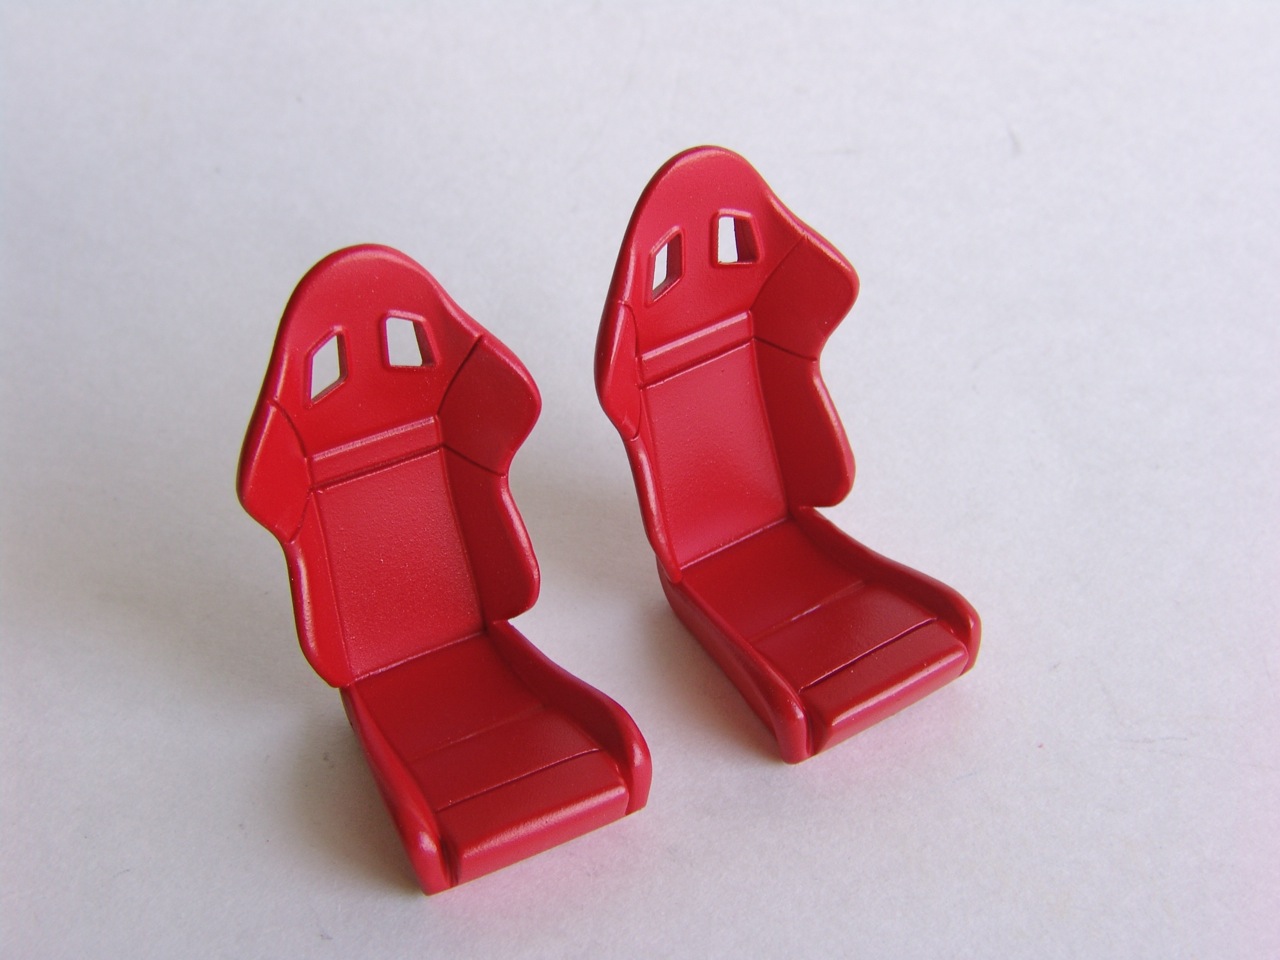 |
After everything was said and done, I sprayed a coat of Tamiya white primer followed by two coats of Tamiya red gloss/red flat acrylic mix. |
 |
Engine lid was painted yellow, and then the frame and underside was painted flat black. |
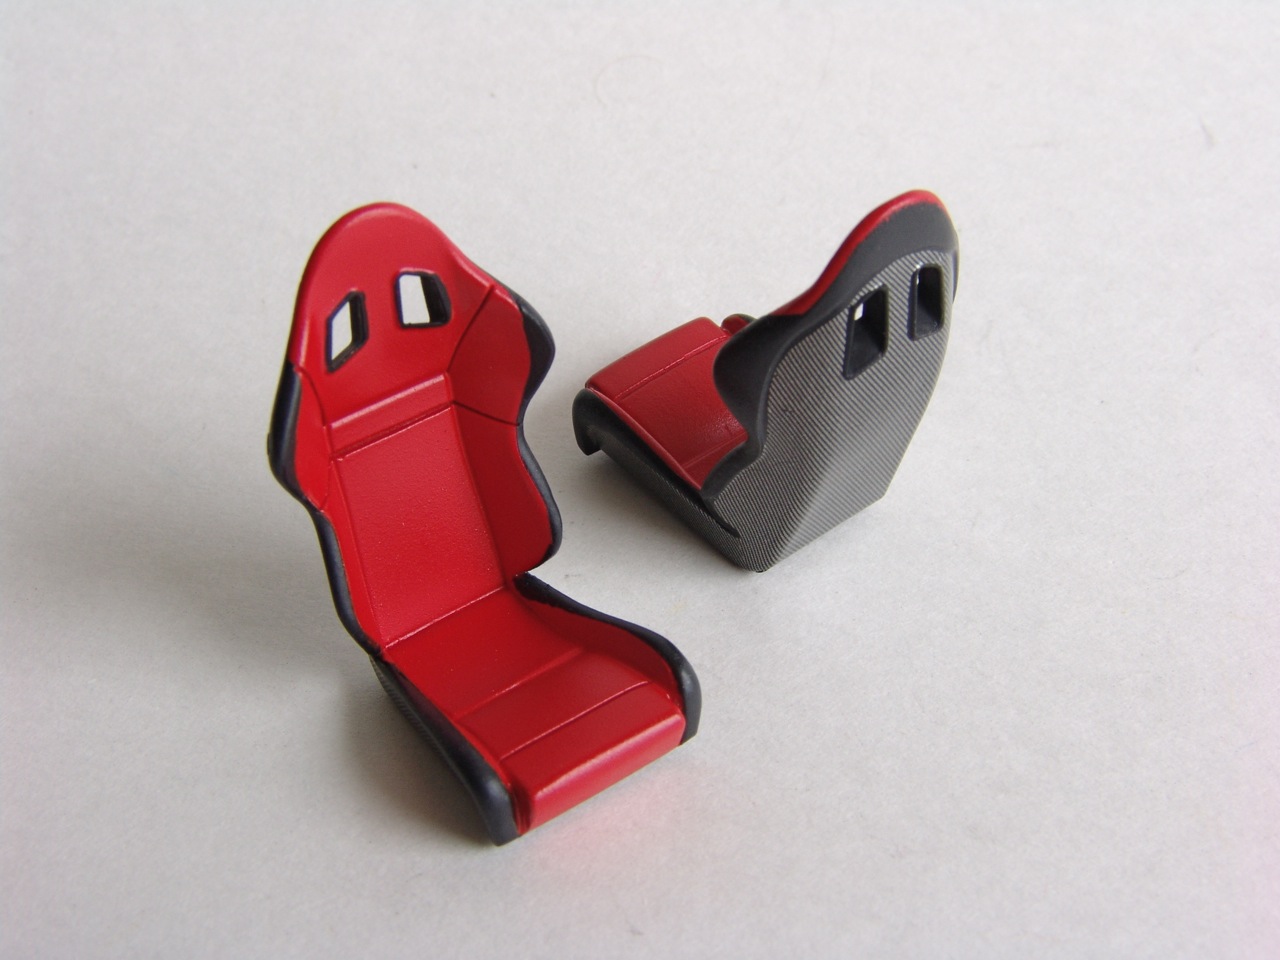 |
Then, the seats were masked off, painted flat black and decaled with SMS C/F. |
 |
Some careful masking was required to paint that underside. I wanted it to look good since the lid could be opened to show off the engine. |
 |
Finally, I clear-coated the C/F and seats were almost (need racing harness still) completed. |
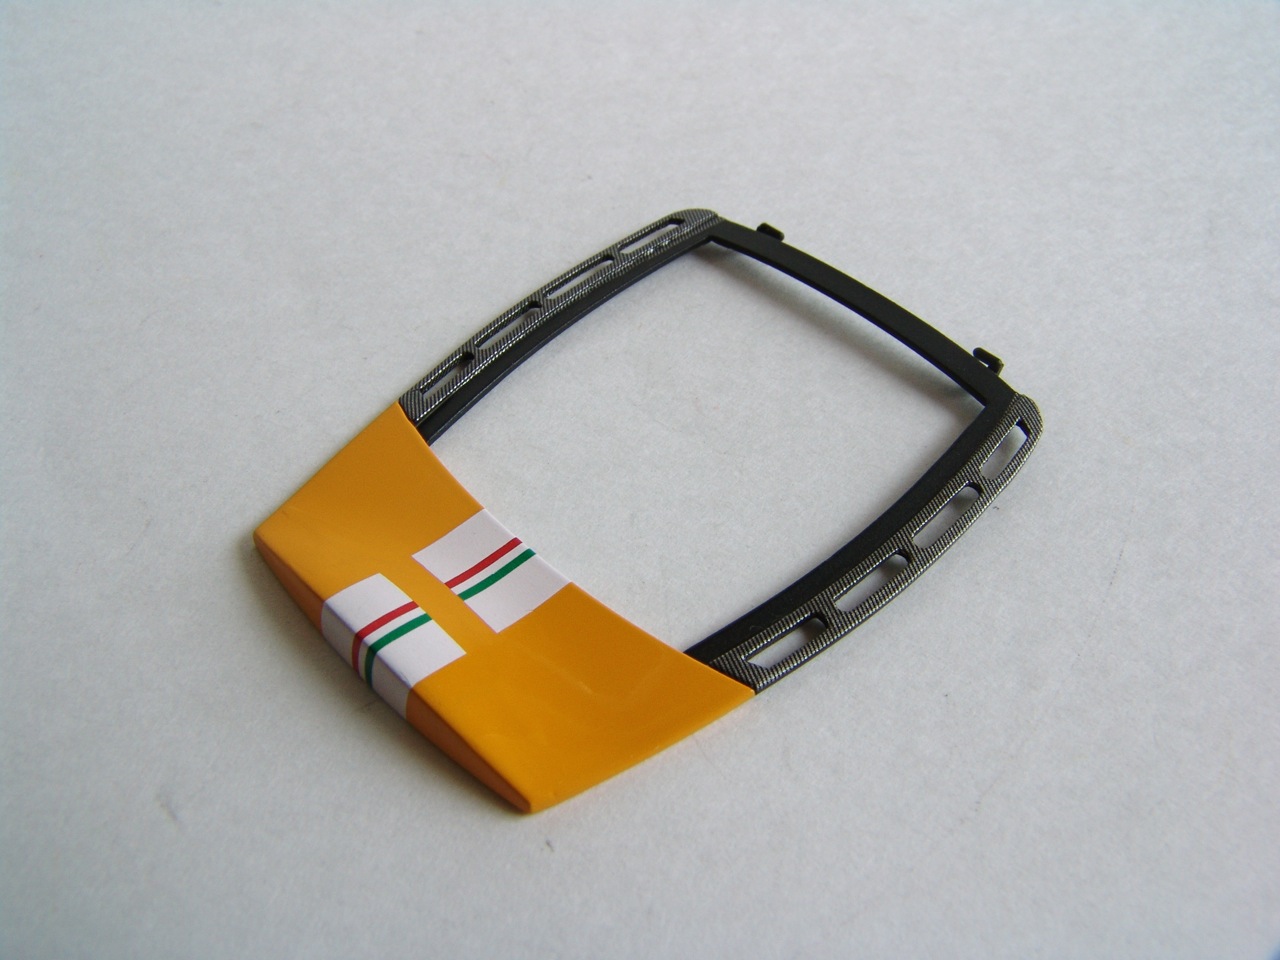 |
Vents were decaled with Crazy Modeler carbon fiber, and I also added CS stripe decals in the back. |
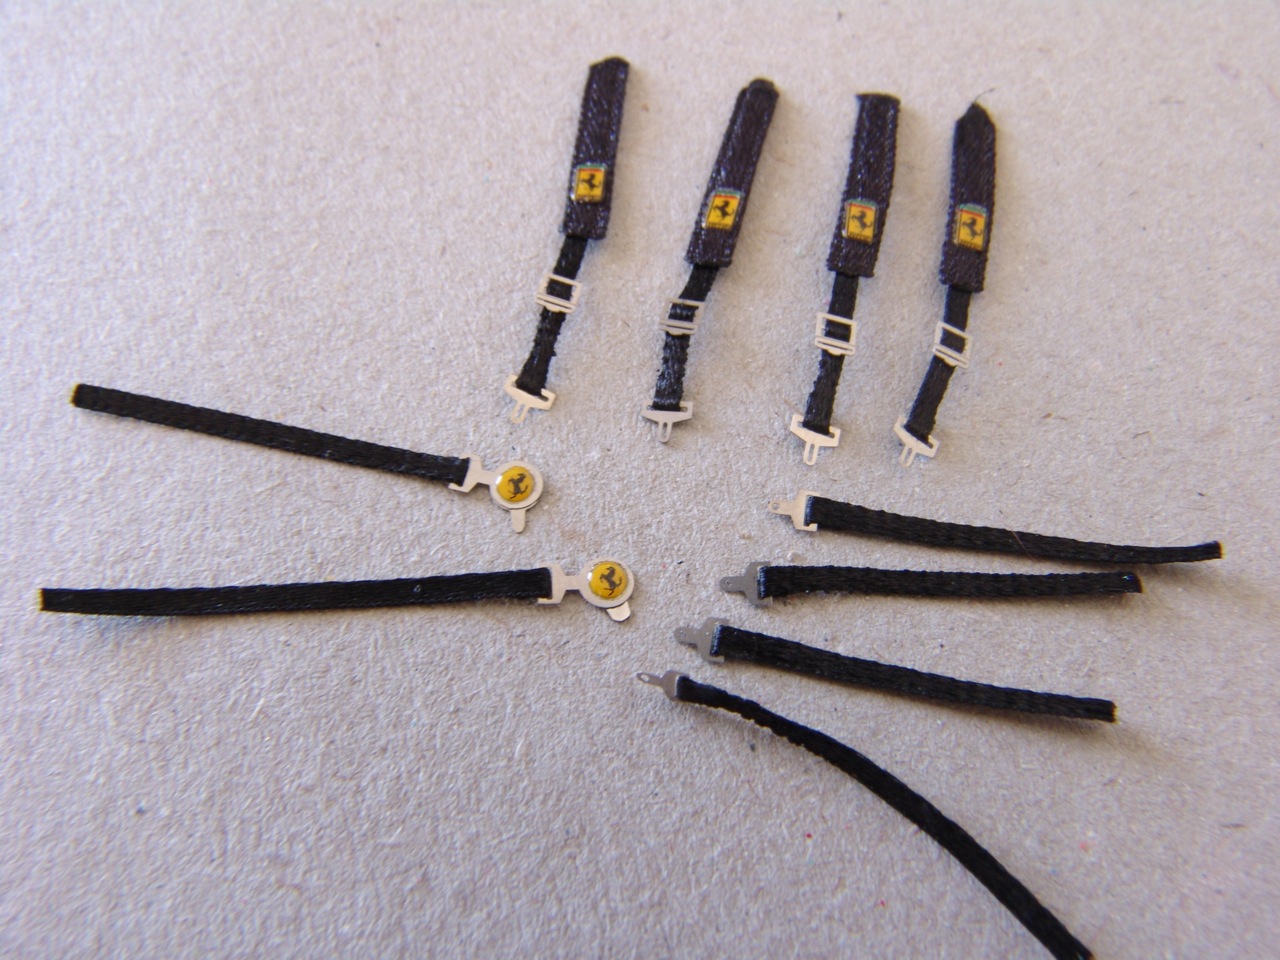 |
Seat harnesses were made from various ribbons and Acu-STion photoetched hardware, then detailed with Model Factory Hiro self-adhesive Ferrari emblems. |
 |
Then vents were detailed with plastic mesh supplied with Modena kit. The mesh was a good match for this application. |
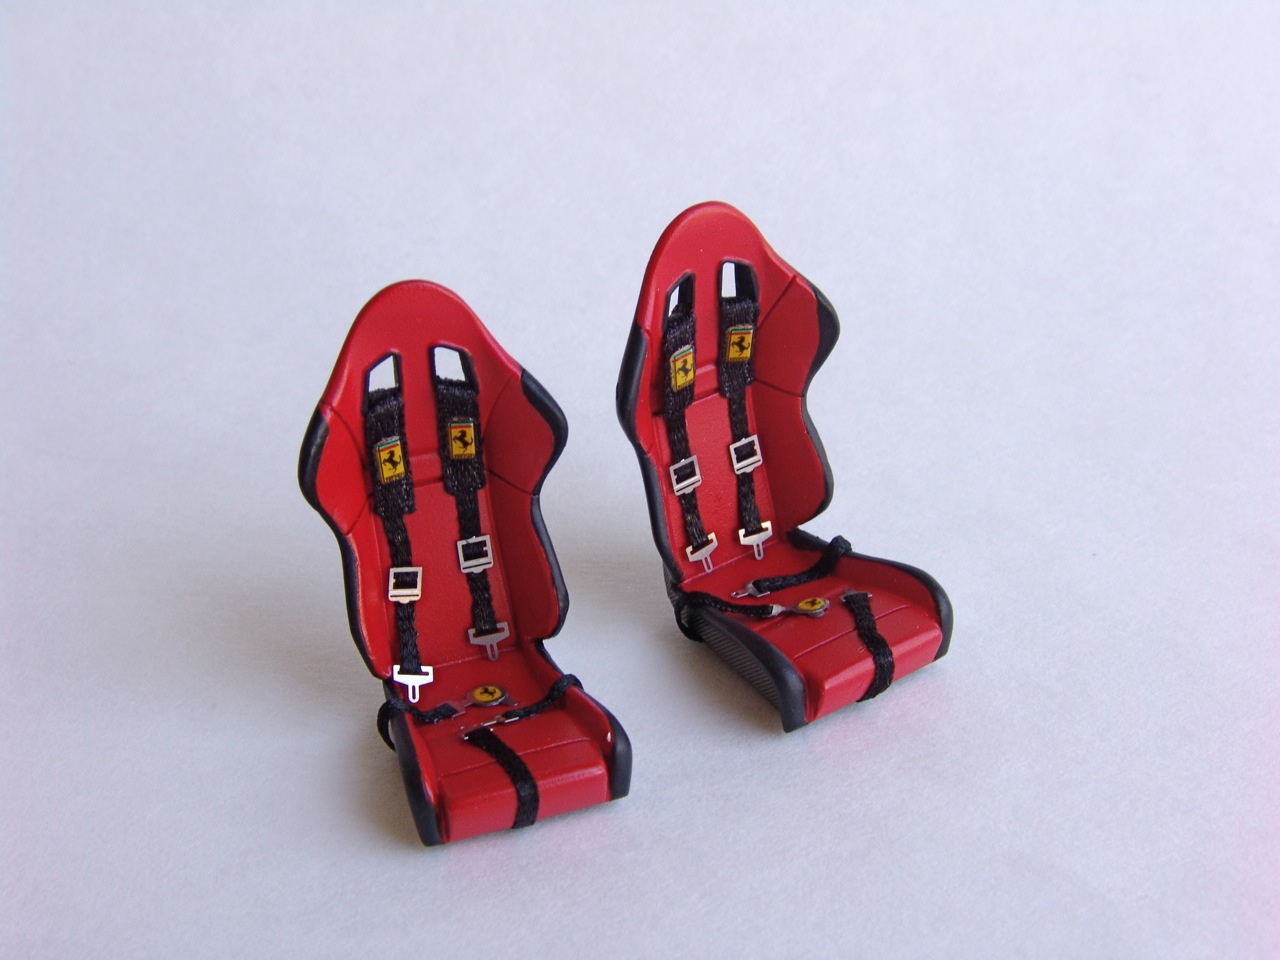 |
Then belts were attached to the seats. Finally, seat modification was complete! Onto the rest of the interior! |
 |
Stradales don't have rear window defroster, so I had to sand it off from the kit part and then sand more, and more with progressively finer grits, and polish the glass with 3M polishing compound, and then Treatment wax to make it clear again. |
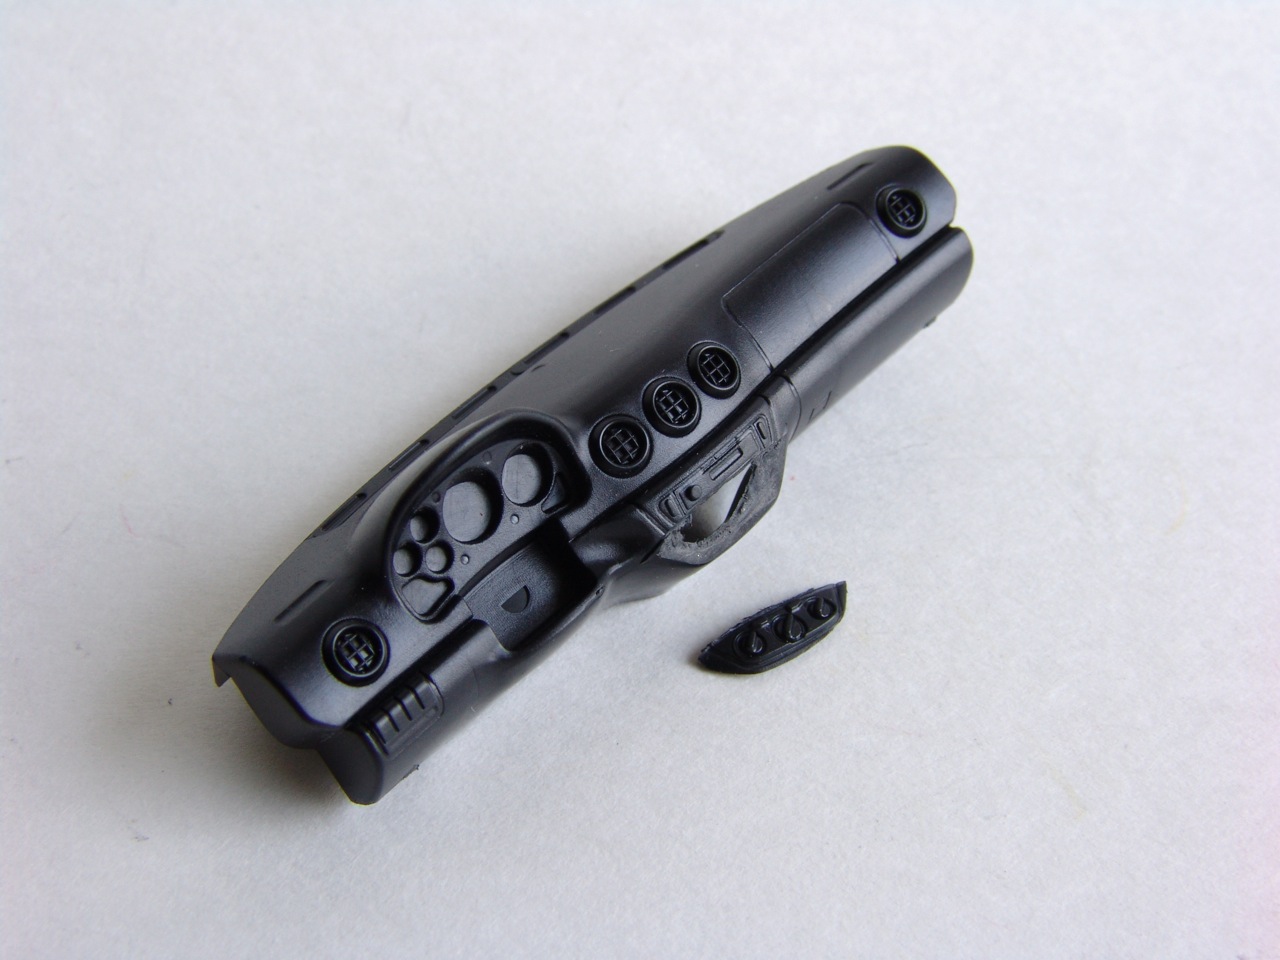 |
Stradale's dashboard is different from 360 Modena - it has different central panel, different air vents, and instrument cluster/steering column. To modify the central panel, I cut off the part with regulators (its identical on the CS) and bent/reshaped the console. |
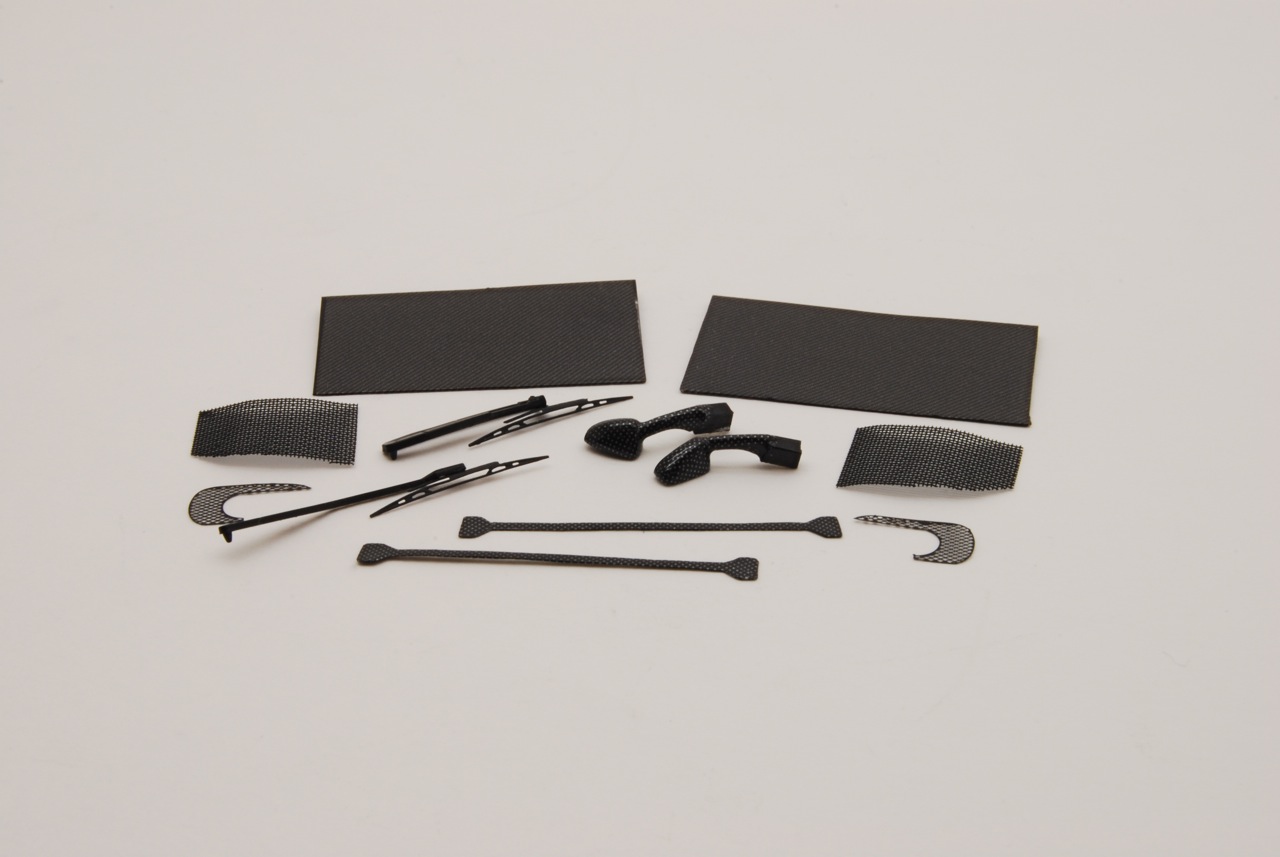 |
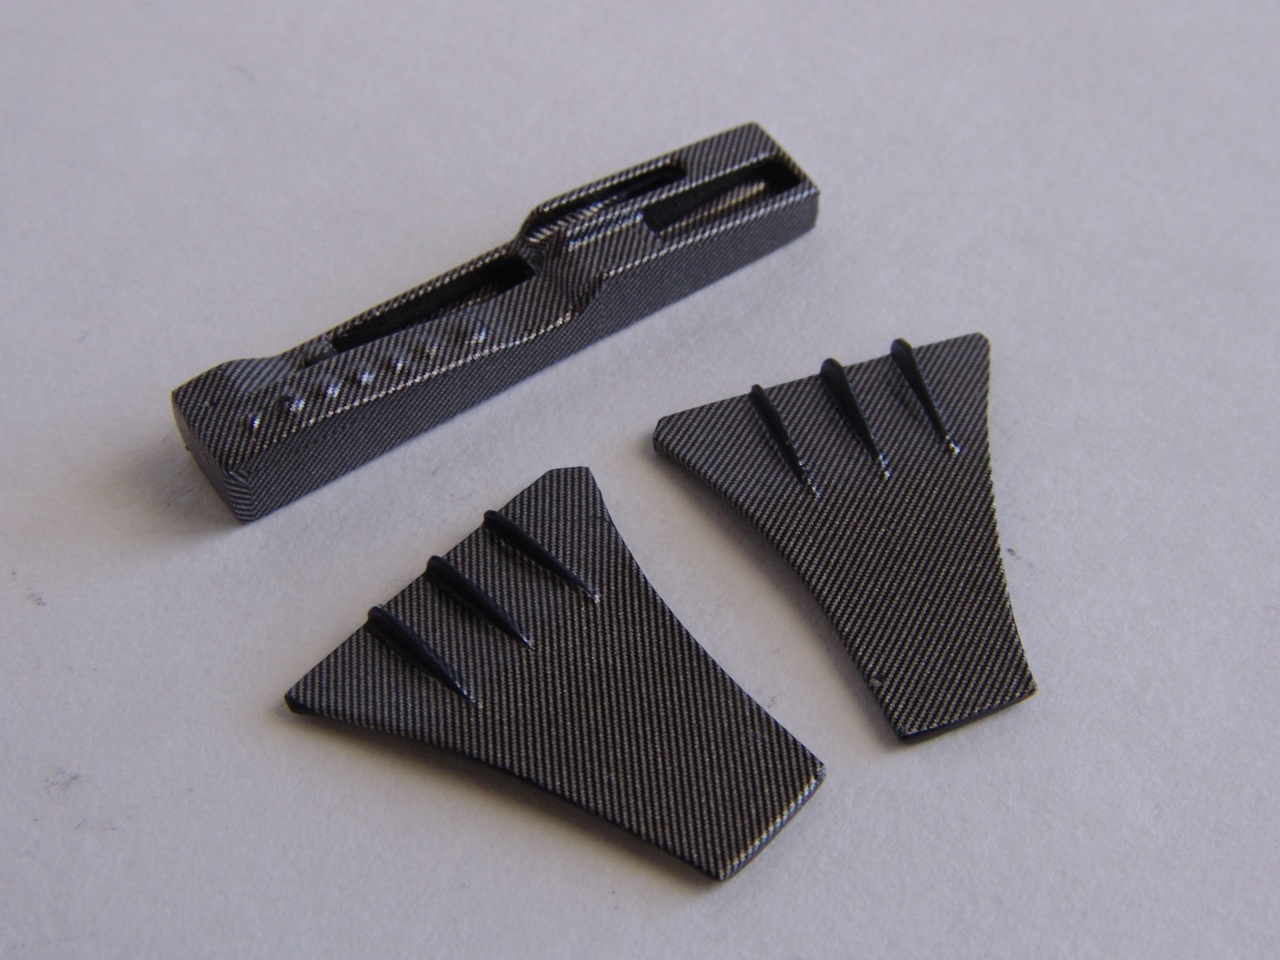
Few things were covered with C/F, kit wipers replaced with P/E from parts box (I cut only the blades, left the arms from the kit), various mesh and little bits were painted too. |
 |
Gap was filled with sheet styrene then puttied and sanded smooth. |
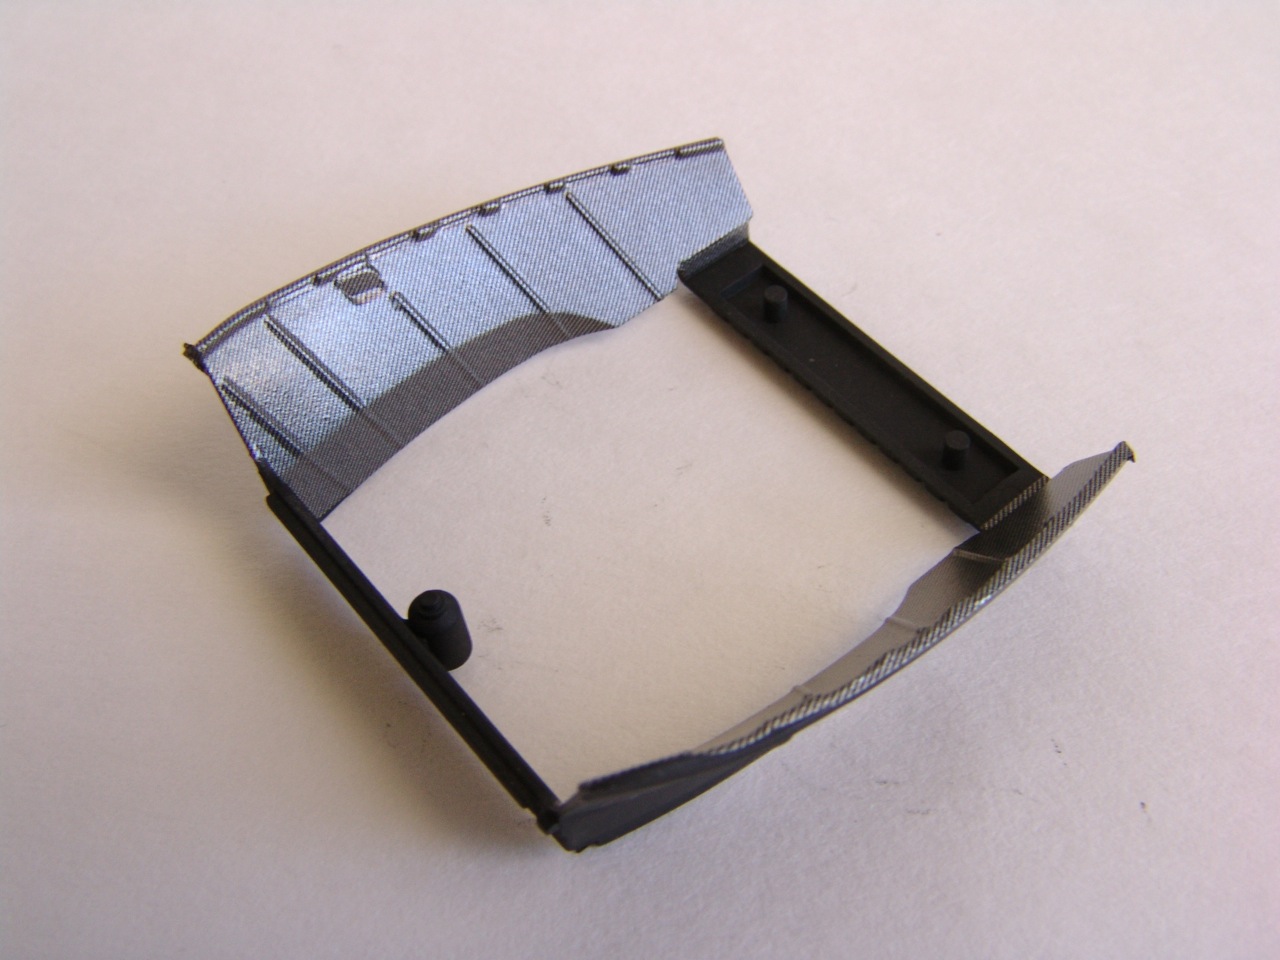 |
Engine bay walls were covered with C/F... |
 |
Then I bored out the socket for the regulators with my motor tool. The regulator plate needed to be covered with C/F and cut to shape. Finally, I drilled out the air vents since they are completely different on CS. |
 |
...and fluid bottle was detailed and wired. |
 |
Dashboard was painted red, then masked and painted black. I also decaled and detail painted the panel with regulators and installed it on the dashboard. |
 |
Finally I added C/F bars, Crazy Modeler Cavallino badge, and glass to the engine lid. |
 |
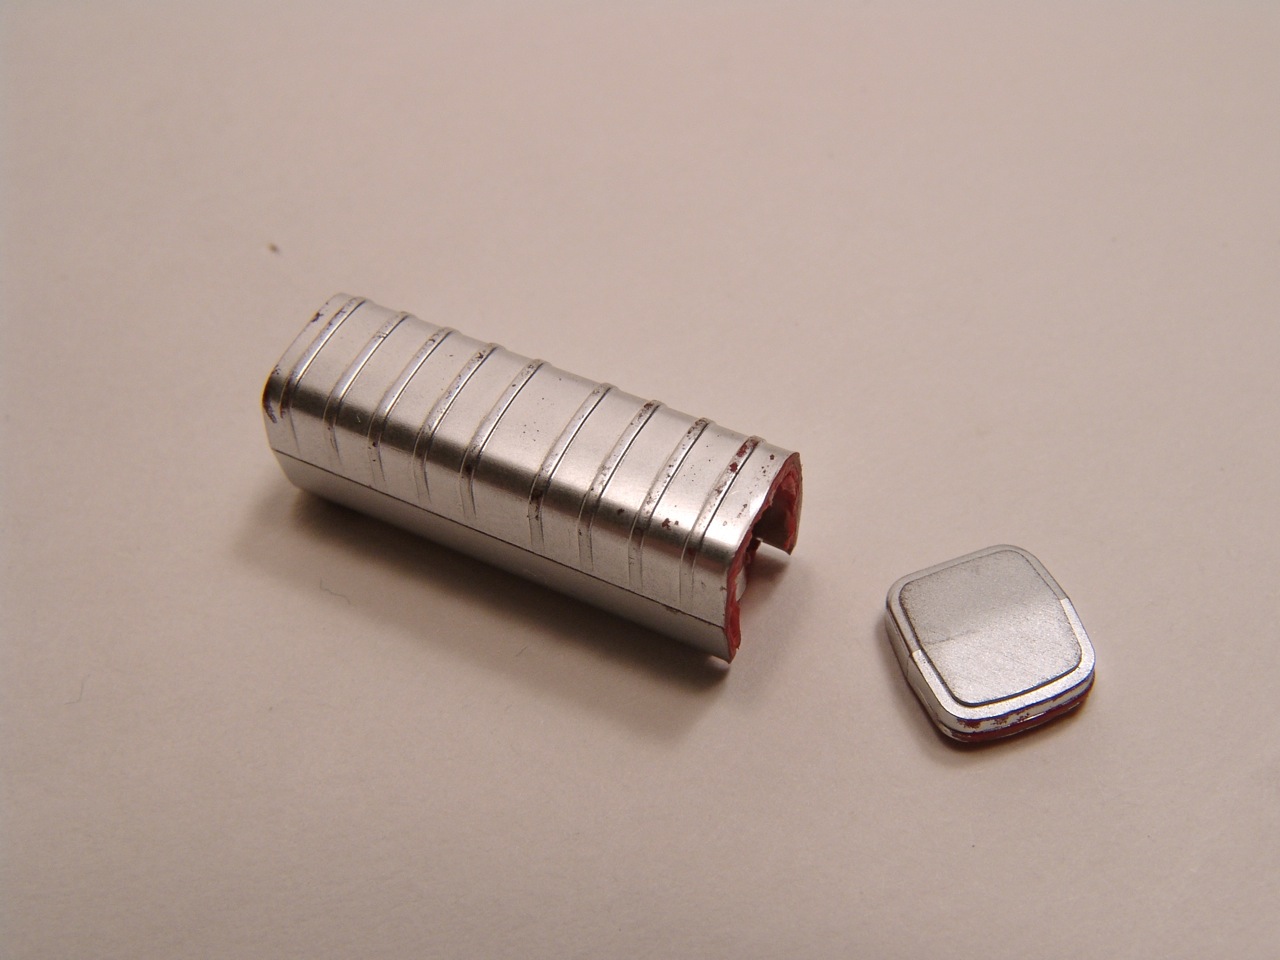
When I measured MSM wheels, they were too small for the Stradale - probably 2" smaller than needed. Chris from Scale Auto Style came to rescue, and sent me a set of SAS 19" BBS rims - they were a perfect fit. On this picture you can see how much bigger SAS set compared to MSM. |
 |
Model Factory Hiro adhesive heat shielding was added to the underside of the engine lid. |
 |
SAS and MSM wheels, dressed with identical Tamiya tires - see the difference? |
 |
And finally I added third stop light (which is actually a photoetched part from Acu-STion Enzo detail set), and painted it clear red. |
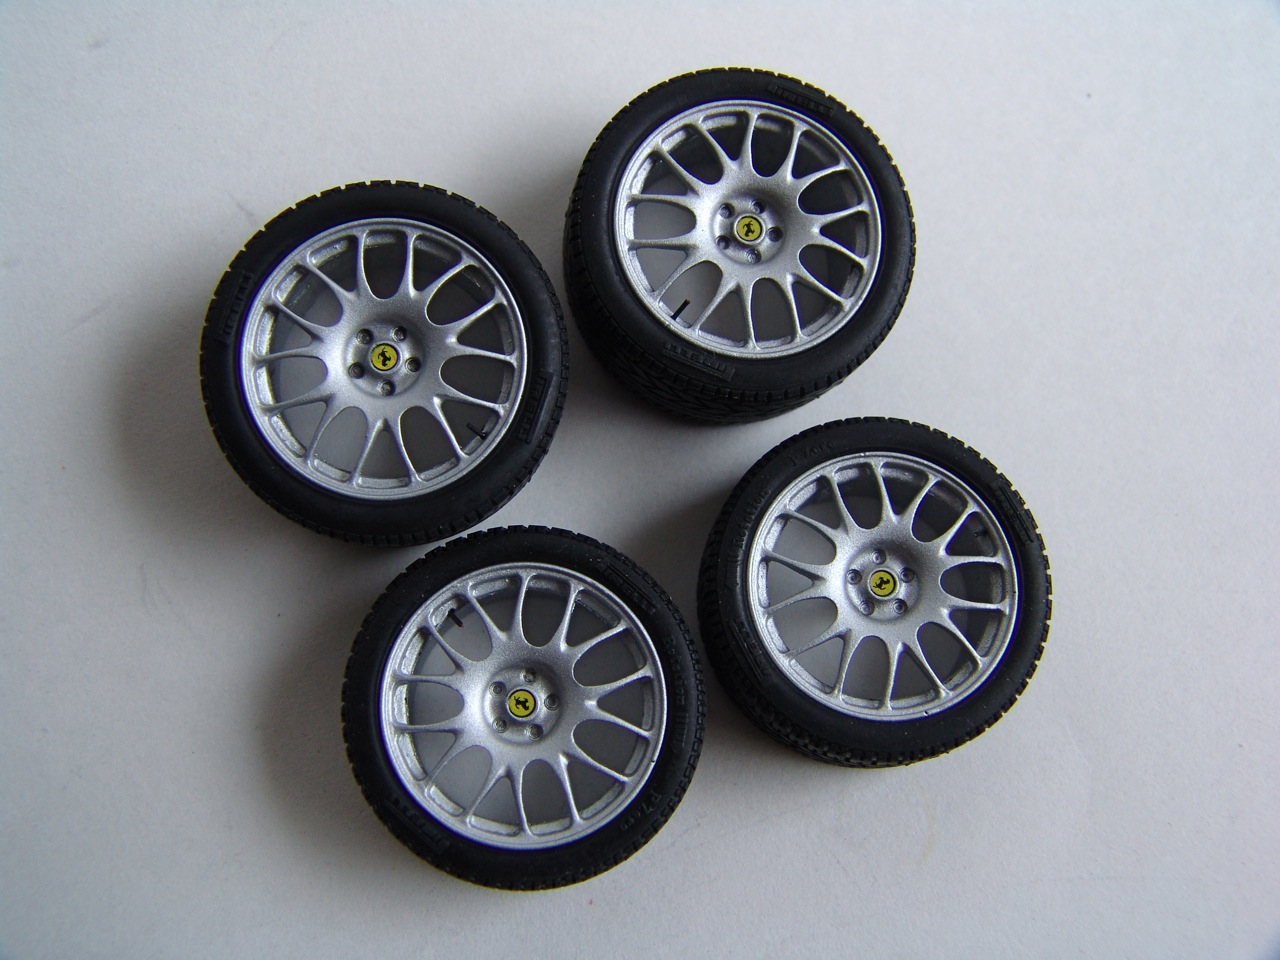 |
Anyway, the wheels were cleaned, primed, painted with Testors Aluminum metalizer, clearcoated, fitted with center decals and tire valves, then tires from Tamiya kit were put on. Looks GOOD! And the size is just right. |
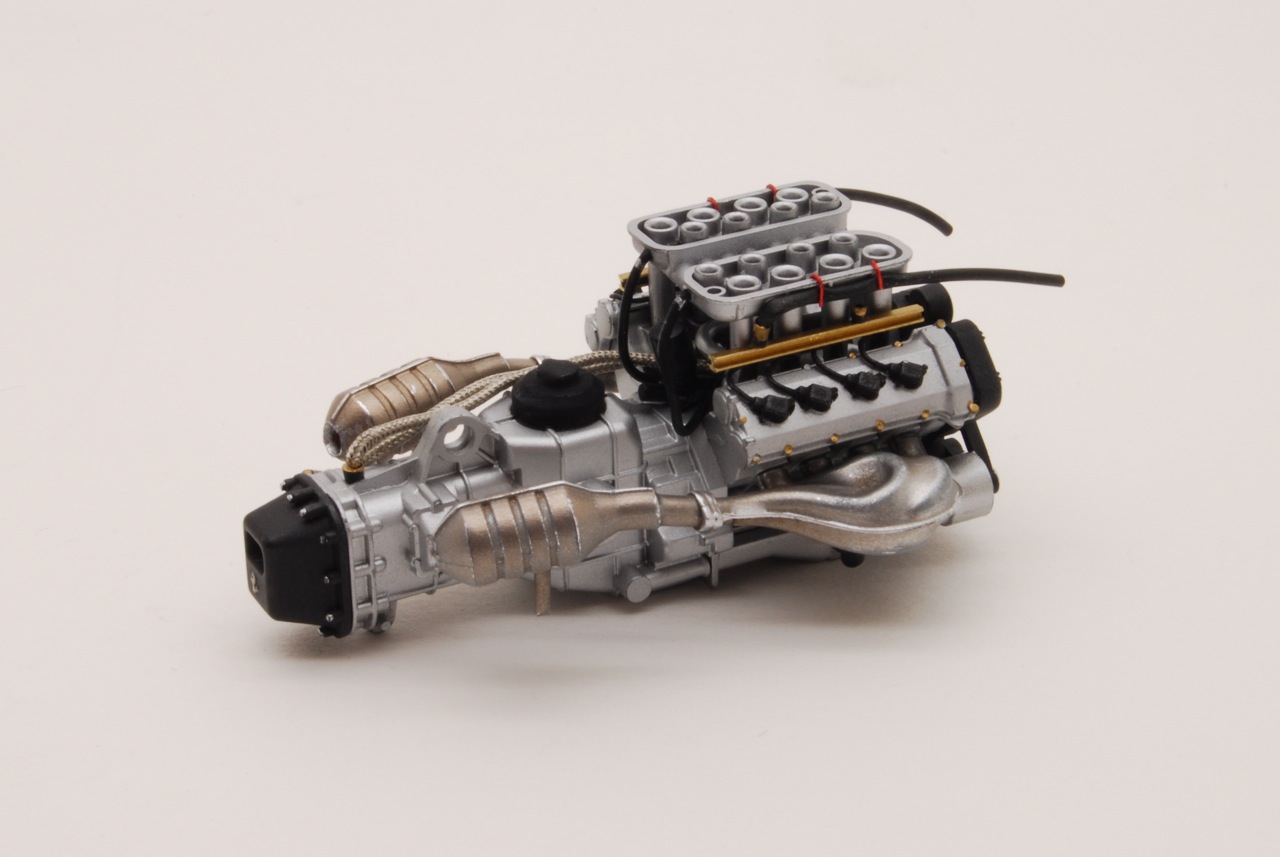 |
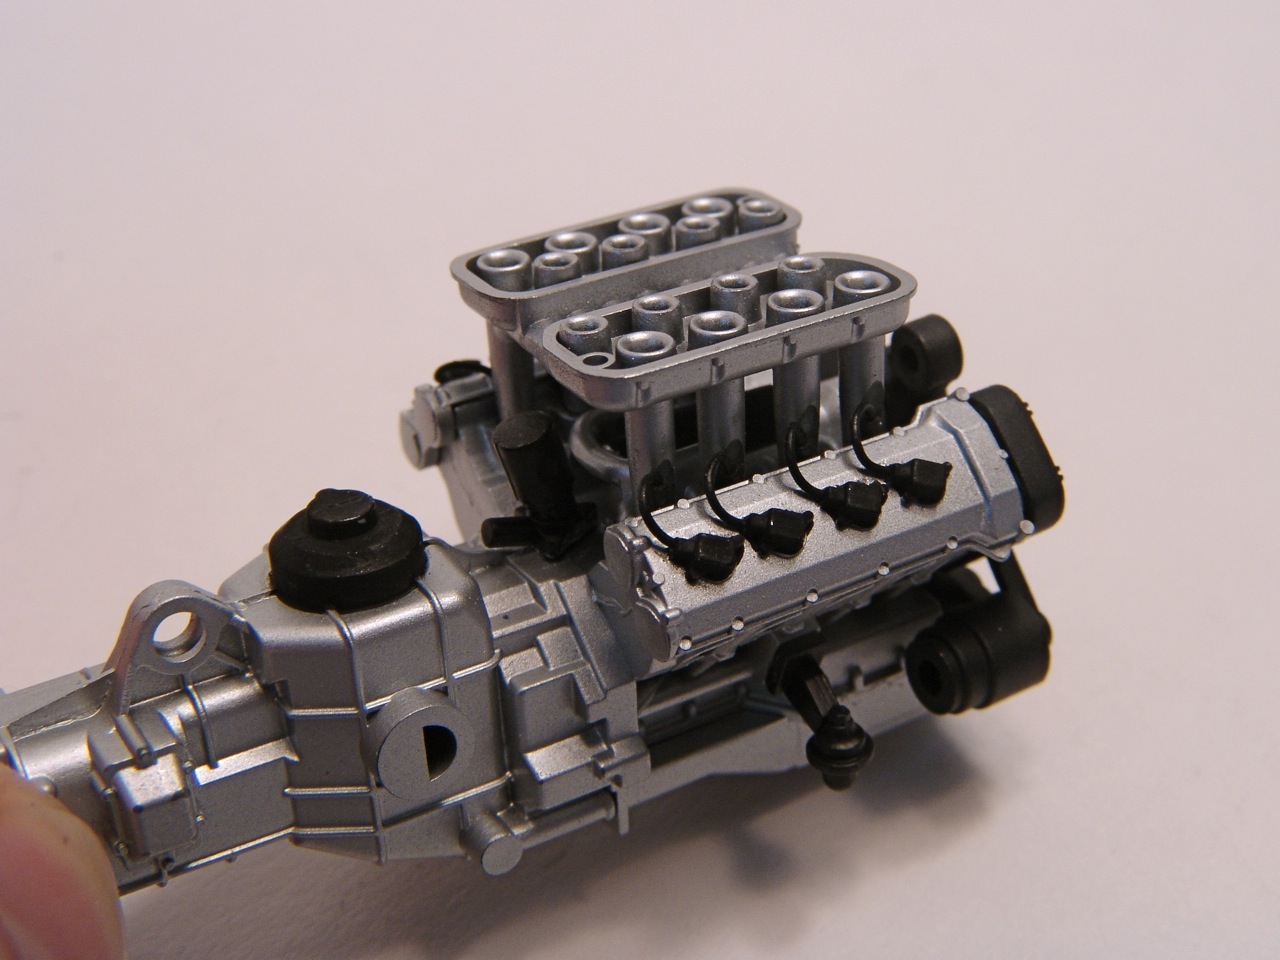
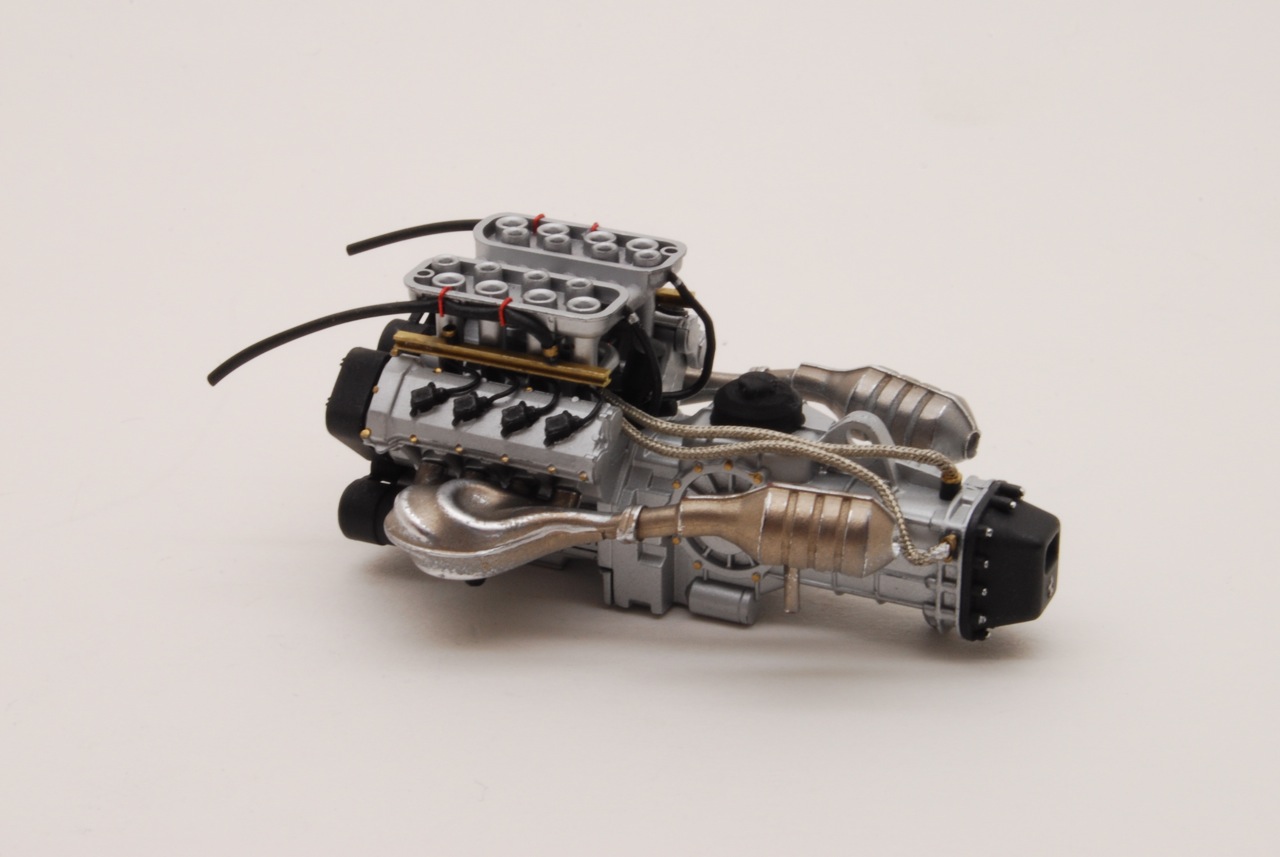
Engine block was assembled, wired, and plumbed (partially). Then I added fuel rails (made from thin square brass rod) and injectors, oil lines, and Pro Tech braided lines for the transmission. |
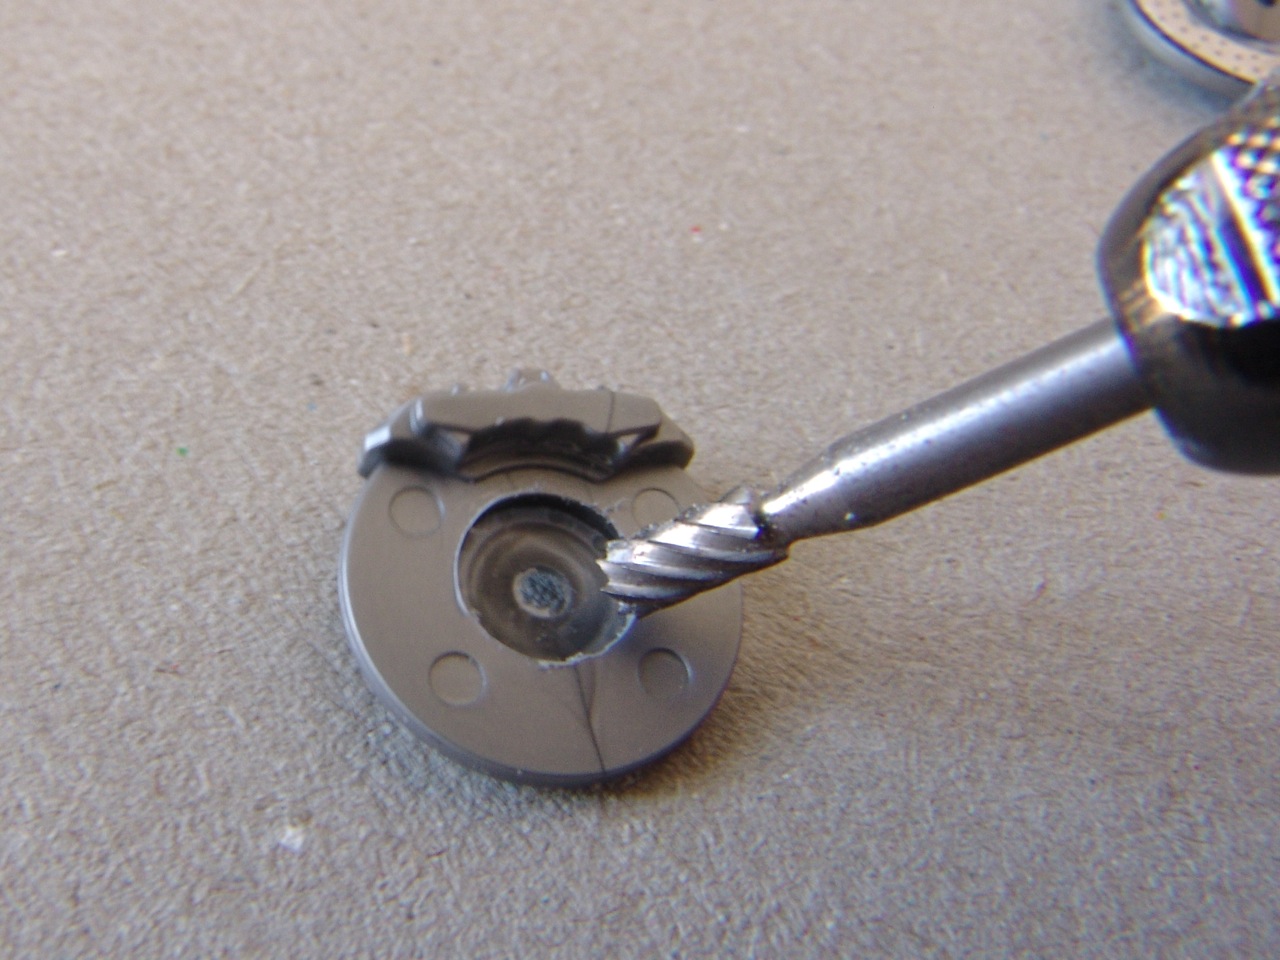 |
Real Stradale has bigger brakes than Modena, so I decided to replace them with Enzo brakes, cause they in fact are identical (with minor differences). The problem was that Enzo brakes (Tamiya parts) had different attachment to the hubs. I decided to just cut the pieces from the Modena rotors and put them on Enzo rotors. |
 |
I decided not to do anything to the belts since they will be invisible anyway - I just detail painted them. |
 |
Front rotors were carefully grinded out with motor tool to accept Modena's hubs. This picture shows original and modified Enzo rotors, with separate hubs removed from Modena's rotor. |
 |
Another view of the engine block after some detailing and wiring. |
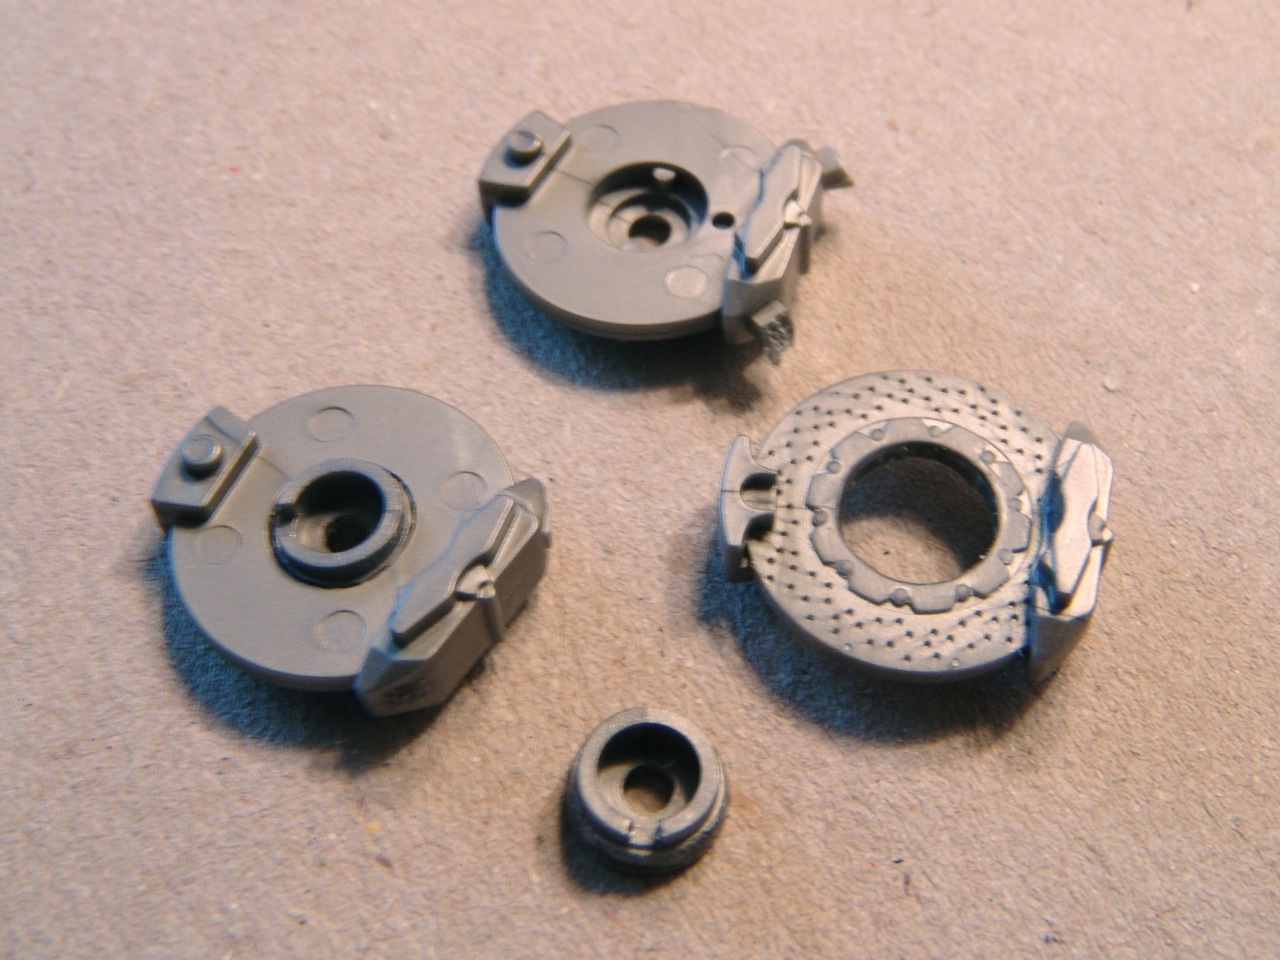 |
Similar surgery was performed on the rear brakes, only this time I had to cut the hub completely out. |
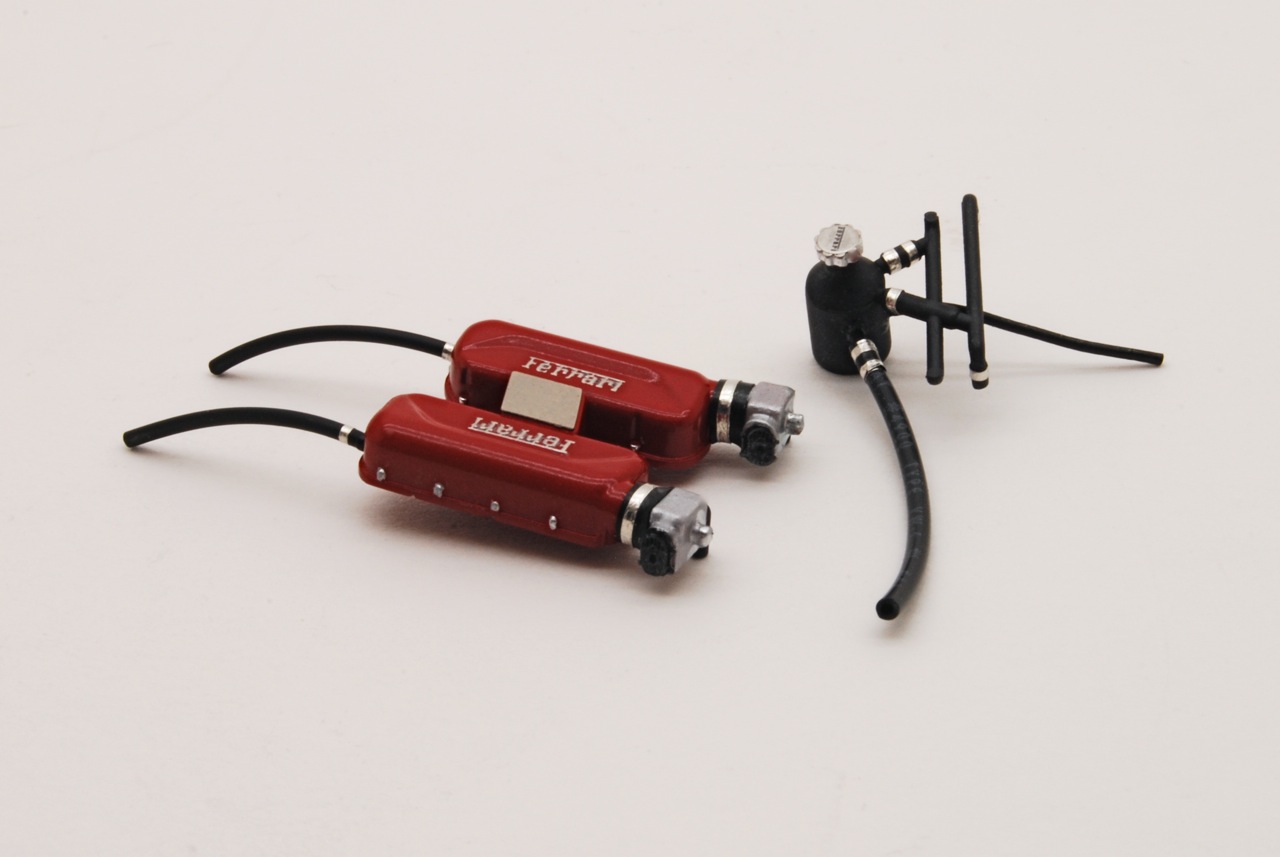 |
Cam covers and fluid reservoirs were also painted and detailed. I used some of my friends' Gio custom-made P/E parts for the MAF meters (thanks Gio), and added P/E from AST Enzo set to the fluid caps. Clamps are BMF, hoses are plastic tubing from Detail Master. |
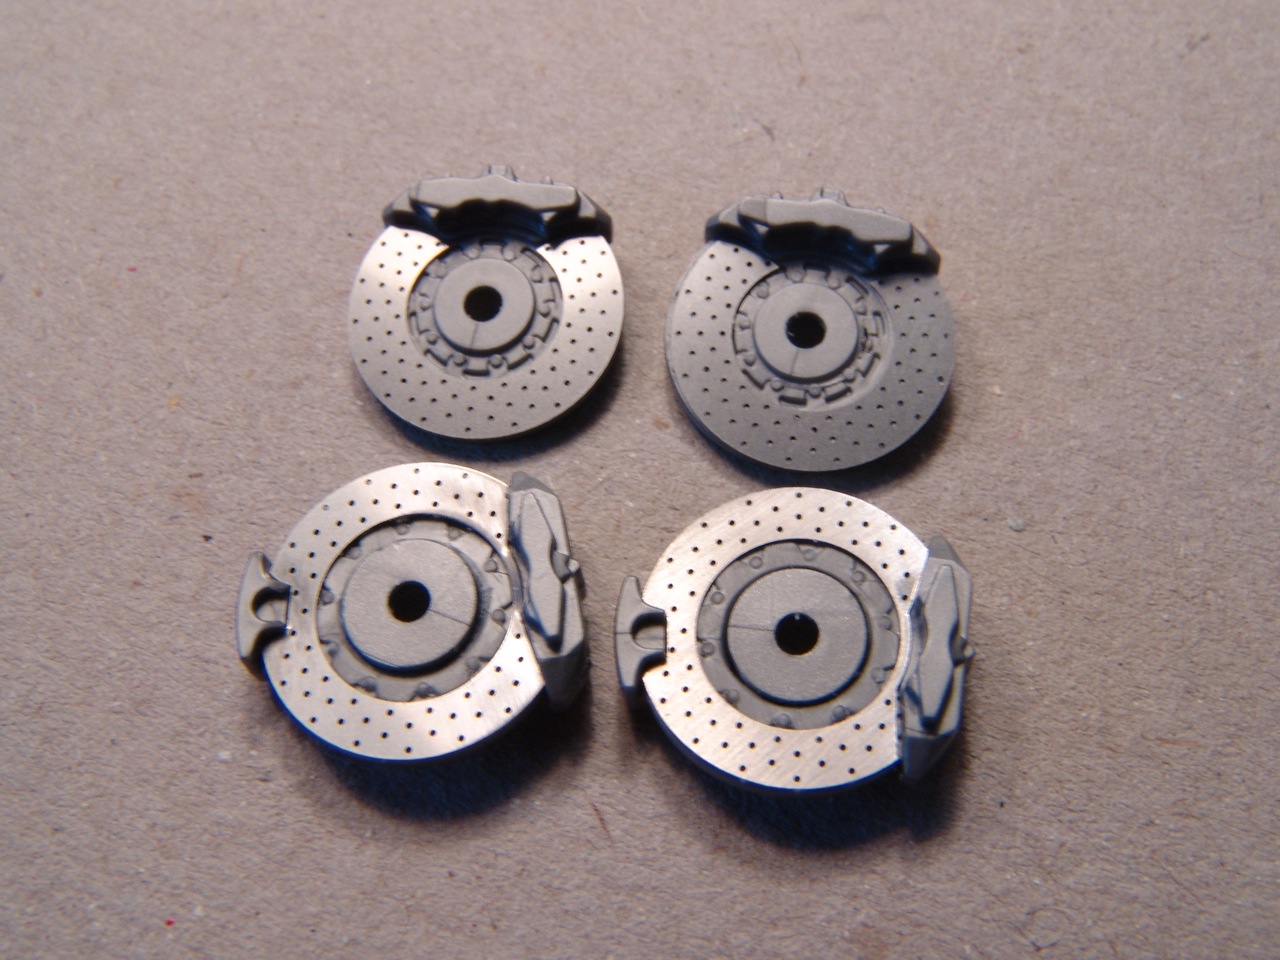 |
Now all 4 rotors were made to fit original Modena suspension. To make rotors even more realistic, their faces were replaced with photoetched faces from Acu-STion Enzo set. |
 |
Little Cavallino emblem on top of the cam covers was covered with KA Models C/F and Crazy Modeler P/E badge was added to the top. |
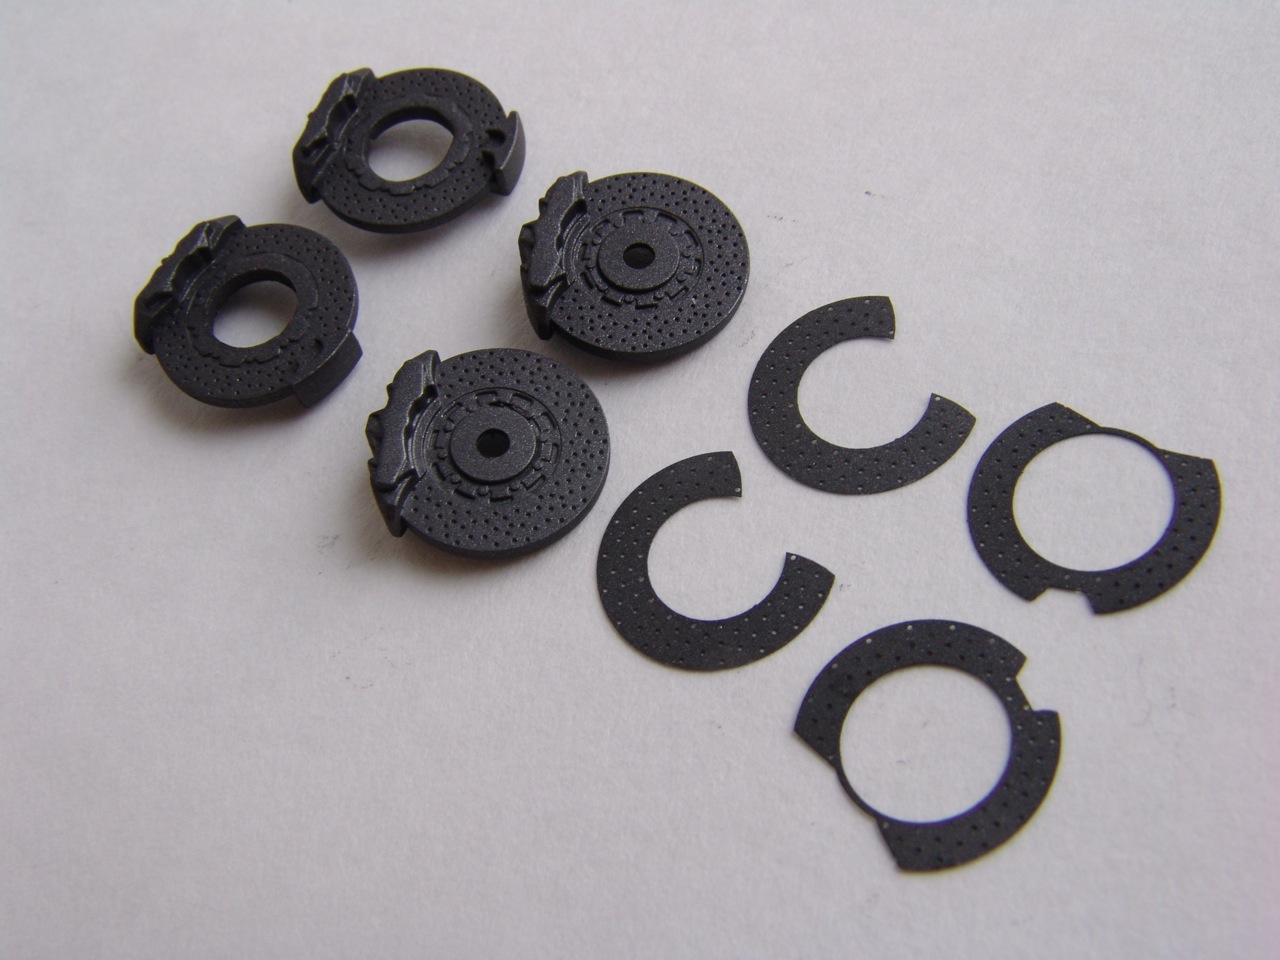 |
Both plastic brakes and Acu-STion photoetched faces were painted with Testors metalizers to simulate carbon brakes. |
 |
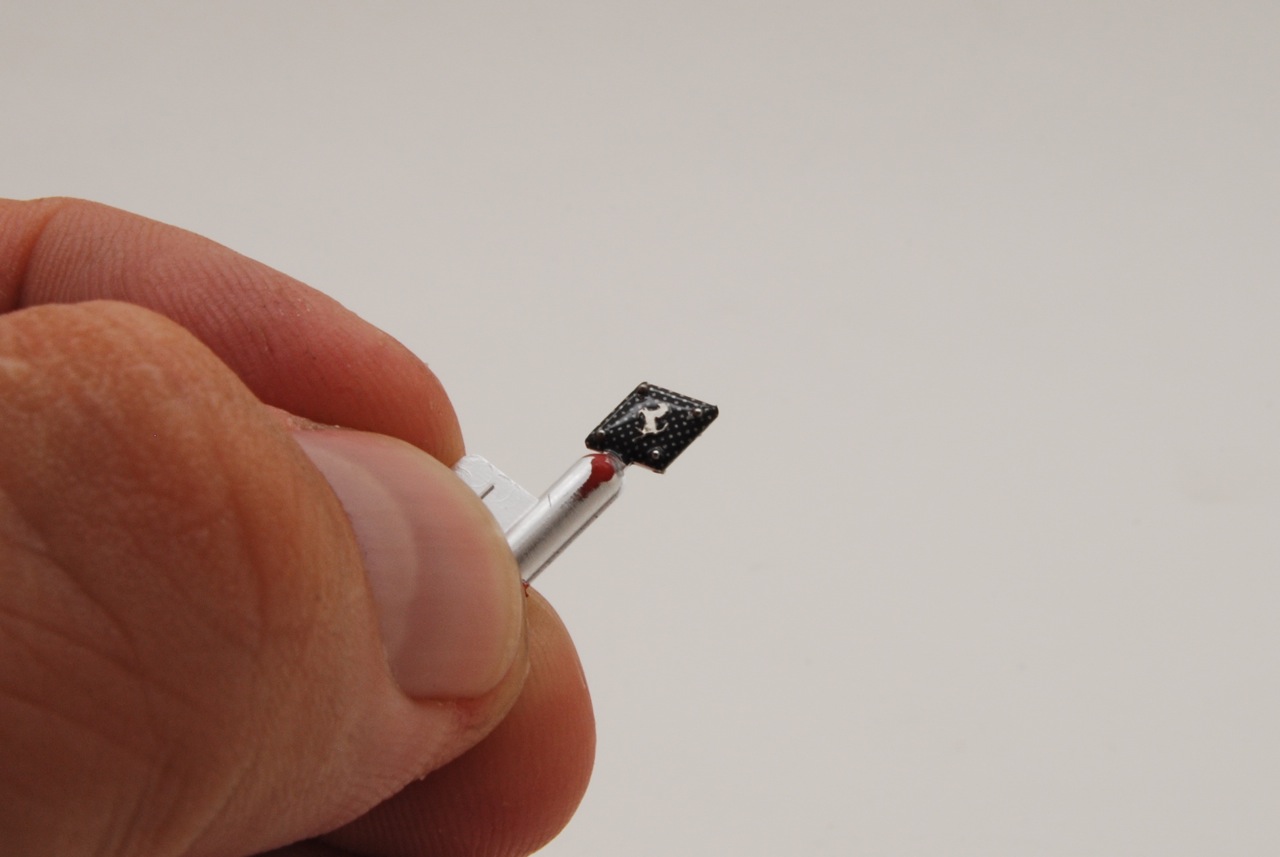
Plastic rivets were sanded off and replaced with some Scale Hardware rivets for more realism. |
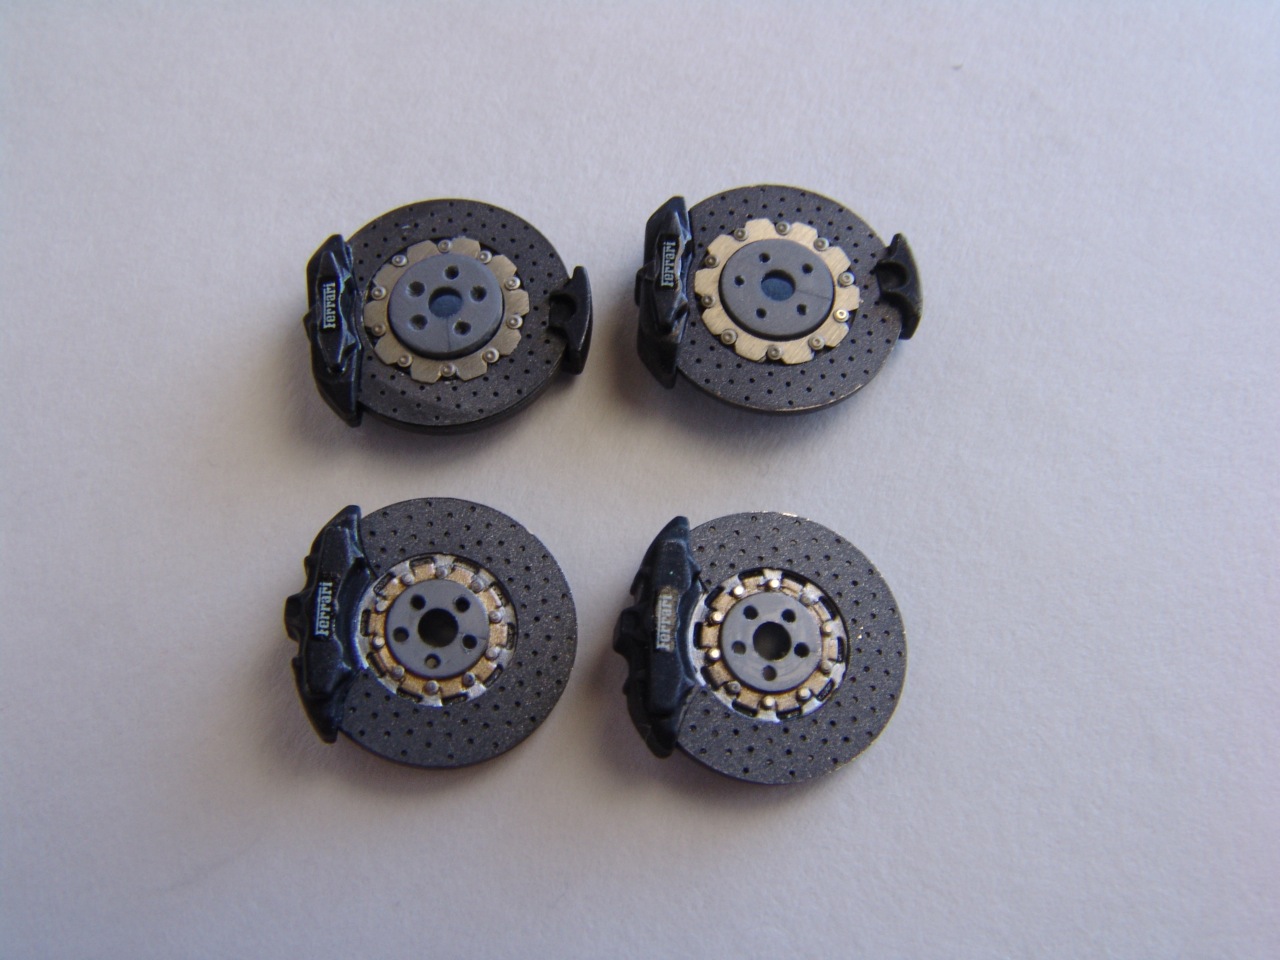 |
Then brakes were put together, calipers painted semi-gloss black and decaled, and hubs received some photoetched detailing from Acu-STion Enzo set, including some nice hub rivets. |
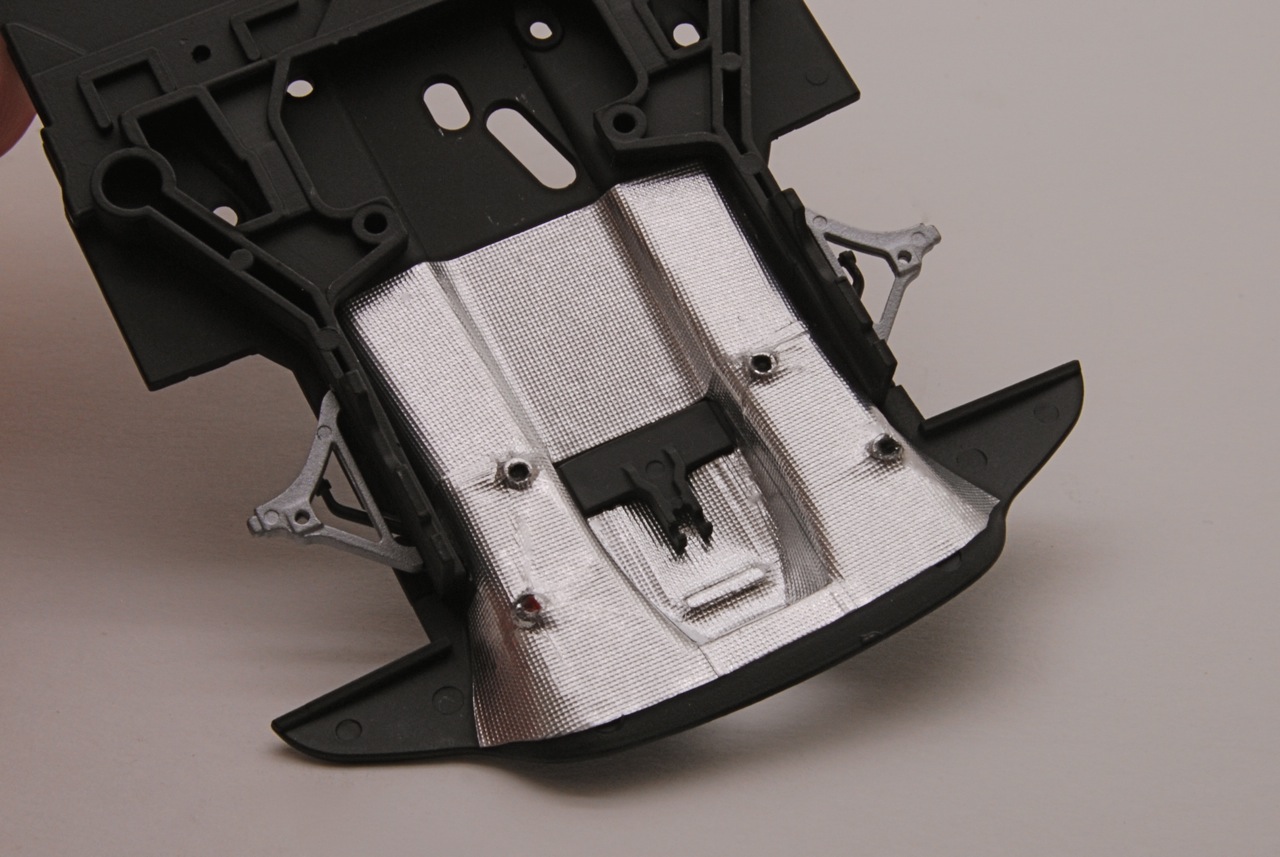 |
Engine bay on the chassis was lined with some self-adhesive Model Factory Hiro heat shielding material. It is a wonderful stuff! |
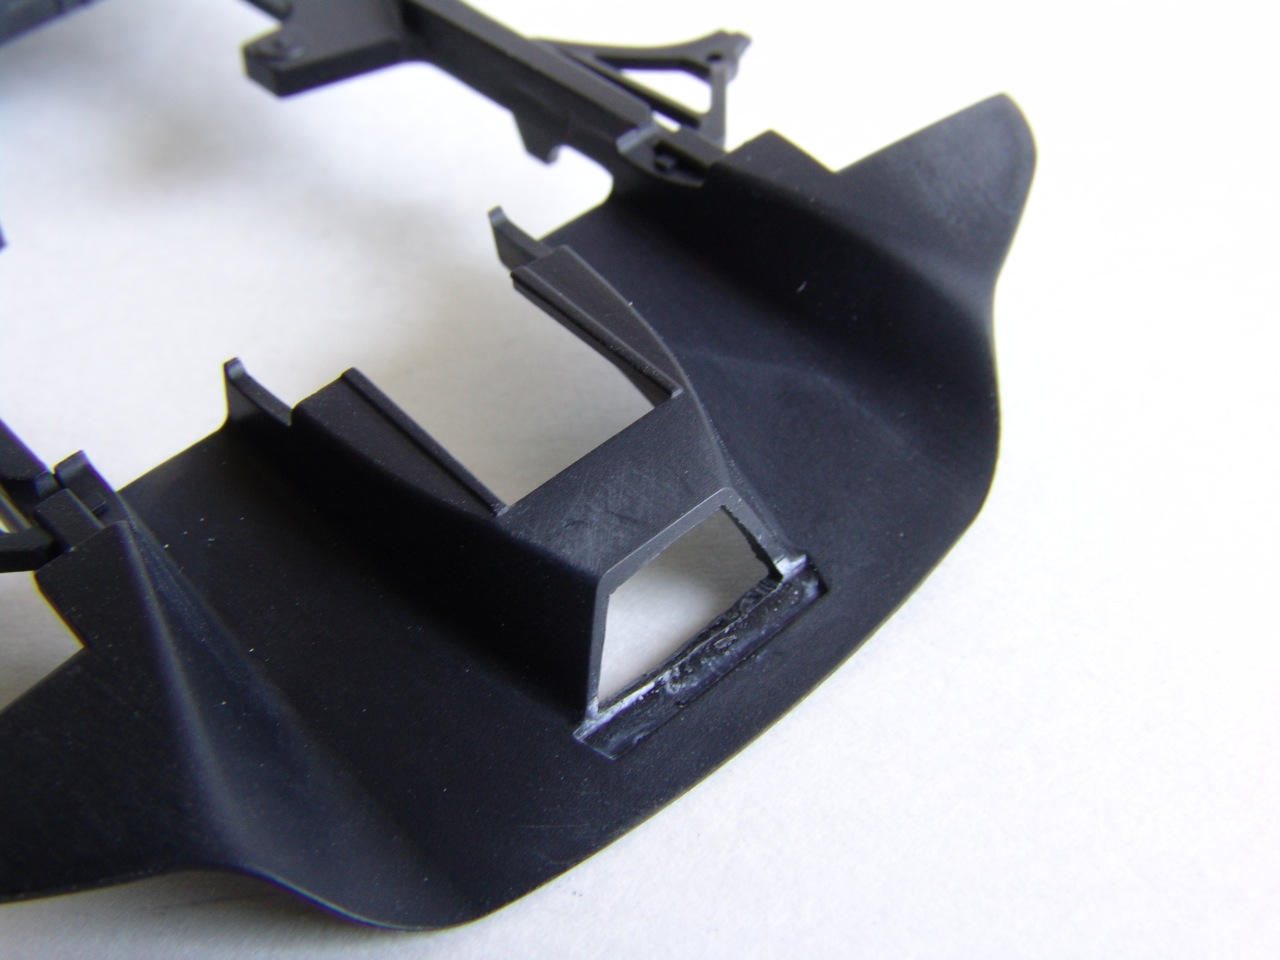 |
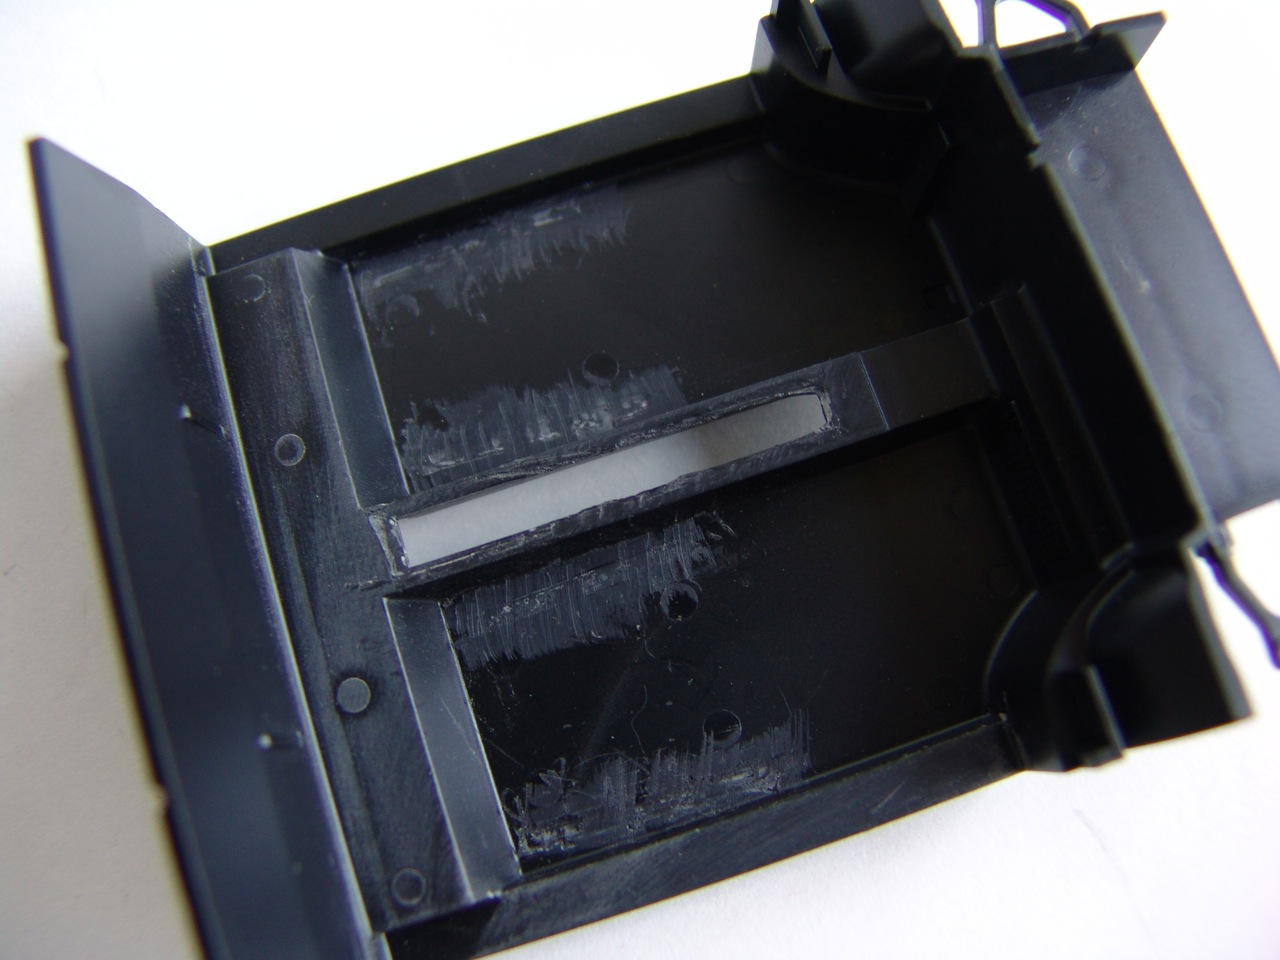
Gearbox vent on the chassis was cut out, but then I lost the piece that goes on top of it! I decided that I will deal with it later (I scratch-built it with sheet styrene and mesh supplied with the kit). |
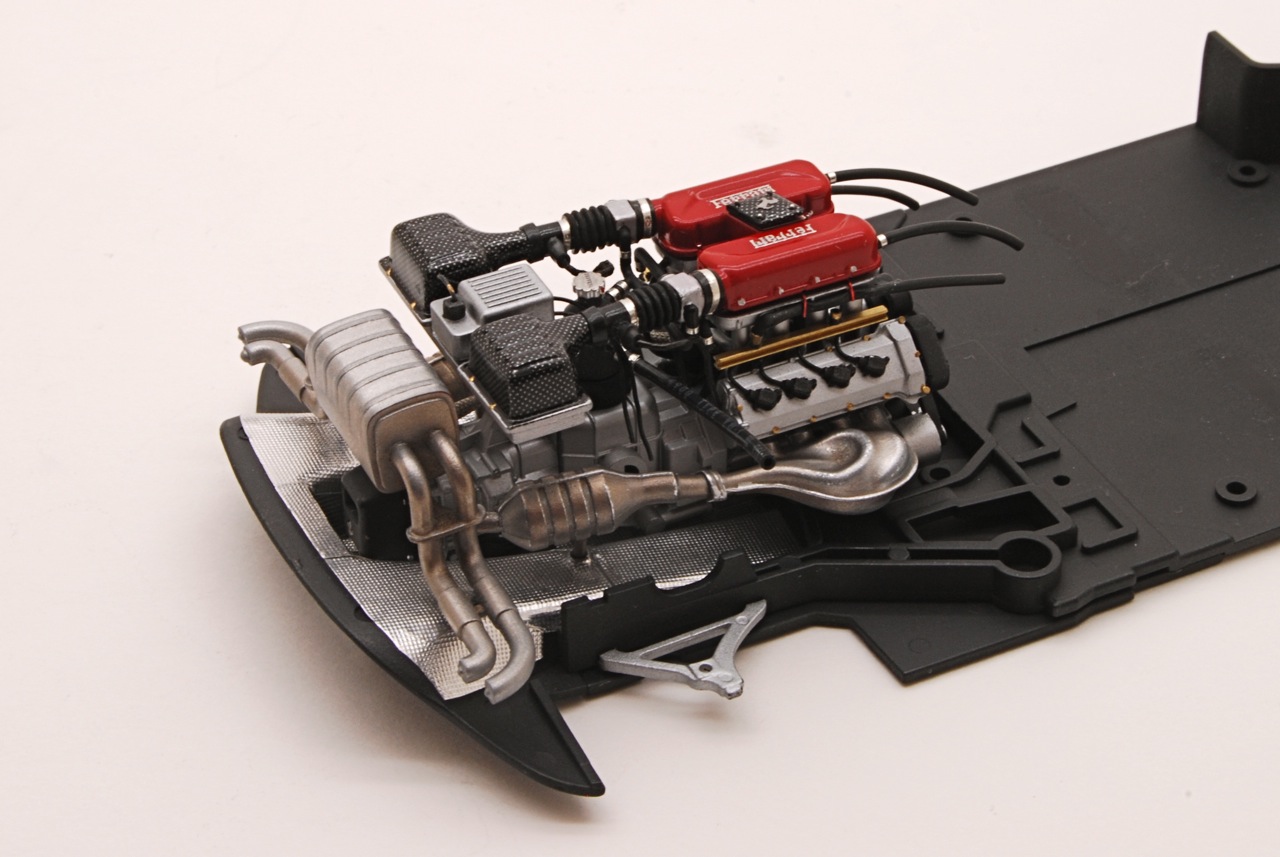 |
After everything was detailed and wired/plumbed, I mocked up engine assembly to check for fit and clearances. |
 |
Then I installed engine pan (provided as a clear part in the kit) and painted everything flat black. Suspension A-arms were painted aluminum. |
 |
Everything looked like it was lining up correctly so I proceeded with engine assembly. |
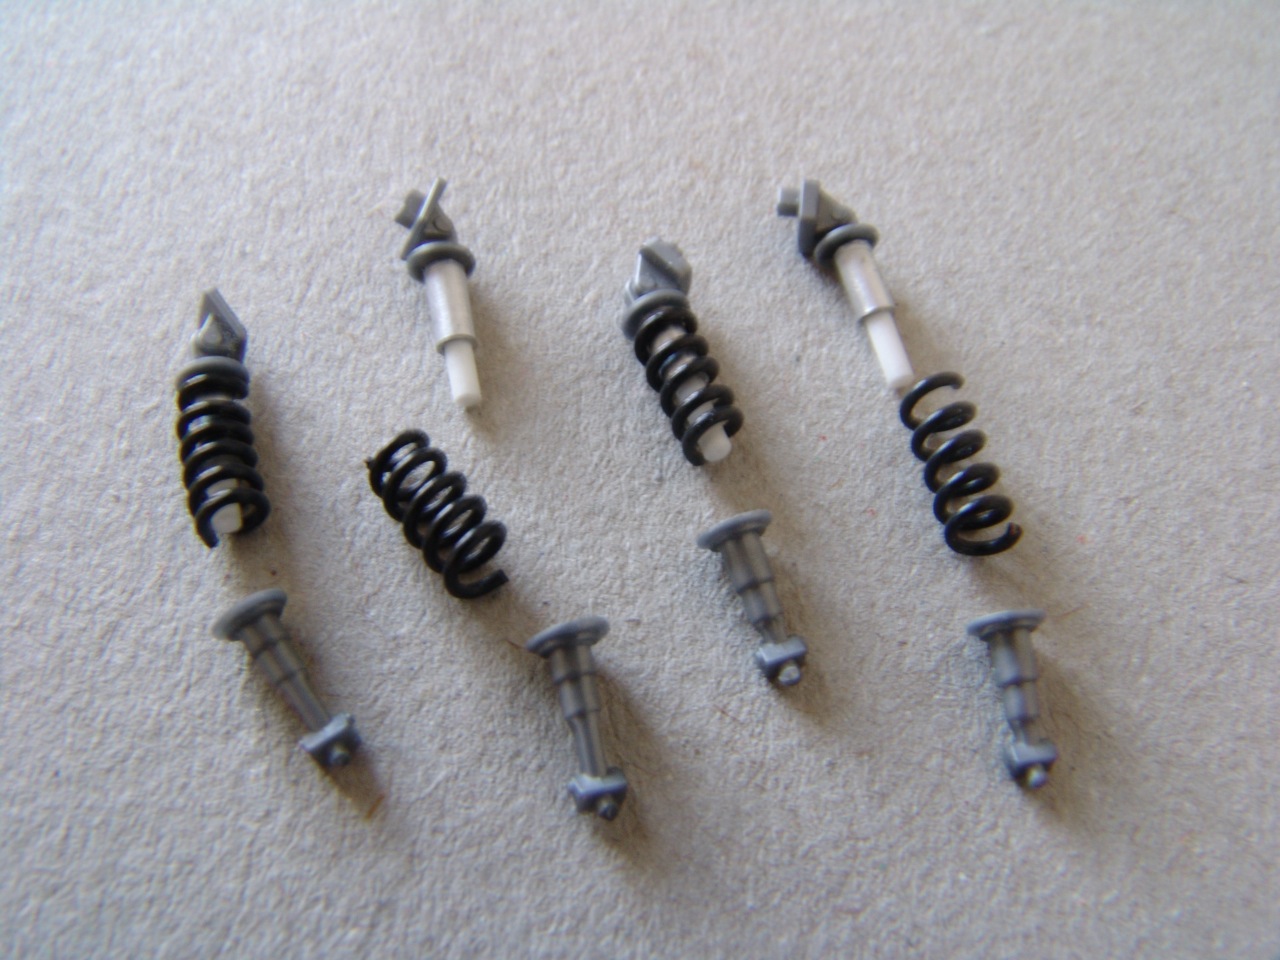 |
I had to do something to the shock absorbers - they looked pretty plain compared to the brakes now... So I cut them in halves, replaced shock body with aluminum tubing and plastic rods, and made new springs from black wire. Now they were waiting for paint and final assembly. |
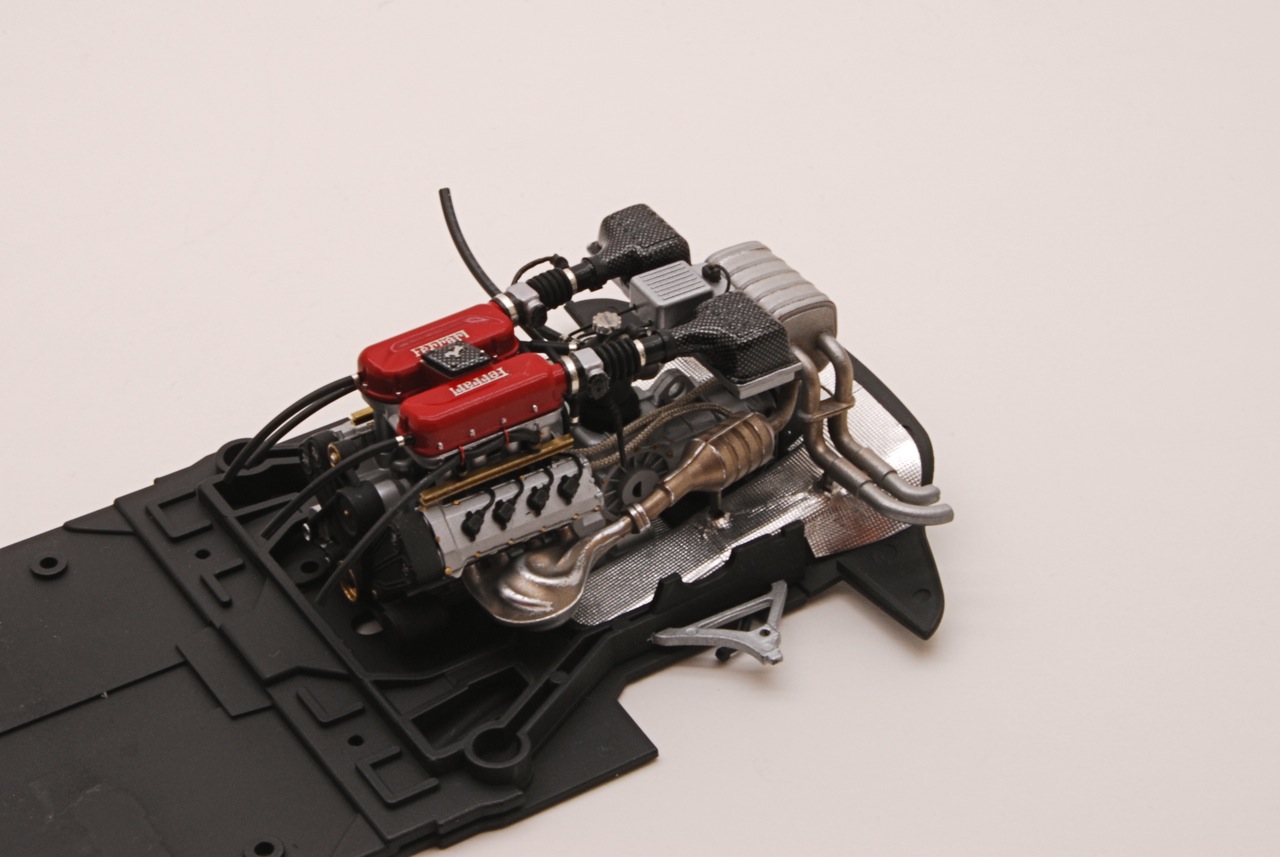 |
Driver's side view of the modified engine. |
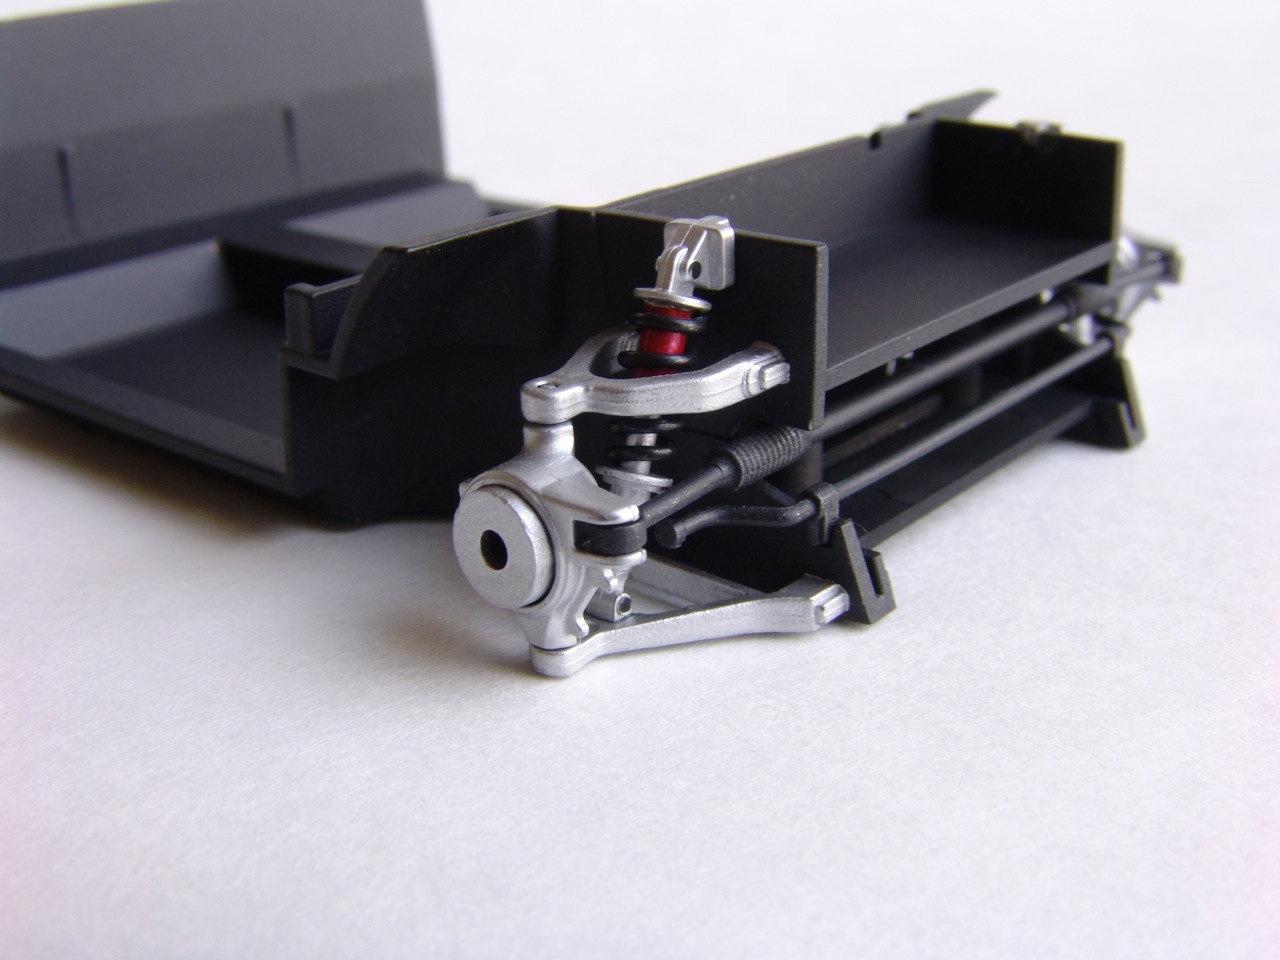 |
With shocks and hubs completed, I decided to go ahead and assemble front suspension, wheel hubs, steering rack, and shocks. |
 |
This side will be completely covered by firewall, then interior and then body. This was the last time I saw it! |
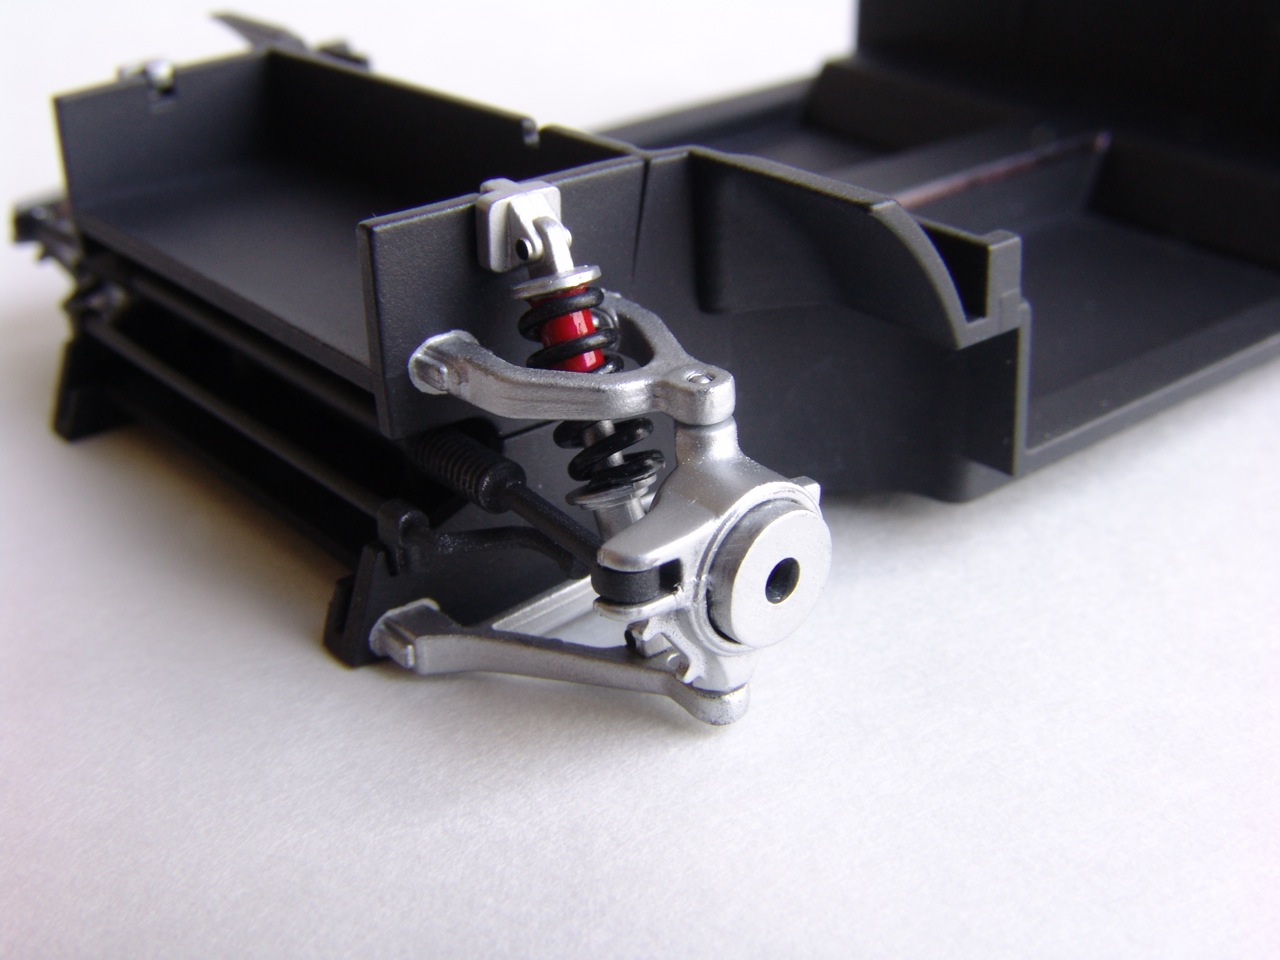 |
Another picture of the completed front suspension. |
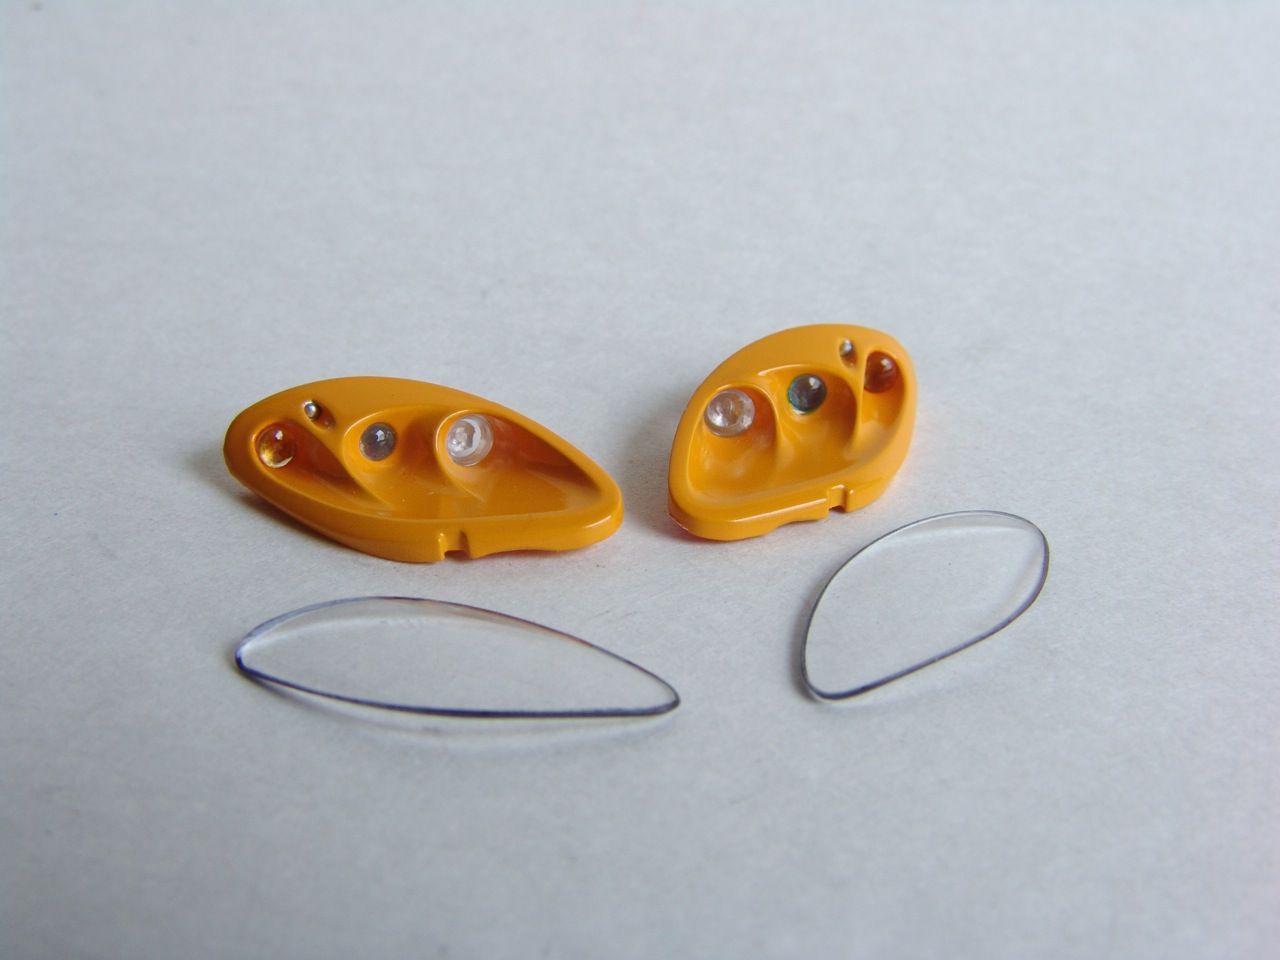 |
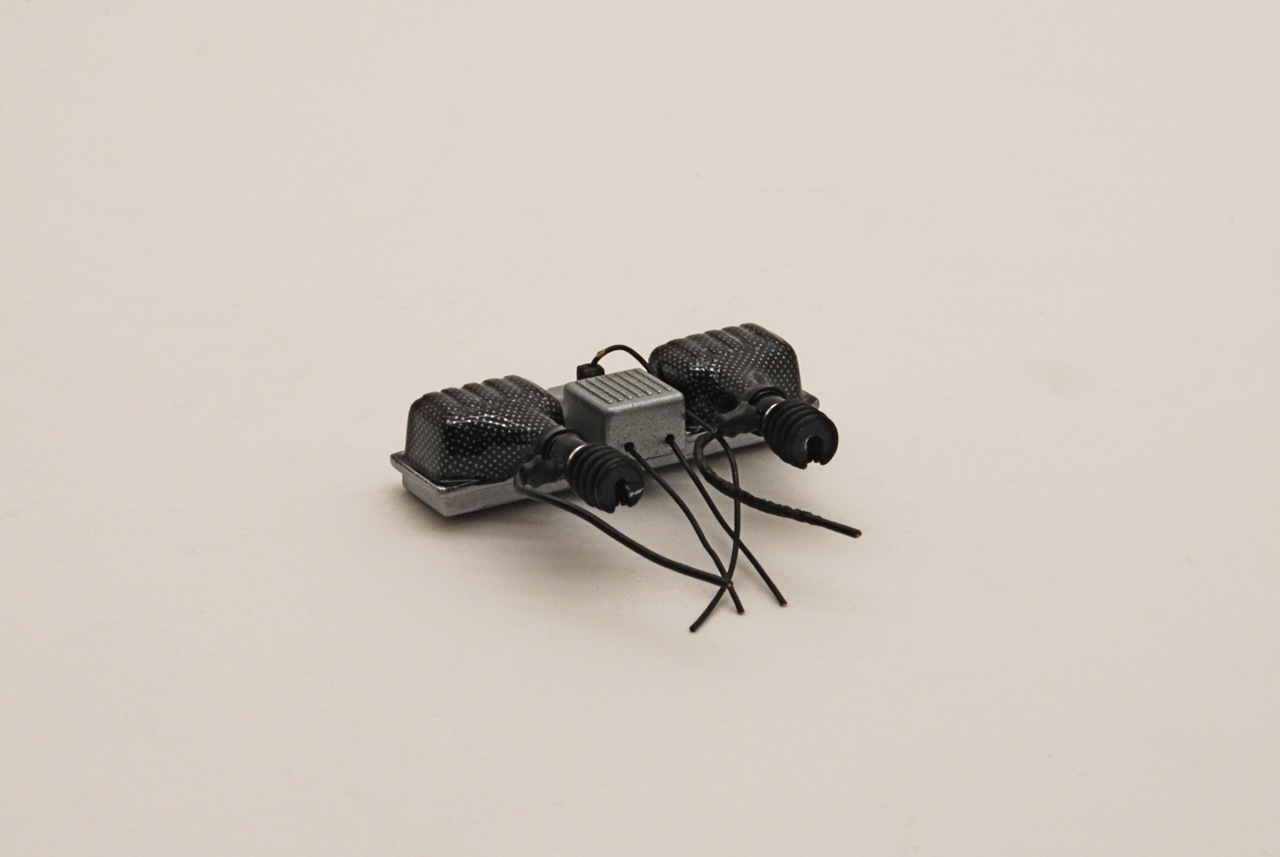
Headlights were fitted with lenses. Lenses were painted with Tamiya clear paints from behind and then backed with some BMF for better reflection. Headlight cover edges were painted with black Sharpie marker. |
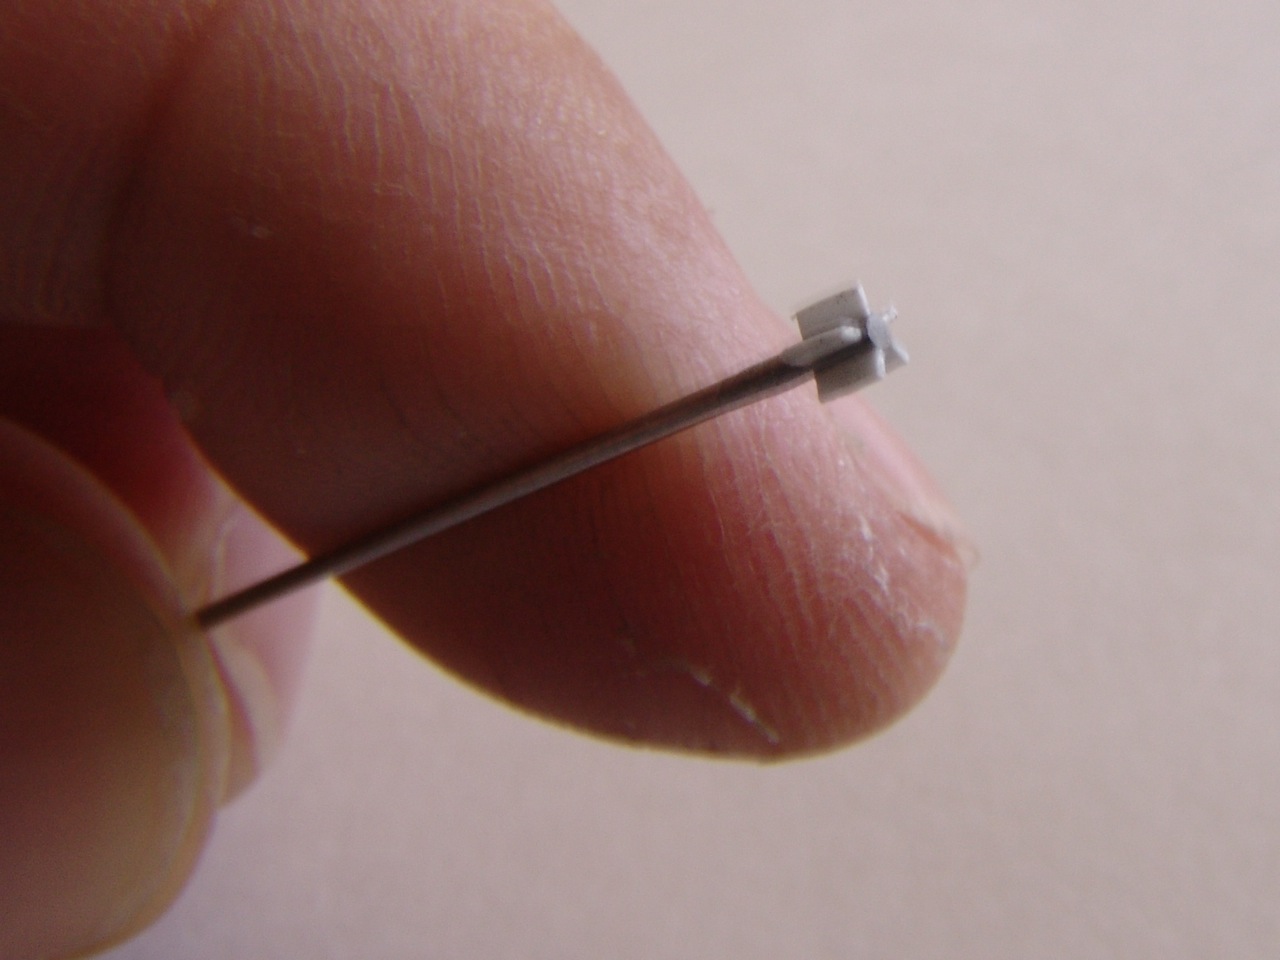 |
As mentioned above, CS's air vents are different from Modena's. I made new vents using thin metal rod and small plastic leaves made from thin sheet styrene. Plastic was glued to the rod with CA glue. |
 |
After windows were glued in to the body, and entire bodyshell painted flat black inside, I attached headliner and rearview mirror. Headliner was replicated using some Tamiya self-adhesive fuzzy paper supplied with Porsche GT3 kit. It looked like a good match for CS's headliner. |
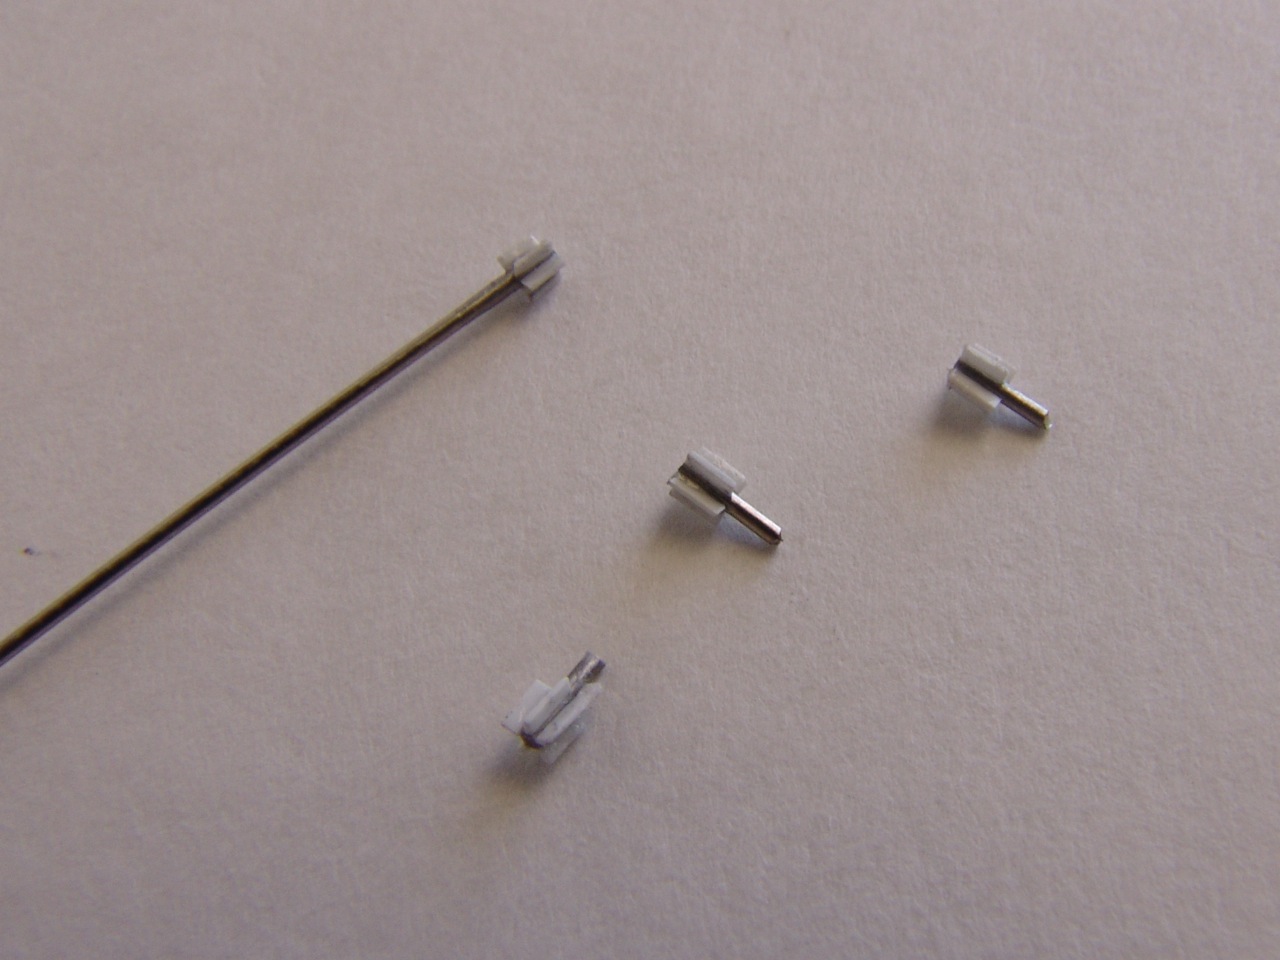 |
Once I had one vent made, I would cut the rod, sand it smooth, and make another one. I needed five vents but ended up making 7 or 8 because I kept screwing up! |
 |
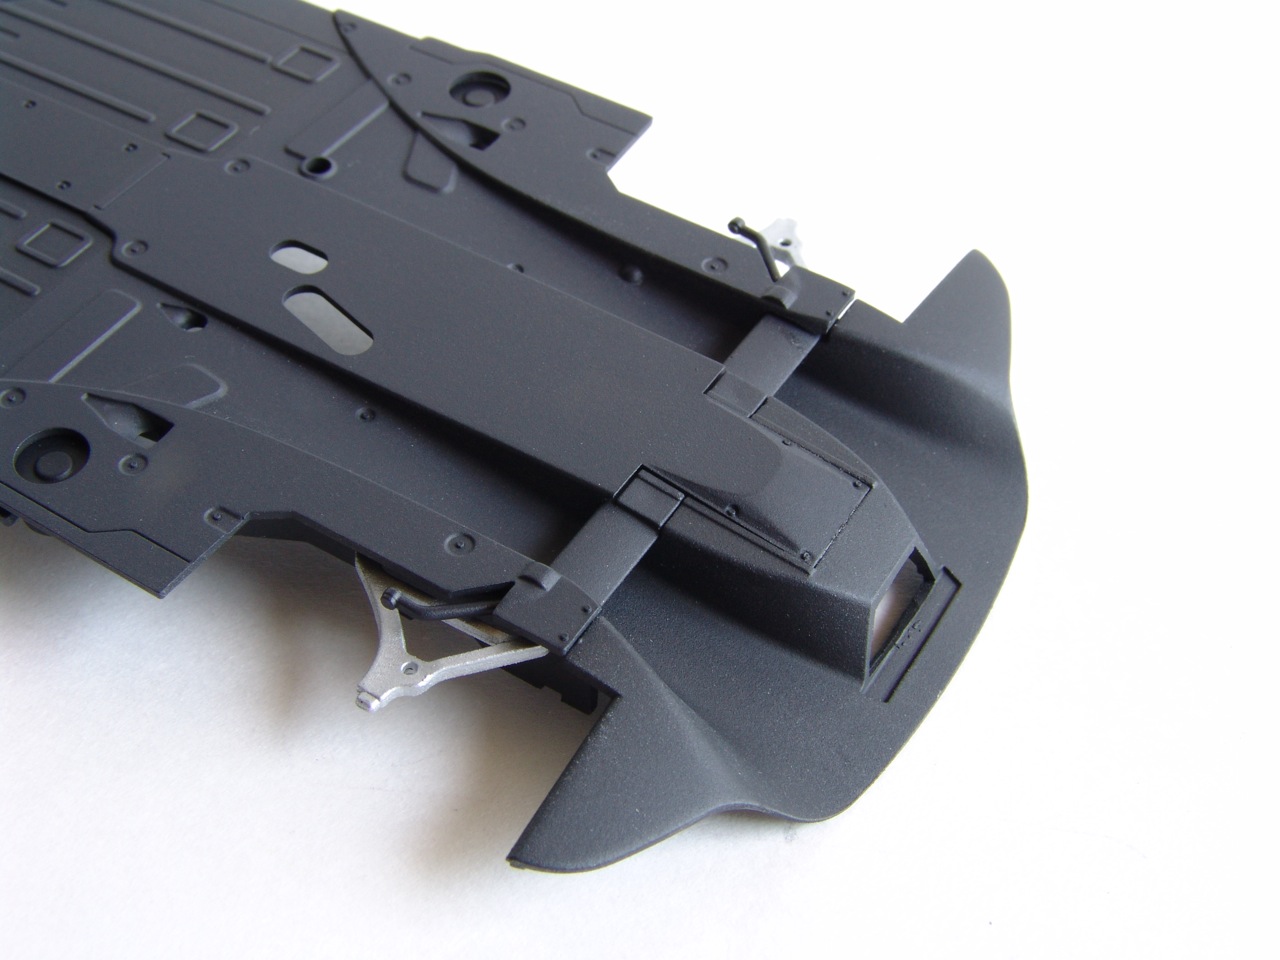
Finally, engine frame was glued to the chassis, and rear suspension assembled. I also attached rear window, brakes, shocks, and cam covers. |
 |
Finally the vents were completed and test-fitted with the dash. They were a bit out of scale, but I thought once painted black, they would be quite acceptable. |
 |
Next was interior and engine bay walls, then I connected all the wiring and plumbing and the chassis was pretty much complete. |
 |
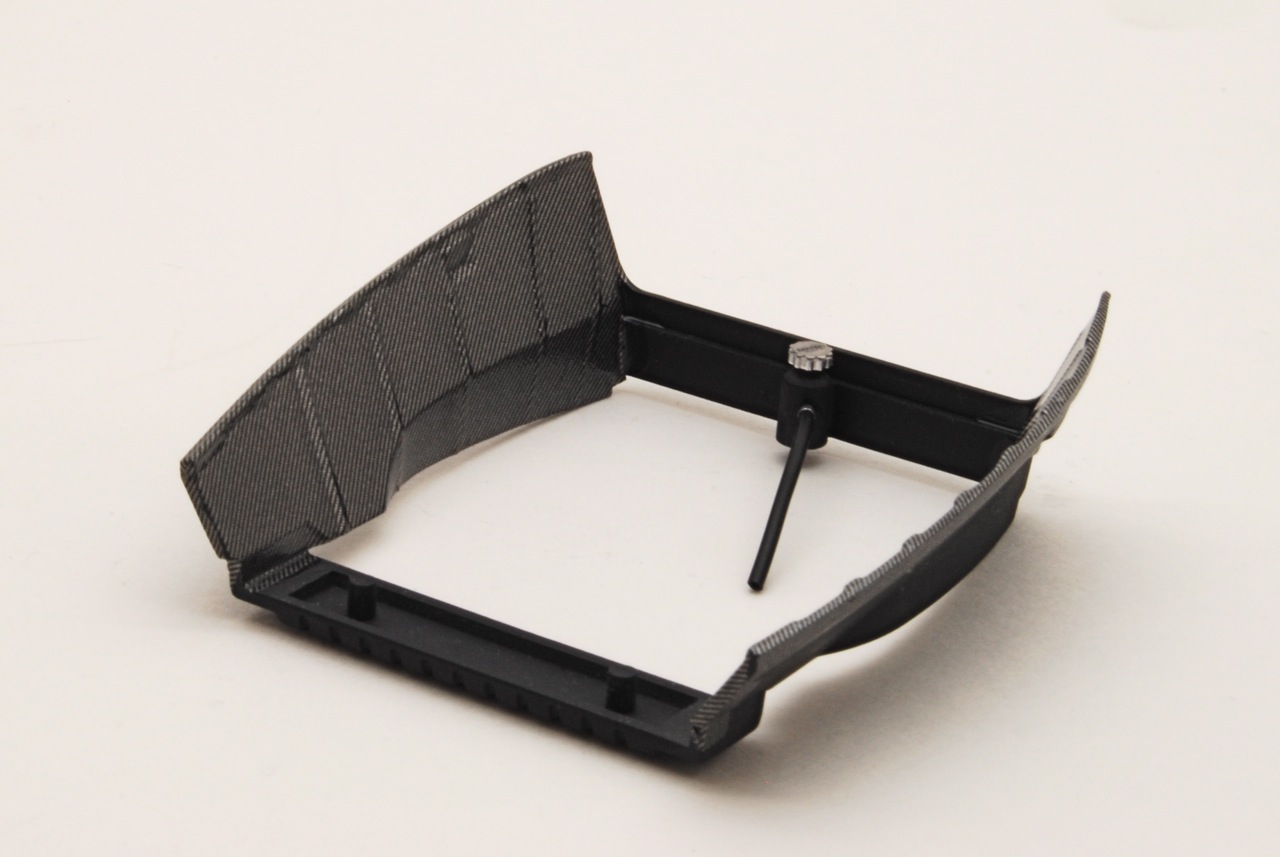
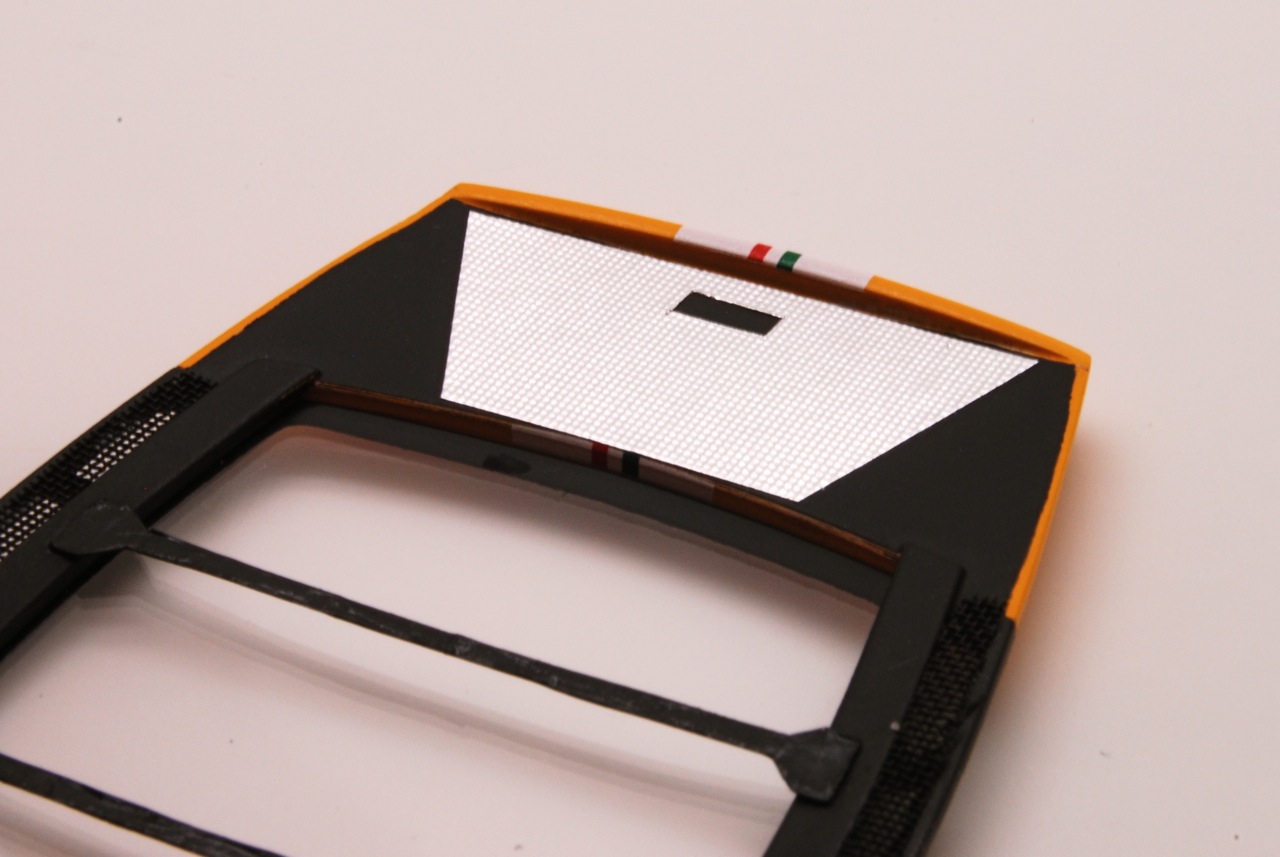
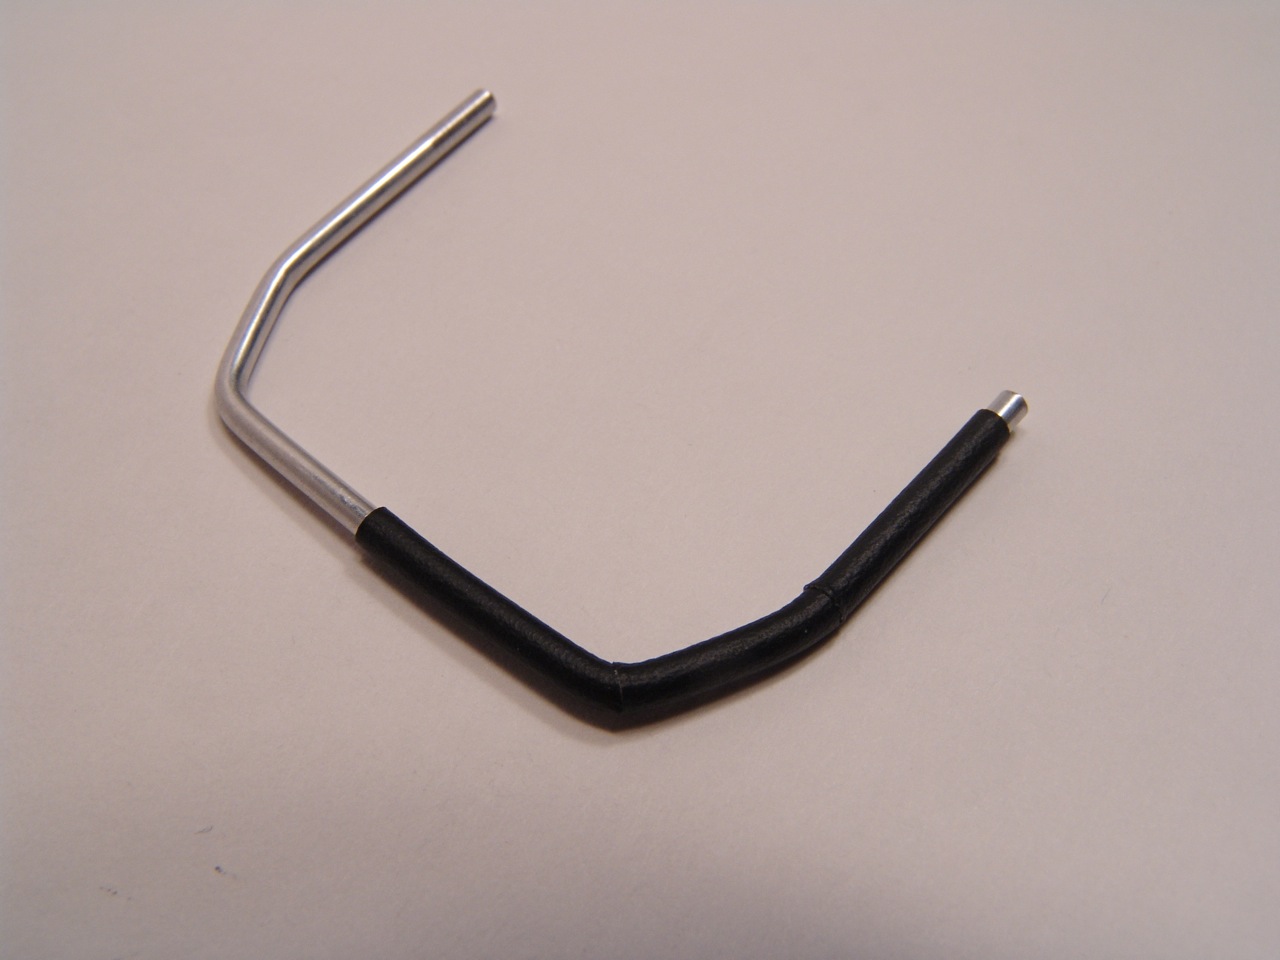
European version of CS is a little bit different than American, and since I was building Italian spec car - I needed to make a roll bar and sliding perspex side windows. I started with the roll bar. To prevent aluminum tubing from kinking, I slipped plastic rod inside the tubing before bending it. |
 |
Radiators were installed in the front. I didn't do anything to them since they would be completely hidden after model assembly. |
 |
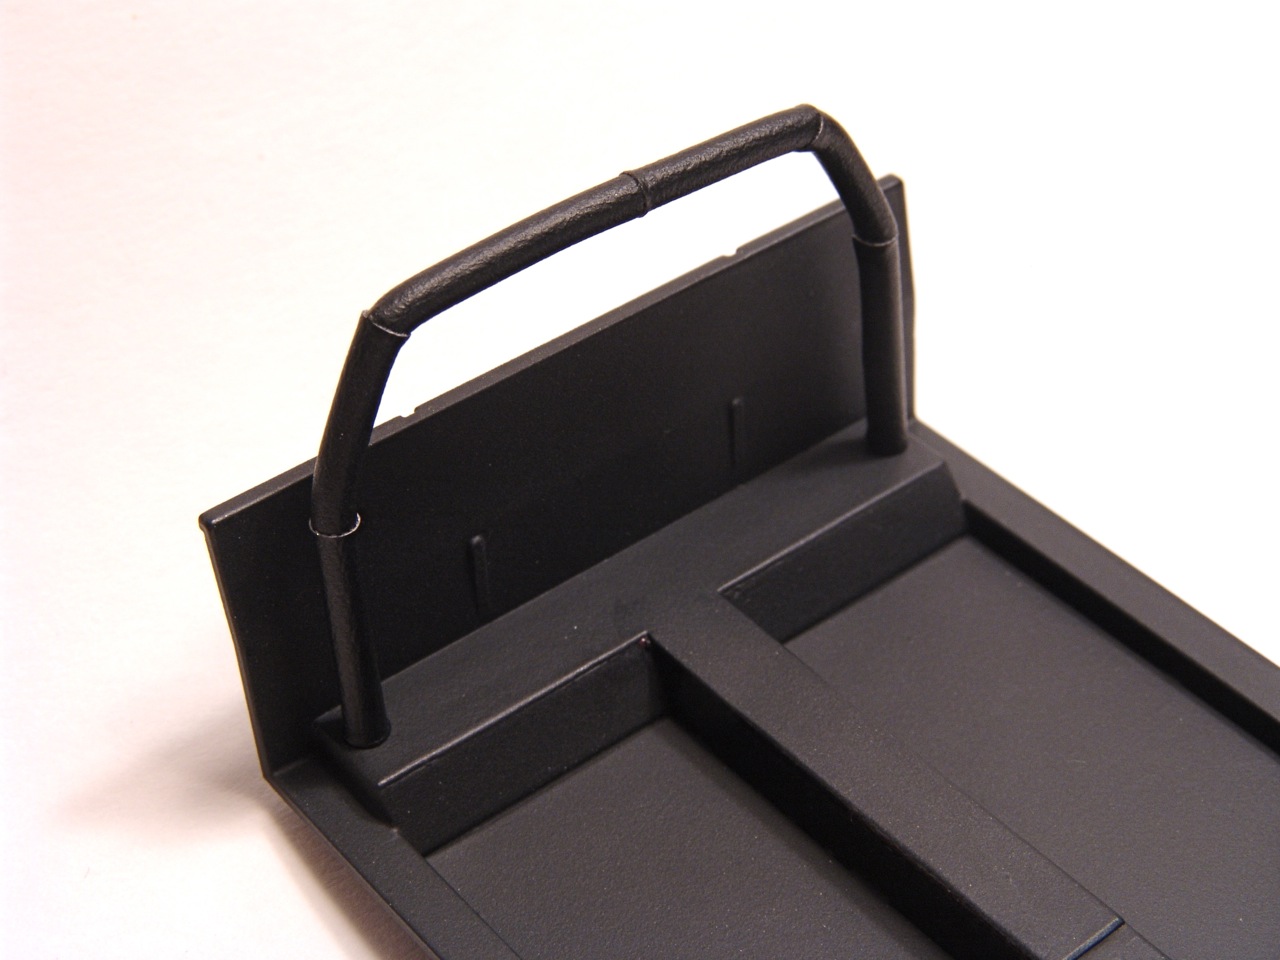
Leather upholstery was simulated with model factory Hiro adhesive leather - and its fantastic stuff. Real roll bar upholstery made out of 6 pieces, so I replicated that with 6 separate pieces. |
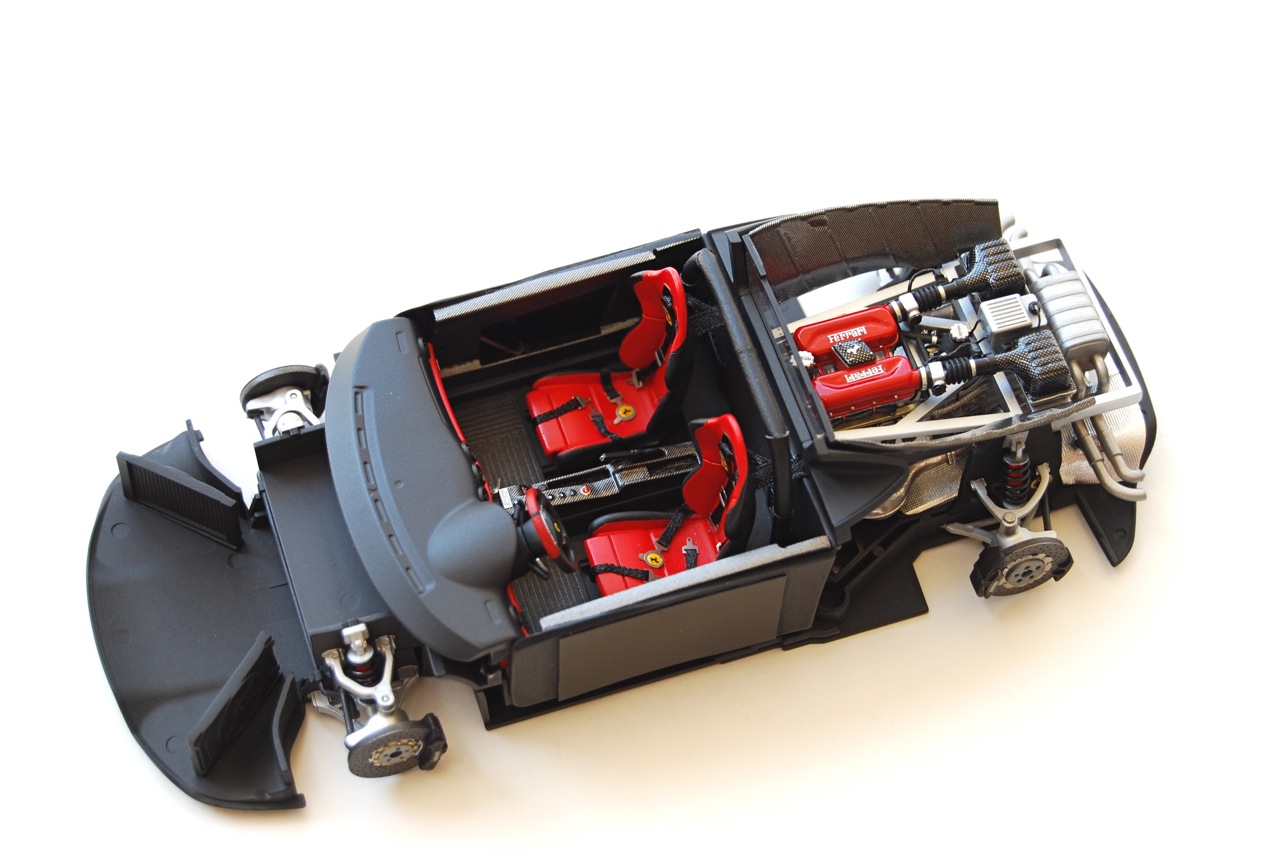 |
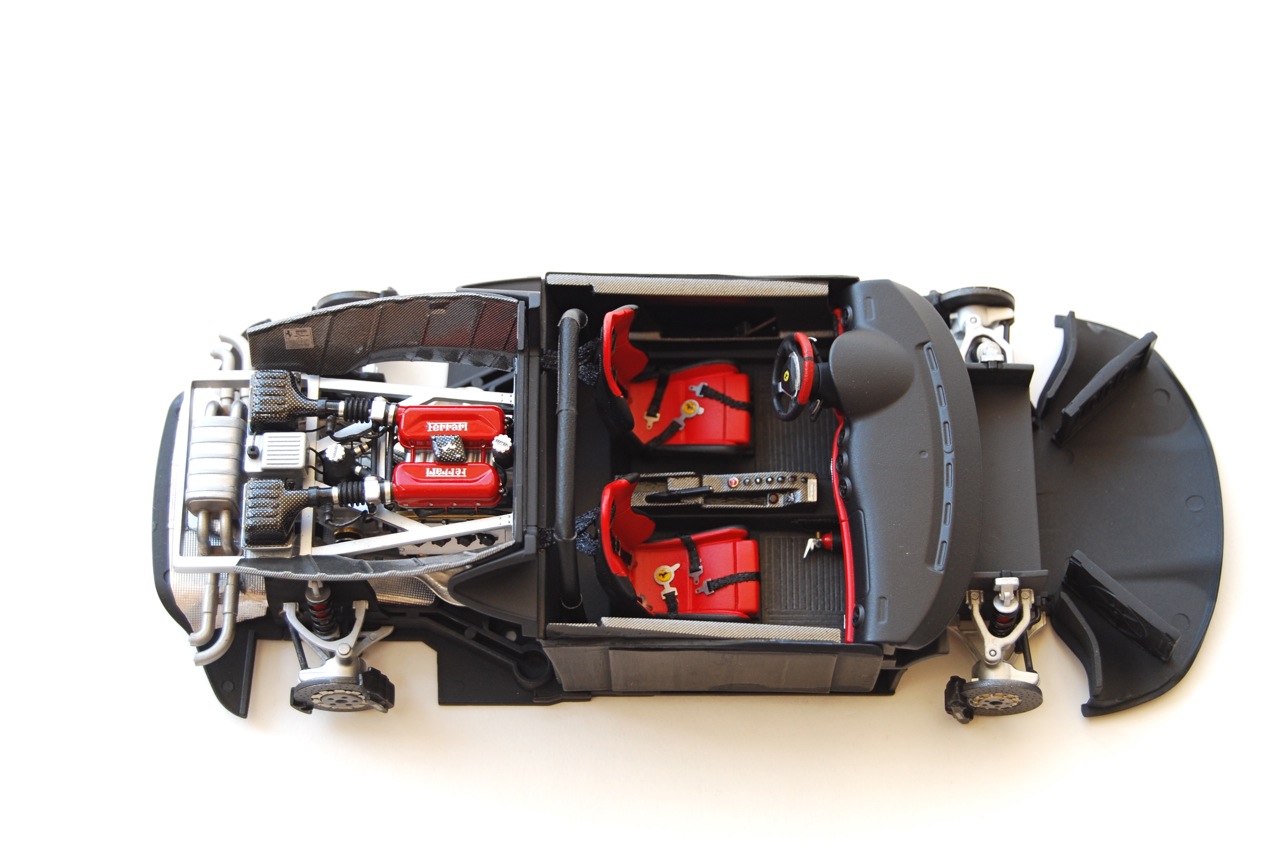
View of the completed chassis before installing it into the body for good. I had faced few problems with fit at this stage since rear wheel arches (not shown here) would not fit, and wouldn't let me install the chassis correctly. I had to trim the arches a bit to fit. |
 |
Completed roll bar covered in Model Factory Hiro leather upholstery. |
 |
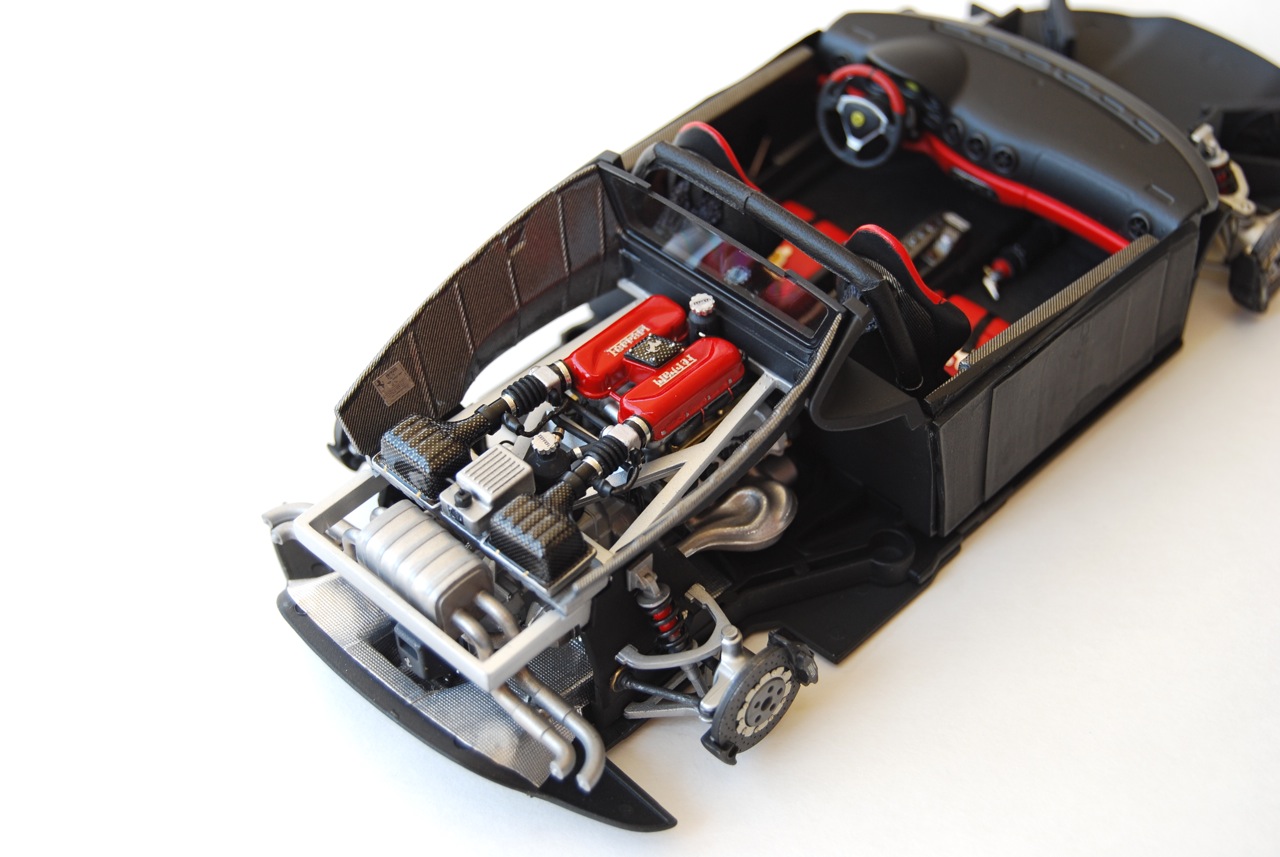
At this point everything was assembled together, and all external details, such as badges, emblems, plates, wipers, mirrors, etc were attached to the body. I had to play with the wheels to get the correct stance a bit. But it turned out just fine in the end. Final wax - and the model was complete! |
|
|
|
Copyright 2008 Alex Kustov. No copying or reproduction in any shape or form without written permission of the author.